Lace (lily of the valley) wedding 13th summer wedding what is it called
The thirteenth anniversary is associated with the number thirteen, and since this number does not have a very good reputation, so does the whole...
The colorful image of indigenous North American tribes excites many children's souls. Boys dream of trying on the type of courageous and noble warrior, and girls dream of being reincarnated as a wise and brave squaw. That is why the Indian national costume is so popular among children. Fortunately, such a traditional cultural item is not difficult to make at home. It does not require a lot of time or financial expenses, even those mothers who do not know how to sew can do it.
All indigenous people living in America are commonly called Indians. But in terms of clothing, the most interesting tribes were those living in the north and east of the country. Men in these regions wore pants (leggings), made of two pieces of leather, and a shirt. In the cold season, a poncho was thrown on top.
The Indian men's suit was distinguished by its simplicity of cut, since it should not restrict the movements of the hunter and warrior. The nation's love of freedom is reflected in the straight, spacious lines of the style.
The Indian's shirt was comfortable, long enough and warm. Thanks to the round neck, it was easy to put on over the head. Oval armholes did not interfere with raising your arms, throwing a spear or drawing a bow. The trousers were no less comfortable. For Indian men, they started from the waist, and thanks to a special cut, they made it possible to quickly jump on a horse and ride without a saddle.
Women's clothing was richer, although it was based on a simple cube dress. In different tribes it was transformed into a tunic or long shirt. In some areas, the national costume consisted of a skirt and a straight blouse. Women were more likely than men to wear items of clothing made from suede, while the stronger sex preferred leather. Moccasins were put on their feet. Sometimes they smoothly turned into leggings, decorated with fringes, and resembled high boots.
The Indian costume is characterized by multi-layered and colorful, natural colors reminiscent of the colors of the steppes. These are mainly beige, ocher, terracotta, and other shades of brown. Thanks to the rich decoration with beads, deer incisors or porcupine quills, the national costume of the Indians looked very original. Women made extensive use of embroidery, decorating clothes with geometric patterns and lines.
Until the 19th century, warriors' costumes were generously trimmed with beads on the chest and back, which served not only as a circular ornament, but also performed protective functions.
All elements national costume Indians were richly trimmed with leather fringe. Sometimes the shirt was painted: the top was covered with blue and green (sky), and the bottom with red or brown (earth). Some especially prominent warriors and hunters applied special drawings to their costumes, showing the number of killed or captured enemies, the number of horses killed in battle, and the number of scalps taken.
Almost all members of the tribe wore long hair. To prevent them from interfering with work, the forehead was tied with a thin red strap. For men, it was simple leather; women's headbands were richly decorated with beads and totemic designs.
The national headdress of the Indians is a crown of feathers, which is a cap or headband. Only leaders could wear it. To make an attribute of power, eagle feathers taken from the tail of a bird were used. Ordinary Indians preferred a headdress called a roach. It was made from horse mane, feathers of simple birds, and porcupine quills.
In addition to the costume, additional accessories that served as a symbol of honor and dignity were of great importance for the tribe. The warriors did not part with a tomahawk, the name of which came from the English transliteration of a war club. The standard weapons of the Indians were a bow and arrow, a knife and a flexible spear with a stone or bone tip.
The Indians were very fond of all kinds of decorations, giving them a sacred meaning, considering them a talisman against evil spirits. Bracelets and chest necklaces were characterized by an unusual combination of colors and structures. They were made from animal bones, beads, shells, and metal tubes. Deer fangs, bird claws, coins or remains of military weapons were strung onto leather strap bracelets.
An Indian costume is easy to make with your own hands. The first one is a tunic for girls, and if it is shortened, it becomes an ethnic shirt for a boy. Step-by-step algorithm:
We make the fringe for the neck separately. To do this, take a piece of fabric of the desired color, cut out a rounded ribbon 6–10 cm wide. Then we make cuts on it and stitch it to the collar. To decorate an Indian costume, we sew colored patches onto a tunic or shirt or apply special paint for clothing.
Indian trousers are best made from ready-made items. They may be a slightly different shade, but in the same color scheme same as the shirt.
To the trousers you need to sew fringe stripes made of material 5–10 cm wide. We choose the length ourselves - to the knee or to the bottom of the trouser leg. Before attaching the fringe and adjusting the length, you need to try on a boy's Indian costume.
It is much easier to make a set of clothes from color-matched T-shirts without inscriptions and trousers. They need to be sewn with fringe, decorated with an ethnic pattern or colored embroidery. On top of the costume you can put a vest with fringe or a cape, jazz it up with a bright bib made of beads, pieces of fur, small feathers, and shells.
Making an Indian feather headdress is not difficult. To create a roach, you can use real feathers, fabric or paper.
An Indian feather roach would look most plausible. You can assemble the headdress on a strip sewn from thick fabric, a rigid ribbon with a geometric pattern, or a rim made of corrugated cardboard. You need to take real feathers, at least 10 cm long. It’s a good idea to paint them in different colors. Manufacturing algorithm:
Before you make an Indian headdress with your own hands, you should look at photographs of ready-made options.
 On an A4 sheet of paper folded in half, draw the following figure
  Place the cut out figure on a sheet of polypropylene fabric and cut out the blank
  We make holes in each corner and insert eyelets
  It is necessary to insert a canape stick into each feather, having previously lubricated it with glue
  It is necessary to prepare rectangles of felt measuring 8x12, the number of which should be the same as the number of feathers
  Each feather must be wrapped in felt
  All feathers must be wrapped with thread
  Feathers are attached to the prepared frame
  The sticks protruding from below are carefully cut off
  The resulting structure is covered on top with a cloth coated with glue.
  Sew a row of feathers on top of the fabric
For another, more complex option Indian headdress in the War Bonnet style will require a tight-fitting Indian hat made of felt or other dense material. You can sew it yourself. To do this, take a strip of fabric 18–20 cm wide, slightly longer than the circumference of the head, matching the color of the suit. The edges are worn down. The top of the warp is gathered onto a thick thread and pulled together. You will get a hat. Step-by-step algorithm for making fabric roaches:
At the end of the work, we arrange the feathers in a fan and complement the Indian roach with a bright forehead. If desired, you can decorate the product with side pendants made of thin strips of fur, placing them in front of the ears. You will get a real Indian headdress.
One of the available materials for making roach can be plain paper. It should be dense and better tinted in the mass. In addition to this, the work will require scissors and glue. Creation algorithm:
To make the roach look more fun, feathers are decorated with colored pencils or felt-tip pens. To complete the image of a real Indian, a boy can be given a battle hatchet or a spear, and a girl can wear ethnic bracelets on her hands. Paint the child's face with body paints, using black, white, red and brown shades as a basis.
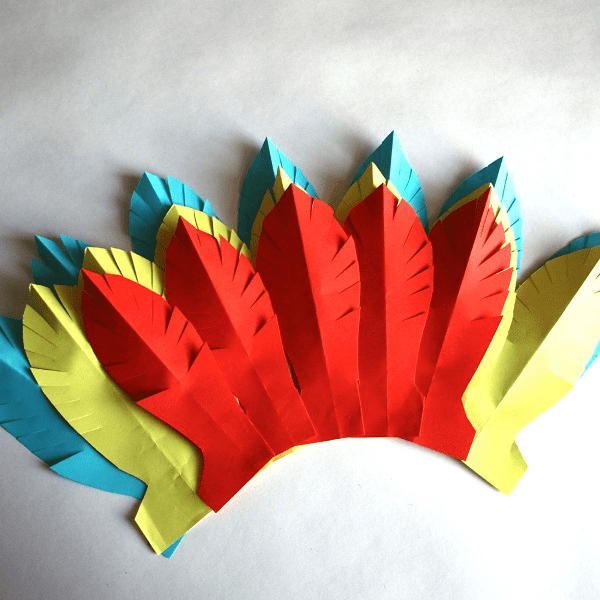
Use a cross stitch to stitch together the multi-colored cardboard feathers of the headdress of an Indian chief, ready for great adventures.
Materials and tools:
Pencil
- Precision collet knife
- Wood glue in a tube
- Backing for cutting
- Scissors
- Scissors with curly blades
- Finely corrugated cardboard in different colors
- Colored thick wool or cotton thread
- 1 large needle
- Glasses (diameters 4 and 6 cm)
- Flat elastic band
- 8 wooden beads of different colors
Using a collet knife, cut out 1 red feather A, 2 orange feathers B, 2 golden yellow feathers C, 2 lemon yellow feathers D, 1 blue feather D, 2 green feathers E, 2 lemon yellow feathers F, 2 blue feathers G, 2 green feathers N. Cut out the blue bandage using scissors with curly blades.

Glue the largest feather into the center of the headband. It is necessary to glue the feathers so that they stay in place while sewing. Glue the remaining feathers in descending order, starting from the center and lightly overlapping them 2 cm from the bottom of the headband.
There are a few free centimeters left on each edge of the bandage. Glue the remaining feathers in the same way as the first row.
Cut the red headband so that the stripes run vertically using curved scissors. Cut out a golden-yellow circle 6 cm in diameter (following the outline of a small glass) and place it on the red bandage so that its center is 11 cm from the middle of the bandage. Mark 4 square-shaped holes with a pencil (with a distance of 1 cm between them) and pierce them with a needle.

Sew the parts
Using thick thread, cross stitch the yellow circle onto the red headband using the holes to form a square. Mark the stitch holes on the red headband with a pencil, starting from the center (a square of 4 holes, 2cm apart). Place the blue headband, decorated with rounded feathers (as if on a head), on top of the red headband so that it takes on the same rounded shape. Sew the red headband to the blue one using a cross stitch.
TIP: To make the headpiece fit any head, sew a piece of flat elastic to each end of the headpiece to close it.
Cut out 1 red circle 4cm in diameter. Mark and punch 4 holes to form a square for stitching. Cut out one green feather I and one blue feather J. Pass a length of thread
30 cm, threaded into a needle, into 4 beads, then into 2 feathers, then into 4 beads in the opposite direction. Pass the 2 threads that come out of the 2 holes at the bottom of the red circle back. Cross them in front of the red circle, pass them back through the top holes, placing the red circle on the yellow one. There are 2 threads running through the headdress: tie a knot to secure the pendants.
This is the easiest costume to make. It can be made even without a sewing machine, simply by sewing or even gluing the necessary parts. This costume consists of pants or shorts, a T-shirt, a cape and a headdress.
In order to make DIY Indian costume you will have to sacrifice one of the T-shirts and pants or shorts.
It is better to choose a T-shirt in sand, yellow or another warm color. On the sleeves and bottom of the T-shirt, cut off the hem seams, and cut the edges with fringe 3-4 cm long; you can also sew fringe on the side seams of the T-shirt.
Pants or shorts for DIY Indian costume It’s better to choose beige or brown ones too. Long fringe and braid are sewn onto the side seams.
Sew a round or square cape around your neck from linen or other material with a similar texture, cut out a square. It is positioned diagonally so that two corners of the square fall on the front and back of the future Indian, and the remaining two cover the shoulders. A hole for the head is cut in the center of the square. The cape is trimmed with fringe and decorated with feathers, braid, beads and beads.


And of course, DIY Indian costume wouldn't be complete without a feather headdress! Prepare wide elastic band(so that the headband does not slip off the head) and sew feathers onto it, overlapping one another. Sew patterned braid, tassels, beads… on top. It is better to secure the headdress on the head with ties, because the Velcro gets tangled and pulls the baby’s hair. If you don't have feathers, don't be upset, just cut a wide feather from tissue paper in the center, stick a piece of straw or thin wire and cut it thinly, simulating fluff. You can make a leader's feather cap using the following video:
For shoes, preference should be given to beige or brown moccasins.
Complete your Indian costume with your own accessories: baubles and leather bracelets, a bow and arrow or a tomahawk. And of course, war paint to intimidate the pale-faced!

Today I’ll tell you how to make an Indian headdress with your own hands. Moreover, on the nose New Year's parties. The Indian costume is very popular among children. But what is an Indian without a headdress?
For work, please prepare:
Colored paper should be thick. It is better to take not a traditional set, but paper colored in the mass - several sheets of the same color.

1. Fold a sheet of paper into an accordion shape.

2. Having assembled the accordion, cut out a blank that looks like half a feather. Leave a small straight part at the bottom - it will make a strip on which the feathers will be held.

3. Make cuts from the top and somewhere up to half of the feather. They should not be too long, otherwise the feathers will not stay firmly on the head.

4. Unfold the feathers. As you can see, they are located far from each other.

5. Move the pen a little, coat the curves of the workpiece with glue (it’s good if you have a glue stick), press firmly.

6. If the resulting blank does not fit the front of the head, glue the same one to it and try it on.
Glue a couple more multi-colored blanks on top.
7. Now you need to hide the places where the feathers are attached. To do this, cut out a colored paper strip and glue it to the bottom of the feathers. Decorate with colorful circles.

8. To make ties you will need a hat elastic.

Here you go! The Indian's roach is ready. Complementing the image stylish vest or a poncho, you can safely go to the New Year's carnival.
Here's what it might look like Indian headdress made of feathers or felt for the little ones.

The most important of the Indians is, of course, the leader. Let's make him a luxurious headdress.
You will need:
1. Print the template. Cut out parts from corrugated paper using a collet knife:
One red feather A,
Two orange feathers B,
Two golden yellow feathers C,
Two lemon yellow feathers D,
One blue feather D,
Two green feathers E,
Two lemon yellow feathers F,
Two blue G feathers,
Two green feathers H.
And also cut out the blue headband using curly scissors.
Feathers for pendants are indicated in red on the layout.

2. Glue the first row.
Glue the largest feather in the center of the headband, 2 cm from the bottom edge. Layering the feathers on top of each other, glue them to the headband in descending order. Remember to leave 2 cm at the bottom of the bandage.

3. Glue the second row.
Glue the remaining feathers in the same way as the first row. From the largest in the center to the smallest at the edges.
4. Assembling the roach.
Cut out the red headband using curly scissors so that the stripes are positioned vertically.
Now cut out a golden yellow circle with a diameter of 6 cm and glue it at a distance of 11 cm from the center of the headband. (Glue the same circle on the other side). Using a thick thread and a gypsy needle, sew the circles to the red headband with a cross.

5. Sew the red headband to the blue one with a cross stitch, making four holes with a needle every 2 cm of the headband for stitches. Start making crosses from the center so that the embroidery is even.

6. Attach a small flat elastic band to each end of the roach so that the headdress stays well on your head.
7. Make pendants from wooden beads and feathers, indicated in red on the model. Sew to the yellow circle. Cut out a red circle with a diameter of 4 cm, and puncture four holes in it in the middle, sew it to the yellow one with a cross.

Oh, what a beauty it turned out!
If you don't feel comfortable wearing a whole Indian "crown", make a couple of bright feathers and enjoy active play!
You will need:
1. Fold a linen strip of fabric in half, put a glue web inside. Iron the workpiece with an iron.
2. Now draw the contours of the feather, lightly paint over the middle of the feather with white paint.
3. Using a flat brush, make stripes: blue and black.

4. Use a thin brush with black paint to outline the feather and draw details in the middle.
5. Cut out the feather along the contour. To make it more natural, make cuts.
6. Sew the feather to the embroidered ribbon. That's it - the Indian headdress is ready.


How fun it is to play Indians with friends - shoot arrows, look for treasure, hide in teepees, frolic and joke. And to make the joyful Indian holiday look colorful and colorful, you need to dress up in rainbow “feathers” and create a themed environment.
Today I’ll tell you how to make an Indian headdress with your own hands. The Indian costume is very popular among children. But what is an Indian without a headdress?

For work, please prepare:
Colored paper should be thick. It’s better to take not a traditional set, but paper colored in bulk - several sheets of the same color.

1. Fold a sheet of paper into an accordion shape.

2. Having assembled the accordion, cut out a blank that looks like half a feather. Leave a small straight part at the bottom - it will make a strip on which the feathers will be held.

3. Make cuts from the top and somewhere up to half of the feather. They should not be too long, otherwise the feathers will not stay firmly on the head.

4. Unfold the feathers. As you can see, they are located far from each other.

5. Move the pen a little, coat the curves of the workpiece with glue (it’s good if you have a glue stick), press firmly.

6. If the resulting blank does not fit the front of the head, glue the same one to it and try it on.
Glue a couple more multi-colored blanks on top.
7. Now you need to hide the places where the feathers are attached. To do this, cut out the colored paper strip, glue the bottom of the feathers. Decorate with colorful circles.

8. To make the ties you will need a hat elastic.

Here you go! The Indian's roach is ready. By complementing your look with a stylish vest or poncho, you can safely go to the New Year's carnival.
Here's what it might look like Indian headdress made of feathers or felt for the little ones.
The most important of the Indians is, of course, the chief. Let's make him a luxurious headdress.
you will need:
1. Print the template. From corrugated paper cut out the parts using a collet knife:
- one red feather A,
- two orange feathers B,
- two golden yellow feathers C,
- two lemon-yellow feathers D,
- one blue feather D,
- two green feathers E,
- two lemon yellow feathers F,
- two blue G feathers,
- two green feathers H.
And also cut out the blue headband using curly scissors.
Feathers for pendants are indicated in red on the layout.
2. Glue the first row.
Glue the largest feather in the center of the headband, 2 cm from the bottom edge. Layering the feathers on top of each other, glue them to the headband in descending order. Remember to leave 2 cm at the bottom of the bandage.
3. Glue the second row.
Glue the remaining feathers in the same way as the first row. From the largest in the center to the smallest at the edges.
4. Assembling the roach.
Cut out the red headband using curly scissors so that the stripes are positioned vertically.
Now cut out a golden yellow circle with a diameter of 6 cm and glue it at a distance of 11 cm from the center of the headband. (Glue the same circle on the other side). Using a thick thread and a gypsy needle, sew the circles to the red headband with a cross.

5. Sew the red headband to the blue one with a cross stitch, making four holes with a needle every 2 cm of the headband for stitches. Start making crosses from the center so that the embroidery is even.

6. Attach a small flat elastic band to each end of the roach so that the headdress stays well on your head.
7. Make pendants from wooden beads and feathers, indicated in red on the model. Sew to the yellow circle. Cut out a red circle with a diameter of 4 cm, and puncture four holes in it in the middle, sew it to the yellow one with a cross.

Oh, what a beauty it turned out!
If you don't feel comfortable wearing a whole Indian "crown", make a couple of bright feathers and enjoy active play!
You will need:
1. Fold a linen strip of fabric in half, put a glue web inside. Iron the workpiece with an iron.
2. Now draw the contours of the feather, lightly paint over the middle of the feather with white paint.
3. Using a flat brush, make stripes: blue and black.

4. Use a thin brush with black paint to outline the feather and draw details in the middle.
5. Cut out the feather along the contour. To make it more natural, make cuts.
6. Sew the feather to the embroidered ribbon. That's it - the Indian headdress is ready.


The thirteenth anniversary is associated with the number thirteen, and since this number does not have a very good reputation, so does the whole...

You have passed the newborn stage. Already in the second month of a child’s life, you begin to understand his personality. You also already...

Quarrels and squabbles are a common occurrence in our lives. One is good, but two is better. While training a baby nutria named Barbie,...
Do we have readers and admirers (pardon the pun) of Sherlock Holmes and his numerous analogues in detective stories around the world?...

Yulia Potapova Conversation “Let's talk about friendship” Goal: 1. Reveal the essence of the concept “friendship”. 2. Show what qualities...

Nicolas Cage is free again! The 52-year-old actor divorced his third legal wife, Alice Kim. The couple decided...

Recently, many articles have appeared on the Internet about what it is. What is the difference between basic shoes and...

Even a novice needlewoman can crochet a women's beret. The manufacturing process is very fast and...

Today, anyone can purchase anti-cellulite massagers and carry out procedures at home. For...

For a triangular face, a good solution would be hairstyles that create volume in the lower part. It can be...

Contrary to existing stereotypes, a hairstyle with short hair can look very charming and...
The treble clef in its familiar form appeared in the sixteenth century, when instrumental music was born....

The placenta is a unique organ that helps the baby grow, develop, receive all the necessary nutrients...

A convenient and simple hairstyle for medium and long hair is a fishtail braid. She got the name...

You have passed the newborn stage. Already in the second month of a child’s life, you begin to understand his personality. You also...

Quarrels and squabbles are a common occurrence in our lives. One is good, but two is better. Training a baby nutria in...