Ski suit - choose a beautiful jacket and pants Which membrane is better in a ski jacket
There is specialized sportswear designed for skiing not only...
What would a New Year's holiday be without its main characters? There are not only themed paper crafts. There are even some for the holiday table.
But let’s not digress from the topic, today our “menu” includes paper crafts in the form of favorite children’s characters.
These are very simple origami toys that can become New Year's souvenirs for your baby's grandparents.
You can make Santa Claus and Snow Maiden out of paper for the New Year quite quickly and easily.
We offer 2 assembly options, choose the one you like and suits best.
You will need: thick, beautiful paper, bright red on one side and white on the other. The sheet should be square in shape.
1. Fold the square in half diagonally and in half again. Fold one corner towards the center line.
2. Also fold the second corner.
3. Bend the resulting elongated top to the right upper corner.
4. Turn the workpiece over with the colored side facing you.
5. Fold the top corner towards the base.
6. Fold the top edge a little to create the edge of Santa Claus's hat.
7. Now fold back both sides of the inverted trapezoid.
8. And you got such a simple and elegant Grandfather Frost. Draw his eyes.
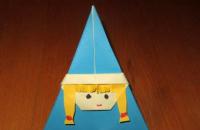
What is Father Frost without his granddaughter Snegurochka? It can be made according to the same scheme, only from blue paper and adding pigtails, which are separately cut from a yellow sheet. Make cuts in place of the bangs, and the hairstyle is ready!

And here is another option on how to make Santa Claus out of paper:
 1. Fold the piece in half and unfold it back.
2. Fold the corners towards the center.
3. Bend 2 corners to the sides along the dotted line.
4. Make 2 more folds along the dotted line.
6. Make an accordion in the direction of the arrow.
7. And one more below.
8. Turn over.
9. Fold along the dotted line.
10. Fold the corner up.
11. Fold in the sides.
12. Turn over.
13. Draw a face and your paper Santa Claus is ready!
When preparing for the New Year, there are no trifles. After all, you need to think through everything - decorating your home, the holiday menu, as well as gifts for loved ones. Regarding the last point, it is not always necessary to run to the store. You can prepare gifts yourself, involving your children in this. For example, you can make a lot of New Year's crafts. We suggest doing Santa Claus using origami technique. The process of creating it is simple, if you follow the step-by-step photographs of our master classes from Marina and Vasilisa.
To make Santa Claus we will prepare:

Initially, the squares should be the same size, we took 10 x 10 cm. From one we will make a head with a cap, and the other square will be needed to make the body. Let's start with the head. To do this, we make small folds on both sides.

We bend a small corner from the opposite edge. This will be the top of the cap.

Now we turn the square to the other side. Here you need to bend a third first.

Then we make a symmetrical fold on the right side.

This is how we formed the Santa Claus hat.

The bottom corner needs to be folded up.

Then we make a slight bend in the opposite direction.

We bend the top part of the cap to the side and, if necessary, glue it a little.

To make the body, take another square. We make small folds on it on opposite sides.

Fold in half.

After this, we unfold it, so we have outlined the middle line. First we bend the left edge to it.

Then we make a symmetrical fold on the right side.

We turn the top part in the form of corners.

We bend the top side down. After this, you can glue a little on the wrong side.

We connect the two parts together. To do this, we will use glue again.


If you wish, you can draw his eyes and mouth. This craft can become part of a New Year's greeting card.

To create Santa Claus we will prepare:

When making this craft, it is important to use red paper, which will be white on the reverse side. If you don’t have one, then you can take 2 sheets of red and white. First, fold the red square diagonally.

This is how we outlined the middle fold line, which will become a guide in further work.

You first need to bend the right corner to this line.

After this, we perform a symmetrical fold of the left corner.

For further convenience, let’s slightly rotate the blank of the future Santa Claus.

Now you need to fold the workpiece in half. To do this, bend the bottom corner up, aligning it with the top corner.

The next stage we will form the beard of Santa Claus. To do this, bend the top corner down.

Let's make a small border. To do this, we will again bend the upper part in the form of a narrow strip.

We bend the left protruding part back.

Now we need to do the same with the right side of our workpiece.

Let's take a red marker. We will use it to draw a nose. Using a black marker we will mark the eyes.

Our Santa Claus made from paper using the origami technique is ready.

Such a craft can later become part of a New Year’s greeting card.
Marina's master class on how to make paper Christmas tree, look .
You will need:

We need to bend our square diagonally.

Unfold the workpiece and also bend it in half along the second diagonal.


We bend the outermost corner to the top of the workpiece.

We see we have a line drawn, we need to turn the corner back.

We turn back. We see that we have a line; we need to bend a corner to it.

Now we can completely wrap up our lapel along with the corner. You will get it like this.

We work with the bottom of the craft. We bend the bottom corner to the top point.

We make a bend to the bottom point.

Turn over:

We make narrow stripes on the sides.

The same on the opposite side.

We see the middle line and bend both sides towards it.

And the second one.

We take the white parts and make a fold along the red line to the white one.

We bend this strip and make a square.

We do the same on the opposite side.

And a square.

And when we turn the figure over, we can see Santa Claus.
Origami “Santa Claus” is a simple New Year’s craft for children 6-7 years old. Children of this age are not yet ready to work according to origami patterns; they fold models “from the show”. That is, they repeat all operations after you. To make an origami “Santa Claus” figure, take single-sided colored paper. When folded, the white side will become the face and beard.
This New Year's origami craft can be placed under or on a Christmas tree, given as a souvenir, or glued to a sheet of Whatman paper to make a postcard. In addition, you can create a fun New Year's garland from origami Santa Clauses. Of course, this requires a lot of figures, so this option is suitable for a school or kindergarten. Make multi-colored figures - then the New Year's garland will look more elegant!
Assembly diagram of Santa Claus - simple origami for children 6-7 years old
For this origami Santa Claus model, we take a square of single-sided paper in red, blue or green.  The square lies on the table with the white side up. Fold the square in half diagonally and unfold the workpiece.
  We fold the sides of the square to the central marked line, with an acute angle at the bottom.
  Raise the bottom corner up, matching the top and bottom corners.
  Let's turn over the Santa Claus blank.
  Bend the top corner of the workpiece down.
  We make a fold by bending a small strip forward - this is the lapel of Santa Claus's hat.
  Turn the origami workpiece over.
  We bend the protruding corners towards the center.
 To complete the origami figure of Santa Claus, draw his face. If desired, you can add decorative elements to the cap and fur coat of Santa Claus.
  Santa Claus figurine - simple origami for children 6-7 years old is ready.
  Such an origami figurine of Santa Claus can be an independent element of decoration of the New Year's table, just like a paper craft candle.
Or such a figurine can be used for a New Year's card.
In order to assemble a garland of origami Santa Clauses, take a long thread, thread it under the triangle - the face of the figure, grease this triangle with glue and glue it. Another option is to attach two paper clips to the triangles on Santa's back and thread a thread through the paper clips.
If you have children over 7 years old, then make a figurine with them.
DIY paper Santa Claus
Master class “Santa Claus. Origami"
Description:
For work we will need: colored single-sided paper, scissors and felt-tip pens.


New Year's holidays are coming and it's time for gifts; what could be nicer than a gift made by yourself? It is not necessary to master complex techniques and spend hours on end doing needlework. To get your dose of positivity, you can make some simple but fun New Year’s craft. In this master class we will talk about how to make paper Santa Claus using the origami technique. This ancient technique will allow us to quickly and easily make a cute New Year's craft.
To make an origami paper Santa Claus we will need:
- red colored paper (one-sided);
- scissors;
- black marker.
How to make a paper Santa Claus using the origami technique with your own hands
1. Cut out a square of arbitrary size from colored paper. To make it even, you must first draw it from the wrong side using a ruler and a simple pencil, and then cut it along the contour. Pencil lines, if they remain on the square, carefully erase with an eraser so that Santa Claus using the origami technique turns out neat. We fold both diagonals and pull one side of the square to one of the diagonals.
By the way, for lovers of simple but beautiful crafts, we also suggest making a tutorial for which you will find at the given link.

2. Do the same with the second side.

3. Connect the bottom vertex of the resulting figure to the top.

4. Turn the future Santa Claus origami paper over to the other side. The result is a red pentagon.

5. Bend the top to the bottom edge.

6. Shorten the triangle slightly by tucking it in as shown in the figure.

7. We bend the right and left sides back.

8. Draw the eyes with a black marker. Funny origami paper Santa Claus is ready!

Even a preschool child can handle making this craft. You just need to help him when handling the scissors so that the child does not get hurt. This small souvenir can be used to decorate a New Year’s greeting card. You can decorate the symbolic figurine of a cheerful, funny old man at your discretion - with sparkles, rhinestones, half-beads and other decorative elements that you have available. Or you can leave it the way it turned out. You can make many of these crafts and make one long garland of them. Or attach loops to them from the most ordinary threads and hang them on the Christmas tree. In general, the use of origami paper Santa Claus can only be limited by your imagination.

There is specialized sportswear designed for skiing not only...

Materials and tools: White patterned wrapping paper and mesh; - wide white silk ribbon; - thin...

What would a New Year's holiday be without its main characters? There are not only themed paper crafts. There are even...

Only people baptized in the Orthodox Church according to the rules of Christian...

While looking for outerwear for myself, I noticed a fluffy, short-cropped fur coat. Her fur was quite nice...

Today there is an abundance on the shelves of cosmetic stores - the choice of care products, in particular face powder, is huge. Among...
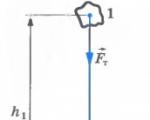
12/25/2014 Lesson 32 (grade 10) Topic. Potential energy 1. Work of gravity Let's calculate the work...

Published 01.09.17 08:41 Kurban Bayram in Moscow 2017: festive prayer takes place in the Moscow Cathedral...

However, on August 29, Vladimir Putin, speaking on television to the citizens of the country, ordered to mitigate the increase...
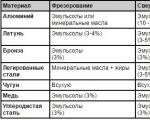
Anyone, even a novice metalworking specialist, knows that when performing turning work on a machine...

Details How to learn to curl your hair beautifully with a curling iron Gone are the days when, in order to curl your hair,...

Looking for detergents and cleaning products in Moscow? The Eco-Dostavka24 online store offers a wide range...

Slight asymmetry of the mammary glands is a physiological phenomenon that is observed quite often. Many...

Tired of your hair? Do you want to change your style? Find out how to cut your own bangs and feel free to add some fun...
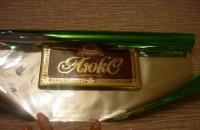
Materials and tools: White patterned wrapping paper and mesh; - wide white silk ribbon; -...
What would a New Year's holiday be without its main characters? There are not only themed paper crafts. Eat...