We crochet beautiful potholders: patterns and descriptions
A good housewife has everything beautiful in her kitchen. But how often the picture is spoiled by old burnt rags that are used for...
A good housewife has everything beautiful in her kitchen. But how often the picture is spoiled by old burnt rags, which are used to handle hot dishes. But this is not only not aesthetically pleasing, but also inconvenient and dangerous - you can easily burn your fingers. But if you know which hand you need to hold it in, then you can consider this issue resolved. Even leftover yarn and deformed threads from old knitted items are also good for knitting potholders, which can vary in complexity - from those that will take you half an hour to almost works of art. But be prepared for the fact that your household may accidentally burn the result of your labor or smear it with food.
This project will require a minimum of time and skill from the knitter, and will help beginners hone their skills in forming an even, neat fabric.
The potholder has a square shape, we start work from the center. We close 4 loops in a circle, 1 lifting loop and begin the pattern: single crochet and 2 chain loops. In subsequent rows, 1 loop is made between single crochets, only adding two at the corners. And so on until the potholder is the right size. And a cheerful terry edge is achieved only by increasing the number of air loops: we knit not one, but four.

Experiment with colors; if desired, make the main part of the potholder striped. Melange yarn will have an interesting effect - the smooth transitions of color will be advantageously set off by a plain border.
The classic “granny square” pattern also produces original crocheted potholders. The patterns of the pattern are extremely simple: a ring of 4 loops, 3 lifting loops, 2 more as part of the pattern and 3 and a loop between them. To get even corners, add 2 loops. The columns are arranged in a checkerboard pattern. By using different colors of yarn you can achieve a very interesting effect. Such squares with rows in rainbow colors look bright and unusual.

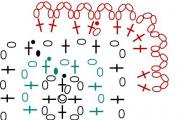
Based on the granny square pattern, many new ones have appeared that will allow you to make excellent crochet potholders. Schemes can start either from the center of the square or from the corner, but here is also an option with a voluminous flower in the middle.

The work is done in rows like this:
Yellow
1. Core of the flower: ring - 4 air loops.
2. 1 lifting loop, 8 arches of air loops and single crochets.
White color
3. We make chamomile petals: on each arch we knit 3 air loops, three and again 3 loops.
Green color
4. The basis for the leaves will be elongated arches of 4 loops, which will pass behind the white petals. Due to this, the flower will rise and become voluminous.
5. We begin to work according to the principle of the usual “granny square”. Next, the color of the thread is arbitrary.

Please note: the points in the diagram are not air loops, these are simply symbols of the places where subsequent elements are attached.
Funny fruits will take up residence in your kitchen if you know how to knit in the round. If not, then this is a great opportunity to learn and then use your new skill when knitting hats, napkins, baskets and even pillows.

To crochet neat potholders, patterns must be calculated based on certain rules. Then the canvas will not gather into a cone and will not fold into flounces.
When knitting with double crochets, we always start with 6 chain stitches, in the first row we make 12 stitches. s/n, mentally divide them into 12 wedges and in each subsequent row add a loop to the wedge. To avoid getting a regular hexagon, the increments need to be shifted slightly relative to each other. This does not affect the number of loops, but this results in an even, flat circle. If we knit with single crochet stitches, we do the same, but we start with 6 stitches and make additions in every sixth part of the circle.

We continue to develop the theme of knitting in the round. Small remnants of multi-colored yarn will be useful for this work; with them you can create beautiful crochet potholders. The schemes are quite simple; when working with a project, you can complete it in half an hour.

The highlight of the first version of the two-color potholder is a row of “melange” yarn, which was obtained by connecting one thread of each color. Work in rows is done like this:

The “star” potholder (hook) looks very impressive and complex. The diagram, on the contrary, shows that everything ingenious is simple, and if you are familiar with the basic techniques of knitting, then you can do this work. More often, these potholders are made in different colors, then it seems that the stripes are cleverly intertwined with each other.

Well, let's reveal the secret of the “star”:

This is how this elegant “star” is made. You can increase the number of rows of binding, then the potholder will look like a circle with a voluminous center.
This cheerful flower will decorate any kitchen. Many craftswomen knit patterns, and they range from simple circles of black or brown yarn, tied in a circle with yellow “shells,” to intricate ones, like this one.

But in fact, if you carefully read the description of the previous potholder, then this flower will be easy for you to repeat. We do the same steps - a flat circle, but from double crochets in the amount of 11 pieces and petals we knit not 9, but 12. We tie them with 3 rows of single crochets and continue working in circles according to the pattern, making the necessary additions.

Do not forget that a potholder is, first of all, a functional item. Multi-ply cotton yarn is ideal for crocheting potholders. Pattern patterns with a minimum of holes will allow you to create a product that will reliably protect your hands. But this does not mean that you need to give up beautiful openwork potholders. If there are a lot of holes in the pattern, be sure to make a two-layer version. Sew on just a crocheted square or circle, or a lining made of non-woven fabric and cotton fabric.
Knitted potholders for the kitchen can come in a wide variety of shapes:
Below is a diagram following which you will knit these original products.

Materials you need to make two “mittens”:
Knitting instructions:
Cool handmade mittens are extremely popular (see also article). Among them are horse potholders, bee potholders, fish, monkeys, and a frog princess potholder.

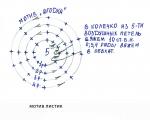
Kitchen potholders can be crocheted in one, two, or even three threads. Let's consider the order of knitting a product under the beautiful name “Star”.
Knitting order:
Attention! In the picture, the star potholder is knitted using Yarnart Begonia threads.

Crochet oven mitts for the kitchen with your own hands - star oven mitt pattern.
Advice! For beginner knitters, you can create simpler, but no less effective potholders. As an example, let's take a product in the shape of a hexagon.

Crochet oven mitts - an original and simple hexagonal product

We suggest crocheting potholders for the kitchen in the shape of a watermelon slice.
To make them you will need:
Operating procedure:
Important! The rows do not need to be knitted in a spiral, otherwise the knitting will not look very aesthetically pleasing at the end.
Important! Don’t forget to close each tier with a half-column.

Our website presents a variety of patterns of potholders for the kitchen, for knitted or crocheted products. You can also get acquainted with video materials, which show in great detail all the nuances of knitting (see also article). Use and enjoy the results of your work - bright and impressive products.
If you know how to crochet, creating cute and original things for your home is no problem. DIY oven mitts will add a pop of color to your kitchen and make great gifts for any occasion.
And, considering that most of them are knitted very simply, you will enjoy the needlework process and make your own original gift for your mother or grandmother for March 8th with any subject (fruits, animals, simple geometric shapes).
We suggest starting with the most common and simple crocheted decorative potholders with diagrams, videos and descriptions.
If you are just starting to master the skill of knitting, you will find useful diagrams with descriptions of round crocheted potholders for beginners.
Crochet potholders, photo
They are great for pots and can even be used as convenient trivets. It is very important that hand-crocheted oven mitts for the kitchen are wide and have good density. Since their patterns don't involve moving from row to row (round shapes are created by spiral knitting), you won't spend much time on this work.
So, let's start crocheting kitchen potholders for March 8th in several techniques with diagrams and descriptions.
Advice: Additional elements can be connected to a round potholder. For example, it’s easy to make a ladybug potholder: modify the head and black circles for red or other bright wings.

Despite their simple shape, round potholders turn out to be very impressive: you can get design ideas from photos and diagrams, and video tutorials on crocheting potholders will help you understand the process itself.
You can make square pot holders for the kitchen with your own hands very quickly and easily. They are created according to the principle of knitting with single crochets from the corner.
How to crochet a square pot holder step by step for beginners:
Another simple way to crochet a potholder for beginners is a technique that involves making a braid with any required number of loops. Using an elastic band, make single crochets along the braid. In this case, the potholder will periodically turn inside out and vice versa.
You can choose the size for potholders of this shape yourself. To knit similar patterns, there is no need to use special patterns, since even basic skills and knowledge of the techniques used will be enough to quickly and easily complete such a decorative product for the kitchen, having only a pattern or description for crocheting potholders.

The next master class on crocheting is creating a product in the shape of a strawberry. The classic pattern of this type of crochet - strawberry - is made with red and green yarn using a No. 5.5 hook.
Crochet details with diagrams and descriptions of potholders with a shape like a strawberry:
 Knitting pattern for Strawberry potholders
 If you understand the knitting technology, you can easily make beautiful crochet potholders according to the patterns with descriptions - and update your kitchen with original berry design elements.
Crochet Berry potholder: how to crochet - watch the video:
The crocheted “Star” potholder will become not only a necessary item for the kitchen, but also an original element of kitchen decor.
Do you want to knit a star like the one in the photo with your own hands?
 Crochet potholder Star, photo
 Knitting pattern for star elements:
 Pattern of potholder Star crochet, photo
To make the crocheted Chamomile potholder made according to the pattern look even more beautiful, consider our recommendations:
Crocheting potholders is fun and easy. For a detailed tutorial on how to crochet potholders for beginners using simple patterns, watch the video tutorial:
How to crochet a rooster potholder? This video shows the process of knitting Cockerel potholders - a full-fledged master class:
To diversify your kitchen with the help of homemade decorative elements, we advise you not only to look at photos of crochet potholders patterns, but also to think about creating original shapes:

 Crochet Lamb potholder: photo
 You can use one of the attached diagrams: today both geometric shapes and themed figurines for the kitchen are popular.
Use these step-by-step diagrams:
 Crochet potholder - diagram, step-by-step photo


Considering what super-masterpieces can be created using only a hook and yarn, it is not surprising that even today knitted items for the home do not go out of fashion.
Make yourself and your loved ones happy, learn new techniques and bring your best ideas to life! And videos and master classes on crochet potholders will help you do this kind of work better and better.
Knitted heart is another subject for potholders. Crocheting the original Heart potholder is shown in the video below:
Even at school, during labor lessons, girls are taught to take the simplest things, for example, potholders. For beginners, this is the very springboard from which the path to the world of needlework and, mainly, knitting begins.
You can quickly create a very simple and cute round potholder with your own hands. For example, an option for pans. It must be strong and wide enough. You need to knit it in a spiral, as such there is no transition from row to row, the pattern will be clear even to a beginner.

Tips for knitting this pattern:


It will not be difficult for a beginner to make a “Ladybug” model, which is based on a circle tied around the perimeter with a black border, a small head on top and many black circles sewn to the circle. You can decorate such a thing with your own hands with metal threads or beads.
Square models for the kitchen are also good. For those who have not crocheted squares, now is the time to start. And as a first lesson, a simple master class.
The principle of knitting a square potholder is single crochet from the corner. Use step-by-step instructions:

You can also knit a square model with your own hands in a different way - cast on a braid (any number of loops), and make single crochets over it with an elastic band. The product will turn either front side or back side.
In both cases, the size of the tack is as the master decides.
These are the simplest ways to make a square model; they do not even require diagrams with a description. For the first samples of handicrafts, for decorating the kitchen - the best option.
Most often, this name refers to the “Strawberry” model - an old kitchen decoration that has gained popularity almost since grandmother’s times. A master class of a variety of options can be found on the Internet, but the most accessible is the classic one.


To crochet such beautiful patterns as a berry, you need to follow the pattern and choose the right materials. Most often this is synthetic yarn in red and green colors, hook size 1.5.
Step-by-step diagram, master class of a simple model:
The descriptions of crocheting berries and the patterns may differ slightly from each other, but they all help you create a cute, cozy decoration for the kitchen with your own hands. And by adding a few of your own touches to the design, you can give a master class yourself.
And such models for the kitchen are a godsend. They look neat, strict in form and very cute. To create such a model, you will need hook No. 2, 50 g of yarn in two colors.

To make the star even and bright, and decorate your kitchen space, a small master class with tips will help:
The “Star” potholder may not be a luxury product, but its original color combinations make it possible for the kitchen to become brighter and more comfortable.
Original potholders, the creation of which requires only yarn, a hook and ideas that you can actually implement with your own hands, can not only become a symbol of the hearth. This is a good gift for loved ones, a sign of attention to guests, a memorable present. Any master class from the Internet can be repeated and even improved. Follow the diagram, check the photos, start with simple models. And then you will definitely be able to be proud of what you created with your own hands.
In the kitchen, when preparing dishes, oven mitts will help you handle hot dishes. You can link DIY beautiful crochet potholders. In this article we present several knitted potholders with diagrams and a detailed description of the work.
When knitting small items for the kitchen, you will learn how to make complex patterns, elements and these techniques can be used in knitting other larger items. You can start knitting potholders with simple patterns that you understand; knit more complex patterns using master classes with step-by-step photos.
Braided potholder consists of connected strips of two colors, they are intertwined and tied along the contour to be combined into one fabric, an interesting chess pattern of colored squares is obtained.

Colored potholder with spiral pattern
It is knitted with simple double crochets in the round, but at the same time 2 to 4 threads of different colors are used in the work.
Potholder in the shape of a flower It is knitted according to a simple pattern, and the outline of the flower is tied in a contrasting color at the end.

For the kitchen you can knit simple beautiful potholders. To make the base of the potholder, made according to a simple pattern, resemble a flower, it is tied along the contour of the petals with a thread of a contrasting color.

Knitting three-dimensional elements is described in detail when knitting this model of a potholder for the kitchen. With practice, you can knit beautiful things with three-dimensional flowers on the canvas.

Beautiful potholder sunflower will decorate your kitchen. The middle of the potholder is made with black flowers, and the petals are made with yellow yarn; tie the outermost row of petals with green thread, like leaves.

More simple potholder sunflower Even a beginner learning to crochet will knit with wavy edges.

Beautiful flower potholder can be knitted from a simple circle, the flower petals are knitted second row on the circle, they can be made in different colors using leftover threads.
A good housewife has everything beautiful in her kitchen. But how often the picture is spoiled by old burnt rags that are used for...
28 years of marriage is popularly called the nickel wedding. Nickel is a shiny and durable silver-colored metal. Besides,...

The musical mobile for the crib can be used from the first days of a child’s life. Such hanging toys are not only...

Many women have had to face betrayal and betrayal in love. Men from whom you can expect betrayal...

A long time ago, on a distant island, That was hidden from prying eyes, All Feelings lived in a deep mystery, Captivated...

Everyone has at least once encountered a person wearing a bauble. This small woven bracelet is a symbol of friendship and peace, not without reason...

The feeling of future motherhood is inherent in every woman literally from childhood. There is such a wonderful...
Size: 23.5x30cm. Knitted from “Iris” type threads with 0.75 crochet. It took approx. to form the berries. 20g. cotton thread with...

Karakulova G.K. On the stylistic and genre originality of the short story “Date” by I.S. Turgenev. Story "Date"...

Over the past few years, trends in the nail aesthetics industry have changed rapidly. They alternated with each other...

How to do a manicure using regular newspaper; what is required for preparation and procedure; how to do...

Many women who are naturally gifted with chubby cheeks dream of looking slimmer, at least visually, having...

Yarn - Caucasian troika, it took about 400 grams, size - up to 6 months. Description Cast on...

0 Pigs have always had a special meaning in human culture. They are deeply rooted in our religion...
28 years of marriage is popularly called the nickel wedding. Nickel is a shiny and durable silver-colored metal....

The musical mobile for the crib can be used from the first days of a child’s life. Such hanging toys are not...