Efficient Wardrobe: Basic Shoes
Recently, many articles have appeared on the Internet about what it is. What is the difference between basic shoes and any other?...
Even a novice needlewoman can crochet a women's beret. The manufacturing process is very fast and not at all complicated. Such a headdress can be made light, airy or warm, but at the same time unusual. In any case, it will be special, fashionable and stylish.
Even a novice needlewoman can crochet a beret
A beret knitted in a classic style for autumn can make any look perfect. This headdress will add special colors to rainy autumn days, the main thing is to choose the right yarn. The knitting pattern is very simple, understandable even for beginners.
Progress:
It’s incredibly easy for a girl to knit an original beret for spring on her own. On sunny spring and summer days, such a headdress will protect against the negative effects of ultraviolet radiation, and will simply become one of the most important decorations.
What is necessary:

It’s incredibly easy to knit an original beret for a girl yourself.
Progress:
By alternating concave and convex double crochets, make a border three centimeters high, and then finish knitting.
Choosing the right pattern for a beret is already half the battle. After all, it directly determines how the headdress will turn out. One of the most popular ornaments is the so-called “pineapple”. You just need to master the technique and you can put it into practice in the knitting process.
Progress:

Choosing the right pattern for a beret is already half the battle
Finish the work with a couple of columns, three air loops and a couple more columns.
It’s not only in the cold season that you can wear berets. There are many excellent summer models. A light, airy headdress will be appropriate even in summer.
Progress:
Having finished decreasing, tie the bar in columns and tie the finished product for the summer.
Knitting a winter beret is a fascinating and absolutely not difficult process. If you strictly follow all the instructions, then even a novice knitter can make such a beautiful winter headdress for women.
Progress:

Knitting a winter beret is a fascinating and absolutely not difficult process.
Without decreasing the stitches, knit the last row.
Crocheting a beret is an excellent practice for beginning needlewomen, especially since the product turns out incredibly beautiful and is ideal even for summer. An openwork beret looks especially stylish on little fashionistas. If desired, you can complement the product with accessories, for example, gloves or mittens, scarves or light capes. The summer beret is very convenient to crochet; it takes little time to make - no more than 3 hours; the process itself is simple.
Summer versions of berets are weightless and delicate. Warm hats for adults and children have a denser pattern and are made from thicker threads. If desired, a lining is sewn on if the product is planned to be used in early or mid-autumn and spring.

One of the easiest options for beginners is knitting a beret in the following way:

At the end, you should cut off the excess threads and tighten the tip passed through the outer loop. The work is finished, and the product turns out simply stunning in appearance.
You can knit a child's size beret designed for summer if you have your favorite color of yarn and a hook on hand. The latter must be chosen correctly. For thin threads, the best option is number 3, 4 or 5.

When working with the product, you should pay attention to the result: if the fabric is too tight, you need to replace the tool with a thicker one, otherwise - with a thinner one.

Openwork fashionable berets for summer are well made from linen-based fabrics. You can also choose cotton material. Insulated options should be made from wool blend materials or all wool.

The beginning of making a beautiful children's beret should start from the center. You need to cast on about 6 chain stitches, close them in a ring and knit eight columns. It is imperative to monitor the formation of the circle, do not forget about the increments; if you work without a double crochet, then there should be at least six increments, if with it - at least 12.
It is important to pay attention to the uniformity of the spaces between all the loops. If during the process it was noticed that waves are formed along the edges of a rounded product, then the number of increments must be reduced and vice versa.

Over time, each needlewoman not only accumulates knitting experience, but also develops her own individual style of making things. In the beginning, it is recommended to adhere to several standard techniques that will allow you to avoid errors and shortcomings during work.

If you plan to make an openwork summer beret with a relief ornament, then you need to start work (and then each row) with one air loop for single crochets. If the situation is the opposite, then the number of loops should be three. During the manufacturing process, you should focus on the selected diagram or description.
Another method is knitting using the spiral method, which involves starting each row without an air loop. The product will turn out even if the columns are made without a crochet. It is easy to count all the increases by sticking a regular pin on one side of the canvas. Drawings and ornaments can be made in different ways: it all depends on your imagination or finding a suitable option from any relevant source.
Summer beret using fillet technique
Taken from here http://stranamasterov.ru/node/164124
Summer openwork beret with fillet technique is knitted from "Pelican" yarn (composition: 100% double mercerized cotton, 330 m, 50 g.)
It took approximately 60-70 gr.
Hooks No. 1.5 (main part of the beret), and No. 1 (band)
Based on MOD Magazine No. 535
Something has come to change, because... the original is crocheted from thicker threads with crochet number 2

The beret is quite simple, even a novice craftswoman can do it


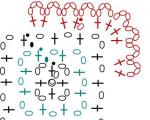
Diagram of the main part of the beret.
Tie 8 vp, close them with a ring connection. Art. Next, knit 12 double crochets into a ring, the second row - 24 double crochets. Etc. according to the scheme

After the main part of the beret is ready, you need to make a band about 3 cm wide

Summer is ahead, and I really want something bright, airy, positive! Somehow, in one breath, this beret got in touch. Although I planned completely different things. Probably, the coming spring is taking its toll. Well, I can’t knit warm scarves, vests, etc., and that’s it!
When I first learned to crochet, I tried my hand at fillet knitting. At home, many napkins, collars, and even a lampshade were preserved. I still like the technique, I remembered it with pleasure.
Crochet is almost like lace. This tool is used by needlewomen when they need to knit a beautiful thing for the home: a napkin for a table, a tablecloth, a bedspread. Even curtains are crocheted when there is enough time, patience and desire.
It’s easy to make a beautiful beret with your own hands. The main thing is to be good at crocheting. If you have started to master the tool, do not deny yourself the pleasure of tying the first thing - a beret.
The first beret is difficult to knit openwork, but dense, warm and elegant - certainly. Leave some more thread for a scarf, mitts, and mittens to complete your look. When you get a warm beret, you should take on the openwork version.


Crochet hats are usually crocheted from the top of the head. You need to pick up two or three loops, close them in a circle and knit in a spiral. In each loop, five single crochets are knitted. The new row is knitted like this: in each loop, after 1 - 2 single crochets. It all depends on the threads: sometimes you start to get something like a shuttlecock. Then the number of columns needs to be reduced. Does the knit tighten? Enlarge! You need to get an even circle. Make sure to keep it even as you knit and add 6 to 8 stitches on each row. Continue knitting several rows without increments. Then start rows with decreases of 6–8 stitches. You need to try on the beret to understand when to stop decreasing. Having reached the desired parameter, knit the band in simple rows without decreasing.


The simplest beret is a summer version of the mesh type. You can knit it like a cobweb consisting of chains. Knitting begins from the middle: a chain of air loops is knitted. We make three to five loops and close the circle. Next, from each loop, knit several stitches, between which make an air loop. In the next row, knit a chain - seven loops, attaching to the resulting circle through three loops. A row is knitted with such chains, after which you need to knit chains of greater length, say, from eleven chain stitches, attached with a single crochet to the middle of the chains of the previous row. This is how the circle should be connected. After this, we do not increase the chains, but knit them to the same length.


If you are good at crocheting, then it will not be difficult for you to find beautiful openwork patterns for knitting a beret. For example, a fan pattern. For beginners, you can take a simpler scheme. Cast on 5 chain stitches, from them we knit 2 chain stitches for lifting, and then alternate 3 chain loops and a double crochet from the base of the row - five times. The series closes. The next row again begins with two lifting loops and consists of repetitions of three chain loops and two double crochets. You need to do 11 repetitions, after which – 2 air loops. The third row is done in the same way, only 1 single crochet is performed. Next, the beret is knitted in the same way, only you need to add a column in each of the forming petals. Try on the job. When you realize that there is no need to increase the size, knit the petals straight and try them on again. Then you need to knit 7 rows in each petal with decreasing stitches. The bottom edge of the beret is knitted from two rows of single crochets.


Autumn berets should not be airy, like lace, because their task is to warm. Such a product needs to be made from thick threads, but it is not necessary to use wool and, especially, down yarn, because these are options for winter. For September and early October, you should choose acrylic yarn.
Look at the pictures to see what crocheted berets look like. Openwork knitting is used for summer items, and for winter items it is more dense.


Crochet products are sometimes easier to understand if you see a diagram in front of you rather than a row-by-row description. After all, most of the work is knitted in a spiral, so it is not always possible to understand where the row ends and the next one begins.


It is better to knit warm berets for winter from down threads. This will give them a stunning look and make them as warm as a fur hat. In addition, when knitting a beret, not a single animal will be harmed, since the yarn is made from sheared wool from goats or sheep of specially bred breeds. This type of wool is found under the name “Angorka” (more often referred to as goat wool) or “Mohair” (this name refers to sheep or even camel wool, which does not exclude its advantages). You can knit a beret from wool both by knitting and crocheting. A seamless product comes out either by crocheting or using circular knitting needles.

1.) Make 1 loop.
2.) We knit 12 single crochets from it.
4.) Again 24 stitches - one from the loop. We get a “snail”.
5.) We begin to knit this row differently: 1 tbsp. single crochet from the loop, from the next one - 2 similar stitches, 1 chain stitch and so on until the end of the row.
6.) 1 single crochet - from 2 loops, 2 tbsp. single crochet - from 1 loop, chain stitch - and continue until the end of the row.
7.) Next, make single crochets from each loop 3 times, 2 tbsp. – knit from 1 loop, knit a chain loop and continue until the end of the row. At first, the work will turn into a flounce, but do not worry, because the tails are included in the style of this beret. In addition, after this row you have to make decreases through the row. As a result, the resulting wedges will begin to wrap.
8.) So, we knit 2 single crochet stitches together, knit 1 stitch twice from a loop, and from the next stitch – 2 stitches, a chain loop and continue until the end of this row.
9.) 1 tbsp. Single crochet is performed 4 times, then 2 of the same stitches and an air loop. We do this until the row is completed.
10.) We knit 2 single crochets together, perform 1 such stitch three times, then 2 single crochets and a chain stitch until the row is completed.
Reductions are made until the work reaches the desired diameter.
The last two rows must be knitted with columns in each loop. The third row is special: you need to put an elastic band and tie it.


Today, berets and hats with braids are gaining popularity. Sometimes even an ordinary felt beret is found with braid-type clips. Such patterns are very good to make on knitting needles using a special pin. If it is not in your toolkit, then you should use a regular hairpin, an additional knitting needle or any other wire product that has a smooth surface from which the loops will not come off. Such a device allows you to overlap loops, which allows you to get the structure of a rope or braid.
If you only have a crochet hook in your arsenal, you should be smarter and make your work profitable using yarn. Learn to crochet with bouclé yarn. Even if you perform the beret using ordinary single crochets, the knitting will not look smooth precisely due to the special texture of the thread. In addition, the beret hat will be warm. You should initially make a pattern for the beret so that you can check your work against it. But if you knit without a pattern, then you need to make an even circle of at least 30 cm in diameter, and then think about decreasing. A simple fitting will show when to stop making them. Don’t forget to tie a band: it will allow the beret to fit well to your head and not stretch from wear. When the product has stretched, it is worth saving the work by knitting a row on the band, where to pass the elastic.
If you want to practice knitting berets with different patterns, then you won’t find a better model than a child. The greatest number of options can be selected for girls, since boys are unlikely to wear elaborate openwork headdresses. While a girl—sister, daughter, niece or granddaughter—grows, both the size of the product and the style change. What a baby can wear is not always appropriate for a “young lady” of primary school age, and even more so for a teenage girl. While you are practicing, your model is a small child. In addition, a small item can be knitted very quickly.

Openwork crocheted berets are more suitable for little fashionistas, as they are not very rigid. If you are knitting tightly, it is better to do it on knitting needles.

For an older child, it is good to knit a “Snowball” beret, because it looks great on both adults and children. Beginning knitters should make the petal beret described in the “Summer beret” section. You can also find many patterns on the Internet and create an original work of art based on them, if you are fluent in crocheting.
A beret should be knitted not only as an abstract item, but as a wearable item. You must initially take the choice of pattern seriously. Do you prefer a solid color? Choose a relief pattern that can decorate your beret! If you are a minimalist by nature, then make do with plain knitting. Fans of African motifs should take a closer look at Kenyan berets. They usually follow the colors of the African country's flag. You can search for a pattern of the product on the Internet using the query “Bob Marley Beret.”
Openwork berets of the summer version are suitable for sophisticated natures. Do you want something airy in winter? It is worth choosing the “Snowball” beret pattern described above. It sits well on the head. Knit a beret from pastel-colored threads, which is why you will benefit. It is worth knitting a tight pattern if the beret is knitted for the winter. The work is done both with crochet and knitting.
In addition to the pattern, it is important to know what color beret to choose. The color of the threads should be in harmony with your clothes, complexion and eyes. And you don’t have to think that only orange or green colors suit green eyes. Everything is decided near the mirror.
There are things that every fashionista should have in her closet:
It can be made from bulky and textured yarn or delicate merino in several folds, which will protect against autumn weather or severe winter cold. Adding a thin thread of kid mohair or angora will give the model a slight fluffiness and increase heat-protective properties.
More often they are made from cotton or blended yarn containing flax, which holds its shape well and allows air to pass through well.
The main thing is that the unique piece is knitted with your own hands from high-quality and noble yarn. Skillful use of hooks of various sizes allows you to create patterns of interesting structure and density, which provide the model with an exclusive design and the hostess with a fashionable image. Berets of a classic shape, with a smooth surface in the spirit of modern minimalism, will harmoniously complement an elegant coat. The color scheme can be one tone darker than the clothes or contrasting, and a miniature brooch or an original knitted item with transparent crystals or artificial pearls will add a nostalgic charm to the image.
A timeless model, knitted with a voluminous ornament made of coarse or fancy yarn and a neat pom-pom ball guarantee increased attention to the brave young lady. A casual style look or a sports set will sparkle with new colors, complemented by a unique knitted beret. An unexpected effect is produced by a voluminous and airy headdress, completing a stylish summer outfit. The snow-white foam of refined lace, collected through the efforts of the knitter into an exclusive masterpiece, will set off an even tan and the beauty of the face and will expressively emphasize the refined taste of the owner.

Recently, many articles have appeared on the Internet about what it is. What is the difference between basic shoes and any other?...

Even a novice needlewoman can crochet a women's beret. The manufacturing process is very fast and completely...

Today, anyone can purchase anti-cellulite massagers and carry out procedures at home. For...

For a triangular face, a good solution would be hairstyles that create volume in the lower part. These can be different braids...

Contrary to existing stereotypes, a hairstyle with short hair can look very charming and feminine....

The treble clef in its familiar form appeared in the sixteenth century, when instrumental music was born. But...

The placenta is a unique organ that helps the baby grow, develop, receive all the necessary nutrients...

A convenient and simple hairstyle for medium and long hair is a fishtail braid. She got the name...

Modern cosmetologists use many different natural products to care for the face and body. One of them...
A good housewife has everything beautiful in her kitchen. But how often the picture is spoiled by old burnt rags, which...
28 years of marriage is popularly called the nickel wedding. Nickel is a shiny and durable silver-colored metal....

The musical mobile for the crib can be used from the first days of a child’s life. Such hanging toys are not...

Many women have had to face betrayal and betrayal in love. Men you can expect...

A long time ago, on a distant island, Which was hidden from prying eyes, All Feelings lived in a deep mystery...

Even a novice needlewoman can crochet a women's beret. The manufacturing process is very fast and...

Today, anyone can purchase anti-cellulite massagers and carry out procedures at home. For...