Placenta maturity: the degree of indicator by week is normal What does placental maturity mean 1
The placenta is a unique organ that helps the baby grow, develop, receive all the necessary nutrients and...
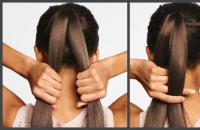
A convenient and simple hairstyle for medium and long hair is a fishtail braid. It received this name because it is similar to the tail of sea and river inhabitants. It’s not difficult to do this hairstyle yourself, you just need to practice on yourself several times, and everything will certainly work out. Now let's take a closer look at the types of weaving. Learn how to make this stunning braid so you can look fabulous every time.
A spikelet based on a fish tail is made of either two or three parts, which are then intertwined with each other and hair from the entire total mass is braided into them.
The shape of your Fishtail can be interlaced or sparser, thick or thin, loose or very tight.
This hairstyle will look more elegant on straight hair, which also shines.
And if there are highlights on them, then this will further emphasize the beauty of the hairstyle, because strands of different colors will be more noticeable due to the weave.
To create a fishtail and make a hairstyle, you first need to comb and moisturize your hair, spray it with shine spray. There are several options for weaving this fashionable braid.
When braiding it, you can take not only small curls, but also large ones - the hairstyle will look completely different. How tightly you weave also affects the final look. The less you pull your hair, the more romantic and airy your hairstyle will look.
Fishtail braid step by step
Apply moisturizer to combed hair before starting. Otherwise, they will begin to fall apart, and it will be difficult for you to weave this type of braid.  Make a high ponytail at the top of your head and divide it into two equal parts. Separate a strand from one part. It should intercept the base of the tail from right to left.
  Select the same thin strand from another part of the tail. Cross them together.
  Strands are thrown into the braid from different sides each time. You can continue weaving all the way to the neck. And then as desired. The tail can be tied with an elastic band, leaving it free. Or you can continue weaving.
If you are going to braid your hair yourself, rest assured that you will not need any special preparation. The main condition is that the hair must be clean and thoroughly combed. This will allow you not to get confused during weaving, especially the first time, and avoid unsightly “cockerels”.
Second weaving option. In this case, the base of the braid is three strands, so that one is in the middle. Now alternate them according to the usual pattern.
Each of them can be woven into a braid constantly, each first or second weave can be taken with an additional part of the hair, or less often.
Fishtail Variation for Beginners
The best option. You need to take three main strands of hair and braid a regular braid. Then continue as in the first option - sketch out the rest one by one, first on one side, then on the other. In this case, the spikelet will not hang in the air and lie on the entire mass, but will have the main braid as a support. Once you master this technique, you can create a variety of braids and hairstyles.
How to weave a fishtail braid: video
Fishtail variations for every day
This braid is easy to braid, allowing you to do it every day. You can either tighten it tighter or loosen it, make it loose - this way you will look more romantic.
Don’t be upset if you don’t succeed the first time as famously as the professionals do - they have been braiding hair every day for many years. And for you, we will arrange the process of braiding on the shelves - stage by stage.
First, you need to wash and blow dry your hair. You can use some smoothing conditioner. Then comb your hair thoroughly so that it becomes smooth and free of tangles. After all, you have to weave a braid from them.
Then divide all the hair into two ponytails of equal thickness. Make sure that during this you don’t get any “cocks” - it won’t be easy to remove them further, in a ready-made braid.
Make sure that all the strands are exactly the same in thickness, and take out one small one from the left one.
Move the new strand to the middle.
Now attach it to the right one.
Now we separate the small one from the right main part, put it in the middle and attach it to the left main one.
Continue this way until you reach your desired braid length for each day.
Follow the steps and finish weaving
For the final finish, tie the braid with an elastic band and that's it.
Get creative with your braid for every day - weave a ribbon, a string of beads, real or artificial flowers, whatever you like into it. The main thing is that such decoration looks harmonious and beautiful.
Fishtail Braiding for Beginners
Pre-comb your hair, then gather it into a bun and divide it into three equal parts. Hold one strand in your left hand, and the right and middle ones in your right hand (the outermost one should be located slightly above the middle one).
The right strand must be laid on top of the middle (central) one. The right one should be in the gap between the left and the middle one, at the same time slightly bent under the left one.
Then place the left one on top of the central one so that it is between the right and middle one.
When finished, all the parts are put back together and secured with some nice elastic.
How to weave a fishtail braid: video tutorial
The braid can be different, there are a lot of options for weaving it and each of them can be turned into a delightful hairstyle. You can learn how to braid a fishtail yourself if you study the pattern and practice a little.
Of the simplest weaving options, fishtail is considered the most popular. It even has several design options, thanks to which you can fit such a braid into any created image.
The hairstyle goes well not only with everyday clothes, but also looks great on the red carpet. Fashion brands love to use this type of weaving in photo shoots. Many popular domestic film stars and foreign pop singers choose a fishtail as the main decoration of their image.
In the classic version, this is not a French braid, so it should not start at the forehead line. The modern version involves braiding from the side; the technique of creating such a hairstyle is no different from a regular fishtail. Sometimes the hair is first tied into a ponytail with an elastic band. Girls who are just gaining experience do this, because the hair remains fixed and braiding becomes easier.


Using a spray bottle of water allows you to make the braid even, without any stray strands. When the curls are clean, they fluff and fall apart easily, so sometimes they don’t even specifically wash their hair a few days before creating their hairstyle.
“Fishtail” is not quite a spikelet, although their weaving is similar in appearance. It is valued by craftsmen for its attractive appearance, ease of execution, and the ability to combine with other elements, for example, a ponytail or loose hair. When the fishtail is finished, it remains movable and pliable, so you can later style it with pins or bobby pins. If there is not enough volume, you can add it by slightly pulling the curls from the braid.
But despite the huge number of advantages, a beginner will not be able to braid this braid on his own, since his hands get very tired. The beginning of such a braid can be different, some do it from the tail, others from the side of the temple or from the forehead throughout the head. They always start weaving with three strands, only then switch to a fishtail.

If a girl braids her own hair, then to create a beautiful transition, you need to move your hair to one side only when your hands reach neck level.
You can make a fishtail only on long or medium-length curls. If the haircut involves several levels, the first ones will stand out, which can be used to your advantage. They are usually curled into large curls and laid separately.


Depending on your hair type, there are special requirements for your hairstyle. On straight hair, you can braid any of the fishtail options; if there is insufficient volume, use a crimp or slightly curl the hair before braiding with a curling iron. But for girls whose hair is naturally curly, it is better to straighten it with an iron, otherwise it will be difficult to make an even braid without stray strands.
If girls have thin hairstyles, they are advised to weave a fishtail with a little backcombing. Hair with highlights or coloring looks very beautiful, since weaving in a flattering color demonstrates the intensity and color palette of the dyeing.


If you study the process and weaving patterns step by step, then after a few training sessions the girl will easily be able to make any of the options proposed by the modern fashion industry.
A “fish” or “pike” tail, on the contrary, is a very interesting hairstyle that is easy to learn on your own. Modern fashion is again looking to the past, so it returns to pulled-back curls, and among the possible options for braiding, it is this one, done inside out, that allows you to create an unusual look. The outward weaving in question was in great demand among the Slavs. The step-by-step process of weaving from the forehead is as follows.
All strands must be symmetrical and even, so you may need a spray bottle of water and a comb. There are several options for how you could make a pigtail in this design:


Professionals can create extraordinary designs that amaze the imagination, but this does not mean that a girl is not able to master each of them. All of them only seem complicated, but in fact, with a more detailed study of the technique, they turn out to be simple. The most important thing is to learn how to hold your fingers correctly and move them according to the required pattern.
The classic version is also woven from the beginning of the forehead, but it looks best when it starts to be woven from the middle. The step-by-step instructions on how to create a classic weave are very short because it is simple once you get into it.
The movements are repeated until the braid is completely finished.


One of the most voluminous options is side weaving, which can be done independently. If we talk about the versatility of modern hairstyles, then this is exactly the option you need. Such weaving can be supplemented at your own request, you can use accessories, weave ribbons. The easiest way is to weave one braid, more difficult, two, which are then connected to each other. In the second case, skill and experience are required, since it is most difficult to make a smooth transition.
This hairstyle acquires special charm in the summer, when girls try to tidy up their hair, but do not want to sacrifice beauty.
This hairstyle can rightfully be called universal, since there are a huge number of possible transformation options. Some hairdressers prefer to weave only one fishtail, others use two of them in the hairstyle design, then combine them into a single design towards the middle.


You can remove the bangs, then the face will be more open, or, conversely, let out short curls to make the hairstyle seem more airy.
In any case, a fishtail will be an ideal solution for an everyday walk or date. The execution technique looks like this:

This is one of the simplest options that can be made a little more voluminous by carefully pulling the hair out of the braid.
You can braid a fishtail from the temple area to the opposite ear, bringing the braid down around the neck. To do this, begin to divide the hair on one side above the ear, preferably higher, since the head should be visually divided into two halves, but horizontally. The weaving technique remains the same.


If you want the braid not to be too tight, you should not tighten the curls. It is better to take them larger in size and lay them without any tension.
This option is considered one of the most difficult because it requires long training. First, you will need to spend time putting your hair in order and removing all existing knots, then divide it into two halves along a straight parting. One part of the hair is temporarily tied with an elastic band, since you will have to braid two braids.
The technique remains classic, not for a reverse fishtail. The braids are braided to the end, then the strands are slightly pulled out so that the hairstyle looks a little careless. One braid is twisted into a ring on the head and secured with hairpins. The other braid is thrown over the opposite shoulder and also fixed in a comfortable position.

Girls who have gorgeous thick hair should definitely do a fishtail braid from the top of the head, as it looks incredible. You can simply braid the braid to the middle of the length and secure it with an elastic band, it will turn out very unusual.
They begin to weave from the curls located at the beginning of the forehead. If the volume of your own hair is not enough, then you should comb it a little, then the desired effect will be achieved.

photos
Not long ago, weaving around the head became especially popular, and there were several reasons for this. It looks great both as a daily hairstyle and for a festive event, you just need to add a few accessories.
An unusual, but very attractive look will be a fishtail all over the head with additional volume, although this hairstyle takes a lot of time. Weaving begins from the temple and moves not over the forehead, but along the occipital region. When the braid is completely braided, a wreath is formed around the head, the end of which is secured with an elastic band and hidden under the hair. Real professionals have learned how to make zigzags and snails on the head, but this must be learned.


If a girl is just learning the science of braiding, then it’s worth trying the simplest option:
A simpler version of what is described is to braid two braids from different sides and lay them in opposite directions, that is, one along the forehead, the other at the back of the head.


If a girl already has very voluminous hair, especially for African-American women or women with curly locks, then the extra volume is completely unnecessary. In this case, girls tend, on the contrary, to tighten their braids as much as possible so that they look organic and match the image. A tight braid is one of those remedies that can help without the use of fixing compounds.
When weaving a tight fishtail, the technique will be slightly different. First you need to thoroughly comb your hair, then divide it into three parts. A standard braid is woven from each, and the one that will be located in the center should start a few centimeters lower.
From the resulting braids, a braid is woven again using the classical method. As a result, the base of the resulting hairstyle resembles a semicircle. This weave is ideal for girls with thick wavy hair.


A well-combed hairstyle using two fishtails is a great option for girls with long hair. In the finished version, it seems as if the loose strands lie around the bun in a specially chosen sequence. The instructions for creating are as follows.

Design experts give their advice on how to what else is worth considering when using the braid in question as an option for a hairstyle.


If you want to add solemnity to your hairstyle, you should use accessories; there will be no problems with the choice, since they are presented in a wide range. Shiny beads, pearls or fresh flowers will add femininity to the style.

You should start training with a small area to understand the process.
Volumetric braids also have their secrets, and most experts are happy to share them.
Fishtail has become a favorite among other weaves and is used by women of all ages. The hairstyle became a major hit several years ago, when it could be seen on the catwalk and on Hollywood stars. Today it has not become less in demand; on the contrary, hairdressing masters have begun to invent new versions and experiment with images.

If a girl is looking for a chic new look, then she simply must try one of the hairstyle options that the fishtail offers. Although most of the hairstyles with it may look complicated, in reality it turns out that everything is much simpler and it is not that difficult to recreate the braided look. A fishtail can look romantic, sexy and a little funny. These braids can be wrapped around your head or made into a crown, they look very beautiful in a ponytail and are a versatile option that can be adapted to suit any style.


In a regular braid, three curls are used, but in this case there are only two, hence the unique relief. The basic idea is to use strands from the outside and bring them inside the other part.
The looser the fishtail, the more romantic and intriguing the style becomes. These braids should weave more freely than traditional ones; you can choose the size of the strands at your own discretion. If you want to create a side braid, then you should not lift your hair too much.

You can feel like a princess if you just make a big braid, which you then decorate with flowers. Start creating a hairstyle from the temple and move across the entire forehead, then behind the ear and up to the neck.


The Dutch fishtail looks very modern. When creating it at the front, the hair up to the top of the head is gathered into a ponytail, leaving a few free strands behind the ears on both sides. Afterwards the braid is woven according to the classical pattern, and the remaining strands are gradually woven in. The approximate length of the weave is 8 centimeters, then put on an elastic band. Loose curls remain under the braid. This hairstyle looks great on medium length.
Easy to do braid fish tail has another name - spikelet. This hairstyle suits all representatives of the fair sex, regardless of age.
The braid looks best on long and long hair. It will look perfect for those with smooth and straight curls. But if the strands are of different lengths, then their ends will come out of the hairstyle in different places.
The beauty of a fishtail braid is that it looks good on any curls, both thick and very sparse. In the latter case To create a hairstyle you will need preliminary backcombing. You can give the styling a neat or careless look. It all depends on the occasion, mood, condition of the curls.
The hair does not have to be straight; you can braid it wavy, even curly. To make it easier to deal with them, you should use a flat iron and styling mousse.

A fish braid goes well with a simple house dress, a business suit, a party outfit and a leather jacket. There are many varieties of this type of installation, and it’s easy to choose the one that most accurately tells about your mood and emphasizes the advantages of the outfit.
On weekdays, a fishtail is used to prevent hair from interfering with work. On weekends and holidays, by slightly complicating the technique, it is easy to achieve a combination of hairstyle and outfit. When going on a date or a walk, you can tie your hair a little casually in a braid and catch the admiring glances of others.

The weaving pattern is simple and does not require much effort:
It’s simple: send the right strand to the left, the left strand to the right.
This video shows a free fishtail braiding course.
The simplest execution. First, the hair is collected in a ponytail at the height that you like best.
The bundle is divided in half, each part is picked up by hand: right - right, left - left. A thin strand is separated from the part on the right, transferred to the left hand and grabbed by it. Then with the left hand on the left they take the same strand on the left and bring it to the right, into the right hand.
This series of simple actions is sequentially repeated until the weaving is completed.
Then you need to secure the hair, for example, with an elastic band.
Helpful advice! To close the elastic at the place where the braid is secured, you need to separate a small strand, wrap it around the elastic and, using a hairpin, pull the tip of the strand under the bun.

For this model, you need to divide the taken strand into 3 parts.
Step by step plan:
Ties can be made at a certain distance, separating a wide curl from the total mass of hair. Disconnect from the left, add to the right strand, then, on the contrary, take from the right and connect to the left. After some distance, make new hooks and continue weaving.

Based on fishtail weaving beautiful hairstyles for young fashionistas.
You can start by moving the center of the installation to the side. Make a regular braid of two strands with tiebacks, placing it on one side of the head and gradually moving it to the other. Having finished the tacks, continue weaving with two strands, then fasten.
Carefully wrap the finished braid in the shape of a snail shell, hiding the end under a spiral of hair. Secure it with pins. Leave in its natural state or decorate the place of fixation.
Any type of braid is suitable for girls: one, two braids, from a ponytail, on the side, around the head. It all depends on the length of the curls, the preferences of the young beauty and the occasion for which the hair is being done.

It is difficult to braid yourself such a braid using thin strands. Your hands get numb, so you need experience. After the braid is braided to the neck, you should turn it to one side to make your task easier. To begin with, you can try to create it from the side, and also use not too thin curls.
After a few practices, you will be able to braid your hair all over your head.
This video shows you how to do a fishtail braid for yourself.
The hairstyle is performed either from one braid or from two at first, joined together later. All hair or some part of it can be braided.
The technique is simple: divide your hair in half and move it to one side. Weaving begins at the temple and continues on the selected side.

How to do:
Having finished braiding, straighten the resulting hairstyle.
Loved by many girls ideally suitable for fine, sparse hair. To perform the styling, the same method is used as for weaving a classic spikelet. Difference: strands separated from the side are placed not on the adjacent strand, but under it.
Note! In this case, the strands are placed under a braid.
This model can be made with clamps, as in the photo.

To create a reverse fishtail, you need to use both hands to evenly pull the braided curls to the side.
Creating a hairstyle step by step:
Helpful advice! To add volume, gently stretch the braided curls to the sides.

There are different variations of the volumetric spikelet. Let's look at creating one of them step by step:

Layouts can be very diverse. Fantasies are limited only by the skill of the hairdresser.
The hairstyle is created based on the tail, from which. Strands evenly stretched to give volume. The braid is twisted around the tail attachment, and its end is hidden down and secured with an invisible one.
Advice! Using hairspray will extend the life of your hairstyle.
Side curls of the required thickness are collected into a bun or flagella are made from them and secured. Then from the fixed curls make a classic spikelet of the required length.
This video shows you how to create a donut updo with a fishtail braid.”
A variety of colored curls can be easily woven into any spikelet. Thanks to them, you can add volume to your hair and increase length, which especially pleases fashionistas. Important before starting the hairstyle process carefully secure synthetic strands under natural ones.
This can be done at any height. Kanekalon is fixed with an invisible one, which is removed after installation.
Fishtail is good on its own, but you can further decorate it with accessories:

Hairpins and bobby pins with decorations are used to secure individual strands and spikelets. With their help, you can create a fishtail with braids.
Remember! It is important to use jewelry in moderation, because if you use it incorrectly, you can spoil the impression of your hairstyle.
Colored crayons will help add variety. However, even here a measure must be observed: you should not use more than 2-3 colors at the same time.
A regular braid is made of three parts, but a fishtail is made of two. We'll figure it out and learn. If you have a curling iron that crimps, use it. The hair will be more manageable and pliable when working with it.
Let's start in order!
What is needed for this:
As soon as a novice stylist sees the principle of creating this hairstyle, panic immediately begins and the whole procedure is tantamount to a volcanic eruption. But in fact, everything is very simple. There is a goal, there are tools, there is a desire to be beautiful. Do not need anything else.
Having combed your curls well, separate a part in the middle and divide them into two equal parts. Now let's separate them on the left and attach them to the right. Then we will separate a part from the right strand and attach it to the left. The procedure is repeated. Again, take from the total mass and attach it to the left one in the left handle.
Instruction 1 Option 2
 There are two main curls in weaving, “left” and “right”. Now in this order we continue to weave our braid to the end. This is the simplest option.
If you stick to this order, everything will work out!
We invite you to watch the video instructions:
At the end we will have no hair left, we braid in the same order and braid our ponytail. If you have bobby pins, you can use them to pin the braid “inside” on the sides. You can also use hairpins. They will help your hair last longer and not fall apart prematurely. If you wish, you can use varnish or other fixing agents.

 Fishtail on white hair
  Side option
  The hairstyle looks very gentle and original
 In our case, there are many weaving options. We will look at a few of them. A huge number of girls want to learn something new. Especially when it comes to beauty and attractiveness. You can weave various ribbons and hairpins into your braids. It all depends on your imagination. If you put in a little effort, everything will work out. 
 With her hair down
  Side hairstyle
 When you finish it, you will have the feeling that the volume has increased. It gives the effect of a very fluffy and smooth hairstyle. Select one strand in the center, focusing on the middle of the forehead. Behind it, on the other side, we take another one and throw it over.

 Option with loose hair
  This hairstyle is suitable for smooth and straight texture. No cascading haircuts. Because it will be very difficult to get them together to the middle, or to any side.
Next, we transfer it from one edge to the other side. The central middle part should be constantly in the hand; the entire weaving will be built on it. Now we take it again from the right edge of the head and throw it through the center to the left side.
 The amount of hair should be approximately the same thickness. To ensure that the drawing is neat and of the same size. Lift it up a little and tighten it. The volume of the braid depends on the landing height. All actions are repeated, and the tail is left hanging.
After all the loose hair has been braided, continue to keep the central strand slightly raised. We take the most extreme one. The one that is closer to the head, and weave it to the opposite side. We take a little curl at the bottom and intertwine it, and let the rest be in a free position. And so on until the very end.
A few looks just for you:
 Hairstyle with loose hair
  Option with curls
  Volumetric option
 Bun
Bun 
 On straight hair
 When you finish braiding, put on an elastic band to secure your hair, but not too tightly. Then we pull it out and only after that we tie it tighter. And that's it, your hairstyle is ready. Use any fixing agent.
Today we will learn how to braid a fishtail braid inside out, i.e. vice versa. First of all, we comb our hair. We make a parting on the left side. You can make a zigzag version, at your discretion. It will still be very cute. Since we are doing it on the side, it will be very original. And at the end we will beautifully attach the tip on the other side.
Separate and comb the hair from the parting to the right. We separate the temporal zone with a vertical parting. We don’t pin anything, we just comb the occipital area back. We won't need it for now.
Before braiding, you can sprinkle your hair with glitter for added effect and variety. Also with varnish or water so that it does not drag on and does not stick to your hands.
 Separate a small strand and divide it into four equal parts. We start weaving from the right. For convenience, we will designate the curls with numbers from one to four. On the right we have the outermost curl number four. We take it and place it under the third and second, then transfer it to the left hand. On the left we take strand number one and put it under the second and fourth, transferring it to the right hand.


We connect two identical braids with an elastic band. The thickness of the beams should be different. Because they are separated by an asymmetrical side parting. It looks very stylish and creative.
For added sex appeal, place both braids in your hair. This will add chic and attractiveness to you.
To make the braid beautiful, you need to start from the left. We separate a small curl with the index finger of our left hand and place it under our main left braid, transferring it to our right hand. Press with your middle finger. We remove the main strand so that it does not interfere, and begin to add a pick-up.
Separate the small ones and add them to the main mass. We take our main left curl back into our hand and do the same with the right side. Using the index finger of your right hand, we separate a small mop and place it under the main one. Now we pinch it with the middle finger of our right hand. We move the right strand to the side so that it does not interfere, and add a tie.
 Also, do not forget to tighten all the braids separately. And then we do everything as written above. In this braid we don't have any exact number of curls, we just randomly separate all the small parts. You only need to take small curls. You place them under the main curls. While adding new pickups.
About the pick-up on the left! Where to get them from and how?!
We will braid our braid along the growth line. And after the ear we turn left. Therefore, in order not to make unnecessary partings that are unnecessary and ugly, we separate the strands from the ear. When we have braided a little, we pull out the curls. It doesn't matter when you do it.
At the very beginning, you don’t need to stretch your hair too much. We make it like a Christmas tree, gradually stretching the braid. On the right we separate them with horizontal partings. Don't forget to periodically stretch your braid. Try not to overdo the hooks, then everything will be fine.
 The hairstyle looks great on thick hair
Get a feel for your main curls so that they can be separated comfortably and not tangled. We braid the strands that are in the temporal zones and finish the whole process.
We completed the braiding and began to stretch it from the ends to the end. We try to pull out each strand, so the braid will look neater. Moving, we straighten it from bottom to top and create beauty. And when we have finished pulling, we begin to comb and carefully remove the bald spots.
For strength, it can be secured with bobby pins and hairpins.
We invite you to watch the video:

 Two braids
 You need to comb your hair well and part it into two parts in the middle. To avoid tangling, we twist and fix one. We start by weaving a regular braid. We take it from the corner of the parting, divide it into three parts and weave it inward.
The extreme one is under the central one and the other extreme one is under the main one. We get two curls. Separate a small part and pick up a strand from the total mass. We repeat the procedure and capture the entire hairstyle. From time to time, we pull a part out of the braid to get the desired braiding pattern on top.
In this order we go along the entire length until we capture the entire mass. Next, without picking up, we braid the rest of the braid using the same method.
We hope everything worked out for you?!
And above all, you need to believe in yourself!
 Two braids
  Volume braids
  Now let's start the other side. We weave in the same way! You must not deviate from the set course. We do everything carefully and focused. Separate from the parting and divide into three parts. The outermost curl under the central one and again the outermost one under the central one. Then we connect two, distribute, make a pick-up and add to the second. We carry out all the manipulations as with the first one.
Don’t forget, there must be two main components, the rest will be taken care of.
Celebrities also actively use this hairstyle, here are some options:
 Side hairstyle
  The hairstyle looks very gentle
Four-curl braid. One of the simplest options to make your ponytail very beautiful. You can leave it like this, or twist it into a bun.
 Its time to begin! What you will need:
There are many options:
First: We tie the ponytail at the back and divide it into four parts. Starting from the right side, the outer one goes to the second, and under the second. Next, we cross the central curls. Now we repeat the whole procedure. And we cross the central curls.
We pull them out on the sides and they take on a beautiful appearance. So we have finished this unusual type of braid. All we needed were pens, an elastic band and a comb.
 Let's try the second option:
We divide the head into four parts and start, as in the first version, the outermost by 2, from the other edge under the third. Now on that side under 2, and on 3. Now again on the second, under the third. It should turn out that at the very least you have to make two bindings.
You need to remember that on one side the extreme goes up, and on the other, down. For convenience, you can even pronounce it so as not to get confused.
Now you have a braid, all you have to do is pull out the strands. There is nothing difficult in this option either. Beauty without much effort.
 We separate the bundle at the back of the head from the beginning of the head. We initially divide it into two parts, then divide each one in half. And as in the second option, we start towards the edge up by 2, on the other side under 3.
Don't forget to tighten and grab. Thus, we do it to the end of the hair. If you wish, you can leave the harness unwoven at the end.
Video instruction:
If everything turned out great for you. You need to develop and learn something new. Undoubtedly, effort, a little perseverance, patience and desire are required. This is important when a girl shines, and even more so if she made all this beauty with her own hands.
If it doesn't work out the first time, don't be discouraged. After you try a few times you will succeed. You need to go to the end and not doubt your abilities. This hairstyle will suit every girl. For any event, bachelorette party, interview. Whether it will be a wedding, name day or just a walk in the park. On a date or to a nightclub. Even go to the store. She looks elegant and attractive. The main thing is that each curl is intertwined with each other.
 Two braids
  Try to choose the length that is needed at the moment and for this hairstyle. It’s very convenient if you can watch and learn while sitting at home on the Internet. A huge amount of information is around us. Step-by-step instructions can help you cope with any task. Even if it seems impossible.
Now you have learned how to braid your hair and at any time you can teach it to another person, or simply do it yourself. Being attractive and beautiful is the path to success and self-confidence. You can now do a variety of hairstyles yourself and not pay money.
Here are the stylish looks:
 Fishtail on long hair
  Here's another interesting option
  Fish tail
  Wedding option
 Option with curls
  Braid in ponytail
  With her hair down
  Two braids
  With decorations
  Fishtail is a popular hairstyle that has become a trend among celebrities. Models, pop singers and movie stars use it to highlight their popularity.
The fishtail braid is a decoration for a festive dinner or an everyday pastime. This weaving differs from the classic image. However, this is what attracts many girls. The hairstyle looks original and unusual. Some girls don't know how to braid a fishtail. Below is a diagram and photo of the execution technique. After studying these images, you can easily create a beautiful hairstyle yourself.
With some skill and experience, you can learn how to beautifully braid your hair in the form of an unusual braid. You can do this procedure for long and medium hair yourself at home. To do this, it is recommended to prepare all the necessary accessories:
Massage comb;

1. All curls must be combed back.

To make it easy to braid your own hair, it is recommended to make a tail before braiding. And secure your hair with a regular elastic band.

Options and methods for creating an attractive hairstyle may vary. So, a fishtail can start from the top of the head. There are different types of braids that are fixed at the sides.


For those who are already accustomed to traditional weaving, you can try different interpretations of the classic method. A festive option would be a braid braided at the back of the head. In this case, the hair on the top of the head should be heavily combed first. Thus, the hairstyle will have additional volume and look interesting from the front and back.


For women with long hair, you can try not braiding your hair too tightly. Thanks to this, you will get a romantic and gentle image. The end of the fishtail can be thrown over the shoulder. With this hairstyle you can go on a date with your loved one. It is relevant for classes at school or university. In addition, the braid can be done for work and everyday use.


For those with thick hair, it is recommended to make two braids. To do this, the hair is parted in the middle. After this, weaving is done on each part according to the method described above. At the same time, the braids can be braided to the end. Or the lower parts of the strands are left loose.


As decorations and accessories for this hairstyle, preference should be given to simple details. After all, the fishtail braid itself is stylish and beautiful. Therefore, it is not recommended to purchase large hairpins and elastic bands with rhinestones for this hairstyle.

The placenta is a unique organ that helps the baby grow, develop, receive all the necessary nutrients and...

A convenient and simple hairstyle for medium and long hair is a fishtail braid. It got its name because...

Modern cosmetologists use many different natural products to care for the face and body. One of them is...
A good housewife has everything beautiful in her kitchen. But how often the picture is spoiled by old burnt rags that are used for...

28 years of marriage is popularly called the nickel wedding. Nickel is a shiny and durable silver-colored metal. Besides,...

The musical mobile for the crib can be used from the first days of a child’s life. Such hanging toys are not only...

Many women have had to face betrayal and betrayal in love. Men you can expect...

A long time ago, on a distant island, Which was hidden from prying eyes, All Feelings lived in a deep mystery...

Everyone has at least once encountered a person wearing a bauble. This small woven bracelet is a symbol of friendship and...

The feeling of future motherhood is inherent in every woman literally from childhood. There is such a wonderful...

Size: 23.5x30cm. Knitted from “Iris” type threads with 0.75 crochet. It took approx. to form the berries. 20g. cotton thread with...

Karakulova G.K. On the stylistic and genre originality of the short story “Date” by I.S. Turgenev. Story "Date"...

Over the past few years, trends in the nail aesthetics industry have changed rapidly. They alternated with each other...

How to do a manicure using regular newspaper; what is required for preparation and procedure; how to do...
A convenient and simple hairstyle for medium and long hair is a fishtail braid. She got the name...

Modern cosmetologists use many different natural products to care for the face and body. One of them...