Master class on making a paper vase with your own hands
Valentina Zaitseva The spring holiday is approaching - Women's Day on March 8th. Teachers and children prepare crafts for...
..............................................................................................................................
..............................................................................................................................
Elastic 2 x 2: knit 2 knits alternately. p. and 2 p. P.; in purl knit loops in rows according to the pattern.
Elastic 1 x 1: in persons rows knit alternately 1 persons. p. and 1 p. n. In purl. rows of faces. knit a loop under the knitting needle (near below), purl. knit a loop purl.
Relief pattern: knit according to the pattern. The diagram shows only individuals. rows, purl knit loops in rows according to the pattern.
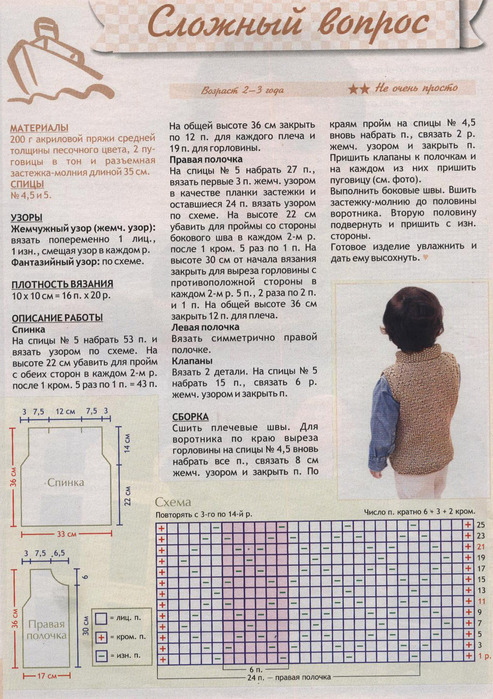
Before: on knitting needles No. 2, cast on 74 sts, knit 4 cm with an elastic band of 2 x 2. Then change the knitting needles to No. 3.5 and evenly decrease 10 sts per row (every 6 sts) = 64 sts. Then knit as follows: chrome p., 7 p. elastic 1 x 1, 48 p. relief pattern, 7 p. elastic 1 x 1, 1 chrome. p. At a height of 17 cm for the armholes, close on both sides in each 2nd row alternately 3 p., 2 p., 1 p. Knit another 10 cm straight. Then, to cut the neckline, bind off the middle 18 stitches and then knit each side separately. To round the neckline, close the inside of each face. row 5 times x 1 st. Close the remaining 12 sts of the shoulder in one step. Tie the other side symmetrically.
Back: knit similarly to the front, but without the neckline. To do this, at a height of 14 cm from the beginning of knitting the armhole, close 12 shoulder stitches on each side, and remove the remaining neck loops for additional stitches. knitting needle
Assembly: sew shoulder seams. Along the edges of the armholes, using needles No. 2, evenly cast on 86 stitches, knit 7 rows with a 2 x 2 elastic band. Cast off the loops according to the pattern. Sew the side seams. For a collar using knitting needles No. 3.5 along the neckline, cast on 74 sts evenly, starting from the left shoulder. Knit 13 cm with 2 x 2 rib. Bind off the stitches according to the pattern. Do not sew the side seam of the collar. Turn the collar towards your face. side. Sew 2 buttons on the front edge, and on the opposite edge make 2 button loops using a crochet hook.
Items associated with warmth and care are better for keeping you warm in cold weather. Therefore, you need to knit only with positive thoughts and in the most pleasant mood. If you are a happy mother of a boy and want to give your son a pleasant surprise, then a knitted sleeveless vest will be the best gift for him in the cool season. To complete this model of a sleeveless vest for a boy, you do not need any special skill. It is enough to have a little knowledge of knitting needles and be able to alternate the front and back rows.
To knit this model of a sleeveless vest for a boy with knitting needles, it is better to choose yarn that contains natural wool, because this time we are knitting a winter model of a sleeveless vest. If you want to make the same pattern for the warm season, then it is better to use 100% cotton for knitting. Just keep in mind that to knit a summer version of a sleeveless vest, you will need much less yarn, and you will need to cast on more loops.
Size: for 5-6 years. If you plan to knit for a boy of a different age, you can easily adjust the number of stitches cast on yourself.


ALIZE Cashemira yarn, which has all the benefits of cashmere. The yarn contains 100% merino wool. One hundred grams of yarn corresponds to a length of 300 meters. For knitting you need: 100 grams of white, 100 grams of blue and 50 grams of dark blue yarn.
Knitting needles No. 3.5 for knitting. Pattern: knit stitch: knit rows - knit stitches, purl rows - purl loops.


In order not to make a mistake in the size, you need to knit the sample with knitting needles. It’s better to spend an extra 10 minutes on this than to then re-knit the entire sleeveless shirt, if suddenly the knitted product is not suitable for your boy. We knit a sample with knitting needles measuring 10 x 10 cm. On this segment you should get 30 rows of 20 loops. If your number of loops or rows does not meet the requirements, then simply change the number of knitting needles, depending on the density of your knitting.
 Gray vest for a boy with a braid pattern
 Cast on 72 stitches with blue thread and knit 14 rows with 1 x 1 rib. In the last row, evenly add 2 stitches. Then alternate the threads as follows: *2 rows with white thread, 2 rows with blue thread*, repeat from * to * 2 more times. Then we knit 8 rows with white thread, 12 rows with dark blue thread, 8 rows with white thread, 2 rows with blue thread, repeat from * to * 2 more times, 8 rows with white thread, 12 rows with dark blue thread, 8 rows with white thread, 2 row with blue thread, repeat from * to * 2 times, 8 rows with white thread, 2 rows with blue thread, repeat from * to * 2 times, 10 rows with white thread.
At the same time, after 27 centimeters (i.e., after 74 rows) from the edge of the sleeveless shirt, decrease on both sides for bevels: 1 time x 6 loops, and then, in every 2nd row 5 times x 1 loop. After knitting 41 centimeters from the cast-on edge, leave 53 loops open. Is knitting really addictive??
We knit it like the back, but bind off the middle 3 loops after 27 centimeters for the neckline, and you should finish both parts separately. Decrease on both sides as follows: in every 4th row 7 times x 1 loop and in every 2nd row 5 times x 1 loop. After 41 centimeters from the cast-on edge, leave 13 loops on each side for each shoulder.
Sew one shoulder seam on either side. Then cast on 112 stitches along the neck using blue thread and knit 12 rows with a 1 x 1 elastic band. At the end, close all the loops.
 A brown vest for a boy is knitted with a bear pattern and a clasp on the shoulders
  The back of a children's vest with a bear pattern
 After tying the neckline, sew the second shoulder seam. Grab the edges of the neck of the placket as well.
Now all you have to do is tie the armholes of the boy’s sleeveless vest. To do this, cast on 90 stitches along each armhole with blue thread. Knit the armhole straps in the same way as the neck strap: with a 1 x 1 elastic band. When finished, all that remains is to sew the side seams. It is best to use a back stitch.
 Orange vest with openwork "flowers" with button closure
All! The knitted sleeveless vest is ready!
The finished product should be washed in a special detergent. After all, woolen items require delicate care. Under no circumstances should this sleeveless vest for boys be wrung out too much and hung to dry on a line. Lightly wring out the product and lay it out to dry on a cotton cloth in a horizontal position. As the fabric becomes wet, it is worth changing. And only at the very end of drying, when the product remains only slightly damp, can it be carefully hung on a rope to dry. Knitted items are delicate, handle them carefully.


Depending on your preferences, you can easily knit several things for boys using the above pattern. Change the colors of the yarn, the number of rows of a particular color, as well as the alternation of front and back rows. Each time you will get a new knitted item, different from the previous one. And working on this model for a boy will not be boring and will bring you only positive emotions.


 Black and white knitted vest for a boy with a tailcoat pattern
  Knitted vest for boys with diamond pattern and V-neck
  Pattern and description for knitting a vest for a boy with a diamond pattern
  Knitted vest with a hood for a boy and a “frog” pattern
 Due to the versatility of the relief patterns used for knitting, such a vest is suitable for both boys and girls, it all depends on the color of the yarn and your preferences.
All calculations are given for three sizes: 62/68 (74/80) 86/92, which corresponds to the age of babies from 6 months to 2 years.
To knit a vest you will need:
— wool yarn with a thickness of 105 m/50 g (100% superfine wool was used in the original; 105 m/50 g, pink) depending on the size – 200 (250) 300 g;
- straight and circular knitting needles No. 4 and straight knitting needles No. 4.5
— 2 buttons in tone.
Knitting patterns
Garter stitch: Knit all stitches in knit and purl rows.
Pearl pattern 1x1: alternately knit 1 knit, 1 purl, shifting the pattern in each row by 1 loop. The knitting density of the pattern is 19 sts x 34 r. = 10 x 10 cm.
Volumetric braid of 30 loops: knit according to the proposed pattern, repeating the pattern from the 1st to the 12th rows. The width of the pattern is approximately 11 cm. The diagram shows only the front rows in the purl rows of knitting according to the fabric pattern.

Volumetric braid pattern diagram:
Row 1: purl 2, knit 6, cross 6 stitches to the right (slip 2 stitches onto an additional needle and leave BEHIND the work, knit the next 4 knits, and then knit 2 from an additional needle), purl 2, cross 6 stitches to the left (slip 4 stitches on an additional knitting needle and leave BEFORE work, knit the next 2 loops - knit, and after 4 knit from an additional knitting needle), 6 knit, 2 purl;
2nd and all even rows: knit 2, purl 12, knit 2, purl 12, knit 2;
3rd row: purl 2, knit 4, cross 6 stitches to the right, knit 2, purl 2, knit 2, cross 6 stitches to the left, knit 4, purl 2;
5th row: purl 2, knit 2, cross 6 stitches to the right, knit 4, purl 2, knit 4, cross 6 stitches to the left, knit 2, purl 2;
7th row: purl 2, cross 6 stitches to the right, knit 6, purl 2, knit 6, cross 6 stitches to the left, purl 2;
9th and 11th rows: purl 2, knit 12, purl 2, knit 12, purl 2.
Repeat the pattern from the 1st to the 12th rows.

vest pattern diagram
Operating procedure
BACK
On needles No. 4, cast on 52 (60) 66 stitches and knit 5 rows in garter stitch (all knit stitches) to form the bottom bar. Then switch to needles No. 4.5 and knit, distributing the loops as follows: 1 edge loop (slip without knitting), 4 stitches in garter stitch, 42 (50) 56 loops in pearl pattern, 4 stitches in garter stitch, 1 edge loop ( knit purl).
Adhering to the given pattern, knit 17 (20) 23 cm from the cast-on edge.
To form armholes, (at a height of 17 (20) 23 cm) close 3 loops on both sides, in this case it is necessary to shift the pattern, extending the garter stitch by 3 loops to the middle of the product (on both sides of the vest). In each 2nd next row, decrease 1 loop 3 (5) 5 times, on both sides, in a special way, knitting together the loops of the pearl pattern and garter stitch. Namely: at the beginning of the front row, the last loop of the garter stitch together with the 1st loop of the pearl pattern with a slant to the left (slip 1 stitch, knit 1 knit stitch, and pull it through the removed loop), as well as knit the last loop of the pearl pattern together with 1 th stitch in garter stitch. After all the decreases, there should be 40 (44) 50 stitches left for the armholes.
After 26 (30) 34 cm from the cast-on edge, close off the middle 12 (12) 14 loops for the neck, and finish both sides separately. First, knit on 14 (16) 18 loops along the left edge, while closing and at the beginning of each next front row, close 1 time 4 loops and 1 time 2 loops.
After 28 (32) 36 cm from the cast-on edge, knit another 1.5 cm for the placket on the remaining 8 (10) 12 loops in garter stitch and bind off all the loops.
Next, knit on 14 (16) 18 loops along the right edge, at the beginning of each next purl row, close 1 more time with 4 loops and 1 time with 2 loops. After 28 (32) 36 cm from the initial row, bind off the remaining 8 (10) 12 shoulder loops.

BEFORE
On knitting needles No. 4, cast on 54 (62) 70 stitches and knit 5 rows in garter stitch, evenly adding 4 stitches in the last row.
Then switch to needles No. 4.5 and knit, distributing the loops as follows: 1 edge stitch, 4 stitches in garter stitch, 9 (13) 17 stitches in pearl pattern, 30 stitches in voluminous braid pattern, 9 (13) 17 p. pearl pattern, 4 p. garter stitch, 1 chrome p. = 58 (66) 74 loops.
After 17 (20) 23 cm from the cast-on edge, begin to form armholes, decreasing the loops, as on the back.
After 22 (26) 30 cm from the cast-on edge of the vest, close off the middle 14 (14) 16 loops for the neck and finish both sides separately.
First, knit on 16 (18) 21 loops along the left edge, and at the beginning of each next front row, close 1 time 4 loops, 1 time 2 (2) 3 loops and 2 times 1 loop.
After 28 (32) 36 cm from the cast-on edge, bind off the remaining 8 (10) 12 stitches of the shoulder. Then continue knitting 16 (18) 21 stitches along the right edge, at the beginning of each next purl row, close 1 more time with 4 loops, 1 time with 2 (2) 3 loops and 2 times with 1 loop.
At the same time, after 26.5 (30.5) 34.5 cm from the starting row, continue knitting for the placket in garter stitch. After knitting 2 more rows, evenly distributed, make 2 holes for buttons (= 2 stitches knit together, 1 yarn over). In the purl row, knit yarn overs. After 28 (32) 36 cm from the cast-on edge, bind off the remaining 8 (10) 12 shoulder loops.
ASSEMBLY
Moisten the vest parts and lay them out on the pattern, stretch them slightly if necessary, pin them with pins, and leave them on the pattern until completely dry.
Sew the right shoulder seam and side seams. To finish the neckline, use size 4 needles to cast on 76 (76) 84 stitches along the edge and knit in garter stitch. After 1.5 cm, loosely close all the loops. Sew buttons.
Knitted vest for babies from 6 months to 2 years – ready! Have a nice walk in a warm new thing!

we knit for children, a vest with knitting needles, a knitted vest for kids, patterns for knitting a vest
Dimensions: 56/62 (68/74) 80/86. You will need: 300 (300) 350 g of lilac yarn ONline Linie 16 Starwolle light (100% wool, 160 m/50 g); knitting needles No. 3; set of double needles No. 3; auxiliary knitting needle; 4 small transparent buttons and 7 large transparent buttons.
Facial surface: faces. R. – persons p., out. R. -outside p. Purl stitch: knit. R. - purl p., out. R. – persons n. Garter stitch: knit. and out. R. – persons P.
Double pearl pattern: knit 2 stitches alternately. satin stitch and 2 p. satin stitch, shifting the pattern in a checkerboard pattern in each purl. row. Elastic band 2/2: alternately knit 2, purl 2.
Special decreases from the right edge: edge, 4 stitches in garter stitch, knit 2 stitches together with a broach (remove 1 stitch, knit 1 and pull it through the removed stitch) or purl 2 stitches together. crossed; from the left edge: knit the penultimate and last loops before the bar together. or purl, 4 sts in garter stitch, chrome.
Knitting density. Persons satin stitch: 24 p. and 32 r. = 10 x 10 cm. Double pearl pattern: 24 p. and 32 r. = 10 x 10 cm.
On knitting needles No. 2.5, cast on 128 (148) 168 sts and knit between edges. 3 cm as follows: 4 p. in garter stitch for the fastener bar, 128 (148) 168 p. with 2/2 rib, 4 p. in garter stitch for the fastener bar, while making 1 hole for a button in the right placket at a height of 2 cm: Cast off 2 sts and cast them on again in the next row. At the same time in the last r. decrease elastic bands evenly 12 sts = 116 (136) 156 sts. Switch to needles No. 3 and knit as follows: chrome, 4 sts in garter stitch, 106 (126) 146 sts. satin stitch, 4 stitches in garter stitch, edging, while on the right placket at a height of 3 (4) 5 cm, 7 (9) 11 cm, 11 (14) 16 cm from the elastic, make 1 hole for a button. On both sides of the middle 54 (64) 74 sts (back), make marks with a contrasting thread. After 4 (5) 6 cm from the elastic in the next row, knit: chrome, 4 p. garter stitch, 5 (7) 9 p. knit. satin stitch, 16 sts set aside for pocket, knit 64 (80)96 sts. satin stitch, 16 sts set aside for pocket, k5 (7) 9 sts. satin stitch, 4 p. garter stitch, edge. In the next purl. row above the postponed loops, dial on 16 stitches again. After 10 (13) 16 cm from the elastic band, knit 4 rows on all loops. in garter stitch, then on the middle 106 (126) 146 stitches, knit with a double pearl pattern, and on the outer loops - with garter stitch. At a height of 12 (15) 18 cm from the elastic band for the neckline, decrease on both sides in every 2nd r. with special decreases 13 (15) 18 x 1 p. After 13 (16) 19 cm from the elastic, 9 p. on both sides of the marks, knit in garter stitch. After 14 (17) 20 cm from the elastic on both sides of the marks, close for the armholes with 4 stitches = 46 (56)66 stitches for the back. Set aside the loops. Finish the back and shelves separately.
Knit 46 (56) 66 sts according to the pattern, while for the armholes on both sides in every 2nd r. decrease by special decreases 5 x 1 st. After 21 (25) 29 cm from the elastic band, knit on all loops with garter stitch.
After 22 (26) 30 cm from the elastic band, close the middle 16 (18) 20 stitches for the neckline and finish both shoulders separately. Close the remaining shoulder sts at a height of 23 (27) 31 cm from the bar.
On the postponed loops of the right shelf, continue working in accordance with the pattern. Make an armhole on the left side, as on the back. At a height of 21 (25) 29 cm from the elastic band, knit in garter stitch on all stitches. Close the remaining shoulder stitches at the height of the backrest.
Left shelf: knit symmetrically. Pockets: Using knitting needles No. 2.5 on the set aside pocket stitches, knit between the edges. elastic band 2/2. After 2.5 cm, close all loops freely.
Assembly: sew shoulder seams. Sew the sides and bottom edges of the pockets. Sew buttons.
Even for the youngest girls, one year old, it is very important to remain beautiful. A knitted baby vest is a beautiful garment that can be worn to school or for a walk. A school vest is the dream of all girls; it is very easy to knit, and you can also find patterns and designs for such projects on the Internet.
Even for the little girls it is very important to remain beautiful
A knitted sleeveless vest is an excellent children's clothing that can be worn both in autumn and spring. Of course, sleeveless vests are also worn at other times of the year, even in summer, when the evenings are quite cool.
Knitting sleeveless vests is an easy and interesting activity. Mothers love to pamper their children, so why not learn how to make vests yourself?
Description of work:
Girls under 2 years old are very sick (especially girls under 1 year old), they can catch a cold from any hypothermia, which is why it is recommended to use wool yarn for such work.

Knitting beautiful vests is impossible without first knitting a sample
Master Class:
At the last stage, the protruding threads are cut off.
Things knitted by parents always delight children, especially little girls. How to knit a beautiful sleeveless vest for school?
Diagram below:
At the end of the work, the two blanks are sewn together.
Master Class:

You can choose a variety of colors
For this type of work you will definitely need:

You don't need many tools for this job.
When knitting clothes, it is very important to cast on the stitches correctly, because if there are too few of them, the product will turn out dense or small, and if there are too many loops, the clothes will hang shapelessly on the body. So, in order to make the correct calculation, you need 2 numbers: chest circumference and the length of the pre-knitted sample.
The following proportion is drawn up:
The number x is the desired one. The identity of the chest circumference and the size of the sample must be divided by the number of loops that were needed to knit the sample. The result will be the number of loops that need to be cast on.
However, there is one nuance that is not in the formula. The sleeveless vest is knitted in two separate parts, which are then sewn together. That is why the first number in the formula (chest circumference) must first be divided in half.
More professional knitting involves knitting the front part, the number of loops in which would be 2 or 3 more than the back part. Why? The little girl's chest is slightly wider than her back. That's why you need to knit a pattern.

Valentina Zaitseva The spring holiday is approaching - Women's Day on March 8th. Teachers and children prepare crafts for...

PROGRAM TASKS Enrichment of passive and active vocabulary Contribute to expanding children's understanding of the environment...

Olga Buzova was attacked by an unknown man during a concert in Dubai. The footage posted on Instagram shows...

Friends, we are starting to prepare for the next New Year season. We are putting together master classes on . The pioneer will be like this...

Verbnaya (Verbnitsa) and Easter rag dolls. Traditions are being revived. The folk patchwork doll is becoming the most...

In the modern world, pagan and Christian traditions are closely intertwined. The interaction of the ancients is especially noticeable...
Svetlana Markova Beauty is like a precious stone: the simpler it is, the more precious it is! Contents Often...

string(10) "error stat" string(10) "error stat" string(10) "error stat" string(10) "error stat" string(10)...

People have admired the beauty of healthy hair since ancient times. Some peoples attach special importance to them. Thai...

The question is what is more important: the proper upbringing of a child or providing him with a fundamental education...
Why are we so calm and relaxed when we are in the water, or the water flows smoothly over our body?...

Inga Mayakovskaya Reading time: 7 minutes A Some women look forward to the birth of their grandchildren, while others...

Greetings, my dear ones! Today I will tell you about an insidious and very common mistake many women make...

PROGRAM TASKS Enrichment of passive and active vocabulary Contribute to expanding children's understanding of...

Olga Buzova was attacked by an unknown man during a concert in Dubai. In the footage posted on Instagram...