Sew socks from an old sweater
Useful tips The time has come when we all start to warm ourselves up and pull sweaters out of the closet. But if you noticed...
The lesson is based on my daughter Varya’s hat. She is 2 years 3 months old. But, knowing the technique, you can knit this classic hat to any size.
Yarn COCO 100% cotton. In 50g. 240 m. It took about 35 grams of green yarn. And for the flower - a little milk. Hooks No. 2.25 and No. 1.75.

Photos enlarge when clicked, so you can see everything in detail!

Before you start knitting, you need to take measurements from your head:
1.
Head circumference. We draw a measuring tape horizontally above the eyebrows and along the level of the most protruding part of the back of the head. In our case, the head circumference is 48 centimeters.
2.
Depth. If we want a cap in depth to the beginning of the eyebrows, then we draw the tape from the middle of one earlobe to the middle of the other earlobe through the center of the crown. In our case, this measurement is 36 centimeters.

If we need a hat to the middle of the eyebrows, then we measure the depth not from the middle, but from the end of the lobe of one ear through the center of the crown to the end of the lobe of the other ear.
Crochet hats are most often crocheted:
1. From the bottom to the crown. The advantage of this method is that if we take a straight fabric pattern for a hat, it will not be turned “upside down”, but will remain as is, since straight fabric patterns are read from bottom to top, and the hat is knitted from bottom to top. This is where the advantages end. Disadvantages: you need to knit a sample in order to calculate the loops at the beginning of knitting. You can, of course, make a “cunning move”: pick up a chain of chain stitches, wrap it around your head and knit according to this “calculation”, but then the evening will be wasted, because we are unlikely to get the size right. Only a full-fledged sample and calculations based on it! Another disadvantage of knitting from the bottom is that we will not get such a perfect crown, unlike knitting a hat from the top. Although this does not apply to all patterns.
2. From the top of the head - from top to bottom. This method is chosen probably in 90% of cases, primarily because it gives the perfect crown and makes it easy to adjust the size while knitting. I myself crochet hats from the top of the head, and I recommend the same to you.
Today we will knit a hat with double crochets.

How to knit the crown of a hat?
The crown of the hat is knitted in the round. The main part and the rim are a pipe. There are certain rules for forming a circle.
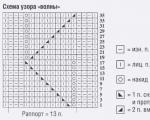
For a circle of double crochets they are:
Row 1 - knit 12 dc;
2nd row - 24 CCHs: 2 CCHs are knitted into each column of the previous row;
3rd row - 36 Dcs: 2 Dcs are knitted through a post;
4th row - 48 Dcs: 2 Dcs are knitted through two columns;
5th row - 60 Dcs: 2 Dcs are knitted through three columns;
Row 6 - 72 Dcs: 2 Dcs are knitted through four stitches, etc.
Thus, to increase the diameter of the circle, 12 stitches are added evenly in each row by knitting two stitches into one loop in each wedge. There are a total of 12 wedges in this circle of double crochets. Options for distribution of increases:

Choose the method of increase that you like best. I use the second method - I add an increase at the end of each wedge.
If we tie 13 wedges instead of 12, then before moving to the pipe, the circle will look neat:

But, when we move on to knitting the main part, it turns out that the top of the head is folded, which is why it doesn’t look quite neat, and to give the hat a neat look, you’ll have to work hard with an iron with steam:

The diameter of the circle up to which you need to knit the crown is calculated using the formula:
Divide the head circumference by 3.14 (Pi).
48 cm: 3.14 = 15.3 cm. This is also the diameter of the widest part of the hat.
In order for the hat to fit your head beautifully, the transition from the top of the head to the main part of the hat must be made smooth. To do this, subtract 3 -3.5 cm from the calculated diameter of the circle.

After that, we knit these remaining 3-3.5 cm to the required diameter with increases through a row: a row with increases, a row without increases, a row with increases, a row without increases, a row with increases. As a result, the crown will gradually and neatly round, like a dome.


Some beginners have a problem - noticeable gaps in the places where the row closes.

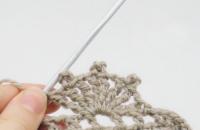
The reason is that when knitting a connecting loop, the hook is inserted between the lifting loops and the post that follows them. In the photo above it is marked with a black circle. The hook must be inserted into the third air loop under the top and middle threads (blue arrow in the photo), and the connecting loop must be knitted tightly. Then there will be no gaps.
Having knitted the top of the head, we move on to the main part of the hat, which we will knit with a pipe.
I think this knitting is a great choice and solves the seam problem!
Is there another way to solve the seam problem without resorting to spiral knitting?
There is such a way.
We start the row with two lifting chain stitches and at the same point where the chain stitches are knitted, we knit a double crochet. We knit a row. Tied up. We close it not into the second lifting air loop, as we would have done before, closing the row by knitting a connecting stitch into the top lifting ch, but into the base loop of the next double crochet. In the photo, the place where the hook is inserted when closing a row is shown with a red triangle. This will move the row a little to the left.

Even this method will not give a completely perfect seam, and it will still be a little askew. But after ironing with steam and a little leveling with hands, we get a good result.


The diameter of the cap should be: head circumference: 3.14 = 15.3 cm.

The headband of the hat in our example is tight-fitting, so I took a hook that was full size smaller. Knitted in a spiral with single crochets. We determine the height of the rim as desired: 2-4 cm. The last row was knitted like this: single crochet, 2 chain stitches, skip a loop of a stitch at the bottom, and a single crochet in the loop of the next one. The edge turned out to be in the form of a small picot.
How to determine without trying on whether the depth of the cap is accurate?
To do this, fold the cap in half and measure it from the top of the head to the edge. You should get a number: a measurement from the lobe of one ear to the lobe of the other ear, divided in half. In our case, 36 cm: 2 = 18 cm.

I tried to take model shots. But first, my Varya rushed off somewhere along the windfall.


Then on the site she saw a nest of firefighter beetles. And in general there was no time for photographs. My daughter studied them with such curiosity that I gave up and covered the camera.

I thought about taking pictures at home, but she found the book about chicken more interesting
I didn’t bother to distract.

I tied a flower to the hat: something between a chamomile and a water lily. Daisies give joy, and water lily- magical flower.
I knitted it without a pattern, just as the crochet went. And, only after sewing the flower to the hat, I remembered that I had not written a description for it. Suitable like this:

Adjust the number and height of the petals as desired.
We knit a ring of air loops. A row or two - single crochets. Then the petals, and the last row - we tie all the petals with single crochets.
Such a hat can be decorated with any knitted flowers and entire flower beds, knitted butterflies, and various appliqués. You can knit a hat with multi-colored stripes. Instead of the proposed headband, you can knit a beautiful openwork border...
In short, there are a million options. The main thing is technique, love of knitting and imagination.
I also like these hooked hats because they fit perfectly on the head and do not ride up, unlike many store-bought knitted hats without ties, in which the child turns his head twice and his ears are bare.
If you are planning to crochet a hat but don't know where to start? Take advantage detailed description, tips and recommendations that are set out in the article. Stock up on threads, a little patience and get to work.
Before you begin, prepare everything required material. You will need:


Before finishing the piece, think about how you can decorate the hat. Perhaps it will be a cute knitted flower, pompom or brooch.
It is unlikely that anyone will object to the fact that a hat is an essential attribute of the wardrobe, especially if you do not live on the equator. And even there she will find her fans among adherents of a bright style, rock musicians and those who like to diversify their lives, because with the help of this headdress you can not only protect yourself from the cold, but also express your individuality. Hats are knitted from the most different materials. Hats differ in purpose, style, and style. Choose any one - depending on your taste, time of year, gender, religious beliefs, the color of your clothes, as well as where you are going to go. It could be a beanie, cap, yarmulke, beret, turban, fez, boyarka... As a child, you probably had
For a man, during the cold northern winter, earflaps will be indispensable, and during a visit to royalty, a top hat will be indispensable. A beret will suit a respectable lady or a playful girl, and for a wedding you can wear an openwork snow-white cap, crocheted. By the way, crocheting a hat is not particularly difficult. The technology is very simple and you can learn in a very short time.
First of all, you need to decide what you want the finished product to look like. Depending on this, the thickness of the hook and thread, their color and texture are selected. If you take a narrow hook, medium-thick yarn and knit in continuous rows, the hat will turn out to be very warm, almost not blown by the wind, since the knitting density will be high. In the case when you need additional insulation, it is recommended to sew on a lining (for example, if you need a hat for a child), which is a piece of fabric or a knitted back of the product that duplicates the top layer.
You can also take a rectangular or trapezoidal fabric as a base and then pull it together with thread on one side. It turns out that you are knitting across. However, in the traditional design, the rows go one after another in a circle - you start at the top of the head and end at the forehead. Or vice versa - move up, decreasing the number of loops towards the end, and start knitting with an elastic band. By the way, it can be embossed or knitted with single crochets (along the circumference of the head) behind the back wall.
You can make brim, then you will get a hat or panama hat. The main part of the headdress is called the crown. It can be knitted separately from the bottom, which crowns the hat on the top of the head.
In order to knit a hat, you need to find out the volume of the head and the height of the hat, and to do this, take measurements. The measurements must be taken correctly - we need to know the length of the desired product from the forehead to the back of the head and from ear to ear. Also measure the circumference of the head at its widest point (find the protruding point at the back of the head), as well as the circumference where the edge of the hat will pass (measure directly through the ears, if it will cover them). 
Next you need to calculate the number of loops. It's simple: you select the desired model, go to the “Crochet hat, description” section and knit a small sample according to the pattern indicated. Then you apply it to a centimeter or ruler and see if the numbers match the calculated ones. If not, try changing the knitting density, the thickness of the yarn, or using a hook of a different diameter. When you use threads of different colors, make sure that their thickness is the same (you can knit in two or three folds).
A crocheted hat for women (and children) can be decorated with appliqué, fur inserts, sequins, tassels or pom-poms, which in turn can be made from warp or contrast yarn or fur. In the latter case, it is better to make a removable pom-pom to make it easier to wash the hat.
The finished product requires wet-heat treatment. By the way, we recommend doing the same with the sample - you will immediately see how the yarn behaves. Pay attention to the label that was on the purchased skein, which should indicate how to handle the yarn. The product must be carefully wetted, lightly squeezed, and laid out on a terry towel. Knitted hats (crocheted or knitted) can consist of several parts - in this case, they all need to be sprinkled with water (or wet, wrapped in a warm, damp towel) and then, placed between layers of fabric, dried. When the hat is dry, it should be carefully steamed.
Nowadays, hats are very fashionable (and not only among children, but also among girls and even young people who do not lack a sense of humor) made of bright yarn, imitating animals - these are hares, foxes, wolves and even fairy-tale creatures. Hats with ears, long tassels, ethnic motifs, and stylish berets, which are popularly called “like Nagiyev’s,” are also popular. Choose any model to your liking, don’t be afraid to start, and very soon you’ll have a great one. knitted hat– crocheted or knitted, according to your choice.
Hat - a pilot's helmet for spring (autumn) for a boy. YarnArt “JEANS”, composition: 55% cotton, 45% acrylic. Size for 1.5-2 years (head circumference 47 cm).
Crocheted hat-helmet today. The Internet is full of options for similar hats. And here is mine. To avoid seams, I knitted in rows in a spiral using single crochets.

Work by Evgenia Rudenko. This hat is very easy to knit. Without calculating increases and decreases in a circle. During assembly, the pipe is pulled together at the top. And the hat is ready. In fact, you can take any other pattern and use it to knit a pipe in the round without any increments, and then pull it off at the top of your head.
To knit the hat, the yarn used was Gazzal Baby Wool, I really liked the thread, soft and warm, composition 40% merino wool, 40% polyacrylic, 20% cashmere.
Hat size: 54-56. I crocheted No. 2 from wool blend yarn 340m x 100g. in two threads. Consumption is about 50 g.
If you add a lining to it, you can wear it in winter. I have been knitting and wearing this pattern for several years. Friends will see and order. The hat is knitted from the bottom in circular rows.
The work of Natalia Trusova.
I present to your attention a beautiful crocheted hat for a baby. Yarn 50% wool 50% acrylic. I knitted according to the pattern that is attached. Head circumference 44-46 cm. Colors alternated in 4 rows each. Ordinary pompom. Ties: I tied threads of the required length through a loop to the tip of the ear and braided the braid loosely.
Cap size: 56-58 cm.
You will need: 50 g each of Vista yarn and viscose silk; some dark yarn for finishing; hook number 2.
The hat with a flower is the work of Olga from Irkutsk.
Hat size: 56-57.
To knit a hat you will need: 100 g of white yarn (50% wool, acrylic 50 96, 280 m x 100 g) and 15 g of fuchsia yarn (100% wool, 200 m x 100 g); hooks No. 3 and No. 4.
Roxanne's work. Autumn hat for a 1.5-2 year old boy, knitted from Kamtex Nadezhda threads, hook No. 3. The hat itself is knitted very simply: we knit the bottom without increases according to pattern No. 1, then we knit 1 row without increases, a row with increases, and continue knitting the hat to the desired depth. The size of the bottom of the hat can be found out using the table and measuring the child’s OG.

Work by Olechka Kuts. Crochet hat for daughter with cat ears. The hat is knitted from 100% cotton Semenovskaya LILY 400m/100g, almost the entire skein is gone. I used a hook number 1.5 to make the hat tighter
Work by Alena T.
Once upon a time I saw the same one on the Internet, but unfortunately I don’t remember where, so I decided to write a description myself.
I knitted it from Nako yarn (I think Sirius), the yarn itself is made from a double thread, but I knitted it twice, that is, in four threads, hook 4. It took about one skein for two hats.
Work by Olga Izutkina. The black turban is knitted from Pekhorka Narodnaya yarn, 100g 220m, one ball of two threads per head circumference 57cm, crochet number 3. Emerald knitted from Vita Brilliant, consumption 200g, hook No. 2. I knitted two rectangles 110 cm long and 10 cm high (you can adjust the parameters from 100 to 120 cm and height from 9 to 12 cm) and sewed them according to the pattern.
A hat is crocheted from Pekhorka Merino (50% merino wool, 50% acrylic; 200m/100g) with crochet number 5. It took less than 1 skein per hat.
Hat size: for OG 54-56 cm.
The cap does not fit tightly to the head.
Cap size for OG 54cm.
You will need: Alize Superlana yarn (75% acrylic, 25% wool; 100g/280m) and hook number 5.
The video should load here, please wait or refresh the page.
In this post I want to tell you how to crochet a baby hat for beginners and provide you with my first step-by-step tutorial. Please don't judge strictly.
Since I don’t have a lot of experience in knitting, but just a little, I spent a lot of time and very carefully scouring the Internet for hours, and looked at a bunch of pages for the queries “how to crochet a hat”, “crochet a baby hat”, “crochet a hat " etc. In my step-by-step MK "Crochet baby hat for beginners" I will try to optimize and put together all my searches, and I hope that in a few days you will be able to pamper your child with a new, beautiful hat.
I crocheted my hat from leftover yarn, and it took me a little time - only 1 day, it would have been faster, but the child takes up the lion's share of my time.
So, let's begin. First, we need to decide and calculate the size of the children's hat. In order not to burden you with long measurements and calculations, I offer you the already calculated dimensions in the picture:
First we need to knit the bottom. We knit it with single crochets in a spiral (I like this method the most, since the seam is not visible). But there are other ways to crochet a hat, now I will show you the patterns.
Crochet hats, knitting patterns:
But if you decide to knit using the 3rd method, like me, that is, in a spiral, then let's get started:
2. 2 sc in each loop (12)
3. 1 sc, increase = repeat 6 times (18)
4. 2 sc, increase = 6 times (24)
5. 3 sc, increase = 6 times (30)
And so on until we get a circle - the bottom of the size we need; during the knitting process we measure it with a centimeter or a ruler. A few rows before the end of knitting, we knit the bottom in a row without increments - so that the transition is smoother. For example, I knitted the bottom up to 10 sc, increase - repeat 6 times. After 8 sc, increase - 6 times, I knitted a circle without increase, then I knitted 9 sc, increase - 6 times and again a circle without increase. Then I knitted 10 sc, increased 6 times and got the circle bottom of the size I needed. I think everyone understands. I knitted a hat for a 1-year-old child using 1 thread of Yarnart Jeans thread, it took less than half a skein of blue and half a skein of black. I used hook #3.
Now we simply knit in a spiral, without increases or decreases, to the depth we need. In my case, the depth of the hat is 15.5 cm. In order to measure it, you need to fold the hat and place a ruler/centimeter in the middle, from the highest place (top of the head) down. If you want to tie a hat with a crayfish step, then do not knit 0.5 cm to the required depth, and if you want to do it like I did - I tied 1 row with a blue thread, and then knitted a crayfish step with the same thread - do not knit it to the required depth 1-1 .5 cm depending on the thickness of your thread. I tied the hat over the ears.
How to knit a crab step - watch the video
Ears for a crochet hat: we finished the hat and knitted it to the depth we needed. We knitted the last loop of the connecting stitch (SS), pulled it through and broke the thread if you want to make ears of a different color. Now we attach a new thread (you can leave the one that was there - do not break it) if you have ears of the same color.
Ears for the hat:
1.2.3 row 1 lifting loop, 14 sc.
4, 5 row -1 loop ascent, decrease, 10 sc, decrease
Row 6 - 1 lifting loop, 10 sc
7,8,9 row - 1 lifting loop, decrease at the beginning of the row, sc, decrease at the end of the row. As a result, you will have 3 loops left. We will thread ties through them.
We also knit the 2nd eye. In my hat, the distance between the ears was 25 loops. I measured it like this - I put the hat on the child, and put the knitted ear to his ear, then carefully took it off and folded it in half, marked the intended place of the second ear of the hat with pins, tried it on again and crocheted the second ear for the hat.
For clarity, here is a crochet hat with a bunch of notes.
In the cold season, a person cannot do without additional insulation. Helps the body avoid hypothermia outerwear. You can protect your head from the cold with a knitted hat. Moreover, in the fall women have more free time to do handicrafts. And trying to keep themselves busy somehow, they love to make various nice things with their own hands. We offer options for hats that a beginning knitter can knit.
The product can be knitted using knitting needles or crochet. And even if it seems that the second method is more difficult, it will allow you to create an extraordinary new thing for your wardrobe. It will also allow you to while away the evening doing something creative.
As in any creative process, the preparatory stage is important in knitting. And the completion time, labor intensity and final result depend on how correctly it is carried out. The preparatory stage includes the following actions.
The better prepared you are, the more enjoyable this activity will be for you. The time required to complete the work will also be reduced.

Purchasing a suitable yarn option is one of the most important stages of knitting. To avoid making a mistake, you need to decide on the following characteristics of the product.
Reference! If you want to knit something that can be worn throughout the cold season, use high-quality acrylic.
Important! You can check the softness of the yarn by placing a yarn sample (any store should have untied yarn samples) against the skin on your cheek.
The information on the label will help you choose the right hook size.. Each manufacturer specifies a recommended tool.
As for the material from which the instrument is made, this is an individual matter for each craftswoman. You can take wooden or metal, plastic or bone. All options are good, but metal is more reliable.
Taking the required measurements correctly is another important stage preliminary work. For this you will need the following information.
If you are not sure that you will take these dimensions correctly, you can use the approximate data from the table.

For your first experience in making hats, it is better not to choose complex models.. Don’t think that simple stitch knitting won’t allow you to create a unique item. Just look at this option for beginners.

This model is made from top to bottom. To begin, dial 4 v. etc. and connect them into a ring. Next, knit according to the pattern.
Knitting pattern

Of course, this is the simplest option. But if you add to it an unusual decor in the form of a flower, shell or butterfly, you will get an original, attractive little thing.
You can also use a beautiful brooch or embroidered applique, bead pattern or bells as decoration. In general, everything that your imagination is enough for.
Knitting a women's headdress will depend on its shape: classic, beret, beanie or another option. Any of them can be knitted by a needlewoman with the most basic level of skill.
You can choose different patterns to work with.
The hook gives room for flight of fancy not only in relation to openwork models, but also in working with rather dense things. It can also be used to create various weaves similar to knitted arans. This pattern holds its shape remarkably well and does not allow the product to deform. At the same time, it gives the model a special sophistication and charm.
Women's hat Pink miracle

For this incarnation you you will need approximately 100 g of wool yarn and a 2.5 hook.
Most often, this headdress is knitted on knitting needles, but there is an option to make it using a hook. It's done crosswise knitting single crochet stitches. The upper part is formed by knitting 6 wedges.

Let's look at the manufacturing process step by step
This is how 1 wedge is knitted. The rest are performed in the same way.
After finishing knitting, sew the wedges together. Make a pompom and sew it at the top point of the hat.
With this tool you can not only knit stylish things for women's wardrobe. Even more adorable hats can be made for little beauties. After all, mothers really want their fidget to not only be properly insulated, but to look beautiful and stylish.

This adorable baby hat is crocheted from baby wool yarn in a fan pattern. To implement this you will need a skein of pink thread with parameters 400 m\100 g.
Knit the bottom of the hat in a circle, starting with a ring of 4 sts. p. Continuing the work of the CSN. And also make the necessary increases for expansion. Having reached the required diameter, knit according to the pattern.

Finish work next to the CCH. For ties, weave two thick braids. Decorate the top of the product with a pompom.
As you have seen, crocheting a stylish and beautiful hat is not so difficult. All you need is desire and a little imagination.
Even loops for you!
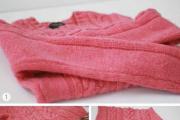
Useful tips The time has come when we all start to warm ourselves up and pull sweaters out of the closet. But if you noticed...
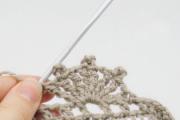
Crocheted picot (or, as it is also called, pique) is the simplest, but at the same time, beautiful pattern for...

Geox is the brand that gave the world breathable shoes. The Italian company Geox creates and produces outerwear and shoes for...

One of the most beautiful and favorite childhood fairy tales is “The Snow Queen”. Many of us have reread the fairy tale several times...

Contents Introduction………………………………………………………… ………………3 Chapter 1. Theoretical foundations of the problem of organizing leisure time for persons...
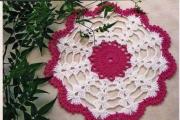
Craftswomen prefer to begin their crochet training by implementing simple napkin patterns. Unfortunately, in...
Spring is the time to replenish your wardrobe with bright and beautiful new items. The talented fashion designer shared...
A warm and cozy sweater is one of the basic things in a woman’s wardrobe. You can knit a sweater with knitting needles from either a light...
You can weave beautiful, original things from bright little rubber bands. As a rule, of particular interest...

In obstetrics, the term “frozen pregnancy” refers to the cessation of fetal development up to 28 weeks...

Nails coated with shellac always look beautiful and neat. And if you glue rhinestones on them, then a manicure...

The thirteenth anniversary is associated with the number thirteen, and since this number does not have a very good reputation,...

You have passed the newborn stage. Already in the second month of a child’s life, you begin to understand his personality. You also...

Quarrels and squabbles are a common occurrence in our lives. One is good, but two is better. Training a baby nutria in...
Crocheted picot (or, as it is also called, pique) is the simplest, but at the same time, beautiful pattern...

Geox is the brand that gave the world breathable shoes. The Italian company Geox creates and produces outerwear and...