Decoration of windows and panels based on the fairy tale “The Snow Queen”
One of the most beautiful and favorite childhood fairy tales is “The Snow Queen”. Many of us have reread the fairy tale several times...
Spring is the time to replenish your wardrobe with bright and beautiful new items. A talented fashion designer shared an accessible sewing pattern stylish cardigan with dolman sleeves which will decorate a woman of any age. Moreover, now such a thing is at the peak of popularity!
With this pattern you will be able to sew cardigan in one evening, and the next morning you can walk around in your new clothes. In addition, the item is so versatile that several interesting models can come out of one pattern.
It's easy to change the size to suit you. Another plus is the fact that this model looks great on both thin girls and curvy ladies with size XXL.

Stitching DIY cardigan, you can save a tidy sum: such a stylish thing is not cheap. I didn’t expect that I could do it either! This wardrobe staple looks amazing!
Significantly different from store-bought ones. They give off warmth and positive energy that you put into your work. It's always nice when no one else has something like you!
Cardigans of various styles are always present in the fashion collections of the world's leading fashion brands. For example, today it is not short fitted cardigans with buttons that are more popular, but long models without a fastener. This is quite easy to sew, even if you are a novice seamstress. In some cases, you don’t even need a cardigan pattern. Gain experience and try to sew a more complex model.
You can either knit or sew your own unique cardigan model. Not every fabric is suitable for sewing a comfortable and beautiful thing. For this purpose, it is best to opt for a fabric such as tweed. This is an elastic soft material with a textured and pleasant-looking texture. Products made from tweed are very comfortable to wear, do not require ironing, and always look stylish and neat.
Another good material to sew a cardigan with your own hands is mohair, the main part of which is natural angora. Thanks to this, mohair is so delicate, fluffy, soft and cozy. Things made from it, despite the volume, look airy and elegant.
Cashmere cardigans look great, which is not surprising since it is one of the most expensive wool materials in the world. Cashmere has a silky, soft, flexible structure that holds its shape well. The only disadvantage of a cashmere cardigan is the high cost of the fabric.

A knitted cardigan looks great - it is a mixed fabric that has remained at the peak of popularity for many years due to its affordable consumer properties, convenience, budget price and lack of complex care. A certain disadvantage of knitwear can be called its ability to fit and highlight any flaw in the figure. Knitwear items require careful fit.
Wool is also a good option for a cardigan. But it should be borne in mind that wool is not only natural, but also a very warm material. Therefore, a cardigan knitted from natural wool is best worn in the coldest time of the year.
Boucle is another type of mixed fabric in which natural and synthetic fibers are intertwined into an original relief texture, which is why any wardrobe item looks quite voluminous. This should be taken into account when choosing a cardigan model.
For this model you will need a rectangle of knitted fabric 1 m long and 1.5 m wide. If you want to spend a minimum of time, this is the ideal cardigan, the pattern is simply elementary. It is enough to take a single measurement - the circumference of the arm directly above the elbow, where the sleeve of the product will begin. The hand will need to fit into it without effort. The sleeve width can be narrowed at the cuff if desired.

Now you need a cardigan pattern directly on the fabric. Lay it out and cut a square measuring 1x1 m - this is the cardigan itself, the rest of the fabric will go to the sleeves. Fold the canvas in half with the right side inward, lay lines along both edges, not reaching the fold by the number of centimeters that is equal to half the measured arm circumference.
For the sleeves, cut two rectangles 50 cm long and the width of the measured arm circumference. Having folded each of these rectangles in half, you need to stitch them into the pipe one by one, and then sew the resulting sleeves into the remaining holes in the main part. Now you can hem the bottom of the sleeves and finish the edges of the cardigan.

In the summer months or on vacation, a smart and light cardigan made from natural fabrics would be an excellent option. Linen with embroidery will look very good.

The basis of the cut is a flared kimono. There are only two necessary measurements: chest girth and chest height. The cardigan pattern is built directly on the fabric, which is folded in four layers and the cutting details are cut out, taking into account seam allowances. Having cut the product, all parts need to be sewn with a straight machine stitch, finishing the edges with an overlocker.

At the same time, adding color and finishing the edges will help, for example, a fringed braid.
For this trendy item you will need 2 meters of soft knitted fabric. The cut is folded in half lengthwise and the cardigan pattern - front, back and trims - is transferred onto it. All details will be received in duplicate.

Cut them out, leaving some room for seam allowances, and start stitching. To begin, place the back pieces together and sew the middle seam. Attach the shelves to the back with the right sides facing each other, that is, inward, pin them together, stitch the shoulder seams, and then the side sections.

Place the plank parts facing each other and sew a short cut. Pin the placket to the edge of the cardigan face to face and stitch along the entire length.
The last step is to tuck the edges of the cardigan at the bottom and hem it, and also hem the edges of the sleeves.
A cardigan is one of the most versatile wardrobe items of a modern person, because various cardigans can be chosen for any occasion, look and time of year. Even in the summer heat, when there is a breeze, you can throw a light cardigan over your swimsuit and go for a walk along the embankment.

You can make a piece of clothing with your own hands, even if you don’t know how to sew a cardigan and don’t know how to sew on a typewriter or knit. An unusual thing can be created in a couple of minutes from a familiar large stole.
To do this you need to master only two movements:
1 - the stole must be folded in half lengthwise.
2 - tightly tie the loose corners at the top into a small knot and unfold. The stole acquired two wide armholes. If you put your hands through them, the knot will be in the back area.
The result is an original loose cardigan, which at any time, if desired, can again become a stole.
fb.ru
Recently, cardigans have come back into fashion. And although the classic cardigan is a knitted wool jacket that is tailored to the figure, without a collar, with buttons, and with a deep neckline, modern models look different. They are not only knitted, but also sewn from various fabrics (cotton, silk, viscose, knitwear, etc.), fitted and loose-fitting, with set-in sleeves and dropped armholes, etc. But the most important advantage of a cardigan, My opinion is versatility, the product fits almost any style of women's clothing and looks nice on any figure. In addition, anyone who knows even a little sewing can sew a cardigan without a pattern with their own hands. Don't believe me? And you try, especially since we will cut fabric from a rectangle... details... rectangles. Measurements and calculations are minimal. So, let's go! :-)
Cardigan with a loose straight cut (oversized style), without side seams, under the belt, collar - kimono placket, sleeve with a lowered armhole, the bottom of the sleeve is decorated with a cuff, the product is hemmed with double stitching. A very simple model that is easy and quick to sew.
What do you need to sew a cardigan? Of course, first of all, taking the necessary measurements:
When cutting, we will focus on the larger measurement. If your hip girth is larger than your chest girth (or vice versa), we will start from it.
Then we go to the store and choose fabric for sewing. My choice settled on melange knitwear with a width of 180 cm. Due to the width and small girths (relevant for girths up to 100 cm), one meter was enough for me to sew. If the fabric width is 150 cm or the girth is more than 100 cm, you need to choose one cardigan length plus the sleeve length. For example, the length of the product is 80 cm, and the sleeve length is 60 cm, you need to dial on at least 140 cm plus you need to take into account seam allowances.
The beauty of this cardigan model is that it can be sewn not only from knitted fabric, but also from any other soft fabric. Moreover, using this pattern you can sew a jacket, robe, or kimono.
You won’t believe it, but there is no cardigan pattern as such; cutting takes place directly on the fabric. Our purchased rectangle of fabric needs to be cut correctly into rectangular pieces. Look carefully at the diagram. Let me remind you that the cutting is given for fabric with a width of 180 cm. If the width of the fabric is 150 cm, the sleeve details are shifted down.
My measurements:
We cut out:
The rectangles are cut out, but that's not all. Fold a large rectangle 110x80 cm in half along sides 110 cm (55 cm each), mark the center with a pin, then divide 55 by 2, we get 27.5, this will be the width of the shelves, bend them to the center as in the photo and picture:
From the central point we will put 3 cm down, 9 cm to the right and left, connect the points with a smooth line, this is the line of the back sprout.
We shape the shoulder bevel - we put 5 cm down on the sides of the rectangle. We shape the shoulders with a straight line. Cut off the excess.
Many people are interested in the balance of the product. The cut of such a cardigan is loose and balance can be neglected. But if you have a stooped back or a very large chest, the shoulder slope may vary - for stooped shoulders: put not 5, but 2-3 cm down the back, for a high chest: 2-3 cm along the shelf.
Let's move on to the sleeves for now. We put the sleeve parts together face to face inward. Mark the center point along the 38 cm side (divide by 2 and get 19 cm).
We put 5 cm down from the sides of the rectangle, connect it with a straight line to the central point, the edge can be slightly rounded.
If you set aside 3 cm for balance along the back or front, then you set aside the same amount on one side (in this case, be sure to mark where the sleeve will be sewn to the front and where to the back.
There is another way to cut the sleeve - attach it to the shelf in such a way that a straight line is formed as in the photo, cut off the excess:
To determine the length of the sleeve, you need to measure the shoulder length of the cardigan, subtract 2 cm for seam allowances and subtract this measurement from the sleeve + shoulder length test measurement. This will give you the length of the sleeve pattern for the cardigan. If you want a sleeve without a cuff, add 2 cm to the resulting measurement for the seams and you can cut further. If you want a sleeve with cuffs, you need to subtract half the width of the finished cuff from the resulting measurement. The finished cuffs will be 4 cm wide, divide in half, 2 cm, subtract from the sleeve length.
Measure the length of the sleeve down from the center point. To the side we measure ½ the length of the cuff plus 1 cm. In our case, 11 cm to the left and to the right. Connect the dots as in the photo. Cut off the excess. The result is a sleeve.
From the central point down the shelves we will set aside 25-28 centimeters, connect them to the shoulder points with a smooth line, and draw up the front shelves along the neckline and center. Cut off the excess fabric (triangles as in the photo below).
Next, we measure half the length of the “round” - from the central point to point 5. We return to the main part. From points 5 along the shoulder, we set aside the length of the “edge” of the sleeve, set a control point, make cuts to this point and go slightly deeper by 1-2 cm, making an armhole, as in the figure.
Be sure to measure the length of the armhole and the length of the sleeves with a measuring tape. They must match!
Details of the sides, waistband, and cuffs remain unchanged. This is all! Here's an easy cut for a cardigan. Sewing a cardigan is even easier!
Before we start sewing, let's make a few points.
Baste and then sew down the shoulder sections of the cardigan. We overcast the allowances and iron them to the back.
We sew the side sections of the sleeves, overcast and iron the allowances.
We sew the sleeves into the armhole. To do this, we combine the central points and the shoulder points, as well as the side ones, baste, and do a fitting. If everything is fine, we sew the sleeves in one line, overcast, and iron the sleeve allowances.
We connect the short sides of the side strips (planks), iron the seam, iron the strip lengthwise along the fold. From the fold we measure the width of the side (4-6 cm), mine is 5 cm, mark the stitching line, leave 1 cm for the allowance, cut off the excess.
We combine the center point of the back along the sprout and the seam of the connection of the sides (straps), pin it, baste along the neck of the back, and then to the shelves.
We attach the border to the cardigan, overcast the allowances and iron them towards the front and back.
Trying on a cardigan, paying special attention to the sleeves. If everything is in order with the length, we move on to making the cuffs. We sew them into a ring along the short sides, iron the seams, then bend them lengthwise and iron the fold. We measure the width of the finished cuff, mine is 4 cm.
We turn the cardigan inside out, insert the cuffs into the bottom of the sleeves, align the side seams of the sleeves and the seams connecting the sides of the cuffs, and attach them. We process the allowances with an overlocker.
Let's move on to the bottom of the product. We combine the sides, make the base, cut off the excess. We sew the cut of the bottom.
We outline the hem line. Mine is 2.5 cm. I make sure to sweep the bottom of the cardigan along the fold so that the seam is even and neat. I iron it.
On the front side, I mark the width of the seam with chalk - 2 cm. On the sewing machine, I change the knitted needle to a double one. I stitch along the front side. I make sure to make fastenings at the beginning and at the end. It turns out, as I said above, a stitch that is no worse than a knitted one.
The belt remains. We connect the parts of the belt along the short sides and iron the seam. Then we bend the long strip along the front side inward, mark the width of the belt (mine is 4 cm), baste it, then sew a line on a sewing machine (start the line from the fold, stitching the ends of the belt), leaving an unstitched section in the middle of the strip for turning inside out.
We cut off the corners at the seam allowances, use a ruler to turn the waistband right side out, iron, stitch or sew up the remaining area with hand stitches.
You can sew 2 loops on the sides to thread the belt. We sew belt loops in any way. For example, like in trousers. Or like this - we cut out a strip about 15 cm long and 2 cm wide. We bend it with the wrong side inward along, and sew it on an overlocker. Iron the belt loops so that the overlock stitch is in the middle.
We put on a cardigan, tie a belt, and mark the locations of the belt loops on the sides. Sew the belt loops along the markings on both sides.
All that remains is to carry out the final wet-heat treatment of the product and you can try on the cardigan!
I enjoyed sewing and wearing this cardigan so much that I ordered more fabric online. This time – knitted angora. I also decided to increase the width of the sleeve, make side seams and fit it a little. But about everything - in the next article-master class, see the link.
www.samoshvejka.ru
My dear seamstresses! Finally, the long-awaited warmth has arrived, and we can already feel that May is still spring, and not February))). And so today I will tell you and show you how to sew one of the most necessary and beautiful items in a woman’s wardrobe - a cardigan. And we will sew a cardigan without a pattern and quite quickly.
In today's master class, I am sewing a cardigan from knitwear, so the technological process has some difficulties and requires the seamstress to have a little experience working with knitwear. But if you are a complete beginner, you can still sew such beauty, you just need to take non-stretch fabric (jacquard, for example).

So, for the cardigan I needed:
Well, my dears, it’s time for me to tell you that the pattern of this cardigan is just a circle, it couldn’t be simpler! There is only one point - you need to correctly find the location of the armholes in order to make cutouts for the sleeves.
We cut out a square with sides of 150 cm from our fabric:

Then you need to find the center of this square. To do this, fold the fabric square in four and place a pin at the fold (in the lower left corner - marked in red in the photo): 
Then we unfold our square, and from a point in the center of the fabric you need to use a centimeter and a piece of soap (or chalk) to draw a circle, imitating a compass. 
How to draw a large circle on fabric without a compass, see here:
This is the circle we should get. We take the maximum radius so that we get a circle across the entire width of the fabric.

Then we take any blouse from our closet that fits you well, but is not too tight (with a little freedom in the cut), lay the blouse on the fabric in the center, retreating 15-25 cm from the top of the circle.

We transfer the lines of the sweater's armholes onto the fabric. The photo below shows how the back armhole lines are translated, that is, the front armhole lines need to be completed by yourself. 
To begin with, we will make small armholes and cut the fabric in the middle. Now you definitely need to try it on to adjust the depth and size of the armholes.
While the armholes were small, as in the photo, the cardigan did not fit well, it did not lie nicely on the shoulders at all, since the armholes on the back needed to be enlarged. And as I cut more and more fabric at the back armhole, the cardigan fit better and better. And, perhaps, the larger the opening on the back, the more beautiful the collar will lie. But I stopped my search at a certain point, because I still planned to sew sleeves to the cardigan, and with a very large armhole I wouldn’t be able to do it.
But a cardigan can also be made without sleeves; in this case, the larger the armhole on the back side (within reasonable limits, of course), the more beautiful the collar will be.

Also, using fitting, when the ideal armhole sizes have already been found, we mark a line on the collar where we will duplicate the cardigan collar with faux leather. It should be taken into account that the line for sewing on the artificial leather should be on the wrong side of the cardigan and should not be visible from the front side. Therefore, standing in front of the mirror, we mark on the cardigan with soap the line where the collar folds. And then we lay the fabric on the floor, and further increase the drawn line of the collar by 2-3 cm, so that later the seam of the skin on the fabric is not noticeable.

So just remember, maybe you have a leather jacket lying around that you haven’t worn for a long time - you can also put it to use)))

This is how I joined the pieces of leather and sewed them into a single piece for the collar of the cardigan.

Now, placing the piece of the cadigan and the leather insert face to face, we stitch along the top line of the collar. I sewed with the maximum stitch size to avoid stretching the fabric along the line. This is important when working with knitwear.
I make allowances of 4-5 mm; before turning the part right side out, be sure to make notches on the allowances, since the rounding is in progress.
Then we turn the collar right side out and sew an interfacing stitch along the front part of the collar, departing 4 mm from the edge. This way we fix both layers of fabric. I also did this line on the largest possible stitch.

Now you need to sew on the bottom part of the leather insert. A little difficulty awaited me here. I don't like basting. So, as usual, I pinned and went to sew. As a result, I received a huge distortion of the fabric, since both knitwear and stretchy faux leather decided to live their own lives under the machine needle. I still had to unravel everything and pre-baste the leather to the knitwear.

We sew first with a straight stitch at the maximum stitch, and then with a zig-zag.

You will immediately have a question - where to get them?, where to get the pattern?
There are two options:
I took the sleeve pattern from this dress. But my armhole turned out to be 10 cm larger than the sleeve cap on the pattern. Therefore, I need to increase the sleeve cap myself by eye. Purely theoretically, you can simply add 5 cm from each side of the sleeve, but then you will get a slightly unnatural shape. Therefore, we also increase the height of the collar by 3-4 cm, and increase the sleeve by the required amount (for me it is 5 cm) on both sides. All these calculations now concern the sleeve cap, i.e. its upper part, I hope you understand))).
Then we measure the size of the armhole on the cardigan with a centimeter, compare it with the piping line on the sleeve, and adjust the piping line on the sleeve if necessary.
I also want to note that I used a tight sleeve as a basis, like on a dress. But I definitely need freedom on the cardigan sleeve. Therefore, we measure the size of the required freedom on the wrist (for me it is 22 cm, despite the fact that the sleeve itself on the pattern is 17 cm, i.e. I added 5 cm for freedom; and this turned out to be enough).
Now we draw new side lines of the sleeve, taking into account the increased line of the bottom of the sleeve.
And we will have a pattern for a large sleeve for a cardigan.
We cut out the sleeves from the fabric, remembering that the grain thread on the sleeve runs vertically.

Sew the sleeves along the side seam:

Now we try on the cardigan again, and mark the lowest point on the armhole (it should look like in the photo below), mark these lowest points with pins:

Now we baste the sleeves to the armholes, matching the bottom point on the armhole and the seam on the sleeve:

Then I decided to make the sleeves 3/4. Because it’s more beautiful)).
We process the sleeve sections and the entire cardigan around the circumference (not counting the collar) with a zig-zag stitch on the largest stitch.
You will get this beauty: 
By the way, I completely forgot that I also wanted to sew square pockets made of leather, it will look even more stylish).
And since the cardigan itself didn’t want to stay on me, I had to help it))) - I sewed three small rings on each side and threaded a chain (I bought both the rings and the chain at a jewelry accessories store). It turned out very beautiful:

I hope, friends, that you will also be able to sew a similar cardigan. If there is anything, ask questions and write by email, I answer everyone))
Sew with me, and see you again on the blog pages))!
You may also be interested in:
There is also this cardigan option:
xn--e1aialfecu4d.xn--p1ai
How to sew a cardigan and where to get the pattern? A cardigan is a universal loose-fitting sweater made of knitwear. If you are thinking about what to sew from knitwear, then be sure to choose a cardigan. It can be worn at any time of the year and combined with absolutely everything in your wardrobe. It will especially help out in emergencies when you don’t know what to wear.
Take a cardigan on a trip; you don’t need to iron it; in addition, a cozy cardigan will save you in cool weather. In this article I will tell you how to cut a cardigan yourself and prepare it for the first fitting.
You will need:
Before proceeding to cutting, it is necessary to check the fabric for defects: knots, holes, textiles, etc. If any of the above is present, then immediately circle it with chalk.
to contents
Decating is important in the initial cutting stage; if it is not done, the parts will become deformed during the sewing process. This will lead to asymmetry and distortions in the finished form. Read more about decating in my article: Rules for cutting fabric.
to contents
Fold the fabric right sides inward along the edge, placing the edges of the edge towards you. When working with knitted fabric, there is one feature. Like all knitted fabrics, knitwear is machine knitted, that is, it has loops and can be unraveled, as with regular hand knitting. Therefore, you should take into account the direction of the loops; they should open from top to bottom. To do this, gently pull the thread in the transverse direction; if the fabric unravels easily, then it is the top.
Next, once you have decided on the top of the canvas, now use a ruler to align the bottom by drawing a chalk line. From the resulting line, set aside the width of the allowance at the bottom of the product 3.0 - 4.0 cm and draw a line again, this will be the hem line of the product. From the resulting line upward, mark the length of the product. to contents
to contentsTake the patterns for the front and back, lay them out on the fabric so that the highest shoulder point on the front coincides with the length mark of the product. The center of the back should coincide with the fold of the fabric. The distance between the front and back pieces = twice the width of the side seam allowances: 2.0 + 2.0 = 4.0 cm.
In order to save fabric, use the second option: place the shelf centered towards the edge, leaving an allowance for processing. This will create more space between the shelf and the back. This is especially beneficial when cutting into large sizes.
to contents
It is worth noting that the control lines on the patterns of the front and back (waist, hips, chest) should be at the same level. Outline the details with chalk; the dart can be transferred to the armhole, so it will be less replaceable in the finished product. In addition, this option is perfect for those with large breasts. This will eliminate creases and folds in the armhole area. Don't forget to shorten the end of the dart by 3.0 - 4.0 cm from the center of the breast glands.
The dart on the back can be eliminated; it is not needed here. To do this, reduce the shoulder seam by the width of the dart and raise it by 1.0 cm. From the resulting point, draw a line until it coincides with the highest point of the neckline. Mark the width of the allowances along the shoulder lines and armhole lines 1.5 cm. to the table of contents
Place the sleeve at the top near the hem. To do this, from the shoulder allowance of the front up, set aside the length of the sleeve + the allowance at the bottom of the sleeve 3.0 - 4.0 cm. Depending on the model and your pattern, determine the width at the bottom of the sleeve and reshape the elbow and inner lines of the sleeve. Apply allowances: 1.5 cm along the sleeve hem, 2.0 cm along the elbow and inner lines.
Check the design again for all widths and lengths. Don't forget to add loose fit allowances, which vary depending on the model and your body type. If you don’t know your body type and what clothes to choose, then go to: How to determine your body type. to contents
Cut out the cut details, taking into account the allowances. To prevent the parts from moving out, they need to be pinned together.
to contents
Using a chisel and a chalk board, trace the chalk lines from one piece to the next.
to contents
Baste the darts on the shelf parts:
Connect the parts of the shelf to the back along the side and shoulder seams.
Sweep the right sleeve, you don’t have to sweep the left one, since the fitting is done on the right side, and all changes are transferred symmetrically to the second side. Excluding figures with asymmetry in posture.
Also, if the model has decorative details, collar, cuffs, pockets, then for the first fitting, you can make mock-ups of them from paper or mock-up fabric (any unnecessary fabric). to contents
At the first fitting, the sleeve is inserted into the armhole, the length/width of the product, sleeves, neckline are specified, and the location of the decorative details is outlined. You will find more information about the first fitting in the article: How to properly conduct the first fitting.
The pattern for a knitted cardigan is not always freely available, which is why the dream of a warm new thing remains unfulfilled. But don't expect to ever stumble upon the cardigan pattern you need. Don’t waste time, cut out the cardigan yourself, using basic patterns of a suitable size, which can be found in any sewing magazine. Just take them as a basis, make the necessary adjustments and make larger allowances. When you try on, you will immediately see what goes where and what goes where. You can always cut off the excess, but the opposite is another matter. to contents
Mark with chalk where the pins are to be chipped so that the chalk is imprinted on both sides of the parts.
Chop the parts and this is what you should get:
To make it easier to adjust details, remove the basting threads on the side and shoulder seams.
Take a measuring tape or ruler and measure horizontally (starting from the armholes) the distance from the chalk marks to the cuts on each piece. Sum up the values obtained, this result will be the surplus that you took from the fitting. Now this value needs to be distributed equally along the side seams in this area. To do this, divide the result by 2 and distribute along the side seams. The same must be done on the following sections of chalk marks, going down from the armholes to the bottom.
What is it for? When trying on, the excess in the seams is pinned unevenly, so when making changes it is necessary to equalize the balance by calculation. If you do not follow this procedure, then when connecting the parts will become asymmetrical, which will lead to distortions and deformation of the product.
After changes have been made along the side seams of the front and back, you now need to connect the resulting marks with lines. Fold the back piece in half, align the cuts and connect the chalk marks with smooth lines using a figured pattern.
Then align the back part with the front part along the side seam, apply an allowance of 1.0 cm and cut off the excess. This way you cut off the excess immediately on the back and shelf. Do the same with the second side.
to contents
Sew the darts on the carpet using a knitted stitch. If you do not have a special carpet stitch for sewing knitwear, then stitch on a regular machine using a knitwear needle. Cut the dart allowances to 1.0 cm, overcast the edges.
What else can be sewn on carpet, read my master classes on how to sew a women's suit and how to sew a fleece jacket.
Iron the dart allowances up.
Sew the side seams from the side of the shelves. Press the seams to the back.
to contents
Fold the product in half, matching all the cuts and side seams, and secure them with pins. Connect the chalk marks along the armhole with smooth lines, apply a 1.0 cm seam allowance.
Align the center of the shelf, as well as the bottom of the product. If you wish, you can leave a wide seam allowance at the front, while only finishing the edges. This way you get a simplified version of the cardigan, but no less unique.
Measure the armhole with a measuring tape, measure the sleeve hem, find the difference. The edge should be 3.0 - 4.0 cm larger than the armhole. If the difference in the edge exceeds these values, then distribute the excess into the seams. Make changes, align the sleeve seams and the hem using a pattern, add 1.0 cm allowances, cut off the excess.
Join the sleeve seams as well as the shoulder seams. To prevent the seams from stretching when worn, iron a strip of adhesive fabric onto the back seams before stitching. Press the seams to the back.
to contents
Cut out pocket details from fabric.
Fold the top seam allowance of the pockets and sew on the carpet with a flat seam.
Fold and baste the edges of the pockets. Secure the pockets with pins to the product and baste.
Sew the pockets on the carpet using a flat stitch. Remove the basting threads.
Fold the bottom of the sleeves and the garment, sew on a carpet with a flat seam.
to contents
The shape of the collar looks like a turn-down collar with a smooth transition into the bar, which is used to process the sides of the shelves.
To do this, cut a strip of fabric with a length = length of the sides and neck + allowances, width = (collar width + allowances) x 2.
Fold the collar in half lengthwise and align it according to the model, i.e. trim the excess from the collar to the bottom to the width of the placket.
Finish the lower ends with a carpet stitch.
Turn it inside out and iron it.
to contents
Baste and stitch the collar to the garment. The turned ends of the collar should coincide with the bottom of the product.
to contents
Baste and stitch the sleeves into the armholes on the product side.
Iron the allowances.
to contents
Presentation of the finished cardigan:
If you want to know how to sew a sheath dress (pictured), then take a look at my article DIY dress.
If you wish, you can make a belt of the same fabric or decorate the cardigan with a stylish strap, brooch, or flower. A DIY cardigan is a versatile and practical item in your wardrobe. A knitted cardigan can be combined with almost everything; it will help out when you don’t have time to put together an outfit. If you want a long cardigan made of knitted fabric, then take a look at my article: how to sew a cardigan coat.
You can take a cardigan on a business trip or travel; it takes up little space and is always at hand. The soft and cozy knit fabric is pleasant to the touch and will keep you warm in cool weather. How to sew a cardigan? Forget about it forever, take the fabric and start sewing using the instructions above.
I wish you success!
Especially for you, I have put together a selection of sewing simple cardigans:
P.S. Did you find this article useful and interesting?!
Leave your comments.
Tell your friends.
And subscribe to blog news.
With friendly greetings, Maria Novikova
marianovikova.ru
Since the cardigan is a universal item, due to its loose fit, every fashionista has it in her wardrobe. Girls who do not have the opportunity to purchase new ready-made clothes in the store are interested in how to sew a cardigan with their own hands quickly and without a pattern. If you have a good piece of knitted fabric, then don’t hesitate and get to work. You don’t have to look for ready-made patterns at all, since you can do everything yourself. This wardrobe item is very helpful, especially in cases where you urgently need to find what to wear. You can take it with you on a trip so you don’t have to iron your clothes. It will save you in cool weather and envelop you in the warmth of home. This article will tell you how to cut a cardigan yourself and prepare it for fitting.

Important! Knitwear is created by machine knitting, which is why it has loops that can be unraveled if desired. It is recommended to take this into account, since the loops should open exclusively from top to bottom. To do this, just pull the thread in the direction transverse to the loops.
This process allows you to sew a cardigan with your own hands with high quality, without the help of professionals, but it is important to do everything clearly, performing all the necessary actions at each of the four stages.
Take the patterns for the back and shelves, carefully lay them out so that the uppermost point of the shoulder on the shelves coincides with the length mark on the product. In turn, the center of the back should coincide with the fold of the material. In this case, the distance between the elements of the back and the shelf should be equal to the width of the seam allowances on the side, multiplied by two.
All control lines marked on the back and shelf patterns should be located at the same level:
Important! This option is ideal for girls with large breasts. In addition, due to this you will eliminate folds and creases in the armhole area.

Important! Be sure to add a loose fit, it depends on your body type and model.
Taking into account all the allowances, cut out all the cut elements. To prevent them from moving, pin them together with tailor's pins.
Important! If you plan to decorate the product with a decorative collar, pockets or cuffs, you can simply make paper mock-ups for the first fitting.
You probably can't wait to try it on? This is quite natural; before sewing a cardigan, you need to check everything, visually evaluate how it will fit. During the fitting process, pin the sleeve directly into the armhole to determine the width, length of the product itself, neckline, sleeves, and outline the location of decorative elements.
Important! It is not always possible to find a freely available pattern, so it is easier to cut out the product yourself using basic patterns of the most suitable size. They are used as a basis, then the necessary adjustments are made, and fairly large allowances are made. Trying on will help you see where and what is best to release, or, on the contrary, remove.
It all starts with making changes after the fitting:

Important! The armhole should be 3-4 cm larger than the edge. If the difference turns out to be greater, you will have to distribute the excess along the seam.
The shape of the collar resembles a turn-down one, smoothly turning into a bar, which, as a rule, is used to process the sides of the shelves:
Important! The ends of the collar should clearly coincide with the bottom edge of the product.
Sew the sleeves directly into the armholes, then stitch from the product side. Iron all seam allowances carefully.
If you do everything following the instructions described above, you can make a wonderful, stylish, warm cardigan with your own hands. It is easy and simple to sew from knitwear, since this fabric is easy to process, there are practically no problems with it at any stage of production. If you wish, you can make a belt from the same material, or decorate the product with a stylish brooch, strap, or flower. Knitted items can be combined with almost all clothing options, especially when there is no time to create a new look.
serviceyard.net
Are you thinking of making a knit cardigan with your own hands? Don’t know how to make patterns and are afraid that you won’t succeed? The one who walks will master the road. This article contains 5 cardigan patterns that even a novice seamstress can make. Be patient and begin the creative process.
Knitwear is a capricious material. On the one hand, it has many advantages: it drapes well and rarely crawls. On the other hand, knitwear is very inconvenient to sew. In order to make any product from this material, you will need a special sewing needle. But if you try, the result can exceed all expectations. How to sew a cardigan from knitwear with your own hands? A pattern for one of the options for such a product is attached below. We print the image, scale it and transfer it to the fabric. You should draw on knitwear with soap, as the chalk will quickly wear off.

How to sew a cardigan from knitwear? The pattern of parts is completed, now you can begin the manufacturing process. First, you should sew the front and rear shelves together. Be sure to finish the side seams with a zigzag or overlock. Now you need to sew the sleeves, and then attach them to the almost finished product. When the cardigan is completely assembled, all edges should be processed. This can be done either using an overlocker or by folding one or two cm to the wrong side. The finished product can be decorated with beads or embroidery.
This item can complement almost any look. How to sew a cardigan from knitwear with your own hands? The product pattern is attached below. We print it out and adjust it to your size. If you want the cardigan to keep its shape, then it should be made of thick knitwear, but if you want to make a soft, tight-fitting cape, you should take a thin material. We transfer the pattern to the fabric and cut out the details.

We begin the sewing process by making sleeves. Sew the details. Now you should sew the shoulder seams of the front and back flanges. Sew the sleeve into the open armhole. This is the easiest way to put the part in place. It should be remembered that knitwear items are sewn without lining, therefore, the inside of them must be perfect. After the sleeves are sewn, you can sew the side seams. Now, using an overlocker, you should process all the edges of the product. If the knitwear is dense, then you can process the cardigan using bias tape.
One of the easiest ways to sew a summer cape is to make it from three parts. One of them will be the front and rear shelves at the same time, and the other two parts will be the sleeves. In just an hour you can sew a knitted cardigan with your own hands. The pattern for such a product is located below. Print it out and transfer it to fabric.

Since the style of the cardigan will be very simple, it is worth playing with it with an interesting print on the material. We cut out the details. Now you should sew in the sleeves. We sew them, as in the previous version, into the open armhole. Now you should process all the edges of the product. There are two ways to secure a cardigan: either sew buttons to the jacket and make holes for them, or make a belt.
The easiest way to make a summer sweater is to make it from a rectangle. There is no need to draw a pattern here. It will be incredibly easy to sew a knitted cardigan with your own hands. You should cut a rectangle from any, preferably plain, material.
Now you should divide it into three parts with two lines. We retreat 15 cm from the top of the strip and make a 20 cm cut. Now you need to overcast the product. It will be difficult to do without an overlocker. But, of course, the edge can also be finished with a zigzag. The cardigan is almost ready. All that remains is to put on the product and decide where exactly to sew the buttons. One of the options for how you can wear the product is shown in the picture.
Making such a cape is as simple as the previous one. How to sew a cardigan from knitwear with your own hands? You can see the photo of the pattern below.

Print out the circle. It will be difficult to draw such a geometric figure by hand without a pattern. Now you should divide the circle into four parts. Set aside 25 cm from the center to the right and left. From this mark you should make a 25 cm cut in the upper part of the circle. Now you need to overcast the edges of the product. The cardigan is almost ready. All that remains is to come up with a way to fix the product on the body. You can sew a zipper into a jacket, you can sew buttons, or you can wear a cardigan with a belt or wide open.
fb.ru
A cardigan is a loose-fitting cape jacket. It is made from knitwear, tweed, mohair, neoprene, cashmere, wool, fleece - a variety of materials are suitable for it. The models it can accept are also varied.

In the classical sense, a cardigan is a knitted elongated vest without a collar. It has one row of buttons on the front, a pair of pockets and a V-neck. Cardigans were originally worn only by military personnel. It served as insulation for the uniform. It was named after the 7th Earl of Cardigan, who invented this item of clothing.
The cardigan became actively used in the “civilian” wardrobe in the 40-50s of the 20th century. Since then, both men and women have enjoyed wearing various variations of these cozy products. Of course, the design of the classic cardigan has undergone many changes. Modern designers offer a variety of models that can be fastened with buttons, tied with a belt, wrapped or oversized. Sleeve length, hemline, various decorative details - the flight of imagination is unlimited.
Sewing an original cardigan is not as difficult as it might seem at first glance. To do this, it is not necessary to have many years of sewing practice behind you. Just follow the instructions and the result will meet your expectations.

mamainastitch.com
In just a couple of hours you will sew an original cardigan in which you can go for a walk in the park, sit with friends in a cafe or go to the movies with your loved one.
You just have to put on a strict plain top, complement the look with trousers or a pencil skirt - and you have a working look for the off-season.
If there is no strict dress code, you can use additional accessories - for example, beads, an original belt or brooch. Just one small detail will help spice up your everyday look.
You can also play with colors and different textures.
Don't deny yourself the pleasure of getting a new cardigan: sewing one with your own hands is easy and simple.
A walk in cool weather will be much more pleasant, and your appearance will become more harmonious thanks to one detail - a beautiful and warm cardigan. You can sew it yourself. To do this, you will only need a couple of hours, a piece of thick knitted fabric measuring 1.2 x 1.5 m (for size 50) and standard sewing supplies.

When sewing a cardigan, a pattern as such is not required. It is sewn from a rectangular piece of fabric, folded in half and stitched on the sides to the armhole level. A loose cut allows you to do without exact numbers, but if you want to cut a cardigan to fit a certain figure, you will need to take certain measurements.
Throw the measuring tape over your neck, making sure that both ends pass through the top of your chest to your waist. Measure this distance (along an arc - from one point of the waist to another). This is line-1.

To measure line-2 you will need outside help. Place the length of line-1 on your back, arms apart. This way you will determine the sleeve length of the future product. It is often approximately ¾. If desired, the sleeves can be shortened, but not more than 5 cm each.
Lay the length of line-1 away from the waist line, lower it down, put it behind your back and return to the waist line on the other side (line-3). This way you will know the length of the cardigan. Please note: in this model the bottom will be gathered (the softness and smoothness of the drapery directly depends on the quality of the material you choose).
Tip: you can add no more than 10 cm on each side to line-1 (total 20 cm).
Problem conditions: finished product of size 50, line 1 – 108 cm, cut width – 150 cm.

zhurnal.rykodelniza.ru
After you have cut the cardigan, all that remains is to sew it correctly and neatly.
The product is ready. Sewing it with your own hands is not at all difficult and not expensive. Taking the idea as a basis, you can safely experiment with different fabrics (both in density and quality), color schemes and decorative elements. The proposed pattern is simply simple to execute, while the possibilities that it opens up for novice fashion designers are practically unlimited.
fashionelement.ru
A cardigan is a loose-fitting cape jacket. It is made from knitwear, tweed, mohair, neoprene, cashmere, wool, fleece - a variety of materials are suitable for it. The models it can accept are also varied.
scene7.com
In the classical sense, a cardigan is a knitted elongated vest without a collar. It has one row of buttons on the front, a pair of pockets and a V-neck. Cardigans were originally worn only by military personnel. It served as insulation for the uniform. It was named after the 7th Earl of Cardigan, who invented this item of clothing.
The cardigan became actively used in the “civilian” wardrobe in the 40-50s of the 20th century. Since then, both men and women have enjoyed wearing various variations of these cozy products. Of course, the design of the classic cardigan has undergone many changes. Modern designers offer a variety of models that can be fastened with buttons, tied with a belt, wrapped or oversized. Sleeve length, hemline, various decorative details - the flight of imagination is unlimited.
Sewing an original cardigan is not as difficult as it might seem at first glance. To do this, it is not necessary to have many years of sewing practice behind you. Just follow the instructions and the result will meet your expectations.

mamainastitch.com
In just a couple of hours you will sew an original cardigan in which you can go for a walk in the park, sit with friends in a cafe or go to the movies with your loved one.
You just have to put on a strict plain top, complement the look with trousers or a pencil skirt - and you have a working look for the off-season.
If there is no strict dress code, you can use additional accessories - for example, beads, an original belt or brooch. Just one small detail will help spice up your everyday look.
You can also play with colors and different textures.
Don't deny yourself the pleasure of getting a new cardigan: sewing one with your own hands is easy and simple.
A walk in cool weather will be much more pleasant, and your appearance will become more harmonious thanks to one detail - a beautiful and warm cardigan. You can sew it yourself. To do this, you will only need a couple of hours, a piece of thick knitted fabric measuring 1.2 x 1.5 m (for size 50) and standard sewing supplies.

When sewing a cardigan, a pattern as such is not required. It is sewn from a rectangular piece of fabric, folded in half and stitched on the sides to the armhole level. A loose cut allows you to do without exact numbers, but if you want to cut a cardigan to fit a certain figure, you will need to take certain measurements.
Throw the measuring tape over your neck, making sure that both ends pass through the top of your chest to your waist. Measure this distance (along an arc - from one point of the waist to another). This is line-1.

zigzagom.com
To measure line-2 you will need outside help. Place the length of line-1 on your back, arms apart. This way you will determine the sleeve length of the future product. It is often approximately ¾. If desired, the sleeves can be shortened, but not more than 5 cm each.
Lay the length of line-1 away from the waist line, lower it down, put it behind your back and return to the waist line on the other side (line-3). This way you will know the length of the cardigan. Please note: in this model the bottom will be gathered (the softness and smoothness of the drapery directly depends on the quality of the material you choose).
Tip: you can add no more than 10 cm on each side to line-1 (total 20 cm).
Problem conditions: finished product of size 50, line 1 – 108 cm, cut width – 150 cm.

zhurnal.rykodelniza.ru
After you have cut the cardigan, all that remains is to sew it correctly and neatly.
The product is ready. Sewing it with your own hands is not at all difficult and not expensive. Taking the idea as a basis, you can safely experiment with different fabrics (both in density and quality), color schemes and decorative elements. The proposed pattern is simply simple to execute, while the possibilities that it opens up for novice fashion designers are practically unlimited.
You can’t ignore the fashionable cardigan this season. This type of clothing can be worn by any body type. Moreover, sewing it is simple and quick.
By offering you a pattern for a fashionable cardigan, I hope that girls and women with curvaceous figures - whose chest circumference is from 110 to 134 cm - will show increased interest in it.
There are 5 sizes here, i.e. 5 sets of patterns. Download, print, glue the sheets, cut out your size and you can start creating.
For a cardigan, soft fabrics are primarily suitable. Moreover, it does not have to be knitwear, although this option can be considered the most successful. You can use soft wool or blended fabric and many others. If you really choose a non-elastic fabric, then the parts can be cut on the bias, and the product will only benefit from this.
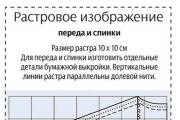
We write how to prepare a pattern for cutting in each article. For those who visited our site for the first time, let me remind you briefly: download the file, print it on a regular printer, glue it together, cut out your size and the pattern is ready. There are very detailed recommendations on this in earlier articles.
Be sure to check the scale for consistency. On a printed sheet with a 10x10 cm square depicted, sides of 10 cm should correspond to exactly 10 centimeters. To do this, in the printer settings, set the document print scale to 100% (no scaling).
Cut out the details of the cardigan, adding seam allowances: it is recommended 1-1.5 cm for sewn seams, 2-3 cm for hems of the sides, bottom of the sleeves and cardigan, depending on the type of material and method of processing.
Sleeve 2 parts
Here, perhaps, are all the main points.
The beginning of autumn is a wonderful time. The sun is warming, but not so active, nature calms down and allows you to think. A great time to wander through the autumn park and dream. And the walk will be especially pleasant if you throw a warm, cozy cardigan made of soft knitted fabric, sewn with your own hands, over your shoulders. You can wrap yourself up nicely in it, and you won’t mind the cool wind. Sewing such a cardigan is easy, even for beginners in sewing. Just follow our advice and the result will exceed all expectations!
To create a cardigan pattern, you need to take several measurements. We use :
Construct a cardigan pattern in the form of a rectangle as shown in Fig. 1. Additionally, create a cuff pattern.
Rice. 1. Pattern of a knitted cardigan
Using a dense overlock stitch, sew the top and bottom edges of the rectangular piece, as well as the bottom edges of the cuffs. Sew the cuffs to the areas marked 1-2. Sew the cuffs in one line and, without interrupting the stitching, the side sections as shown in Fig. 2.
Rice. 2. How to sew a knitted cardigan
Your cardigan is ready! Enjoy autumn, give each other warmth, love and be happy! You will find even more new interesting ideas on the website of Anastasia Korfiati’s Sewing School.
In the classic version, a cardigan is a knitted jacket without a collar, which is fastened with a number of buttons and has two front pockets and a V-neck. Initially, the cardigan was intended for the military and served as insulation under uniforms. It was invented by the English Lord James Thomas Brudnell, 7th Earl of Cardigan, to whom the cardigan owes its name.
The cardigan appeared in women's and men's wardrobes in the 40-50s
XX and has since taken its place of honor in it. However, along with the development of fashion, the spring look of the cardigan changed and gradually became the way we know it. Modern designers have not exactly changed the cardigan beyond recognition, but they have made a number of design changes and the product has been transformed! Now cardigans can be either with or without buttons, have no pockets at all, and the shape and length of the product can vary depending on the trends of the season - with an asymmetrical hemline, with dolman sleeves, with elongated sleeves. The buttons have been removed, its length and shape have changed, they have become more voluminous, and designers are increasingly giving preference to the oversized size.However, no matter which cardigan you prefer - a modern version or a good old classic, you can be sure of one thing - you will always be very warm and cozy in a soft, voluminous cardigan!
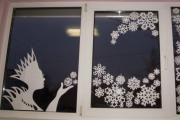
One of the most beautiful and favorite childhood fairy tales is “The Snow Queen”. Many of us have reread the fairy tale several times...

Contents Introduction………………………………………………………… ………………3 Chapter 1. Theoretical foundations of the problem of organizing leisure time for persons...
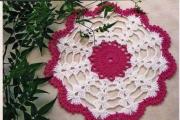
Craftswomen prefer to begin their crochet training by implementing simple napkin patterns. Unfortunately, in...
Spring is the time to replenish your wardrobe with bright and beautiful new items. A talented fashion designer shared an accessible pattern...
A warm and cozy sweater is one of the basic things in a woman’s wardrobe. You can knit a sweater with knitting needles from a light and delicate...
You can weave beautiful, original things from bright little rubber bands. As a rule, diagrams are of particular interest...

In obstetrics, the term “frozen pregnancy” refers to the cessation of fetal development up to 28 weeks...

Nails coated with shellac always look beautiful and neat. And if you glue rhinestones on them, then a manicure...

The thirteenth anniversary is associated with the number thirteen, and since this number does not have a very good reputation,...

You have passed the newborn stage. Already in the second month of a child’s life, you begin to understand his personality. You also...

Quarrels and squabbles are a common occurrence in our lives. One is good, but two is better. Training a baby nutria in...

We have readers and admirers (pardon the pun) of Sherlock Holmes and his many analogues in detective stories...

Yulia Potapova Conversation “Let's talk about friendship” Goal: 1. Reveal the essence of the concept “friendship”. 2. Show what...

Nicolas Cage is free again! The 52-year-old actor divorced his third legal wife, Alice Kim. The couple accepted...

Contents Introduction………………………………………………………… ………………3 Chapter 1. Theoretical foundations of the problem of organizing leisure...

Craftswomen prefer to begin their crochet training by implementing simple napkin patterns. Unfortunately,...