Fashion legend Hubert de Givenchy Hubert Givenchy personal life
Yesterday, March 10, Hubert de Givenchy passed away. The famous couturier, founder of the fashion house of the same name, classic died in...
For 4-5 years
You will need: yarn “Children's whim” (60% wool, 40% fiber, 225 m/50 g) 450 g emerald, 25 g each light and dark brown, yellow remains, yarn “Unity” (48% wool, 52% acrylic, 200 m/100 g) 20 g black, hook No. 2.25, No. 3.75, No. 4, No. 5.
Extended loops: knit 1 row of stitches, then make 2 turns of thread on your finger, hook the thread, pull it through the post, pull it to the desired length and knit st. b/n.
Attention! Knit the vest and shorts in 2 threads, the cap and leggings in 1 thread.
Using emerald thread, use crochet number 5 to create a chain of 133 chain stitches. p. and knit the vest according to pattern 1.
Sew side and shoulder seams. Tie the finished vest with one row of non-woven posts (neck edges, sleeve armholes, fronts and bottom edge of the vest).
Using emerald yarn, use crochet number 3.75 to create a chain of 58 chain stitches. n. Next, knit according to pattern 2, performing 2 air stitches at the beginning of each row. p. for lifting. Knit 2 such parts.
Sew middle and step seams. Tie a belt along the top edge of the shorts. To do this, use black yarn to knit the 1st row of single stitches into each base loop. 2nd row columns s/n. 3rd row columns uncapped. 4th and 5th rows columns s/n. Fold the waistband in half, with the fold line approximately between the 3rd and 4th rows. Hem it from the wrong side. Use yellow yarn to tie a buckle (a rectangle of 2 rows of non-woven stitches).
Using emerald-colored yarn, use crochet no. 2.25 to create a chain of 180 chain stitches. p. Knit according to pattern 3, first 8 rows of 2x2 elastic (alternate 2 convex, 2 concave stitches). From the 9th to the 13th rows, knit s/n stitches evenly. In the 14th row, decrease the number of stitches in the places indicated in diagram 3. Continue decreasing in this way until the end of knitting, until 1 stitch remains. Make a pompom from emerald yarn and sew it to the tip of the cap.
Beard: join together 2 threads of light and dark brown color and crochet the elongated loops using a No. 3.75 crochet hook according to pattern 4.
Sew the finished beard to the cap.
Using emerald-colored yarn, use crochet no. 2.25 to create a chain of 66 chain stitches. n. Next, knit according to pattern 7. Moreover, knit the first and last 6 rows (elastic band) with emerald-colored yarn, from the 7th to the 19th rows alternate the colors of the yarn (odd rows are yellow, even rows are emerald).
Boots for Parsley or a gnome, which are easy to sew and complement the image of a fairy-tale hero.
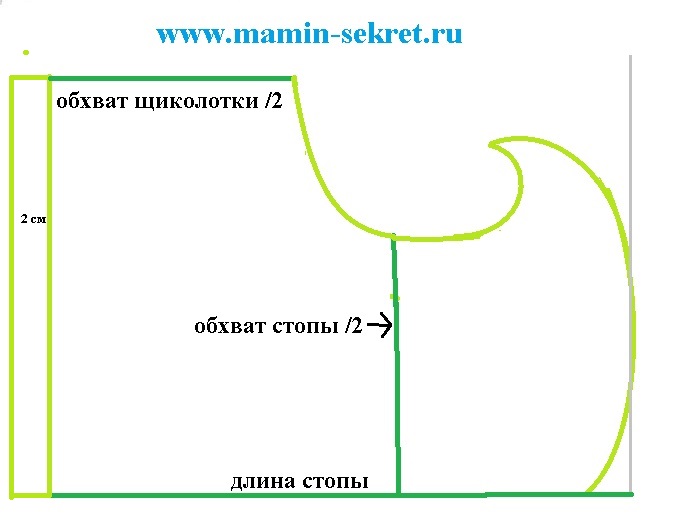
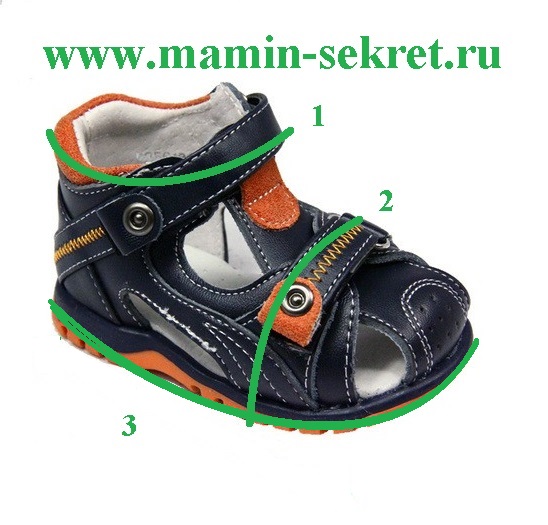 On a piece of paper, draw a horizontal line equal to the length of your foot. From it up, set aside a distance equal to the height of the future Parsley shoe. This distance is determined arbitrarily depending on your preferences, the main thing is that the main shoes are completely covered. The top line is equal to half the circumference of the ankle. Also draw the line of the curved toe arbitrarily, the main thing is that it does not fall below half the circumference of the foot.
Add 2 cm to the back of the pattern to sew on the Velcro fastener.
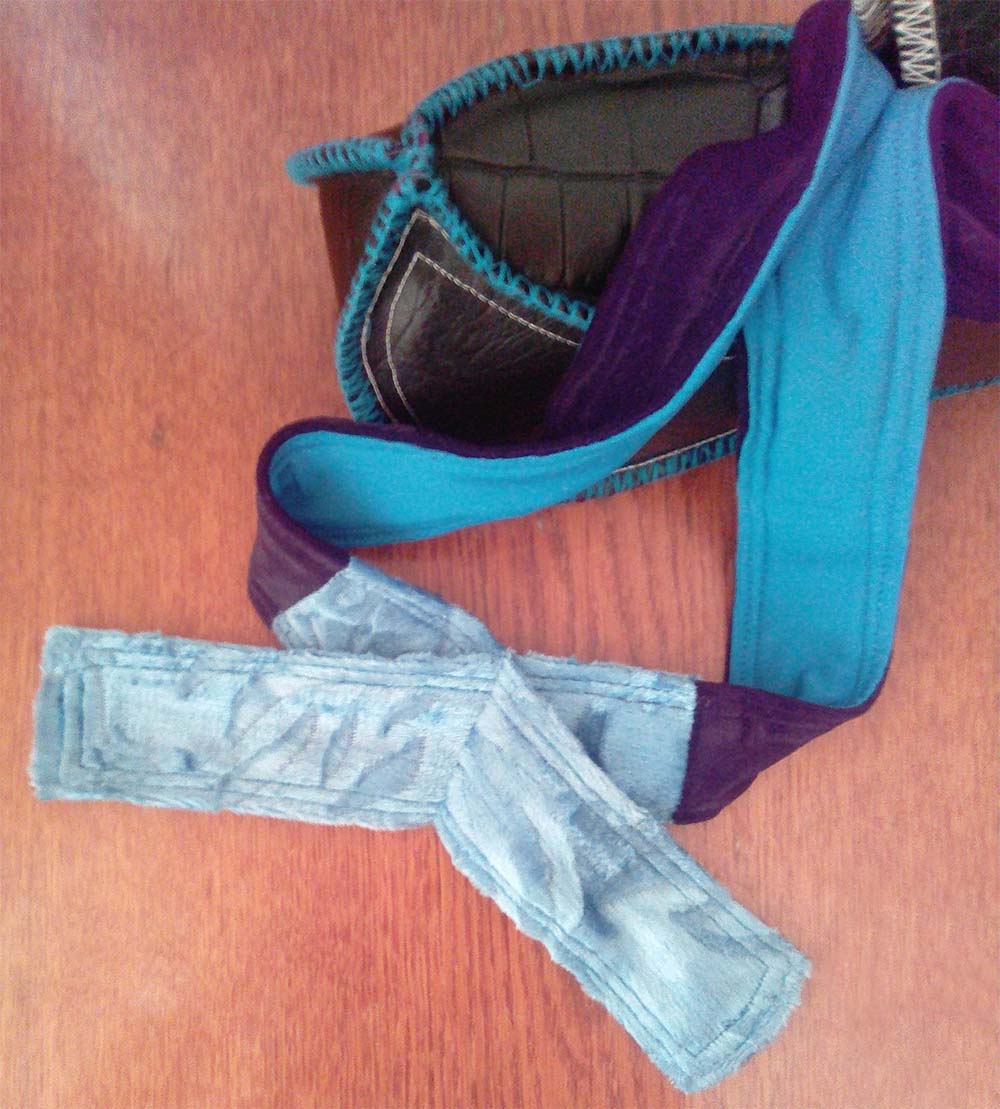
 Connect the two halves of the shoe and sew them along the bottom and front. Don't stitch the back line! Fold the top and machine it. You will get a sock with an open back. Stepping back 2 cm from the heel and the entire back side of Parsley’s shoes, we will sew on Velcro tape.
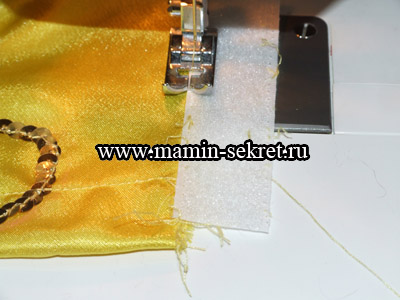
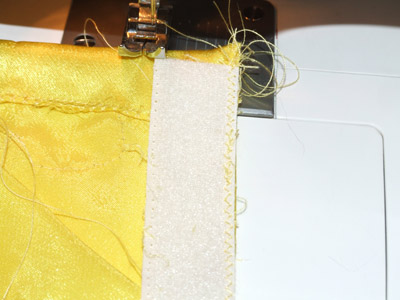 The Velcro overlaps, so we added 2 cm on the pattern.
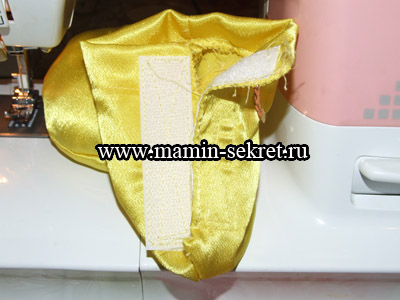
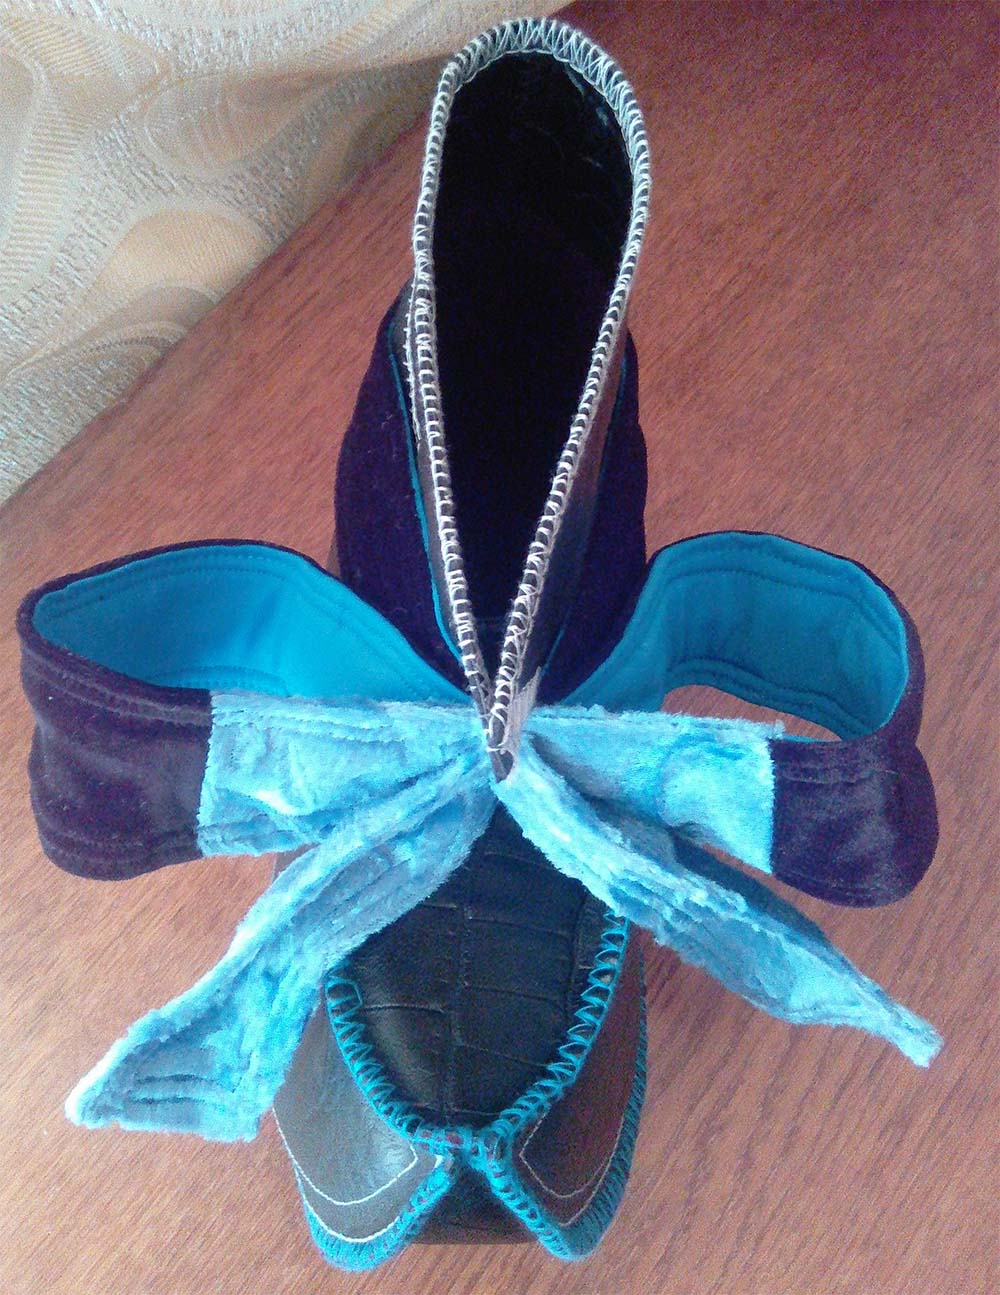
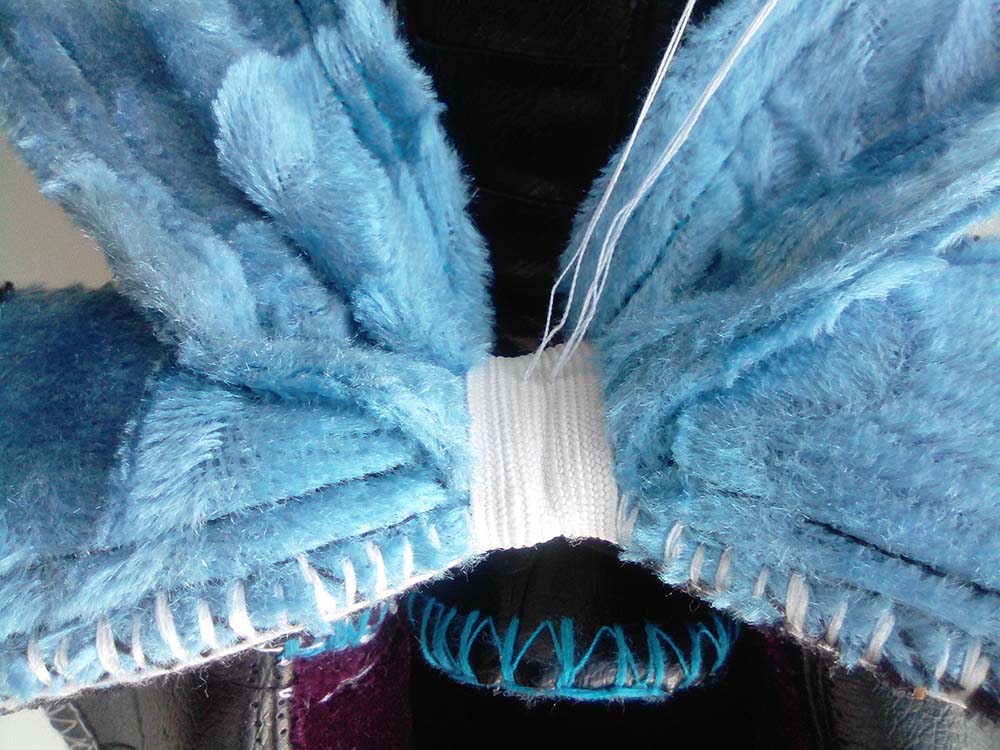
 We fill the tip of the boot with padding polyester and put the sewn boot on the sandals. Let's check how he sits. If you don’t like something, it’s better to fix it right away, for example, adjust the shape of a protruding nose.
 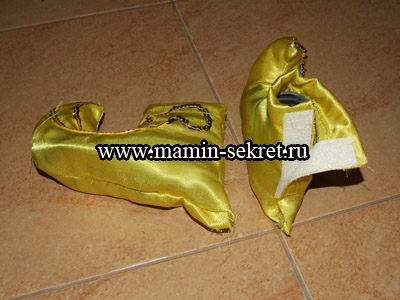 When the Velcro is sewn and fastened, there is a protruding angle at the heel. In order to remove it, we pin the excess fabric onto the sole of the shoe. We do this without removing the sock from the sandal.
 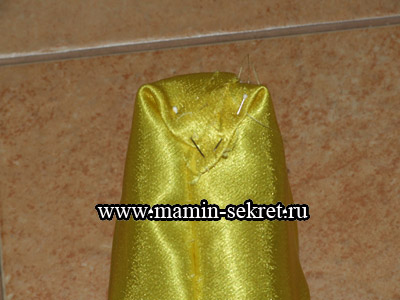 Sew by hand with thread
 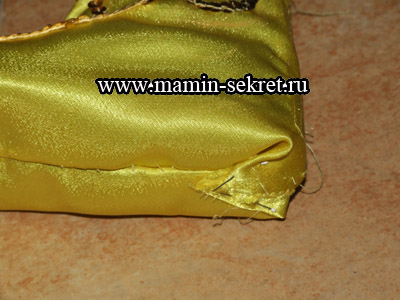 We have the shoe for Petrushka ready. All that remains is to make a sole so that the child does not slip on the floor. For the sole it is better to use a piece of leather or leatherette. Unfortunately, I didn’t have either of these on hand, so I just had to use thick fabric. Place the sandals on the fabric and trace them. Cut out the sole without any allowance.
 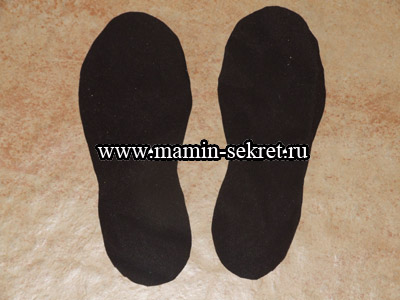 The sole can be sewn on by hand, but it will be enough to glue it with rubber glue. Distribute the glue evenly over the sole and press it to Parsley’s shoes. Leave to dry overnight.
  By morning, the shoes for Parsley or the gnome will be completely ready and you can wear them to the matinee.
  I put a bell in the socks of my boots so that the costume would ring during the dance. This caused great delight among the children.

If you liked this material, tell your friends about it on social networks.
To achieve an ideal physique with beautiful contours of sculpted muscles, you need not only to choose the right system of regular physical exercises, but also to create a diet that helps reduce the level of subcutaneous fat...
Big belly– a general definition of disharmony in the structure of the body, in which the size of the stomach goes beyond natural proportions. It can be larger than the butt, stick out beyond the bust line and completely eliminate the waist. This is a common phenomenon among people...
People are divided into those who like it spicy and those who can’t stand the fiery taste of red pepper. But both of them admit that red pepper is not only a unique taste, but also beneficial for the body. To date...
The number of hormones produced by the female body is about seventy. Their task is to ensure the proper functioning of any organ and tissue of the body. Their level can decrease or increase as a result of the influence of various external...
Many are looking for that wonderful pill, that one true and absolutely safe way lose weight. Of course, it is impossible to say absolutely exactly whether this method is right for you, but the 25th frame for weight loss reviews really shows...
A happy time was childhood, when in the summer you could jump in the yard until your mother drove you home. Today, exercises with a skipping rope are used by athletes in training to work out muscles, and girls use them to lose weight. Why is this simple projectile...
Children's New Year's Eve parties are not complete without costumes of fairy-tale characters. Not everyone can afford to buy a suit. Moreover, the child is growing quickly and this will most likely only be an outfit for one time.
If you have a sewing machine and at least some basic sewing skills, you can sew new Year costume with your own hands. You don't even have to buy it for this. new fabric and other finishing materials. We offer the idea of gnome costumes for boys from what may be gathering dust in closets without use. They are not sewn according to all the rules of “cutting and sewing,” so this is in no way a training material, but only an example of how every inexperienced seamstress can make a New Year’s costume for her child.
To make a pattern, you can use a child’s item as a basis. For example, a turtleneck. We add a few centimeters on the sides, depending on how wide we want to make the jacket. Set aside the desired length. We make a round neckline. Not very deep, but enough for a head to fit through. We draw the armholes as in the photo.

The pattern of the collar and parts that are sewn to the armholes are also shown here.
Sew the shoulder and side seams. Here, for stitching details to the armholes, faux fur was used on the front side and knitwear on the back. We fold the fur and knitwear face to face and sew along one long and two side sides. We turn it right side out and stitch along the edge, placing the piece with the knitwear facing up, watching the fur pile and straightening it if necessary. We sew the finished parts with the armholes and sew them together. The edges of the strip should meet at the side seam.


The collar also consists of fur on the front and knitwear on the back. We sew the parts together, leaving the side unstitched where the collar will be sewn to the neck. Turn it right side out, stitch along the edge, placing the piece fur side down. We sew in the collar. We cut out a strip from the same knitwear and use it to trim the bottom.

Since jersey is used to finish the bottom edge, it can be cut in a straight line. If you take non-stretch fabric, you will need to cut it on the bias.
We make pompoms from black fur: two for the jacket and one for the cap. To do this we draw circles. It is convenient to use a cream jar or a small glass and circle it with a sharpened piece of soap. It is better to cut circles with a sharp blade.

Pinch off equal pieces of cotton wool. They should not be too large, but such that the pompom is softly stuffed and the cotton wool allows the edges to be sewn together without much tension. Using small stitches, we manually pass along the edge of the circle, insert cotton wool and tighten the thread. Make a few more stitches to secure the edges together. Leave the needles and threads on the pompoms.


We sew them to the jacket. It is better to do this together with small buttons on the wrong side. And it looks neater, and the fabric won’t tear.


Instead of fur pompoms, you can sew large wooden buttons. Replace the fur on the collar and armholes with wool or felt, and at the end of the cap make a tassel from the same material cut into thin strips.
Using some of the child’s pants, we make such a pattern.

Cut out 2 pieces and place them together with right sides facing inward. Sew the middle seams and then the crotch seam. We cut out a strip for the belt from knitwear (here black stretch velvet). Its length should be less than the circumference of the top of the trousers. We will insert an elastic band, therefore, having measured its width, multiply the resulting number by 2 and add 2 cm to the seam - we get the width of the strip. We sew the edges of this part together, fold it in half along the length and attach it to the top of the pants with a slight tension, laying a line 1 cm from the edge. Leave an unstitched gap. We insert the elastic, sew its ends, hide it inside and stitch the seam to the end. The elastic inside should fit evenly, so it is important to correctly calculate the width of the strip. As a result, wide pants gather gently at the waist. We also make cuffs at the bottom, but we cut the rectangles wider and do not insert elastic.

We measure the circumference of the head and determine the length of the cap.
Here the circumference is 50 cm and the length of the cap is 45 cm.

Fold the fabric in half with the right side facing inward. Along the fold we set aside the length of the cap and put marks (in the photo “a” and “b”). From point “a” we draw a perpendicular line about 3 cm long (point “c” in the photo). From point “b” we draw a perpendicular line and set aside half the circumference of the head, plus 2 cm for a loose fit, plus 1 cm for a seam allowance, plus 3 cm. From point “c” we draw a line equal to the length of the cap (point “d”) . We connect point “b” to point “d” with a smooth arcuate line. Cut it out. It is better to immediately check on the child’s head to see if the part is too wide or narrow. If everything is correct, place it on the fabric with right sides together, trace it and cut it out. For the inside of the cap, blue jersey is used here. It is softer, thinner and more pleasant.
The gnome's cap will hold its shape slightly. To do this, we use this kind of zig-zag cotton wool. It unwinds from the roll in a thin strip, which is very convenient.


We lay out the strips of cotton slightly overlapping. Place the outer part of the cap and baste it. We sew close to the edge along the perimeter. Cut off the cotton around the edges.


Place the inner piece face up on the side with the cotton wool and sweep it off. We sew close to the edge along the entire perimeter and immediately begin to stitch with straight lines (perpendicular to the bottom of the cap) at an equal distance from each other. We don’t interrupt the line: we finish stitching to the edge, turn it, sew the required distance along the side and again straight line down, and so on. You need to stitch along the front part. The fabric will bunch up a little, no big deal, you just need to make sure it’s evenly distributed.


Fold the cap right side inward and sew the side seam and the top 0.5 mm from the edge. Turn it inside out and straighten the tip. Take the pompom and sew it to the top so that it holds tightly.

From knitwear we cut out a strip 3 cm longer than the circumference of the bottom of the cap. We measure the width of the elastic, multiply by two and add 2 cm to the seam - this is the width of the strip.

We sew together the edges of this facing from the wrong side. Fold it in half and attach it to the cap, placing a strip on the front side. When sewing, you need to stretch the cap a little, because the strip is longer. Thanks to this, the cap will fit your head, holding it tightly, and loosely on your forehead, without pressing your ears.

The figure shows the simplest option.

We cut out one piece from wool (we determine the length by the girth of the abdomen, adding a few centimeters to the free end), make a hole according to the mark, insert the buckle tongue, turn the end inside out and fasten it. We sew the edges of the loop, turn it inside out and put it on the strap. The tip can be made straight. It is better to take a plastic buckle, as it is lighter and the strap will not sag.
This is the pattern for them.

The circumference of the foot is measured as follows: place your foot on the floor and use a measuring tape to measure (with an arc along the leg) from the floor on one side to the floor on the other.
We add a few centimeters to the resulting measurements, because the gnome’s shoes are voluminous. The tongue, toe of the shoe and tip of the sole are modeled freely. For the base of the sole, you can place a child’s shoe on a sheet of paper and trace it. An error was made here and the width of the tongue was not taken into account. That's why the shoes turned out to be huge.
When constructing the side part, divide the width of the tongue by 2 and subtract the resulting result from lines 3 and 4.
The material used was artificial leather, and the seal was a yoga mat. You can take wool or felt. And to add volume - cotton wool. Or do without a gasket altogether.


We cut out the details. If the material allows, we make the sidewalls one-piece; if not, the upper part is cut out separately.
Sew the sides together. To strengthen it, non-woven interlining is used (without ironing), and the edges are ground with a zigzag.


In the same way, we sew the halves of the lapels if the parts are not one-piece.

Sew the top parts to the main ones.


We apply the second parts of the top, sew and zigzag along the sides and top sides.


Then you can stitch along the face again with a thread of a contrasting color.

We place the assembled front part on the fabric (here stretch velvet) and trace it along the contour, excluding the top.

We make an allowance as in the photo. You need 2 of these parts.

Sew on the lining as shown in the photo.

The sealing material was glued with Moment Crystal transparent glue. It must be applied to the entire surface in a very thin layer. First, on one side and apply it to the faux leather part, then on the other side, apply the velvet part. Press down, for example, with a stack of books. However, you can skip this step. Moreover, then the skin comes off in some places, so this method is not very good. And the glue can even seep through the fabric and you get a hard stain.


For the bow we sew a strip.

For the sole and tongues, we also cut out paired parts and assemble everything together.

In the middle of the main part we sew a strip for a bow.

We sew the sole to the main part manually using an overlock stitch. We start from the spout, stepping back slightly from the edge. We also finish the seam a little short of reaching the end.


Sew on the tongue. Mark the middle point on it, align it with the nose and start sewing.


Pull the strip for the bow a little and mark the line where to sew. Remove from the shoe and stitch along the mark.


We form a bow, determining the length of its ends.

We scribble diagonally.

Now you need to sew the middle together - seam to seam.


The bow turned out too big and falling down.
Tip: To accurately determine the length of the strip you need to sew, use a measuring tape. Tie it on your shoe with a bow and see how many centimeters it takes.

Let's make it like this: put the parts together as in the photo and sew them together.


Of course, the bow was too tricky. It could be easier. For example, make it separately by sewing a rectangle, lightly stuffing it with cotton wool and gathering it in the middle. Then sew to the shoe. If you use felt or wool for the shoe, you can pull it up along the leg using an elastic band, and for a bow, a wide ribbon or a buckle is quite suitable.
We pull the bow tightly in the middle with a piece of elastic and sew the ends together.


Sew the bow to the top of the tongue, stepping back a little from the edge.


We make 2 pom-poms and sew one on each spout so that they “sit” firmly in place.


This is how the gnome's shoes turn out.


And the general image.

Since the costumes are for brothers, it was decided that they would not differ much. The main fabric is the same (it's an old curtain, by the way). Only a different color is used for finishing. And other shoes.
We take something as a basis. Here is a jumpsuit, and since it is tight-fitting and already small, we add quite a lot (the fold is on top of the fabric). Sew on the sides.

From the knitwear we cut out a strip around the circumference of the sweater, sew the ends together and iron the edges towards the middle.

Baste to the edge of the sweater, then stitch close to the edge. It is important here that the seam runs smoothly from the face and back and does not go beyond the edge. You can put a decorative stitch on top.


The neck can be made deep enough for your head to fit through freely. Otherwise, you need to make a fastener. To do this, make a perpendicular cut in the middle of the back part (or front part).

The facing would be more careful here, but if there is not enough fabric, we will also trim the neckline with a strip of knitwear. We adjust it from the inside out to the end of the cut.


Sew the edges and finish the stitching.


Now we make a buttonhole. We fold the thread in several layers, thread it through a needle, tie a knot, pierce the facing on the coal from the inside out, bringing it out.

We crochet a chain of air loops of the required length.


Now we insert the needle inside. Make a couple of stitches near the base of the loop, fasten and cut the thread. We turn the edging, baste it, stitch it.


It is also finished with decorative stitching.
Iron, pressing the curve at the bottom of the cut. Sew on the button. The clasp is in the shape of a drop.


We cut out 2 parts from the same jersey (their length is calculated according to the circumference of the place on the sleeve where we will sew) for the drawstring on the sleeves. Iron the edges towards the middle.

We tuck the ends and it is more convenient to stitch them manually.

To tie, take a thin ribbon, cut it to the required length and string a bead onto one end, securing it with a knot at the bottom.

Sew on the drawstring, moving away from the edge of the sleeve. We thread the ribbon. We string the second bead. We tie a bow.


We cut out along the bottom of the child’s overalls. Add as much as necessary.


Sew the middle (back and front) seams, then the step seam.

Iron the edges.


Since the pants are wide and need to be seated on the stomach, we make a fold or tucks on the sides. You can make them with an elastic band. But then, when cutting, do not forget to add on the hem.


Here a fairly wide strip of knitwear is used, which is shorter in length. The elastic was not inserted inside. The strip is cut out to such a length that it fits tightly around the stomach, but does not press.

Hem the edges of the trousers. At some distance from the bottom, we sew a drawstring and insert a ribbon with beads at the ends. We tie bows.

We cut it like this.


All parts are sewn with an overlay seam, so we make allowances of 0.5 cm, and on the sides and shoulders - 1 cm. There is no need to make allowances along the armhole, neckline, bottom and on the opposite edges of the front. But if you sew from wool or felt. Bulk material will need to be processed.
It is convenient to mark the seam line and apply the part along it. We sew on the front side.


First we assemble the back and front, then we sew along the sides and shoulders.


You can beautifully stitch it with a contrasting thread, for example, in the color of the main fabric of the suit.

We mark the places for the buttons.

We fold the thread in several layers, thread it into a needle, fold it in half, and tie a knot. We pierce the fabric and hide the knot with a few stitches.

We crochet a chain of air loops.

Carefully sew around the base of the loop, hide the thread, and cut it.

We tighten the buttons into knitwear. Cut out circles with a diameter larger than the buttons. If the fabric is thin, you can make a double layer so that the button itself does not show through.

Place the button on the wrong side of the circle, pull it together and sew the ends together randomly. To comfortably tighten the circle, sew around its perimeter. We do not cut the threads with the needle.

Sew on one button.

Then the second one, closing the base of the loop.


We cut out 2 stripes for the belt and a loop along the width of the buckle. The length is determined by the girth of the abdomen, adding the desired length of the free edge.

Place the strips together face to face. In the middle at the end we mark the place for the tongue, stepping back from the edge. We lay lines above and below this gap.

We thread the strip into the buckle, insert the tongue into the hole, fold the parts of the belt and, without tucking the edges, sew around the perimeter. We sew the ends of the loops together, turn them right side out and put them on the strap. Mark the location for the holes.

We cut out small holes (it’s convenient to do this with a seam ripper) and sew them by hand along the edge.


We cut it out and line it with cotton wool.


The same fabric is used for the interior.
We sew and turn it inside out.


We cut 2 strips along the width of the cap. The wool used here is the same as for the vest.

Place them together face to face and sew along one edge. Trim the allowance at the ends.

Iron the seam. We apply the resulting unfolded part to the knitwear. Cut out the inner part from knitwear as in the photo.

Sew the ends of the knitted part and the remaining ends of the front part. Let's put it together. Place the knitted strip face up and place the wool strip face up on its edge. We stitch close to the edge.

This is what the inside looks like.

Now we turn it inside out. We have a knitted part on top of the woolen part. So we put it under the foot of the sewing machine. Fold the edge of the knitwear evenly over the edge of the wool and sew a stitch. We make sure that the knitwear under the foot does not move forward too much.


Assembling the strip with the cap. We place it on the edge of the cap with the wool part outward with sufficient allowance. We fix it at 4 points at equal distances. We sew along the perimeter.


Let's make a pattern.

It’s better to check the result on paper: sew a shoe from it and, if necessary, correct discrepancies in the length of the sidewalls and the sole.

We cut out the details. Here the shoes themselves are entirely made of wool, and padding is made from padding polyester.


We collect these “sandwiches” and stitch them close to the edge. If necessary, smooth the edges.


We sew the sides of the shoes together edge to edge.


Hand sew the top together using a blanket stitch.

Cut out rectangles for the top. We sew the ends of each. We trim the top edges with a stitch.

Place it on the top edge of the shoe and sew it on by hand. First with small straight stitches, then with overcast stitches.

We sew the sole with a blanket stitch, starting from the nose.

We make 2 pom-poms from fur and sew them on the noses.

Ready! They turned out soft and cute.


And the general view.


Perhaps you will say that it does not quite look like gnomes. Yes, white fur is more associated with Father Frost or Snow Maiden. But we gave all the recommendations. No beard? And who said that these cannot be the children of gnomes who have not yet grown it?
Gone new year holidays and now it’s time to show Alyosha’s New Year’s costume.
Last year Alyosha was a cockerel, and this year he was a gnome. I sewed both suits myself.
For the gnome costume for the New Year, I used the following materials:
How to make a cap for a gnome costume
It's actually very simple. 🙂 As I did.
I folded the fabric in half, measured the length of the cap along the fold 50cm, measured 27cm away from the fold on one edge and connected the dots. Rounded one corner. The result is a triangle like this.
The measured side of 27 cm is half the circumference of the child’s head + 2 cm seam allowance. For example, Lesha’s head circumference is 52cm +2cm seam allowance = 54cm/2 = 27cm.
Then I folded the fabric with the right side inward and sewed it along the long side of the resulting triangle. When trying on, the cap fit tightly onto the head.
Therefore, if you need the cap to fit loosely, then add another centimeter to the circumference of your head.
I cut a strip of white faux fur with short pile 10cm wide and 54cm long (around the head with seam allowances). I sewed it.
First. Sew a strip of fur to the edge of the cap, so that the seam allowance is on the outside. Fold it over to close the seam and stitch again. Then the width of the strip can be taken smaller.
Second. As I did. I sewed the fur to the edge of the cap with the seam allowance inward, folded the strip of fur in half, hid the edge against the seam allowance and stitched it. So I closed the seam and increased the length of the cap by 4cm ((10cm - 2cm allowance)/2(folded in half) = 4cm).
And I sewed a fur pompom from Irishka’s winter jacket onto the top of the cap. After the holiday I returned it to its place. 🙂
How to sew gnome pants
Since I have problems with cutting, I made the patterns by tracing Alyosha’s elongated shorts. The length of my shorts was 50cm.
First I sewed each pant leg separately, and then I put one inside the other and sewed the middle of the panties.
I folded the bottom and stitched it, leaving a small hole for inserting elastic.
Initially, the belt was made narrow, and the pants had a low rise. In principle, it looked okay, but it didn’t suit me. Therefore, I added another wide strip, stitched it in the middle, and inserted an elastic band into the upper part.
The result is a triple wide belt.
How to sew a vest for a gnome
I made the pattern based on Alyosha’s vest from a two-piece suit.
I sewed three pieces. I cut a strip of white faux fur 7cm wide. I sewed it along the edge of the vest, just like on the cap (using the second method).
Then I sewed two buttons and loops for them from a thin cord.
The vest is also ready.
I didn’t make a beard; for me, it’s an extra detail for a child that will only bother him. Due to convenience, I also refused to wear any shoes for the gnome.
And here is Alyosha’s New Year’s gnome costume. Trying on at home.
White socks and Czech shoes for the matinee itself. I could have taken the colored striped socks from the cockerel costume, but I decided not to distract my eyes from the costume itself. 🙂
Did you like our gnome costume for the New Year? Click on the social media buttons! It costs you nothing, but it pleases me. 🙂
Dwarf costume on New Year
Dwarf costume for the New Year for a 4 year old boy. How to sew with your own hands.
Source: belyekorabliki.ru
Learn to sew online with Elena Krasovskaya
The closer the New Year's costume competition comes to an end, the hotter it gets!
It’s always like this by the end of the competition, everyone tries to make it in time. The next participant sent an application for her competition work quite recently and was in time!
Today I present to you my mother Christina and the wonderful Dwarf Vitaly.
Christina not only sewed a wonderful Gnome costume for her son, but also wonderfully designed her story, even including a poem.
I give the floor to the participant:
"… Hello.
My name is Christina. I really like your site. I recently decided to learn how to sew...I bought a sewing machine...so your tips help me a lot in mastering the sewing craft!
I have a wonderful son Vitaly, for whom I sewed a New Year's GNOME costume! We want to participate in the New Year's costume competition!
Happy New Year!…"
GNOME costume
I am a good New Year's gnome,
I bring good luck to the house!
I give you happiness
After all, I love you all!
At the little gnome's
There are jokes!
The costume consists of a vest, pants, a hat, a belt, and socks, which are worn on sandals. A turtleneck or T-shirt is worn under the vest.
Vest. Fabric – fleece. I didn’t have a pattern, so I attached a turtleneck, added 2 cm on the sides, 10 cm in length, and 6 cm (in width) on the front of the product for the smell. I cut out the neck. I covered the armhole, neck and bottom of the vest with padding polyester.
Trousers. Fabric – fleece. I cut it out according to the existing trousers, with allowances of 2 cm (so that the trousers were wide), for length - 4 cm. I inserted elastic bands into the waistband and bottom of the trousers.
Belt. Made from a wide black elastic band and a plastic plaque.
I sewed a ball made of padding polyester onto the tip of the cap.
Socks. Fabric – fleece. Consist of 4 parts: top, bottom and 2 sides. For the bottom part, I outlined the sole of the shoe, adding 1 cm on the sides, and 14 cm on the heel and toe sides. I narrowed the toe. The upper part is 7 cm wide, 26 cm long, of which the narrowed part is 11 cm. For the side panels, I outlined the shoes, adding 1-1.5 cm for allowances and for a narrow curved nose - 14 cm. The height of the side panels (from the heel side) is 13 cm Connecting products should begin from the bow. An elastic band was inserted into the upper part of the product. The nasal part was filled with synthetic filling from a pillow.
Christina, thank you very much for your participation, for the excellent use of the master class from my resource (doubly pleasant) and the cheerful mood that invariably appears when looking at your son Vitalik in the “Gnome” costume!
You can't stop sewing beautifully!
You can't stop sewing beautifully! Elena Krasovskaya You can’t forbid sewing beautifully! Guide for beginners Learn to sew online with Elena Krasovskaya Costume “Gnome”. Participant No. 12 The closer
Source: shjem-krasivo.ru
The gnome is a symbol of material well-being!
Good day or another time of day, friends and readers of my blog, Tatyana Sukhikh is with you! You can congratulate me: my nephew is 1 year old! I became an aunt for the first time! And although the topic of my article is: how to do baby suit DIY gnomes for the New Year are not related to one-year-old children, but finding a gift for my niece under the Christmas tree helped in writing this text. I found an excellent children's gnome costume for the New Year for babies aged one year and older - just what they need for their first photo shoot!
I will give you a certificate for filming and the cutest gnome or tiny Santa costume. The clothes are sewn in the form of a man's overalls and a hat. Do you think I came up with a good idea? Although the baby doesn’t need all these gifts now, all he cares about is his mother and bright toys, but what a memory it will be!
You've probably seen amazing staged photos of babies on the Internet? Photographers create real stories with little children, dressing them in different costumes and creating funny compositions around them.
I found a seemingly good example of how to make a gnome costume with your own hands, but the catch is that I don’t particularly like to sew, and, as it turns out, no one else does. As always, I am extreme...
If you have time and you don’t want to “sew up” with this problem, you can buy some attributes that will help bring to life a children’s gnome costume: leg warmers or striped tights, Santa Claus’s beard with an elastic band, a cap. At home, all you have to do is pick up short pants, a vest and cover the whole thing with rain.
But I don’t plan to buy anything, I don’t earn that much, unfortunately...
You'll have to figure out how to quickly make a decent children's gnome costume at low cost. As I already said, I have a 10-year-old son, and, accordingly, his clothes are too small for him. I will make an outfit from it. It is not necessary to strive to make all the details of the suit the same color. Use what you have on hand. You will have to sew during quiet time, but what to do?
style=”display:block”
data-ad-client=”ca-pub-8500929059585348″
data-ad-slot=”5932752765″
data-ad-format=”auto”>
Let's take it old sweater, golf, etc. and cut off the sleeve. The widest sleeve is rolled up, trimmed with rain and put on the head. We gather the end of the sleeve with a thread and sew it up. We make a pompom and sew it to the top of the cap. You can make a pom-pom like this: cut a circle out of fabric, sew around the circumference with the seam facing forward. Place a ball of cotton wool in the center and tighten the thread. It turned out to be a ball. We sew it onto the end of the cap.
If you are sewing from a piece of fabric, then simply cut out an isosceles triangle, the base of which is equal to the circumference of the child’s head. We sew the seam and decorate it with rain. Some mothers advise filling the cap with cotton wool, but I didn’t have that much at home. By the way, I spied the making of a cap on a portal for women.
From the same sweater we cut off the second sleeve and cut the front part in the middle. Cut the bottom in a semicircle. We cover everything with rain. I came across another option: we take a long plain T-shirt, cut the bottom with large teeth, make a torn edge, and decorate the bottom of the sleeves in the same way. This will be the vest. We put the vest over a regular knee-high and tie it with a wide belt. If you have a belt with a buckle, great. If not, cut out the buckle from golden cardboard and attach it to the belt. The same buckles can be attached to boots.
Any pants will do for a fairy-tale character. You can decorate them with contrasting patches and rain. I found an idea where a vest is sewn from the bottom of old trousers, and the top turns into breeches.
To make a believable children's fairy gnome costume, you need a beard. Fortunately, the wardrobe lady will give me this detail of the costume, but there are options for independent creativity. Take an elastic band and fasten long pieces of thick white thread for knitting onto it with a knot. You need to make it thick, then comb it. Sew an elastic band to the cap so that the beard does not slip.
If you are also making a children's carnival costume make a little gnome with your own hands, don’t forget about leg warmers or striped tights. This detail will add color to the image. Have time, but don't have the right tights? Sew the stripes directly onto your tights!
Usually gnomes walk with bundles on long sticks - nothing could be simpler. We take a scarf, put a hat, scarf, or any light object in the middle and tie the ends of the scarf with a knot.
The gnome's shoes are the most difficult task, it is for craftswomen. Needlewomen advise covering the shoes with fabric cut in the shape of a pointed boat. You need to stuff the toes of the shoes with cotton wool and use invisible stitches to secure them in a folded position.
For mere mortals like me, these manipulations are something beyond the pale. Therefore, I limit myself to buckles made of golden cardboard on ordinary shoes.
As you have seen, making your own fairy gnome costume is not difficult.
Sincerely, Tatyana Sukhikh, stay healthy and see you!
Good afternoon, dear blog visitors. I, Tatyana Sukhikh again with.
Hello dear readers of my blog. I, Tatyana Sukhikh, offer interesting ones.
Good day. I, Tatyana Sukhikh, want to offer a lot of interesting things about.
Good afternoon, dear friends, Tatyana Sukhikh is with you. When it comes.
How to make a children's gnome costume for the New Year?
DIY children's carnival gnome costume, don't forget about leg warmers or striped tights. This detail will add color to the image.
Source: metodbv.ru
Any event in a kindergarten or school is accompanied by a costume concert of children for their parents. The work of creating the image falls on the shoulders of the parents. No need to worry, in fact, all the costumes can be made by yourself with your own hands.
Today's master class is dedicated to a story about how to sew a gnome costume for a boy with your own hands.
DIY gnome costume for a boy: blouse or vest
In order to look like a gnome, you need to be dressed like a gnome. The main attributes when creating a gnome costume for a boy with your own hands are: a cap, a jacket or vest, pants or shorts and shoes. You can also complement the look with leg warmers if you are wearing shorts, a beard and a wide belt on your jacket.
Decide on the color scheme of the entire suit. If the jacket matches the color of the pants, then the cap must be a different color, and if the jacket does not match the color of the pants, then the cap must match the pants. It’s nice to look not only at the costume, but also to note the taste preferences of the person who chose and assembled the fabrics of the entire look as a whole.
A gnome's blouse is usually wrapped and always has buttons and a large belt.
To sew a sweater you will need fabric of one or two colors, thread, measuring tape, and large buttons.
Stage 1
Take measurements for the child and transfer them to the fabric using these patterns.

If it’s difficult for you and you get confused with the measurements, then you can do it easier: put the fabric from which you will sew a blouse on the table and attach to it any purchased blouse of your child that is just the right size for him. Draw an outline from it, and the patterns are ready.
You can mentally divide the jacket into sleeves, front and back body parts. Do not forget that with this method, for each part you need to cut out fabric that has already been folded in half, or, if the parts are from one layer of fabric, in its mirror image.
Stage 2
If you want to see your child wearing not a jacket, but a vest, then do not sew on the sleeves. The scheme for the body remains the same. The parts are sewn together from the inside. The cut edges are processed using an overlocker, then folded in one or two layers and stitched.
Stage 3
For decoration, you can sew a visor onto the shoulder of a vest of a different color. To do this, take the desired fabric, cut out a rectangle measuring 10x15 cm and fold it in half. Sew it to the inside of the fabric with the cut edge so that the folded edge remains hanging over the child's shoulder. Hide all the edges in the seam so that the cuts are not visible.
Stage 4
Sew large buttons on the chest. Tie a belt around your stomach.
DIY gnome costume for a boy: shorts or pants
Now sew your pants or shorts. If you want to sew shorts, then the suit can be complemented with striped knee socks - leg warmers.
Stage 1
Measure your child's waist and leg height from hip to bottom and from groin to bottom. Divide the circumference of the belt in half, since the fabric will be cut and sewn when folded.
Stage 2
Fold the fabric into four layers and transfer the dimensions to the drawing. Make the pattern according to this pattern.

The diagram shows that the design is applied to fabric folded in 4 layers. Next you will have two parts. Sew them together along the top side seams. Next, twist the product so that the seams run in the middle, and the two parts lie on the sides, folded in half.
Stage 3
Sew long edges in the pieces folded in half together. This will be the seam between the legs.
Stage 4
Turn over and stitch the remaining seams at the waistband and legs. You can sew or insert an elastic band into the folded fabric, which will hold the pants at the waist and tighten at the ankle. If the trouser leg is much wider than the leg, then the elastic band, tightening the lower part, will emphasize the pomp of the suit.
If you decide to sew shorts, then they are made according to the same pattern, only shorter in leg length.
DIY gnome costume for a boy: cap

This cap is very easy to make. You will need only two parts: a cone with a rounded bottom and a rectangle. The width of the rectangle is 20-22 cm, the length is equal to the circumference of the head.
Stage 1
Measure your head circumference using a measuring tape. Transfer the resulting dimensions onto the fabric. You choose the length or height of the cap at your own discretion. If you make it very long, the tip can be tied into a knot, as shown in the picture.
Stage 2
Cut and sew the resulting parts together. The crown for the cap can be different shapes and colors. The contrasting crown looks beautiful and highlights the headdress.
One of the decoration options could be cloves made on it. In this case, sew it on one straight edge and turn the other edge inside out.

It can also be made in two layers, which will give it additional rigidity.
DIY gnome costume for a boy: shoes
Shoes are also an important attribute in a suit. The gnome will not be at all fabulous or complete without beautiful shoes with curved toes and bells at the end. You can make them in several ways using a pattern.
For boots you will need colored felt or thick fabric and thick strong thread. You can use several colors of fabric and make the sole one color and the edges another. You can also make boots one color on the inside and another on the outside. When you put them on your feet and turn out the edges, it will look interesting.
Option 1

For this type of boot you will need to make the following pattern and cut out the parts.

Stage 1
Be sure to measure the length of your child's feet and the height of the instep from heel to ankle and transfer the measurements to the fabric. This is important, because if the baby is not comfortable in these shoes, then he will not feel the joy of the holiday.
Stage 2
Apply a design to the fabric according to the pattern shown above. Cut and sew the resulting parts together. Part A in the picture is the upper part of the shoe, and part C is the lower part or sole.
If you want, you can sew the parts together using a sewing machine, or you can sew them by hand. As a rule, the work is done manually using a buttonhole stitch, because it does not require much time and effort.

A buttonhole stitch looks like this and is sewn by hand using a regular needle and thread. It is used to process the cut edges of fabric or paper.
Stage 3
Decorate the shoes with bells or bumbons, which are sewn onto the sharp ends of the toes. You can also sew a bow from satin ribbon on the tongue of the shoe.
Option 2

This image shows the pattern and the final result. You can, just like with the first option, use several colors and types of fabrics.
Stage 1
Measure your child's foot size and leg height.
Stage 2
Draw the details on the fabric according to your measurements and cut them out. Sew them together by hand or using a sewing machine. Decorate with booms, bells and bows as desired.
DIY gnome costume for a boy: simple and complex images
Any event in a kindergarten or school is accompanied by a costume concert of children for their parents. The work of creating an image falls on the shoulders

Yesterday, March 10, Hubert de Givenchy passed away. The famous couturier, founder of the fashion house of the same name, classic died in...

Which dishes should be included in the menu and which ones should you avoid? What do nutritionists advise? - During the cold season, the body...

Lavender, bacon, foie gras and white wine pancakesAsian fadBlack ThaiFor Maslenitsa in Thai style they offer...

Expectant mothers will be interested in learning about spring-summer 2017 fashion for pregnant women. Every pregnant woman wants to look...

golden beige hue! * low price, mattifies the skin, is dense, does not spread well Good afternoon! and so...

When I wrote about the mistakes that women over forty make, many were indignant: what about men? Really...

Facial skin needs regular cleansing. But to preserve youth and beauty, it is important to pay attention to...

KenzoKi Belle de Jour Dream Night Mask Night care from the main cosmetic sybarites The Japanese KenzoKi came out...

I'll start with the basic rule: you don't have to take sports nutrition, but the right supplements will help you...

Essentially, there is nothing wrong with any emotion, but some of them can cause problems, if not...

It would seem that something new can be invented in the field of tableware production: here is a kettle, here is a frying pan, a bicycle...

At least once in their life, every person begins to think about why they have a lot of money, while others, working all day...

CONSULTATION FOR PARENTS “FUN EXPERIENCES IN THE KITCHEN.” Prepared and conducted by: MDOBU teacher...

State budgetary educational institution of the city of Moscow Secondary school with...

Which dishes should be included in the menu and which ones should you avoid? What do nutritionists advise? - During the cold season...

Lavender, bacon, foie gras and pancakes with white wineAsian fadBlack ThaiFor Maslenitsa in Thai style...