Fashion legend Hubert de Givenchy Hubert Givenchy personal life
Yesterday, March 10, Hubert de Givenchy passed away. The famous couturier, founder of the fashion house of the same name, classic died in...
A paper box is a very valuable item because it can be used as a place to put a gift. And give a person a gift not openly, but in gift wrapping, that is, in a box. This is even more interesting, since any secret intrigues and arouses interest. Or you can store some of your things in it, for example, shoes. Almost anyone can create a box out of paper. There is nothing complicated in its creation.
You will need: paper, decorations, scissors.
1. First we make the lid of the box. To do this, take paper measuring 21.5 cm by 21.5 cm and draw it diagonally. Lines connect opposite corners.

2. Bend one of the corners so that it looks towards the center (at the intersection of our diagonal lines). Then we bend it one more time so that the edge of this fold is flush with the strip drawn in the center. Then we unravel the figure and see that folds have formed, which we will need later.


3. We do the same thing that we did in point two with all other angles.

4. We make cuts on both sides as shown in the picture.

5. And we begin to fold our craft step by step.


6. After creating the lid of the box, we proceed to creating the bottom for it. To do this, take a piece of paper measuring slightly less than 21.2 cm by 21.2 cm. The bottom is made in the same way as the lid. When creating it, you take plain paper, unlike the cover, when it is best to use something colorful, containing several colors, perhaps even some kind of picture.


So you have made a paper box using our simple instructions. You can take other sizes for the box, but do not forget to make the bottom of the box 3 mm smaller than its lid.

You will need a little patience and time, as well as thick paper of any color (you can use it with patterns, or you can use plain paper).
1. Since we are making the box in a square shape, the sheet of paper must also be given a square shape before starting to create the craft.
2. It is necessary to bend the paper square in half crosswise and carefully smooth the fold line so that it is clearly visible. Unfold the square and repeat the same thing, this time bending the sheet vertically. Unbend the workpiece. You should have a square with two intersecting lines.

3. Bend the square in half diagonally. Then straighten it and repeat the same for the other diagonal.

4. Fold each of the 4 corners of the square towards its center to form a diamond shape.

5. Bend back the two opposite corners of the diamond so that the figure looks somewhat like a “candy”.

6. We bend the side parts of the “candy” vertically (that is, those that do not have sharp tops) to form a right angle. We bend its sharp edges vertically in the same way.

7. We bend both tops of the “candy” inside the box (first one, and then the second).

8. So you have made a box. True, without a lid. The lid will also have to be made in a similar way, but to create it you need to take a square of paper a couple of millimeters larger so that it can cover the box. To decorate the box in the future, you can use paints, ribbons, pieces of fabric or glitter. Here you can show your imagination to the fullest.

Such a box looks quite stylish and can become a real decoration for your room. To create it, it is better to use either colored or textured paper.
1. Fold a square sheet of paper in half.

2. Fold the resulting triangle in half again.

3. Unfold the edge as shown below in the figure.


4. We do the same on the other side. The result is a double square.

5. We bend the corners in the same way as in the figure below. We do the same on the reverse side.

6. At this stage you should have a figure like this (see picture).

7. Unbend the bent corner along the marked lines.


8. We do the same on the other side.

9. We turn the figure over.

10. We bend the edges in the same way as shown in the picture.

11. When you do these actions from all sides, you should end up with a figure like the one in the picture below.

12. Bend the corners.

13. You should get a similar figure. A little more and the craft will be completely done.

14. Rotate the figure and begin to unbend it, creating volume.


15. Very simply, the box unbends and becomes a stylish model, which is called an origami star box.
By the way, if you round the corners with a pencil or make a double bend at the corners, you can get a wonderful box, for example, like this picture below.

Now you know how simple and easy it is to create a paper box! Happy crafting!
What is a holiday? - they ask you one day. And you immediately answer with a smile: - This is when everyone is happy, says pleasant wishes, gives gifts... And in response to you: - So, if today you give someone a gift and wish something wonderful, then there will be a holiday? And it’s true... And you can even give a handful of sweets. The main thing is how to do it. Perhaps we should start with unusual packaging. A DIY paper box is a great idea for original gift or a surprise. Even a purely symbolic gift will be worthy of admiration if you present it in its own packaging.
So, what may be needed when making all kinds of boxes.
Useful advice. Before you directly take on the paper that will make up your box, try assembling it from plain paper. You will understand where to cut, how to make folds more conveniently, how to assemble the box. Plus, you can estimate what size box you need. Often the first pancake is lumpy - so let this lumpy be made of simple cheap paper. Decor. As for the elements for decoration, you don’t have to limit yourself here: make flowers from fabric and paper, combine ribbons and raffia, lace, whatever you can think of. The main rule is not to overdo it. And now about the boxes themselves. There are a huge number of options, models and schemes for their manufacture. We offer you the most popular ones - from classic round and square boxes at the base to unusual bonbonnieres. But first things first.
You can give anything in it. From candies and cookies to soap self made and decorations. Naturally, each gift must have an appropriate box decor. In this case, the packaging is stylized as a postal parcel. This gives it a special romanticism, because the services of traditional mail for sending letters and gifts are used less and less today. If you use colored paper with a picture - the box will have a completely different mood. Choose yours!

Redraw the diagram of the box onto paper. We think about the right size in advance. Cut it out.

Carefully bend the workpiece along the dotted lines that are drawn in the diagram. If the paper is thick enough, you can crease it first to make bending easier. To do this, attach a ruler to the fold lines and run a nail file (the tip of a compass, the tip of scissors) along them. There should be a groove - a depression along the line. Now all the folds will be clear.

We glue strips of double-sided tape as shown in the figure. Instead of tape, you can use a glue stick, but tape is still more reliable and more convenient.

We decorate the walls of the box from the outside while the box itself is still disassembled. And then we glue it together. All that’s left is to insert the gift and bandage the packaging!
The box of this model is more suitable for gifts for women. Although everything again depends on the gift and decor. In it you can present both beads and a tie (if you twist it with a snail), as well as a scented candle, a New Year's ball or even a cupcake! Such a DIY paper box can later serve as an excellent box for small items (buttons, beads, etc.).

So let's get started.

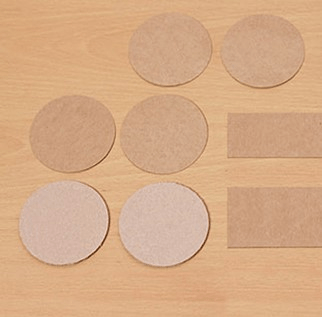
Select the desired radius of the circle at the base. Using a compass, draw 4 such circles on thick paper and 2 on corrugated cardboard. We measure out 3 strips on paper. Their length will be equal to the circumference of our circles (yes, we’ll have to remember our favorite formula 2πR). The widest strip will be the height of the box, another will be 1 cm narrower, and the third strip will be the narrowest - for the height of the future lid. It’s difficult - only while you’re reading this, you should start doing it - and everything will become simple and clear!


We cover the corrugated cardboard circles with paper. We have the bottom and base of the lid.

Glue the first and second strips together as shown in the figure (the vertical shift is approximately the thickness of the bottom of the box, the horizontal shift is 1 cm). The front side of the paper should be facing out. We decorate the future wall of the box.

We cover the bottom of the box with a double strip of paper in a circle. Then we paste the remaining narrowest strip around the base of the lid. The box is ready! We place the gift inside and close it with a decorated lid. You don’t have to decorate the lid separately, but tie the entire box with ribbon. For example, like this:

Is it possible to make a paper box with your own hands quickly and without any glue? Voila! There are more examples of such packaging than you can imagine. Everything is made from one sheet of paper. The main thing is to carefully cut the workpiece and bend it correctly. At first glance, the diagrams of some boxes are complicated, but in reality everything is much simpler. Each subsequent box will become easier to assemble. We recommend that you practice on plain paper first! When working with thick paper, creasing will again be of great help. Let's try!
Although if you make it larger, from paper with a delicate print and decorate it with a flower, it will be just right for giving women’s lingerie.


Ideal for sweets and anything fluffy and airy. In order to thread a ribbon or lace, make holes in the workpiece in advance with a hole punch.

Suitable, for example, for loose aromatic tea. Or for some bottles, candlesticks.

It looks very laconic, perfect for a men's gift.


And with brighter decor, it would be a good option for a gift for a woman.

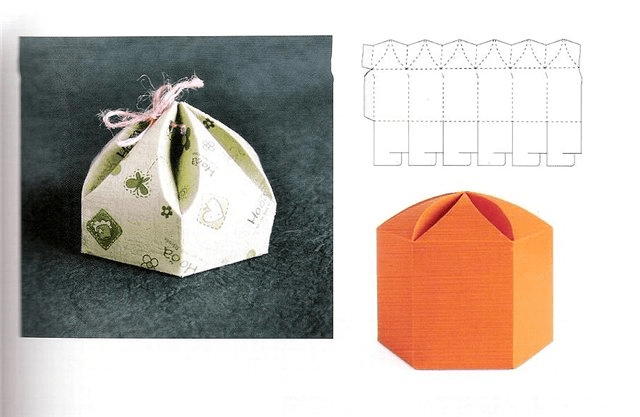
Bonbonnieres are a special type of boxes. Bonbon in French means candy, and the name of the boxes comes from the word “candy bowl”. It is the bonbonnieres with candies or sweet dragees that the newlyweds give to their guests at the wedding - in response to congratulations. Ordering a bonbonniere to be made for each guest is not a cheap pleasure. But it won’t be difficult for the bride and her bridesmaids to make bonbonnieres in the style and tone of the wedding.

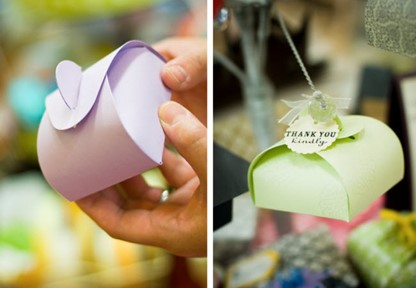
They resemble a box or a small chest. Just a little more difficult than the first ones. We make slits in them with a stationery knife, holes, if we want to pull in a ribbon or lace, with a hole punch.


As a rule, bonbonnieres are located on a special separate table and often on a dish or tray. You can beautifully play with this situation and make bonbonnieres in the form of pieces of cake. And you need to place them together, as if it were a paper cake.

First, we draw a large circle (the plane of the cake) and divide it into sectors in order to know the parameters of our pieces. Then, according to the dimensions, we draw a diagram of the development of the piece. We make the required number of developments, cut them out and glue them together. You can decorate before gluing, or after - it all depends on the idea of your decor.
Content
It is believed that every gift should contain a piece of the soul of the one who presents it. This can be a gift that is completely made with your own hands or ready-made (bought in a store), but decorated with your own hands. Today we invite you to go through master classes that will help us create a beautiful box with your own hands from cardboard with a lid. In such packaging you can give almost any gift, even the heaviest one. It all depends on how carefully you think through everything during the preparation stage.
In almost all cases, you will need a template. It is more convenient and easier to work with, and the box itself will turn out smooth. What other tools and materials may be required:
These are general tips for working on packaging; they will also be useful to you in creating other crafts:
Well? Let's proceed directly to creating the box? To get started, we suggest choosing one of several templates. There are options with a hinged lid and a lid that will separately cover the box.


Each of these box options is interesting. For example, a narrow box is more suitable for watches, gloves, books, a tie, jewelry, and a voluminous wide box is more suitable for toys, vases, tableware and other gifts.
So, first you need to transfer the pattern to the main material and cut it out. Now you need to carefully bend the box along the dotted lines (use a creasing tool).

Use double-sided tape or PVA glue (or any other glue) to join the box pieces together.

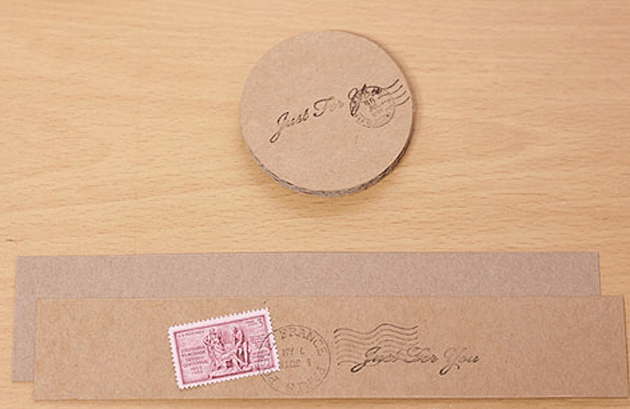
Now all that remains is to decorate the box, for example, using regular postage stamps or any other decor that will match the theme of the gift.

To create a round box you need to use a compass. You will need four circles of regular thin cardboard and two circles of thick cardboard. In addition, you will need one strip that will serve as the walls, one for the lid, and one strip should be a centimeter narrower than the strip for the walls. Visually it looks like this:
Now you need to cover the corrugated cardboard circles with regular cardboard circles so that you get a beautiful and neat bottom of the box, as well as a lid.
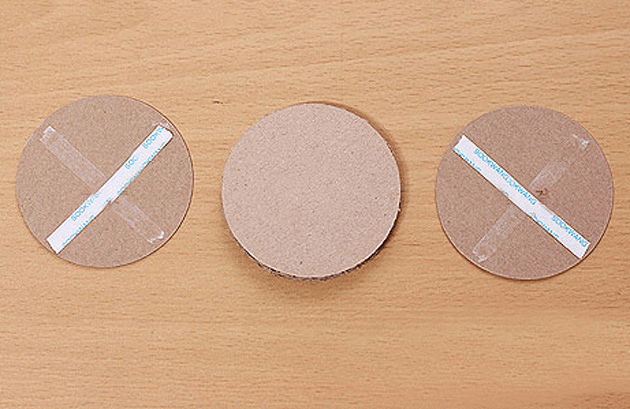
Now you need to glue the wall of the box with the strip, which you made 1 cm narrower. It should look something like this:
After this, you can begin assembling a cardboard gift box.

A similar action must be done with the lid. Already at this stage the box can be decorated. Use ribbons, decorative prints, stamps, beads, dried flowers and other elements. Usually a round box is used to give a gift to women. The gift looks very romantic and touching in such packaging.

This is a very convenient option because you don’t need to fuss with glue and wait for it to dry. All you need is material, scissors and a template. Since we have made a gift box for a woman, let’s make a simple cardboard box for a man.

All you have to do is print the template, transfer it to cardboard and cut it out. Now bend the box along the dotted lines and try to create a box like this:

Special valves allow you to close the box tightly and conveniently carry the gift.
The following option is more suitable for sweets, jewelry, a small figurine and other small gift.
Another option, but it’s more like a cardboard gift bag in which you can present a small souvenir. The packaging is also created without a single drop of glue, and all because of the well-thought-out design.

We really like the following version of a small cardboard chest, which is suitable for decorating a souvenir for wedding guests or for presenting jewelry. Use a utility knife to make the cut. And in this case it is better to choose thin, beautiful cardboard.
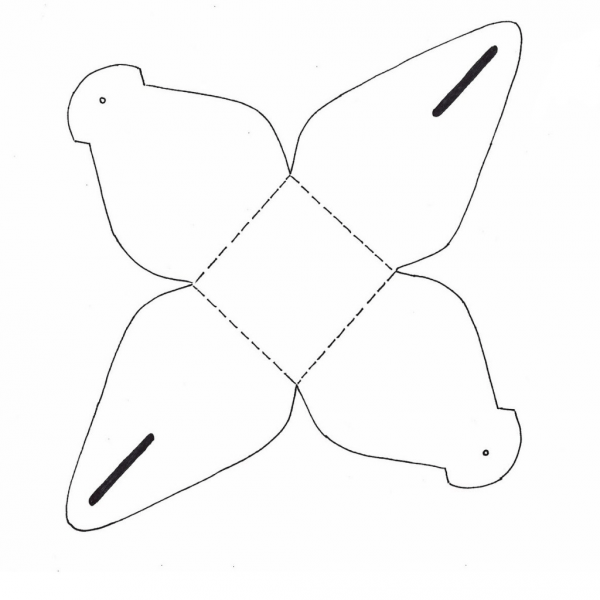
Here's what your cardboard box will look like:
Believe me, it looks simply amazing. You can create one piece to give a touching gift or create an entire cake from pieces that will be decorated in different ways. To get started, you definitely need to get a template:

Use thin cardboard, then the product will turn out elegant and will be more convenient to work with.
The cake without decorations looks something like this:

For decoration, you can use a variety of techniques: decoupage, paper flowers, quilling, pieces can be painted with paints or felt-tip pens.
Gift wrapping is a responsible matter, because even the most desirable thing, carelessly wrapped in newspaper or stuffed into a simple bag, will not make the impression that the giver expects.
Of course, buying gift wrapping is not a problem today. The stores will offer a wide variety of options: boxes, bags, etc. But all the same, standard packaging will not be able to convey the range of feelings that you want to invest in a gift.
Therefore, many are interested in how to make a gift box using scrap materials.
The easiest way is to decorate a finished box of a suitable size. This can be done in different ways. For decoration use colored paper, bows, decorative flowers, beads, sequins, pieces of lace, elegant braid, etc.


You will need to decide for yourself how best to decorate the box, depending on the reason for the gift and the personality of the recipient. It is clear that if a gift is being made for a girl, you can use more decorative elements. And if this is a gift for a man, it is better to show restraint. If desired, you can use a photo of the person for whom the gift is intended to decorate the box.

When decorating, it is advisable to emphasize for what reason the gift is being given. For example, if this new year holidays, then use snowflakes, Christmas tree cones, tinsel, etc. in decoration.
It is not always possible to find a ready-made box of the right size, so you can very easily fold a box from paper or cardboard.

Even a child can make the simplest version of the box; to make it you will need:
If you don’t have colored cardboard on hand, you can cover ordinary white cardboard with colored paper.

First of all, you need to draw a template on a sheet of cardboard:


To get it straight, you should use a template or compass:


You can decorate such a homemade box to your liking using rhinestones, beads, and ribbon bows. But using the technology described, it is worth making only a small box, since a large one will not hold its shape.
To make a rectangular, or rather square, box from colored paper with your own hands, you will have to tinker. Here is a description of the work sequence:


Now we begin to fold the box, the assembly diagram is as follows:


If you need to make a lid for the resulting package, you need to make a slightly larger box in the same way. That is, at the first stage, make a square 3-5 mm larger than the first.

Having mastered this technique, you can learn how to make boxes of various shapes: in the form of a pyramid, cone, cylinder, etc.
Today, instead of a material gift, the hero of the occasion is often given money; a box made in the shape of a book is very suitable for a monetary gift. Let's look at how it can be done:


Now all that remains is to decorate the top part of our book box. You can decorate it with flowers and bows, beads and sparkles. The exclusive box is ready.
Of course, you will have to tinker with making gift wrapping. Perhaps not everything will work out the first time, but with a little practice, you will be able to make unique packaging that will not be found anywhere else.
An original, unforgettable holiday gift is unthinkable without gift wrapping. And all because it contains a lot of magic and is a symbol of a pleasant surprise. Wrapping paper, ribbons, colored boxes with patterns have become an indispensable attribute of the festive mood. Of course, gift wrapping can be easily purchased at a craft store, but the host of the celebration will be much more pleased if you decorate the gift with your own hands. Therefore, we will tell you. Let's try to make gift wrapping in the form of a box ourselves.
To make a paper box you may need all kinds of materials, namely:
Scrapbooking paper is best suited for handicrafts - it usually has an interesting pattern on both sides of the sheet, which will be very convenient when creating a box. Various versions of designer paper, cardboard, multi-colored sheets of paper for pastels, whatman paper, wrapping paper, etc. are also suitable.
Before you start making crafts, it would be useful to practice on regular writing paper. This way you will “teach” your hand and understand where it is best to make folds or cut off unnecessary parts. In addition, it will be visually clear what size sheet of paper will need to be measured for the final version of the box.
You can decorate gift wrapping to your liking, but it’s still worth considering whether it will be relevant to the recipient of the gift. For example, a man is unlikely to appreciate pink ribbons and lace on a gift box.
There are a great many options for boxes, here we will look at the most popular ones - from simple cardboard ones to unusual bonbonnieres.
You can put almost anything in such packaging: a children's toy, a box of chocolates, etc.
Alternatively, you can style the box as a postal parcel. This way, the gift will become a symbolic reminder of the bygone era of mailings, which will add some hint of romance.
But if you use colored paper with an ornament to create a craft, then the gift will “go away” with a completely different impression. 

It is customary to give such boxes to ladies. Although such packaging can contain jewelry, a tie tightly twisted into a spiral, a handmade candle, etc. The paper cylinder box can later be used to store small items or jewelry. And making such a box is not at all difficult. 

Nowadays it has become fashionable to give gifts in a European style in elegant, unique boxes. But you can do something like this in five minutes. And for this you will need paper, sharp scissors and a little patience! Don't believe it's so easy? Then check it out!

Print out the diagram of the box and cut out a piece of wrapping paper along its contours. Fold along the contour lines, cut off the recesses for the future “lock” with scissors. Fold all the edges of the paper and close the box with a lock. Don't forget to hide a gift inside! 
This box is ideal for packaging sweets or other sweets.
A piece of twine or thin tape will help secure the lid, for which you need to make a hole in advance.

Also cut out a blank on colored cardboard and fold it according to the diagram.
A small but quite expensive gift can be “wrapped” in something similar. Making a paper box in this style couldn’t be easier!

Creating a holiday is so easy! Good luck with your crafting!
A paper box is a very valuable item because it can be used as a place to put a gift. And give a person a gift not openly, but in gift wrapping, that is, in a box. This is even more interesting, since any secret intrigues and arouses interest. Or you can store some of your things in it, for example, shoes. Almost anyone can create a box out of paper. There is nothing complicated in its creation.
You will need: paper, decorations, scissors.
1. First we make the lid of the box. To do this, take paper measuring 21.5 cm by 21.5 cm and draw it diagonally. Lines connect opposite corners.

2. Bend one of the corners so that it looks towards the center (at the intersection of our diagonal lines). Then we bend it one more time so that the edge of this fold is flush with the strip drawn in the center. Then we unravel the figure and see that folds have formed, which we will need later.


3. We do the same thing that we did in point two with all other angles.

4. We make cuts on both sides as shown in the picture.

5. And we begin to fold our craft step by step.


6. After creating the lid of the box, we proceed to creating the bottom for it. To do this, take a piece of paper measuring slightly less than 21.2 cm by 21.2 cm. The bottom is made in the same way as the lid. When creating it, you take plain paper, unlike the cover, when it is best to use something colorful, containing several colors, perhaps even some kind of picture.


So you have made a paper box using our simple instructions. You can take other sizes for the box, but do not forget to make the bottom of the box 3 mm smaller than its lid.

You will need a little patience and time, as well as thick paper of any color (you can use it with patterns, or you can use plain paper).
1. Since we are making the box in a square shape, the sheet of paper must also be given a square shape before starting to create the craft.
2. It is necessary to bend the paper square in half crosswise and carefully smooth the fold line so that it is clearly visible. Unfold the square and repeat the same thing, this time bending the sheet vertically. Unbend the workpiece. You should have a square with two intersecting lines.

3. Bend the square in half diagonally. Then straighten it and repeat the same for the other diagonal.

4. Fold each of the 4 corners of the square towards its center to form a diamond shape.

5. Bend back the two opposite corners of the diamond so that the figure looks somewhat like a “candy”.

6. We bend the side parts of the “candy” vertically (that is, those that do not have sharp tops) to form a right angle. We bend its sharp edges vertically in the same way.

7. We bend both tops of the “candy” inside the box (first one, and then the second).

8. So you have made a box. True, without a lid. The lid will also have to be made in a similar way, but to create it you need to take a square of paper a couple of millimeters larger so that it can cover the box. To decorate the box in the future, you can use paints, ribbons, pieces of fabric or glitter. Here you can show your imagination to the fullest.

Such a box looks quite stylish and can become a real decoration for your room. To create it, it is better to use either colored or textured paper.
1. Fold a square sheet of paper in half.

2. Fold the resulting triangle in half again.

3. Unfold the edge as shown below in the figure.


4. We do the same on the other side. The result is a double square.

5. We bend the corners in the same way as in the figure below. We do the same on the reverse side.

6. At this stage you should have a figure like this (see picture).

7. Unbend the bent corner along the marked lines.


Yesterday, March 10, Hubert de Givenchy passed away. The famous couturier, founder of the fashion house of the same name, classic died in...

Which dishes should be included in the menu and which ones should you avoid? What do nutritionists advise? - During the cold season, the body...

Lavender, bacon, foie gras and white wine pancakesAsian fadBlack ThaiFor Maslenitsa in Thai style they offer...

Expectant mothers will be interested in learning about spring-summer 2017 fashion for pregnant women. Every pregnant woman wants to look...

golden beige hue! * low price, mattifies the skin, is dense, does not spread well Good afternoon! and so...

When I wrote about the mistakes that women over forty make, many were indignant: what about men? Really...

Facial skin needs regular cleansing. But to preserve youth and beauty, it is important to pay attention to...

KenzoKi Belle de Jour Dream Night Mask Night care from the main cosmetic sybarites The Japanese KenzoKi came out...

I'll start with the basic rule: you don't have to take sports nutrition, but the right supplements will help you...

Essentially, there is nothing wrong with any emotion, but some of them can cause problems, if not...

It would seem that something new can be invented in the field of tableware production: here is a kettle, here is a frying pan, a bicycle...

At least once in their life, every person begins to think about why they have a lot of money, while others, working all day...

CONSULTATION FOR PARENTS “FUN EXPERIENCES IN THE KITCHEN.” Prepared and conducted by: MDOBU teacher...

State budgetary educational institution of the city of Moscow Secondary school with...

Which dishes should be included in the menu and which ones should you avoid? What do nutritionists advise? - During the cold season...

Lavender, bacon, foie gras and pancakes with white wineAsian fadBlack ThaiFor Maslenitsa in Thai style...