Fashion legend Hubert de Givenchy Hubert Givenchy personal life
Yesterday, March 10, Hubert de Givenchy passed away. The famous couturier, founder of the fashion house of the same name, classic died in...
It is not known for certain who came up with the idea of securing hair with an elastic band. But it was definitely a brilliant decision. The life of long-haired beauties immediately became simpler. The accessory allows you to create a huge number of hairstyles. And just by putting your hair in a bun you can change your look. A decorative elastic band will suit a child's hairstyle just right.
Elastic bands became popular in the 90s. Accessories in “acid” colors appeared on the market, which immediately appealed to fashionistas. Many people remember the real squeak of fashion from the 90s - fur elastic. Of course, today such accessories look archaic, but then there was a real “rubber” boom.
Today, the most popular hair accessories are spiral bands. appearance reminiscent of a telephone wire. “Spirals” fix the strands well and do not damage the hair. But... they are so monotonous and almost all girls have them. And sometimes you want something special or the look requires accessories with a “zest”. Try making your own elastic band. As a result, you will satisfy your creative impulse and receive a one-of-a-kind accessory.
If earlier “homemade products” were created due to shortages or lack of purchasing opportunities, today - to satisfy creative impulses and to get something truly original.
If you have never “made anything”, then start with simple options. They can be made in literally five minutes. At the same time, they look stylish and original. Provided that you are ready to show your imagination. Otherwise, the accessories will end up with the “smell of mothballs”: ridiculous and outdated.
What do you need:
How to do
The elastic can be made from denim, corduroy, suede or a piece of cotton fabric. You can leave it laconic, or you can decorate it: an accessory with beads or sequins looks beautiful.
What do you need:
How to do:
Using the same principle, you can make a headband with ears or a headband. “Eared” elastic bands are now popular among teenagers: please your daughter or niece with a trendy accessory.
For several seasons now, knitted elastic bands and “Athenas” (elastic bands-headbands for creating a hairstyle like a Greek goddess) have been on trend. They take some work to make, but the results are worth it.
What do you need:
How to do
The openwork accessory looks beautiful. You can use any pattern for knitting napkins. Needlewomen will be able to tie a simple elastic band literally in ten minutes.
What do you need:
How to do
“Athena” can be done in different ways. The easiest option is to sew a lace ribbon and a linen elastic band. The only difficulty is that you need to take the measurements correctly: those around you should only see the delicate lace on your hair. Of course, this option is only suitable if you plan to wrap the strands around the “Athena” and not wear the accessory over your hair.
Mothers of girls sure know how to do hair. All these braids, ponytails, “little buns” are a joy for little princesses. To do your baby's hair, you need to stock up on rubber bands. You can find so many accessories in stores that your eyes just run wild. However, homemade is always unique. And giving it to your daughter is much nicer than buying it: so much love has been put into it. You can also involve your little one in creating rubber bands: spending time together will bring a lot of fun. How to sew an elastic band from satin or velvet?
What do you need:
How to do
Another option for a festive accessory is an elastic band in the shape of a flower, made of fabric using the Japanese kanzashi technique. If you are not familiar with her, then it is better to first watch a training video, practice, and then invite your little one to help with the creative process.
What do you need:
How to do
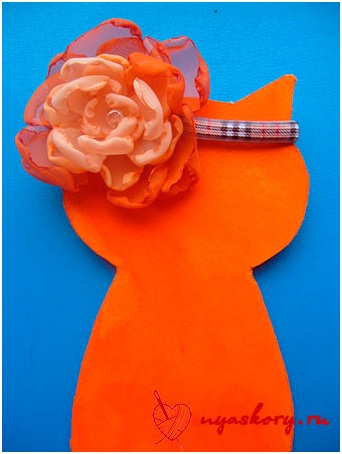
Foamiran flowers look beautiful on headbands. They are worn not only by babies, but also by young girls.


What do you need:
How to do
Schoolgirls are unlikely to appreciate the felt funny figures on the accessory - they are too much for kids. But you can come up with options for young fashionistas: make a felt flower or simply cut a circle out of the material, sew it to the base and decorate it with different “glitters”.
And one more life hack: if you feel like you can’t handle the process of creating an elastic band, but want to diversify your look with an original hairstyle, cut... a sock. By cutting the sock at the heel and twisting it into a tight roll, you will get an accessory for creating a bun (a homemade “donut”). This hairstyle is adored by schoolgirls, city fashionistas, stars, and ladies of Balzac’s age.
Hello, dear readers! It would be quite difficult to do without hair ties, because sometimes you just need to put your hair in a ponytail so that it doesn’t get in the way. It is also necessary to note the fact that beautifully collected hair in a high ponytail or other modifications allows you to wonderfully and not time-consumingly transform the image. Do you want to learn how to make elastic bands yourself? Then get comfortable in your chairs and study this review, which will tell you how to sew a hair tie.
A high ponytail with a stylish elastic band to match your clothes will look not just good, but really stylish! Well, since you can make such elastic bands yourself, your look will always look just perfect, because all you need to do is select the fabric for the elastic band in accordance with the material and color of the clothing.
Necessary materials:
We cut out a piece of fabric 20-25 cm long and 6 cm wide. Fold it lengthwise and pin it along the edge with pins.

We machine sew a strip along the edge. But we don’t reach the end by about 1.5 cm.

Turn the resulting tube out of the fabric. We pin and sew the two ends together.


We thread a 10 cm long elastic band inside and sew it by hand.


Then you need to manually sweep the hole into which the elastic was inserted. But you can also sew this hole from the outside using a typewriter, as shown in the video below.

All girls whose curls are longer than with a “boy’s haircut” like to wear their hair up more or less often, and here you can’t do without elastic bands. Of course, every lady has at least a dozen of these hair accessories in her arsenal, but sometimes you want something original and unusual, which is why the question arises of how to make hair ties with your own hands. Some interesting ideas you will find in this article.
The beauty of this idea is that in order to make a hair tie with your own hands, you can use any available materials without any restrictions:
 Of course, you will need some available tools and materials to hold it all together:
To make such a hair tie, thin fabric of any shade is suitable. The manufacturing process is very simple:
Important! As you can see, there is nothing complicated. As for the color, choose for yourself, but keep in mind that for blondes a soft blue or pale pink color is perfect, and for brunettes you can take a richer green or chocolate.
A wide velvet elastic band always looks very luxurious, and making it is as easy as shelling pears:
Important! This option is perfect for everyday wear. If you make the decoration itself less lush and wide, you can additionally decorate it, for example, with a bow. To do this, after you have sewn the base, cut out a rectangle from velvet, felt or leather. The length of the rectangle is the length of the bow. Gather the part in the center so that folds are formed in both directions and secure it in this form with a rivet on an elastic band.
This decoration is more suitable for girls and will be a wonderful gift or accessory for a holiday. To understand how to make such a hair tie with your own hands, read the instructions below:
 This version of a homemade decoration for your hair will be a real godsend for fashionistas, as you can unlimitedly show your imagination and make a new model every day. For this:
Important! If you have the time and desire to tinker a little longer, you can cut the plastic itself not into a rectangle, but in the form of a specific figure - a bunny, cat, flower, etc.
Leather jewelry looks very solid and stylish when the elastic band covers the bun of hair in several circles. If you just take a strip of skin, it will slide off, causing constant inconvenience. Therefore, we offer a leather option that will definitely look extraordinary and will hold your curls tightly in a bun.
Hello, my dear friends and blog readers. Today I want to tell you how to easily and simply sew hair ties from fabric. I made mine as a gift for my daughter's eighth birthday.
Dasha has been asking me for rubber bands for a long time, but with work, a dacha and a business, it turned out to be not at all easy to find time for even minimal sewing. Be that as it may, now my daughter is glad that her wish list has become a little shorter, and I am glad that I learned a new way to sew an elastic band.
In my youth, I often sewed such elastic bands for myself from different fabrics: velor, velvet, denim, silk. I especially remember one: made from knitwear in natural colors, which I crocheted along the edge. To go with it, I sewed a fabric headband and a top, also crocheted. Since then, the sewing method has been forgotten and I had to go online to remember how such elastic bands are sewn.
Materials:
Preparation method:
And one more angle:

Now one by one:


Do you use fabric hair ties?
A universal selection of gift ideas for any occasion and occasion. Surprise your friends and loved ones! ;)
Hi all! My friends, although it’s not spring outside yet, the time is not far off when we will all be walking around without hats. It’s worth taking care in advance about how your head will look, especially if you have very long hair. That is why today we will make our own hair ties!
We will move, so to speak, from the most basic to something more complex. In any case, you will definitely cope with all types of these elastic bands, because I will describe in detail how to make each of them
In fact, there are simply an incredibly huge number of ideas for creating rubber bands (and not only). And almost every one of them can be brought to life with the help of simple manipulations. In general, I will show you a lot of hair accessories. Make yourself comfortable, I’ll open the door for you to the amazing (really!) world of hair accessories (no matter how strange it may sound :))
Before you start, take a look here. When you get inspired, come back))
In order to make the base, you will first need:
Take the prepared piece of fabric, fold it in half lengthwise, and sew along the edge. Then fold the stitched piece with the holes facing each other and sew along the edge, leaving an opening for turning inside out. Turn the workpiece inside out.
Now insert the elastic band. Tie it, sew up the hole. That's all. This model can be used as an independent product or as a basis for a more sophisticated elastic band.

You just can’t imagine how many rubber bands you can make! Now let's look at the options for elastic bands that can be made even without serious knowledge of sewing art.
Four variations
To jump into creativity right away, I suggest you take a look at these four rubber band options. You can find each of them in one way or another in my articles about homemade gifts. At the end of the article I provide links to those master classes.
In short: bows are made using multiple folds. In the first case, several ribbons are folded, and in the second, the folds are formed from one strip. The flowers are collected from tightly gathered ribbon glued to the base circle. In the latter case, a bow is also placed on top.

Here's another bow option:
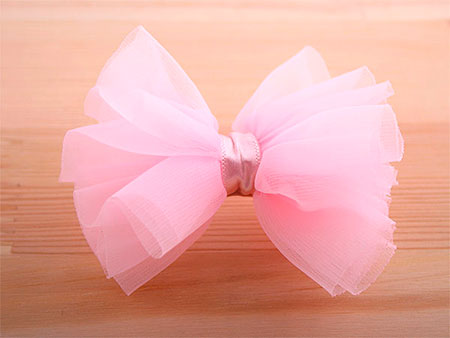
Beautiful and fashionable
I see this model very often now. Do you want to be the center of attention? Then make this beautiful and eye-catching scrunchie. Prepare a piece of fabric, wire, warp and thread with scissors.
Cut two ovals from the fabric and sew them together along the edge, leaving a hole. Insert a wire there. Place the future bow in an elastic band and tie it.
Elegant
There is no shame in wearing such an accessory for the evening. For it, prepare a base, shiny (optional) yarn, various kinds of beads and a crochet hook (although if the yarn is thick enough, you can do it with your hands).
The most important thing here is to tie the base properly. I don’t know what the correct name for this type of binding is, but it reminded me of a voluminous buttonhole stitch. As you weave, gradually add beads (this can be done later by pulling a thread through the elastic and gradually stringing them onto it).

Children's elastic bands for little girls
A five-leaf flower can be created by a simple operation: take a circle, sweep it along the edge, pull it together and stuff it. At the end, you sew it up and make several tightenings from the center. 
They love to attach such flowers to the headbands of newborns and young children in general. Take several circles of different sizes, make cuts along the edges and burn them. All that remains is to fasten it in the center with a bead.
Button happiness
Do you have a few original buttons that are definitely not useful for clothes, but do not give rest to your creativity? Then put them to use! Everything is as simple as shelling pears: take an elastic band, a button and sew one to the other. If the buttons are small and the base is wide, then you can simply make button decoration.
All kinds of additional decorations are welcome: ribbons, rhinestones, etc.

Lace elastic
An elastic band can be sewn in the same way as a base for an elastic band, but with one difference: after stitching, the fabric piece does not turn inside out. With the help of lace you get a very light and playful look.

The second option is with lace: this time only the flower is made from this wonderful material, and not the entire elastic band. To do this, just gather the lace and sew it in the center, the rest is a matter of decoration.

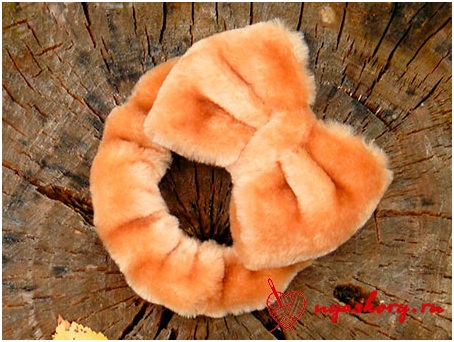
Elastic band "Bow"
An elastic band with a bow can be sewn from absolutely any fabric! I decided to experiment with fur
Below I decided to show you in a diagram how I made the bow. First, make the base for the elastic band, and then for the bow, take a wide strip of fabric and sew it in half (the same as for the base).
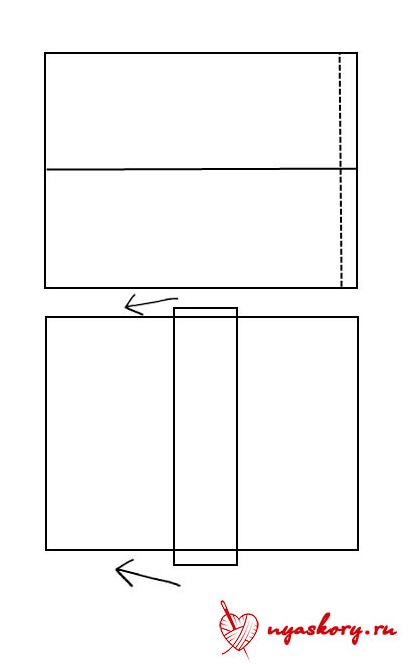
Then you sew the ends of the bow together, folding the piece in half again. Turn the elastic inside out and pull it in the center with a strip of fabric.
It turns out this cuteness:
From ordinary cotton fabric you will get the following:

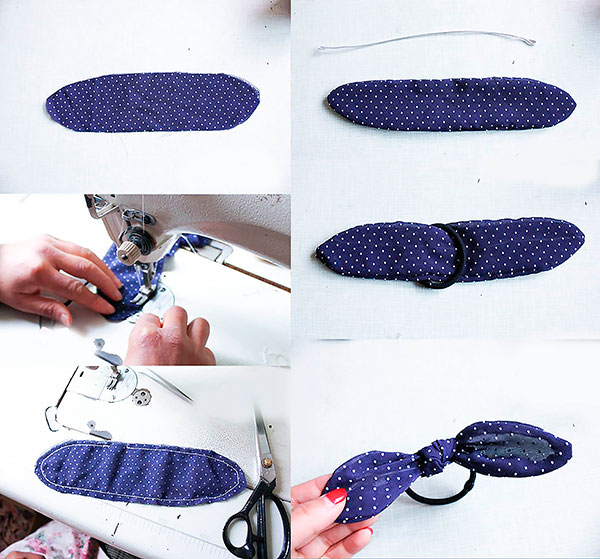
Elastic band “Bunny ears”
One day I wandered into a free master class as part of the BiblioTime project (I talked about it). The theme of the handicraft meeting was rubber bands. But if everyone decorated the cut with beads, then I decided to distinguish myself by remembering the “eared” specimens.
Unfortunately, I don’t have any photos of that product, but I can tell you about the creation of an elastic band with ears
To make such an elastic band, you will need a pattern:

Again we need a base for the elastic band. The ears are tied in a knot around it and you get a romantic and girlishly delicate look. What you need for spring

Rubber band "Jack" (Halloween)
I think many people have watched the cartoon “The Nightmare Before Christmas” by Tim Burton. As for me, the work is specific, but very bright and memorable.
Especially the main character is Jack Skellington, who you see below.

Yesterday, March 10, Hubert de Givenchy passed away. The famous couturier, founder of the fashion house of the same name, classic died in...

Which dishes should be included in the menu and which ones should you avoid? What do nutritionists advise? - During the cold season, the body...

Lavender, bacon, foie gras and white wine pancakesAsian fadBlack ThaiFor Maslenitsa in Thai style they offer...

Expectant mothers will be interested in learning about spring-summer 2017 fashion for pregnant women. Every pregnant woman wants to look...

golden beige hue! * low price, mattifies the skin, is dense, does not spread well Good afternoon! and so...

When I wrote about the mistakes that women over forty make, many were indignant: what about men? Really...

Facial skin needs regular cleansing. But to preserve youth and beauty, it is important to pay attention to...

KenzoKi Belle de Jour Dream Night Mask Night care from the main cosmetic sybarites The Japanese KenzoKi came out...

I'll start with the basic rule: you don't have to take sports nutrition, but the right supplements will help you...

Essentially, there is nothing wrong with any emotion, but some of them can cause problems, if not...

It would seem that something new can be invented in the field of tableware production: here is a kettle, here is a frying pan, a bicycle...

At least once in their life, every person begins to think about why they have a lot of money, while others, working all day...

CONSULTATION FOR PARENTS “FUN EXPERIENCES IN THE KITCHEN.” Prepared and conducted by: MDOBU teacher...

State budgetary educational institution of the city of Moscow Secondary school with...

Which dishes should be included in the menu and which ones should you avoid? What do nutritionists advise? - During the cold season...

Lavender, bacon, foie gras and pancakes with white wineAsian fadBlack ThaiFor Maslenitsa in Thai style...