“Pincushions for mom and grandma” (From an ordinary sponge for dishes)
Crafts from sponges for washing dishes are easy to make, since the material is soft, has a smooth surface, and cuts well...
Crafts from sponges for washing dishes are easy to make, since the material is soft, has a smooth surface, can be cut well with scissors, and perfectly takes the required shape with the help of threads or thin ribbons. Sponges come in foam rubber and in the form of sponges with large holes; they are harder and hold their shape well.
In the article we will look at options for making crafts from sponge with your own hands, which preschool children can make together with their parents, and children in the older group of kindergarten during manual labor classes. You can play with them, use them to draw and print with stamps. Photos of samples will help you understand what result should be obtained during the work process.
The simplest version of a sponge craft is considered to be a boat with a sail. Even kids can do this kind of work. The sponge can be left in its original form by adding a rod from a cocktail tube and a paper sail in a triangular or square shape. Older children will be able to give the craft a shape that is more reminiscent of a real boat.
You can not only cut out the corners at the front, but also create a recess along the entire boat. This is convenient for various games, for example, you can take a Lego man or a plastic soldier for a ride on such a sailboat. You can play with a handmade toy in the bath or take it with you to a river or lake.
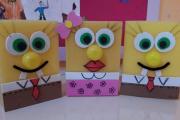
Using a yellow kitchen sponge you can easily create your favorite cartoon character - Bob Square Pants. You need to make a craft from a sponge using the appliqué method, since the shape of the product already corresponds to the chosen character. The nose is made from half a plastic chocolate egg package, and all other parts are cut out from bright cardboard.

Attach the parts to the foam using PVA glue. You can make additional wire arms and legs.
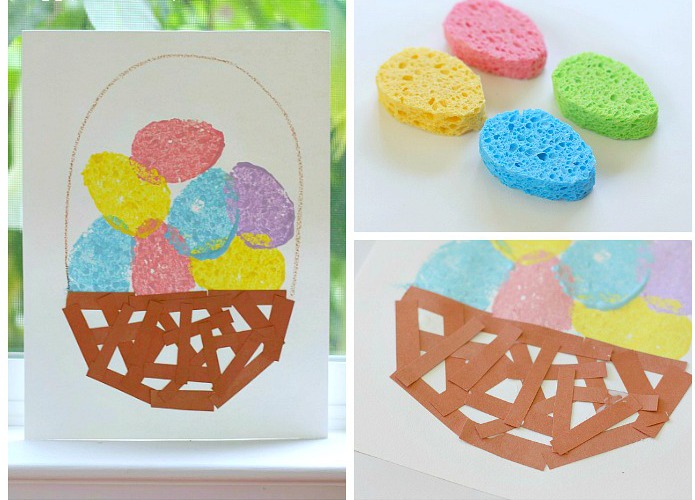
Crafts made from dish sponges can act as seals or stamps to create identical details while painting. In the photo below you can see that the washcloths were shaped into an egg shape with scissors. Then they dip it into a plate with diluted gouache paint and apply it to the work; in our example, an Easter basket with eggs of different colors was made using this method.
If you draw a tree trunk and foliage, and cut out the shape of an apple or pear from a sponge, then in a couple of minutes you will fill the entire sheet with bright fruits growing on the branches. An autumn tree with identical printed leaves will also look interesting. Some people decorate the background image using crafts made from sponges of different configurations, and after the paint has dried, they draw the main plot or ornament. Here you can fantasize in different ways.
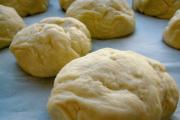
If you take several dense multi-colored sponges and cut them into equal strips, you can make multi-colored balls, as in the photo below. Before making such a craft from a sponge, prepare a nylon thread to tie all the parts together; you can use a thin elastic band. Before tying the strips together, they are laid 5 pieces in two rows next to each other and the middle is marked.

If, after connecting them together, it turns out that the sticks are all different sizes, don’t worry, they can be trimmed with scissors. You can play with such soft balls even in a room without fear of breaking the windows. It’s good to throw them into the water; they won’t sink, because they have many holes filled with air.
If you attach such crafts from dish sponges to a stick or wire and add a leaf, you will get spectacular flowers. They can be made from either single-color stripes or different ones. Using scissors, the shape of a tulip or flower with rounded petals is cut out from a whole thick sponge using a template.
You can make a house from several different colored sponges, as in the photo below. It is interesting to build any structure, it all depends on the amount of material and color. Moreover, the sponges themselves will not suffer at all from such work, and they can be used for their intended purpose even after the construction is completed. To secure the parts, use wooden toothpicks.

If you have a large supply of kitchen sponges, then if you wish, you can build an entire city, and by adding wheels from broken cars, you can make transport.
If you have a growing daughter, then there are always dolls in the house, and the child always asks for new toys to play with. With creative thinking and skillful hands, you can make a whole house with furnishings for dolls. It is easy to make upholstered furniture from kitchen sponges - armchairs, a sofa or a bed, placing them on a prepared base made of cardboard or plywood.

In the sample above, the sponges were joined together even without support, secured together with a furniture cover sewn from fabric. Additionally, cushions-rollers are made from hair. Such furniture will last a long time, and the costs for it are minimal, unlike purchased furniture for Barbie.
A rectangular sponge can be given any shape by tightening the foam rubber. For example, such a cute bear was made quickly. The upper corners were tied with golden rain to create ears. The head was marked with a wider ribbon of the same color. The remaining details of the face were simply drawn with markers.

In the article we looked in detail at how to make crafts from a sponge. This is not at all difficult, because the material lends itself to all types of processing. The sponges are sold in sets, so choosing the right color for the job is not a problem. The variety of crafts depends on your imagination, because you can create anything, from equipment to furniture. Be sure to involve children in working together, this develops motor skills of the hands and fingers, creative and mental abilities, which will later be useful for the child in school.
Therefore, crafts from dish sponges can be made with children in kindergarten and at home.
Upholstered furniture for a doll
For the doll you can make a sofa and two armchairs. For this craft you will need glue and 14 sponges.
1. Take 4 sponges for four parts of the chair: seat, back and sides.
2. Glue all the parts together. We glue the back to the seat, and then the side parts.
3. Now we make the second chair in the same way.
1. For the sofa you need to take six sponges: one for the sides, two for the back and two for the seat.
2. First, glue the two sponges together with their smaller sides. It turned out to be a seat.
3. Now we also glue two sponges for the back of the sofa.
4. Then we glue the backrest to the seat.
5. Finally, we glue the side parts - the armrests - to the resulting blank.
6. A cute and very soft sofa for your favorite doll is ready!
This craft can be given to your mother or grandmother.
In order to make such a pincushion, you need to prepare: glue, a red and green sponge, cardboard, scissors, a black marker, braid for a loop.
The procedure for performing the needle bed:
1. You need to cut a square out of cardboard.
2. Fold a piece of ribbon in half and glue it to the back of the cardboard. You will get a loop for conveniently hanging the pincushion.
3. Let’s start making the leaf on which our ladybug will sit. Take a green sponge and draw a leaf on it. Take scissors and carefully cut out.
4. Spread the resulting leaf with glue and press it to the cardboard. Let it dry thoroughly.
5. Now let's start cutting out the ladybug. To do this, draw a circle on a red sponge. Take scissors and carefully cut out a circle.
6. Glue the resulting ladybug to the leaf.
7. On our little bug we draw spots and a black head with a marker.
8. Cut out two small circles (eyes) from white paper. And glue them to the head of our bug.
9. The cute pincushion is ready!
Applications from sponges for washing dishes.
These crafts are perfect for kindergarten classes.
The teacher can prepare the parts by cutting small squares, rectangles, circles and triangles from multi-colored sponges in advance.
In the process of making such applications, children will study shape, color and develop imaginative thinking.
1. Invite the children to lay out a house out of foam rubber cubes on a sheet of paper. At the same time, apply glue to each cube.
2. Lay out a roof from two triangles and glue it to the house.
3. Next, glue the pipe to the house.
4. Lay out a lawn near the house using green pieces and glue it.
5. Children can make clouds from a blue sponge, and a sun from a yellow circle.
Craft for March 8th from a dish sponge “Vase with flowers”.
1. Let's take for the craft: glue, colored cardboard, sponges of different colors, felt-tip pens.
2. Cut out a vase from a sponge. To do this, cut off two corners from a whole sponge. Glue the vase to the cardboard.
3. Using a felt-tip pen, you can draw a pattern of dots and dashes on the vase.
4. Cut diamonds and stripes from the green sponge. These will be the leaves and stems for the flowers.
5. Cut circles from a yellow sponge for the centers of the flowers.
6. Cut out petals from a pink sponge.
7. Glue stems and leaves above the vase.
8. Glue the centers to the stems and the petals around them.
Ring with a rose from a dishwashing sponge
.
You will need wire and a bright sponge.
1. Cut the sponge into strips. Twist the strips into a flower and secure with wire.
2. Roll a ring from a piece of wire and attach a rosette to it.
If you take a kitchen spatula, wrap a sponge around its tip and secure it with a rubber band, you'll get a great brush.

With this brush you can not only paint, but also wipe away dust and dirt from hard-to-reach places (for example, window frames).
Another option for a brush is to cut a piece from a dish sponge and secure it with a clothespin.

Take a dish sponge, cut it in half lengthwise and make four cross cuts for your fingers. We insert the sponge between the toes and paint the nails, without fear of smearing the polish.

How to use a sponge for flowers? Before transplanting the flower into a new pot, place a dish sponge on the bottom, and pour soil and the plant itself on top, as usual. The sponge will absorb excess moisture, protecting the roots from rotting, and will also serve as a kind of filter: it will not allow the soil to be washed out of the pot, leaving dirty stains on the windowsill.

A dish sponge can be used instead of a soap dish by placing it on the edge of the sink. Firstly, this way the soap will not slide off at the most inopportune moment, and secondly, soap stains will not flow down the edges of the sink.

To prevent furniture legs from scratching parquet or wooden floors, glue pieces of dish sponge onto them instead of special pads. Place the leg of a chair or armchair on the sponge, cut to the desired size and glue with a drop of glue.
In the same way, you can protect the table surface from scratches by gluing pieces of dish sponge to heavy objects (a vase or a stone mortar for grinding spices).

Place the wet sponge in the freezer. You can put it in a bag or leave it like that. Once frozen, the sponge can be used in cooler bags for carrying groceries or as a substitute for a cold compress applied to bruises and bruises.

Dishwashing sponges will replace special wipes that are added during washing to prevent shedding, remove static electricity, animal hair and gray deposits. Take a small container or bucket with a lid and some sponges. Fill a bucket with water, add fabric softener, put sponges in the water and close the lid. When washing, simply take out one sponge, wring it out thoroughly and put it in the drum with your clothes. After use, you can throw the sponge back into the bucket. The result will be the same as using special laundry cloths, which are quite expensive.

Use a dish sponge to care for suede shoes, clothes and bags. Using the hard side of a dry sponge, you can quickly brush off dust and dried dirt, and remove stains by adding suede cleaning foam. The sponge doesn't even need to be wetted in water.
Irina Kirsanova
Spring has finally arrived! And very soon the most important holiday - "International Women's Day March 8". There is very little time left to cook for your beloved mothers and gifts for grandmothers. After all, you always want to please someone with something special, necessary and, of course, made with your own hands. I suggest making a very useful thing with your children - « Pincushion» . It is done very simply, the main thing is that the foam rubber does not need to be painted! Pincushions will decorate not only the interior of my mother’s and grandma's room, but will also be very useful!
How many stars are there in the sky!
These stars are for mom
I'll give it again.
And one morning,
Looking at me
Mom will smile: "My little star!"
So we need: Dishwashing sponges of different colors, colored paper, colored cardboard, scissors ordinary and curly, napkin, PVA or stationery glue, any ribbons or laces, gouache paints, brush, napkin, jar of water.

First, let's prepare the base. Take colored cardboard and cut out a square from it, cut out a smaller square from colored paper using curly scissors. Glue a small square in the middle of a large square, take a lace or ribbon and glue a loop on the other side. We secure it with a square of cardboard. You can also secure it with tape for strength. The result is a loop. The base is ready.


Let's get down to it pincushion. Let's take it dish sponges. We cut some in half, cut off the corners of others, and make a circle. We cut everything out depending on what we plan to do. Foam rubber is very easy to cut, you don’t have to make any special efforts, and the kids will find it very interesting.

I suggest you do « Pincushion - Fly agaric» . We glue all the cut out parts with the hard side onto the base, we make the grass from scraps, cutting the edges. Now, draw peas on the hat with gouache.


« Pincushion – Ladybug» . Cut out the leaf with curly scissors and glue it onto it "Ladybug". We paint the head with gouache, draw spots and paws.


« Pincushion – Chicken» . sponge Divide in half and cut out circles, trimming the corners. We cut out the beak, tail, comb and wing from scraps. We draw the paws with gouache and glue on the grass.

« Pincushion – Sun» . Let's take it sponge, cut out a circle, complete and cut out the nose, mouth and bangs from foam rubber, draw eyes and rays.

« Pincushion – Apple» . We cut out the apple stick from the remains of the hard part and draw a leaf.

« Pincushion – Vase» . Cut out the vase by cutting the top corners towards the bottom. We cut out flower circles from the scraps, glue and decorate with white gouache and draw leaves.

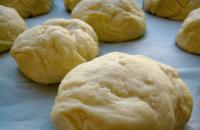
A great idea for a craft that is suitable for absolutely all preschoolers, starting from two years old. It’s great that making such “cakes” and playing with them later is equally interesting, and besides, they will certainly become favorite “treats” in the doll’s kitchen!
How to make crafts like this (clickable) |
||||||
 |
 |
 |
 |
 |
 |
|
A brand new dish sponge is a very attractive item in itself: bright, dense, elastic. Why not a cake! This wonderful set of cakes was made by teacher from Armavir Tatyana Kiryushatova.

Please note how simple the craft technique is: small sponges do not need to be cut, and anything can be used as decoration - broken hairpins, scraps of braid and buttons. The main thing is to glue them more securely.
” The set of “cakes” is very durable, and if necessary, they can... be washed!
Variations on the theme of the previous craft: Anna Pristash did not use a dish sponge, but a two-color washcloth with a textured surface, and the result was a real “cake with cream.”

” In general, pieces of “cake” can be easily obtained by cutting a sponge into triangular pieces. Mom is the best person to handle this task. Well, then you can do whatever you want with such a blank!
For example, you can glue a multilayer “cake” ( innerchildfun.com).

You can paint the “cake” with any colors - it will be a multi-colored “cream”. Painting a sponge is easy, and, of course, if necessary, you can always rinse it thoroughly and return it to its original state ( oneperfectdayblog.net).

You can decorate the “cake” with pompoms, beads, sparkles, buttons, or paint a pattern.

And here on the website sugarspiceandglitter.com They propose not to make accessories for the game, but to organize a real training camp for young housewives! As a cream - shaving foam with food coloring, decorations - cereals colored with food coloring. Of course, such a creation will not last long, but the technique of applying the cream can be honed to automaticity!
Crafts from sponges for washing dishes are easy to make, since the material is soft, has a smooth surface, and cuts well...
Hello, mother country! I want to talk about something that is very close and dear to me, to share my experience, so to speak. When...
Modeling is a useful and exciting activity not only for kids, but also for parents. This is an opportunity to spend time together...

MOSCOW, February 20 - RIA Novosti, Irina Ovchinnikova. Summer camp is a traditional format for children's recreation: teenagers live on...
"TROPICAL RAIN". Participants stand in a circle. The presenter stands in the center: “Now we will all together call for a warm tropical...

Homeschooling (homeschooling, from the English homeschooling - home education) is popular in the USA and Canada, has...

The time has come to send the children to primary school. The place has already been determined, but the free time does not match...
Tennis (or simply tennis) is a sport that at the dawn of its appearance was very popular among...

Ekaterina Morozova Reading time: 8 minutes A Many mothers don’t know about children’s demonstrative tantrums...

Young people often cannot get a job because they do not have the relevant experience. But in order for him...

Having a diploma from an institute or university, or at least a college or technical school, gives you a much better chance...
This game is aimed primarily at children. Little girls are unlikely to refuse...
“What do your clients and your work mean to you?” Natalya Yuzhanina: My client is a friend! Which is ready with...

A guide to easy and fast weight loss. The article contains all the ways to speed up your metabolism in...

Hello, mother country! I want to talk about something that is very close and dear to me, to share my experience, so...
Modeling is a useful and exciting activity not only for kids, but also for parents. This is an opportunity to spend...