Holy month of ramadan photo
The upper part of the Faisal Mosque is made in the shape of a crescent, it is the national mosque in Islamabad, Pakistan. She is one of the most...
This master class is presented in a step-by-step photo format for leaves and berries only. Description for the hat is not given.
Difficulty level: average
For leaves- Coast Eldorado Crochet Cotton No. 6, 50 grams = 175 meters, color - Melange (yellow-orange-brown).
For berries- Coast Eldorado Crochet Cotton No. 12, 50 grams = 285 meters, color - red.
Additionally used black and brown for twigs and stamens.
Hooks: For leaves - 1.75 mm; for berries - 1.5 mm.
leaflet- 3 cm long, 1.5 cm wide.
Berry- 1 cm in diameter.
These elements are made in the freeform technique.
Hook terms are standard.
Air loop (VP)
Connecting bollard (SS)
Single crochet (SC)
| Dial a chain of 10 VP | |
| Work (Ya yarn over and pull up a loop from each back half loop) to the end of the chain. There should be 18 loops on the hook. We begin to close the loops. Pull the thread through the first 3 loops at once in one step. | |
| Pull yarn through next 3 sts in one go | |
The first side of the leaf is ready. | |
| Turn knitting and work on the opposite side of the chain from the VP. Each time, insert the hook into the remaining half loop. Insert hook into 2nd st from hook | |
| Pull out a loop | |
| Nakid | |
| Pull up next st = 4 sts on hook | |
| Continue working in the same way until the end of the chain = 18 loops on the hook. | |
| We begin to close the loops. | |
| Pull the thread through the first 3 loops in one go. | |
| Nakid | |
| Repeat this operation (yarn over, pull the thread through the next 3 loops) - until 4 loops remain on the hook. | |
| Yarn over, pull yarn through next 3 sts. There will be 2 loops on the hook. | |
| Yarn over and pull through the remaining 2 loops on the hook to close the row. There is 1 loop on the hook. The second side of the leaf is also ready | |
| Turn the knit back to the right side. Insert your hook into the nearest stitch and sl-st to secure. | |
| Break the thread and fasten off. |
Run a chain of 4 VPs and close the SS ring.
Run 8 sc in the ring. Do not close the circular row of the SS.
Insert the hook into the ring each time.
Perform a total of 44 sc in a circle.
RLS layers should be superimposed on each other, be dense and form a berry.
Break the thread and fasten off.
The wrong side of the work is the face of your berry
The appliqué can be sewn onto the finished product, while it will be necessary to embroider the trunks of branches at will, or assembled into a separate composition at will.
Size: approximately 20x30 cm.
You will need:
Technique: Crochet
Ashberry. With a red thread, tie a chain of 4 c. n. and in the very 1st loop, perform 4 tbsp. s / n (sh. 19.1). You will need a lot of these berries.

Leaf. With a green thread, tie the initial chain from the 13th century. p. and perform a series of columns on the loops of the chain, as shown in cx. 19.2. Complete the required number of leaves with green and yellow threads.
Twigs. All branches are chains from to. n. of different lengths. Crochet the thinnest branches from thin threads No. 1.5. Knit thicker branches with a thicker hook, folding the thread into several additions. If a branch connected only with air loops does not seem thick enough to you, you can tie a number of b / n columns on the loops of the chain.
Good day to all.
And autumn has crept up imperceptibly. "Sad time".
But needlewomen have no time to lose heart. So much is not connected yet.
More than seven years ago I got hooked on freeform. This is a fascinating activity, almost crocheting.
I will talk in detail about the freeform knitting technique, show interesting works for inspiration, and together we will knit a rowan twig.
This branch can be your first step into the wonderful world of freeform, or it can simply remain a brooch or other knitted decoration.

I knitted leaves and berries with Yarnart BEGONIA threads (50gr. / 169m.), Crochet No. 2.
NET - threads PELICAN 50gr. / 330m. color 3964), crochet No. 1.
She knitted maple leaves and rowan berries according to Olga Krivenko's MK.
Knitted for the THIRD thread of the loop, so that a scar would turn out in the middle of the leaf:

1 - near or front half-loop (sometimes called a wall).
2 - far or rear half-loop (wall).
3 - the third thread of the loop, passing from below, it is inconvenient to cling to it, you can just get by with a far half-loop, but then there will be no scar in the middle of the leaf.
Look at my photo:


I knitted the CENTRAL part of the maple leaf, as in this video:
"Crochet - Lesson 182 - Irish Lace Leaf"
And the side parts of the leaf follow the same principle as in the next video.
How to crochet Lesson 24 Part 1 Single crochet leaf
Crochet Lesson 24 Part 2 Single crochet leaf
Birch or apple leaves.
I knitted according to this pattern from ZhM No. 537, but without tying along the edge of the sheet:

"Leaves" on Yandex. pics
Here they are birch beauties: 
A garland of these delicate leaves runs along the neck and hem of the dress.
Scheme of a mountain ash branch from ZhM No. 537:

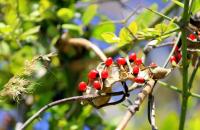
The first berries on a rowan bunch. Knitted very TIGHT, so that they would keep their shape and be convex. I sewed a small, dark bead into the middle of each berry. Knitted according to MK Olga Krivenko.


A centimeter and a matchbox in the picture are placed for comparison with the size of a rowan twig. 
Maple leaves. 
I knitted multi-colored leaves of different sizes:
BIG maple leaf: 
Preliminary layout of motifs on the pattern. Underside of the shelf: 
Shelf. Irregular mesh, wrong side of the product:

Fragment: 

I make handbags for knitted patterns.
For preparation, I use a factory bag bought in a store for 36 rubles. There are shops with goods at the same price.
Here is her appearance: 

Brim hat.

Cape Svetlana Kirilova: 
Rowan crochet- not only an element of such a beautiful and complex pattern as irish lace. This is a completely independent motive, try to use it as crochet appliques for any clothes.
Rowan crochet inspired the craftswoman Luba Davies for the design of a regular beanie-helmet crocheted.
In the presented master class, only knitting of decorative elements is shown. If you want to knit a hat, then check out our selection of descriptions: knitted hats.
So how crochet rowan Look on the site "All by myself".

crochet decorative ornaments on the wall are still relevant. If you have leftovers of multi-colored yarn lying around at home, we offer you to make a stunning decoration for your home with your own hands - a charming panel with a voluminous rowan branch. It turns out very bright and unusual. Rowan leaves and berries are crocheted and attached to linen fabric stretched or glued onto a cardboard blank. Then it remains only to place the panel in a wooden frame and hang it on the wall.
Size: 20 x 30 cm
Required:
● the remains of semi-woolen yarn of red, light green, green, yellow, black (or dark brown) color;
● hooks No. 1.5-3 (depending on the thickness of the yarn);
● wooden frame 20 x 30 cm;
● cardboard according to the size of the frame;
● a patch of linen fabric in natural color according to the size of the frame.
Abbreviations:
R. = row;
air n. = air loop;
conn. Art. = connecting post;
semist. b / n \u003d half-column without a crochet;
Art. b / n = single crochet;
Art. s / n = double crochet.
Air loop: insert the hook into the loop, throw a thread on it and stretch it through the loop.
Connecting column: insert the hook into the loop of the chain, grab the thread and pull it through the loop of the chain and the loop on the hook.
Half-column without crochet: a half-column corresponds to 1 lifting loop. It is used when knitting the edge of the product so that it is even and dense, and when connecting parts. It knits like this: insert the hook into the loop of the previous row, grab the working thread with a hook and stretch it through the loop of the row (chain) and the loop lying on the hook.
Single crochet: insert the hook into the loop of the chain or the bottom row and pull out a new loop, then grab the thread and knit 2 sts on the hook in one go.
Double crochet: yarn over the hook, insert it into the loop of the chain and pull out a new loop, then knit 3 sts on the hook in pairs in 2 steps.
With red yarn, tie a chain of 4 air. p. and in the very 1st loop, perform 4 tbsp. s / n ( scheme 1). You will need a lot of these berries.
With green yarn, knit the initial chain of 13 air. p. and knit a series of columns on the loops of the chain, as shown in scheme 2. Run the required number of leaves with light green, green and yellow threads.
All branches are chains of air. loops of different lengths. Crochet the smallest branches with thin yarn, crochet No. 1.5. Thicker branches knit with a thread in 2-3 crochet additions of a larger size. If a branch connected only with air loops does not seem to be voluminous enough, you can tie a series of single crochets on the loops of the chain.

All rights reserved. Copying material for publication on other sites is prohibited! It is allowed to use an announcement with a picture with an active link to the source ladies.by
Crochet shawl pattern "Bunches of mountain ash". Crochet shawl video tutorial.
Good afternoon You, apparently, have the wrong resolution for the video player, so the right piece of the video is not visible. The whole height is included, but the width does not fit.
And I'm glad that you liked my tutorial)
Good afternoon. The master class is wonderful, thank you) The video has been corrected
Thanks for the warm feedback! I'm very pleased))
The video is still cropped. I have Chrome browser. Notebook 15″

Knitted panel will decorate your favorite corner for relaxation.
Panel "Rowan"
MATERIALS: twine for knitting a plate, hook No. 2.5; remnants of green and brown yarn for a branch, hook No. 1.6; remnants of red yarn in pink shades.
Size: plate diameter 25cm.
PERFORMANCE: the plate is knitted according to cx.1.
Knit ch 10 and close in a circle conn. Art.
1 p.: 3 v.p. and 15 st. from n. in the girth of the circle, close the river. conn. Art.
2 p.: 3 vp, 1 tbsp. s n., 2 vp, * 2 tbsp. with n., 2 ch * - repeat 7 times and close the river. conn. Art. (st. Knit over the st. of the previous river). Starting from the 3rd p., Knit on ex., Adding from * to * 1 tbsp. from n. and 1 v.p.
Branch: knitted with brown thread. Crochet No. 1.25 according to scheme 2. Knit 40 ch. branches + 1 more vp, 1 tbsp. b / n in the 3rd p. chain. and another 6 st. b / n over ce chain Start performing the 1st rowan brush: ch 5 - the base of the brush + 5 v.p. - branch "a" + 3 v.p. for the leg of the berry.
Knit the leg of the berry: 1 vp lift and 2 tbsp. b / n, then perform a co-unit. Art. over the last 5th p. of the branch a ”and perform the 2nd leg for the berry, then the 3rd, 4th and 5th. On the remaining 4 p. branches "a", tie 1 tbsp. b / n, perform connection art. on the 5th p. chain. rowan brushes and then alternately perform 2 more branches of V. Having thus connected 3 branches, along the remaining 4 ch. tie brushes 4 tbsp. b/n. From the 1st rowan brush to the beginning of the 2nd, knit along the chain 20 st. b / n, make the 2nd brush of 5 branches "A" with 5 legs for berries each. Having connected the 2nd brush, knit on the remaining ch. branches of Art. b/n.
Leaves: fasten the green thread on the branch in the places marked in cx. 2 and knit according to cx. 3. For the stem of the leaves, tie 20 ch. and knit sheet "B" according to cx.4. Then knit 2 connections along the chain. Art. and execute sheet "B" on cx. 4, go to the other side and complete sheet "G" according to cx. 4, repeat the knitting of the leaves "C" and "G" 2 more times, knitting in a chain between pairs of leaves, 3 conn. Art.
Berries: cut paper strips 5-7 mm wide and 100 mm long, twist each strip into tubes and wrap them with a needle with a red thread of a different shade, while sewing branches “A” to the leg. On the other side of the berry, embroider a “star” with a brown thread.
IN kindergarten autumn holiday. Children learn rhymes and songs, and parents fall into childhood and collect herbariums for children. Homework from the garden is to make an autumn craft. A caveat - it is the parents who should do it, since the drawing of the son “like these are leaves” is not accepted. To be honest, I had to go out in the cold and collect leaves or wander around the birch grove in search of cones (maybe I'm lucky).
So I decided to crochet autumn leaves
In my opinion, nothing happened. Tonight I will find out what the teachers think about my work. So, this occupation took me all weekend. The most disgusting thing is to knit mountain ash (my beloved was sure until the last that this was a vineyard, however, the color of this “vineyard” confused him somewhat). 
I made the berries as small as possible. I crocheted an air loop, knitted ten double crochets into it, then ten more in the second row, and from the third row I began to knit two stitches into one loop. And so on until all the loops are closed. 
I didn’t have enough for more than eleven berries. Leaves are even worse. Small and spinning. I had to iron them later (which I strongly do not recommend doing, since the leaves, and knitted things in general, cease to hold their shape and begin to resemble some kind of snotty substance).

It was easier with maple leaves. The scheme is simple (this one has already been redone by me). In the one I found on the Internet, I did not like that the knitting goes in a circle. I decided to save time and threads and knitted alternately from the front and back. I think it turned out okay. 
By the way, also a nuance. From each thread and the same scheme, the leaves are different. The largest and most spotted one turned out to be generally inflexible, since the threads are thick. The orange came out the smallest. And yet, I tried to knit as tight and tight as possible - this way the leaves keep their shape and do not wrinkle.

Mushrooms are my personal invention and initiative. In general, ideally, I was going to knit rowan, apple, pumpkin and so on. And about mushrooms, my missus gave me the idea quite by accident. As a result, again, saving threads, time and my nerves. 
Knitting is very easy. Minimum thread. Another drop of cotton. Oh yes, I sewed a cardboard round into the “cap” of the mushroom, and only then sewed the leg. So the mushroom keeps its shape and the cotton wool "does not mix." The sizes of mushrooms are "by eye". It seems to have turned out original - both the same, and everyone is different.
About the basket. Ideally, there are schemes for a wallet with pens on the Internet. But there you need a wire, so that this same handle retains its shape. I decided to knit just a purse (basket or whatever you call it) without any handles.
Knitting is simple. First, a flat circle is knitted with double crochets. Then, when the width is sufficient, a series of columns is knitted behind the back wall. These will be horizontal stripes. Vertical stripes - the same double crochets, only behind the front wall. Very simple, and the drawing is interesting.
To receive the best articles, subscribe to Alimero's pages in Yandex Zen, Vkontakte, Odnoklassniki, Facebook and Pinterest!

You will need: beads 0/9
o \u003d orange - about 100 grams;
h \u003d black - about 5 grams;
h \u003d green - about 150 grams;
BB = brown flower wire 0.3 mm;
GB = green flower wire 0.3mm;
BD = 40 cm wire for stems 1 mm, 9 pieces of 50 cm;
MD = copper wire 0.3 mm.

Description of work:
Leaf: Each leaf consists of 13 "leaves". Weave in the Basic technique I, an example diagram for the "leaflet" - see figure 1 of the diagram.
String 3g (3 green beads) on the middle of 25 cm GB (green floral wire).
Start braiding in Basic Technique I according to pattern 1: 1-2-3-, continue 7x 3p, finish with 2-1- and twist the ends of the wire at the end of the work.
You will need 18 sheets, so in total, you should weave 234 "leaves" as follows:
A: 25 cm GB, 54 "leaves" according to the scheme: 1- 2- (7 x 3-) 2- 1-, twist the ends.
B: 26 cm GB, 36 "leaves" according to the scheme: 1- 2- (8 x 3-) 2- 1-, twist the ends.
C: 27 cm GB, 36 "leaves" according to the scheme: 1- 2- (9 x 3-) 2- 1-, twist the ends.
D: 28 cm GB, 36 "leaves" according to the scheme: 1- 2- (10 x 3-) 2- 1-, twist the ends.
E: 29 cm GB, 36 "leaves" according to the scheme: 1- 2- (11 x 3-) 2- 1-, twist the ends.
F: 30 cm GB, 36 "leaves" according to the scheme: 1- 2- (12 x 3-) 2- 1-, twist the ends.
For each sheet you will need:
3 “leaflets” of group A, 2 pcs of group B, 2 pcs of group C, 2 pcs of group D, 2 pcs of group E, 2 pcs of group F.
(see figure 2 of the diagram)
Take 30 cm of BD (stem wires) and fasten 3 "leaves" of group A to the end of the stem (BD) by winding the ends of the wire from each "leaf" around the stem (BD).
Take a skein of BB (brown floral wire) and wind it around the stem and the ends of the wire from the "leaves" for 1 cm from the fixed "leaves". Take 2 "leaves" of group B and fasten them to the stem by wrapping 1 cm of the stem and the ends of the wire from the "leaves" with brown floral wire.
Continue in this way until you use 2 "leaves" from each group.
Under the last (lower) “leaves”, wrap 4 cm of the stem with brown floral wire.
Make 9 leaves in this way.
Make 9 more leaves in this way, but use only 20 cm of stem wire (BD). At the same time, the stem is wrapped in a brown floral wire 3 cm under the lower “leaves”.
Clusters of rowan: You will need 9 bunches, each of which consists of 25-30 balls.
For one bead: Basic Technique IV: String 5o (5 orange beads) on 25 cm of MD (copper wire). Move them 8 cm from one of the ends of the wire and twist the ends of the wire under the resulting loop 2-3 times. Make 5 loops in this way, placing them as close to each other as possible. For each ball you will need 1 hour - one black bead (see figure 3 of the diagram).
Squeeze the loops so together to make a ball. Under each ball, twist the ends of the wire together 3 cm.
After you use all the orange beads, distribute the made balls into 9 clusters and form a flat bouquet (“umbrella”) from them. (See Figure 4).
Finally, twist all ends of the wires together 2-3 cm. Wrap these twists tightly with brown floral wire (BB) 3 cm.
Attach each bunch to the stem of one leaf that has been wrapped with brown floral wire 3cm under the "leaves" and wrap the stem under the bunch for another 3cm.
Attach a leaf wrapped 4 cm under the "leaves" to the stem, wrapping down another 3-4 cm.
Gather the remaining leaves and bunches in the same way.
Assembly: Take two branches together and wrap them with brown floral wire - start just above the first wrap and wrap both stems together another 2-3cm down.
Attach 2 more new branches to the trunk, wrap them again 2-3 cm down.
Attach the last branches one at a time, while under each of them wrap the trunk 1-2 cm. Under the last (lower) branch, wrap 6-7 cm of the trunk.
Stick the tree into clay (plasticine), you can use a flat bonsai pot and decorate with moss and stones.
The best articles of our site:
In autumn, nature is full of bright colors, it is incredibly pleasing to any person. Every autumn there are several bright days, when the sun is still warm, the leaves are burning red-orange colors, and the mountain ash is waving red tassels. Today we will talk about how to make a rowan branch quickly and easily with your own hands.
Plasticine is an excellent material for modeling lovers. Children especially love to sculpt something from plasticine. Making a rowan brush from plasticine with your own hands is very simple, for this we need quite a bit of material:
Instead of a board, a sheet of colored cardboard can be the basis. You need to take a piece of brown plasticine and roll it into a rod of arbitrary length, up to half a centimeter thick, this will be the basis for the twig. We cut the workpiece into any number of branches and branches, you can make 2-4 things, on one side we make an end converging into a thin line. Then we sculpt the blanks in the form of a twig on the base.
Let's start sculpting rowan berries. We tear orange plasticine into small pieces and roll balls the size of a pea, about 10 pieces. Glue a small black or brown dot to each berry. And to make the berries look like real ones, you need to make small cuts or scratches at each of the points.
We sculpt leaflets from green and yellow plasticine, you can also add a few orange ones. The leaves should not be too large, after you cut out a few leaves from a block of plasticine, you should give them a pattern, this can be done perfectly with a toothpick
The finished composition should be similar to the one shown in the photo.


The leaf is knitted according to this pattern.
The second side of the leaf is also ready.
There is also a scheme for berries:
To make several berries and leaves in this way, you can form a crocheted composition.
For lovers of weaving with beads, there is also a variant of rowan twigs.
To do this, we need small green beads, cutting, red-pink beads, brown beads, cutting. We will weave on the basis of copper wire.
The first step is to make a rowan tassel. To do this, we collect the branches of an arbitrary length of brown color, and at the tip a red-pink bead is fixed with a brown bead. You need to make about 12 of these berries. Several rowans can be fixed on one branch.
2-4. 2 pieces;
5-7. 3 pieces;
8-10. 4 pieces;
11-13. 5 pieces;
14-16. 4 pieces;
17-19. 3 pieces;
20-22. 2 pieces;
Each branch has 13 leaves. The general view of the composition is shown in the photo.

We learned how to make a rowan twig using three different needlework techniques. As you can see, this is quite easy to do. Such a craft will be a rather colorful decoration of your room. We also invite you to watch a short video selection on how to make a rowan twig quickly and easily with your own hands.
Knitted panel will decorate your favorite corner for relaxation.
MATERIALS: twine for knitting a plate, hook No. 2.5; remnants of green and brown yarn for a branch, hook No. 1.6; remnants of red yarn in pink shades.
Size: plate diameter 25cm.
PERFORMANCE: the plate is knitted according to cx.1.
Knit ch 10 and close in a circle conn. Art.
1 p.: 3 v.p. and 15 st. from n. in the girth of the circle, close the river. conn. Art.
2 p.: 3 vp, 1 tbsp. s n., 2 vp, * 2 tbsp. with n., 2 ch * - repeat 7 times and close the p. conn. Art. (st. Knit over the st. of the previous river). Starting from the 3rd p., Knit on ex., Adding from * to * 1 tbsp. from n. and 1 v.p.
Branch: knitted with brown thread. Crochet No. 1.25 according to scheme 2. Knit 40 ch. branches + 1 more vp, 1 tbsp. b / n in the 3rd p. chain. and another 6 st. b / n over ce chain Start performing the 1st rowan brush: ch 5 - the base of the brush + 5 v.p. - branch "a" + 3 v.p. for the leg of the berry.
Knit the leg of the berry: 1 vp lift and 2 tbsp. b / n, then perform a co-unit. Art. over the last 5th p. of the branch a ”and perform the 2nd leg for the berry, then the 3rd, 4th and 5th. On the remaining 4 p. branches "a", tie 1 tbsp. b / n, perform connection art. on the 5th p. chain. rowan brushes and then alternately perform 2 more branches of V. Having thus connected 3 branches, along the remaining 4 ch. tie brushes 4 tbsp. b/n. From the 1st rowan brush to the beginning of the 2nd, knit along the chain 20 st. b / n, make the 2nd brush of 5 branches "A" with 5 legs for berries each. Having connected the 2nd brush, knit on the remaining ch. branches of Art. b/n.
Leaves: fasten the green thread on the branch in the places marked in cx. 2 and knit according to cx. 3. For the stem of the leaves, tie 20 ch. and knit sheet "B" according to cx.4. Then knit 2 connections along the chain. Art. and execute sheet "B" on cx. 4, go to the other side and complete sheet "G" according to cx. 4, repeat the knitting of the leaves "C" and "G" 2 more times, knitting in a chain between pairs of leaves, 3 conn. Art.
Berries: cut paper strips 5-7 mm wide and 100 mm long, twist each strip into tubes and wrap them with a needle with a red thread of a different shade, while sewing branches “A” to the leg. On the other side of the berry, embroider a “star” with a brown thread.

When autumn comes, the well-known mountain ash ripens. It has medicinal properties, attracts with a bright color. According to old legends and myths, the time of the withering of nature is considered the name day of the tree. A colorful symbol of autumn can please the eye at any time of the year, if you make a craft in the form of a rowan twig with your own hands. Juicy red clusters are available to embody in many various ways. Consider some of them that will not cause difficulties even for beginner needlewomen.
 The bead weaving technique is quite simple and understandable, it will not be difficult for beginners who decide to take on such an exciting needlework for the first time.
Necessary materials:
Step-by-step instruction:
1. Bunch. We thread a brown bead, fold the wire, string a large red bead on a double base, followed by several brown elements (about 15-20 pieces). We twist the required number of blanks with berries together, forming a bunch.
2. Leaves. Each detail of a complex sheet consists of 23 rows of weaving. Thread a green bead into the middle of the piece of wire. We stretch two elements to one side, thread the other free edge of the wire base through them. We act according to this scheme:
Depending on the desired sheet size, we weave from 7 to 15 parts. We collect them on the petiole, separating them with brown beads strung on a wire base (2-4 pcs.).
3. We connect 2-3 leaves and a bunch into a rowan branch. Having made several branches, it will be possible to assemble a miniature tree.
 From uncomplicated material familiar to everyone since childhood, funny crafts are obtained.
To make a rowan branch from plasticine you will need:
There are no special instructions for sculpting a rowan branch. To create a three-dimensional composition or original panel It is enough to show imagination and remember a few rules.
1. Plasticine must first be kneaded so that it becomes elastic.
2. It is best to attach the craft to the base: a wooden, paper, glass surface is traditionally chosen.
3. The material is not able to keep its shape for a long time, especially at high temperature. It is recommended to place the finished plasticine product in the refrigerator for some time (up to an hour).
 Crochet lovers will certainly appreciate the possibility of an original embodiment of a rowan twig in a revered needlework technique.
Necessary materials:
Knitting instructions:
1. Berries. From red yarn we make a chain of 4 air loops, close. We perform in a circle in the ring 8 st.b.n. We continue without closing the row, tightly laying the layers on top of each other, until the desired size is obtained. For one bunch, you will need within 20 blanks of berries.
2. Leaves. From green yarn, we collect the initial row of 9-13 air loops, perform a row of columns, tie, forming a pointed tip of the leaf. We knit the number of parts at the rate of 7-15 pcs. per stalk of a complex leaf.
3. We make up a branch from chains of air loops made with black or brown yarn. We connect the details with a hook or sew with a needle.
A knitted rowan branch attached to a fabric and framed will be an excellent decor element or serve as a charming decoration for a decorative pillow.
Nafabriku for the magazine "With Your Hands"
Size: 23.5x30cm.
Crocheted from threads of the "Iris" type, 0.75 crochet. It took approx. 20gr. cotton thread with lurex, approx. 25gr. some green thread
crimson and brown, and very few melange pinks. On the grid a little black with metanit. You will also need a piece of black chintz for the background and a little PVA glue.
Having already a frame, pull it onto a piece of foam plastic white cloth, for example, chintz and fasten from 4 sides with tailor's needles. Draw the contours of the future picture. Skip 2cm. and draw another outline. These 2 cm. will be for tightening on the reverse side of the picture. Next, we knit the elements of the berries according to the scheme in girth and leaves.


Leaflets can be of other sizes if you change the number of air loops of the typesetting chain. We form branches from the bottom to the top with the help of a chain of air loops + single crochets, in the course of knitting connecting the leaves with a connecting loop. Place the branches on the canvas of the future picture face down, pin with needles, and then fasten with a basting to the fabric. In the same way, form bunches of mountain ash from the "berries".
The arrangement of elements and colors can be changed at your discretion. Here is just the case that you can use the rest of the thread, which the knitter always has. Next, along the outer contour, we pierce a needle into each corner and stretch a rubber band with a diameter of 3 mm. along the contour. Baste the elastic firmly to the fabric. When performing an irregular grid, the elastic band is assisted. The elastic band should be smaller than the outline itself, so that the picture is sufficiently tightened on the reverse side. At the end of the work, if it is not enough, then additionally lace up. Now we proceed to the implementation of an irregular grid over free space.
Carefully separate the work from the fabric, turn it on the face, fasten it with needles and make the tails of the clusters by tying with air loops and a chain of air loops + single crochets. We stretch our work on the pre-pasted format with a background fabric and insert a frame. Ready! Success!

The upper part of the Faisal Mosque is made in the shape of a crescent, it is the national mosque in Islamabad, Pakistan. She is one of the most...

Flowers at all times were a symbol through which people expressed their mood or their feelings. We present...

For some women, pregnancy is a long-awaited event, while others are looking for ways to avoid it. For this...

Fish oil contains a large amount of fatty acids, vitamins A, D, E, which are not synthesized in the body. They are not...

Near the seaside, a green oak; A golden chain on that oak: And day and night the learned cat Everything walks around the chain; Goes to the right...

How to make the learning process easy and interesting. We all know that studying is useful, without a diploma it is more difficult to find ...
As the famous saying goes, if you get a lemon, make lemonade out of it. It would be nice if in our...

Everyone knows this situation when you go to a birthday party and give money in an envelope? Do you want your...

Currently, piercing has become widespread among young people - a specific decoration of various ...

In everyday life, there are many opinions about the age difference. Some categorically deny the possibility of "unequal"...

Every girl dreams of having beautiful legs. But not always nature gives every girl beautiful legs with ...

The likelihood of getting mercury poisoning is much higher than we might think. In fact, it can happen to...

Question to a psychologist: I am 36. She is 34. I have been married for 14 years. They dated for 2.5 years before getting married. 12 year old son, 4 daughter...

Memories from deep childhood are inaccessible to people, as well as the memory of the moment of their birth. What is it with...
Flowers at all times were a symbol through which people expressed their mood or their feelings. We...

For some women, pregnancy is a long-awaited event, while others are looking for ways to avoid it. For this...