WITH in English“choker” is translated as “strangler.” This is not surprising, because this accessory fits the neck so tightly that it creates a wrapping effect. Today you can find a huge variety of chokers on store shelves. But if you want to emphasize your individual style and taste, it is best to make it yourself.
Today we have prepared for you instructions on how to make a choker with your own hands without extra costs.

DIY choker tattoo
The most popular type of accessory among young people is the choker tattoo.
We will need:
- a thin flagellum or fishing line about 2.5 meters long;
- stationery clip;
- lighter or matches;
- beads for decoration.


How to do:
- fold it in half and fix the working thread with a clamp to the book (or you can simply stick it with tape);
- we throw the right part of the thread over the left to form a small loop;
- Now we wrap the left thread around the right one so that the loops point in opposite directions;
- repeat the steps until the choker reaches the desired length;
- If desired, you can string one bead onto each loop, attach a pendant or pendant in the middle of the decoration, or you can place beads along the entire length.

We tie the first loop with the remaining tails of the thread, cut off the protruding ends and seal them with fire. In this case, the fasteners will be redundant.

Choker made of colored rubber bands
Elastic bands for weaving have won the hearts of teenagers - there are so many things they can weave with! You can also make a choker from them. If you are familiar with the fishtail weaving technique, then weaving the decoration will not be difficult. Well, if you took rubber bands and a machine for the first time, we offer a mini master class on how to make a choker from rubber bands. For convenience, each rubber band is in a separate color, so as not to get confused.

We will need:
- a set of rubber bands for weaving;
- slingshot for weaving or your own fingers;
- hook-and-loop fasteners

How to do:
- We put a white rubber band, twisted in a figure eight, on our fingers or machine;
- We put on blue and red elastic bands on top, without twisting them;
- carefully remove the ends of the white elastic band so that they fix the blue and red elastic bands;
- put the white rubber band back on and secure it with the red tips;
- repeat these steps until the choker reaches the desired length.

You can also weave the decoration using any convenient technique. In any case, it will look stylish and playful.

Ribbon choker
This decoration will emphasize the elegance and refined taste of its owner. Velvet or satin ribbon look advantageous as a material.

We will need:
- 50 cm tape;
- glue;
- scissors;
- decorative ring for decoration;
- clasp.

How to do:
- cut the tape in half;
- We fix the ring between the tapes and fix the fold line with glue.
- If desired, you can attach fasteners to the ends of the ribbon or simply tie it in a knot.

It’s even easier to make a choker with a bead or any other pendant. For this even step by step description for beginners it is not required, just insert the ribbon into the ring and tie it around your neck.

For special occasions, the ribbon can be decorated with rhinestones or beads, the main thing is not to overdo it!


Lace choker
Another elegant piece of jewelry that makes the list. best ideas homemade chokers - lace decoration. To do this you will need any lace ribbon, jewelry clips with clasps, pliers and 3 minutes of free time.

Manufacturing process:

- cut the lace according to the circumference of the neck;
- fix the clamps with pliers.

The choker is ready - enjoy the result!

For an evening out, the choker can be complemented with an elegant cabochon or stone.

Thread choker
Not the fastest option in terms of time, but, nevertheless, the photo of the choker looks very impressive!

We will need:
- a set of multi-colored floss threads;
- pendant or pendant for decoration;
- scotch;
- scissors;
- tape measure.

How to do:

- measure the circumference of the neck and add 2-3 cm to the resulting figure on both sides for ties;
- we separate 6 identical threads and fix them with tape at one edge for ease of work;
- separate a thread of a different color and tie each of the 6 threads in turn with a simple knot;
- we tie colored knots of thread along the entire length;
- fix the pendant in the middle of the decoration;
- The ends of the colored threads can be cut off or left.

To prevent the pendant from darkening over time, you can cover it with colorless nail polish.

Headphone choker
If you don’t have any of the listed materials at hand, but have old non-working headphones, you can use them as a working material.

How to do:
- cut off the excess parts so that only the wires remain;
- divide the double wire in half and cut off the fastening;
- tie the ends of the wires into 2 knots;
- We perform weaving in the same way as making a choker tattoo.

This way, a non-working mobile phone accessory can easily be turned into a fashionable accessory.

As you can see, you can make a choker from any available materials. They are so easy to make that you can make an original decoration for every outfit.


DIY photo of chokers


Choker is a decoration for the neck,
which will highlight the beauty of any fashionista. This accessory has not gone out of fashion for quite a long time due to its versatility.
It can also be worn with evening dress, and with jeans. Women and girls of any age category can afford to wear it, you just have to choose the right model. But such jewelry is not found on sale as often as we would like. Therefore, you can learn to do it yourself.
What can a choker be made from?
Choker made of fishing line.
The trend is black, white fishing line will look like an elegant decoration, especially with the addition of beads.
Choker made of small rubber bands.
Special sets of tiny rubber bands of different colors are sold; they come complete with a hook and detailed instructions, which will help weave them together.
Headphone choker.
For some reason, the headphones fail, and it’s a shame to throw them away, then you can use them for completely different purposes. Only the wires must look good; shabby wires will not work.
Choker made of satin ribbons.
A choker made of satin ribbons, where each eyelet will stand out, will turn out to be openwork and romantic; it can also be decorated with a beautiful pendant.
Beaded choker.
This option is suitable for festive dresses; by the way, making a choker from beads is not so easy, it can consist of many rows, contain beads of different colors, and have a wide variety of shapes.
Choker made of threads.
Wizards who master the technique of crocheting can also try crocheting a choker. A lace choker made of threads will look especially appropriate with a woolen dress.
Lace choker.
Very young girls will suit thin and elegant jewelry, older women will suit larger and more massive lace, but all options will look very elegant.
How to easily make a choker at home?
Translated from English, choker means “strangler”, as it fits tightly to the neck, but does not cause discomfort. This type of jewelry also looks like an openwork collar.
Chokers first appeared in American Indian settlements and served as protection against evil spirits; of course, back then they were made from natural materials. Then the fashion for chokers overtook Europe.
In the 90s, this decoration created a real sensation. It was worn by representatives of the fair sex of different ages. The choker also included a wrist bracelet. An accessory such as a choker is sometimes at the peak of its popularity, sometimes the fashion for it subsides a little. In any case, the choker is also in trend now.
The technique of making a choker is not complicated; you just need to decide what materials you will make it from.
How to make a velvet choker: step-by-step instructions
- Take a velvet ribbon
approximately 50 cm in size, it can be purchased at any sewing store.
- The main decoration of such a choker will be the end caps, which will secure the ends of the ribbon without sewing or gluing. Ask for this fittings in the same specialized stores as for velvet ribbon.
- Now it's simple: Using pliers, bend the ends at the edges of the tape.
- Tie the choker beautifully in a bow at the back of your neck
, this is the whole essence of this particular decoration, wear it with your hair pinned up.
- If you want the velvet choker to decorate the neck more at the front, measure a piece of ribbon that strictly fits the circumference of the neck, decorate it with a pendant and attach clasps (they are similar to end caps, only they are attached to each other).
How to make a beautiful choker from a satin ribbon?
- Cut a satin ribbon half a meter long, then cut it in half again.
- Place the connecting ring in the center of these segments, lubricate the edges of the tape with textile glue and, forming loops, fix the ring between the pieces of tape.
The loops on the edges of the ribbon should fit the ring tightly, it should not dangle.
- Once the glue dries, you can easily wear the choker by tying it around your neck and combining it with almost any clothing.
How to make a choker from beads: options with photos
Here are options for making a choker from beads with patterns for weaving them.
How to make a choker from lace: master class
- The model of this choker is not so easy to make, but the finished product will justify all the effort.
- Carefully measure the circumference of your neck so that the choker fits tightly to it.
- Make blanks for the flower, cut out six long petals and two round centers from felt fabric. Lay out the petals so that the bottom tier protrudes slightly and is longer than the top, and pin the pieces together with pins.
- Take one petal of the top and bottom layers, fasten them with stitches along the fold line and tighten the thread a little, a fold should form.
- Do not break the thread, then continue the same algorithm with the remaining elements.
- Gather all the petals tightly into a flower and sew one circle on top. Decorate the middle of the flower with beads, beads, and sequins.
- Weave a red ribbon into the black lace. At the same time, sew a black braid one centimeter wide, thereby securing the red ribbon. Decorate the cut beautifully by sewing black braid along the entire width of the cut.
- Measure the third part of the length from the beginning of the choker and sew a second circle in that place from the wrong side, and sew a flower to it from the front side. For decoration, attach a black chain to the choker.
How to make a choker: simple and clear diagrams
Below is diagram of a detailed description of a leather choker
.
You will need:
- Natural, soft leather;
- A cord, the length of which will correspond to the circumference of the neck, 5 mm thick;
- Scissors, needles of different thicknesses;
- Beads and rivets for clothing;
- Locks, nails, chain for decoration;
- Nippers, pliers.
- Make a mark on the inside of the leather, cut out two strips of one and a half centimeters. The length will be equal to the circumference of the neck minus 2 cm, which will then be supplemented by a clasp.
- Fold one piece of leather in half and fold it in the center.
- From the center on both sides, mark the places where the rivets will be attached, spacing 1.0 cm from each other.
- Now attach the rivets as shown in the photo.
- After attaching all the rivets, sew both parts of the leather together, simultaneously sewing with beads.
- Thread the cord prepared in advance between the leather flaps, so it will look more voluminous and hold its shape better.
- Continue sewing the seams with beads, reaching the middle; instead of the usual beads, sew a large one, the pendant will then be attached to it.
- Next, attach the clasp, just pinch the edges with pliers to avoid scratching, you can put a piece of fabric under the pliers.
- Attach a pendant in the center of the choker, where a large bead is sewn.
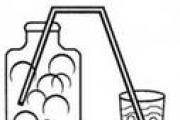
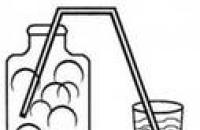
How to make a choker from fishing line?
- Prepare the necessary materials and follow the diagram below, it is quite simple in its execution. The only materials you will need are fishing line, scissors, and tape.
- Bend a piece of fishing line in half and secure it with tape, or use a paper clip.
- Proceed to weaving a choker, guided by the diagram.
- When the product reaches the desired length, tie the ends with a knot; no fastener is needed here. The fishing line stretches very well, so the product can be worn over the head.
How to make a choker with your own hands from floss threads?
- Take floss threads of different colors
, they must be combined with each other or create contrast.
- Weave them into a braid
, secure the edges with thread
so as not to bloom. You can make a choker from one braid, or you can weave several, only the length of the bottom braid should be slightly less than the subsequent ones, so they will form into a beautiful and even semicircle. Or weave one long braid and then fold it in half.
- To the edge of the bottom braid and on the sides of subsequent ones attach a large chain
. Attach a carabiner to the jump rings
. The decoration will be tied with ribbons, tie the edges of the ribbons to the carabiner
and wrap them around the ends of the braids. That's it, the choker made from floss threads is ready.
Here is another manufacturing option choker made from floss threads
.
- Even the most discreet look can be complemented by a bright and massive necklace. The simplest dress can be combined with a memorable accessory, and your look will be simply irresistible. A thread necklace is a type of jewelry that is difficult to find on store shelves, but you can create it yourself, and no one else will have such an accessory, it will be unique.
- The choker is supposed to be massive, so wrap floss threads on a board or other base to create a thick thread.
- Tie the thread at one end and cut it at the other.
- Braid the simplest braid using these threads. Strongly
do not tighten, it should be of medium thickness. Cut off the excess ends of the threads.
- Sew the braid to the metal chain
The longer it is, the longer the choker will be.
- Attach ribbons to the ends of the chain
, on which the decoration will be tied.
- TO Sew large beads on the bottom side of the braid
, place the largest one in the center.
- Experiment with the width of the braid and the colors of the threads; you can complement this choker with a similar bracelet.
How to make a choker from headphones?
Everything ingenious is simple. Tie the headphone cord around your neck several times and tie it with a bow at the front. Decorate the ends beautifully. Or you can attach a clasp to the cord and hang the pendant on it.
You can also weave a choker from headphones using the double knot technique.

How to weave a choker from rubber bands for braiding around the neck?
A choker is a decoration that can be made from many materials, even from silicone rubber bands. It is worth remembering that such an accessory is suitable only for very young girls. You just need to buy a large set of elastic bands at a craft store; the kit includes fasteners and a special hook for connecting them, but you can also tie them on your fingers, and this is the method we will consider. This weaving method is called fishtail. Look carefully at the photo to see how to properly connect the elastic bands together.
The word "choker" translated from English means "strangler". But don’t be afraid to go to another page. In the article we'll talk not about crime, but about a very original decoration that looks stylish and fashionable. Let's look at how to make a choker around your neck with your own hands.
History of decoration
The Indians of North America were the first to wear this type of jewelry. They made it from bones, fangs, skin and sinew, which emphasized their warrior status. The choker also made it to the UK. Queen Victoria, who reigned at that time and was a trendsetter, passionately fell in love with such jewelry. Therefore, “stranglers” that fit tightly to the neck became an integral part of Rococo.
Then the choker around the neck was woven from lace, leather, with the addition of ribbons, precious stones, and so on. IN modern world jewelry made a comeback thanks to the hippie generation, when they began to be woven from fishing line. And the dark color made it possible to get an imitation of a tattoo on the neck.
Style and choker
Today, necklaces are especially loved by representatives of informal movements: punks, goths, Tumblrs and others. The decoration mainly symbolizes rebellion and protest. Thus, famous rebels Britney Spears and Angelina Jolie often wore them.

Of course, not all people will wear such jewelry due to the fact that not every style is suitable for them. But young people really loved wearing them, protesting against the serious life of adults. Weaving is so easy to master that even a child can create a simple decoration.
with your own hands?
Let's try to figure out how to weave a necklace. For this you will need very little. The simplest jewelry is made from ordinary threads or fishing line. If there are already unnecessary wires from the headphones left, then they can also be used. Whatever is chosen as the material, the scheme of how to make a choker on the neck remains approximately the same.
First, two threads should be secured or tied together. This can be done using a binder on the table. Next, the macrame technique is used, namely the principle of fours. In this case, one thread is pulled to the side and pressed under the adjacent one. Then, if you release your finger at this time and do not pull the thread, the four will be visible.

If you want to use wires from headphones, then only the thinnest ones will do. Otherwise, the decoration will turn out too rough. A beautiful and unusual effect can be achieved if you make a choker around your neck with your own hands from several collected threads. You will get a multi-layered original drawing.
For weaving, it is best to find a dark-colored or thin fishing line. Only you should be careful with the latter, as it is unpleasant to the body. Well, to imitate a tattoo, whatever material is selected, it must be thin, dark and soft.
The drawing diagram is the same. But if you wish, you can familiarize yourself with other macrame patterns and use different colors. Then a DIY neck choker will become a very interesting and non-standard option that will attract the eye.
Various options: use your imagination
Another equally effective option would be mesh weaving. The principle is as follows. A round bead is strung on the center of the fishing line. Then one long piece is added on both sides. Then round and long again. After this, a round bead is strung on one side, and the other thread is threaded into it, forming a knot and pulling it so that the end result is a square.
This is repeated until the required length. This DIY neck choker can be expanded by going in the opposite direction, using already woven beads as one side, which will connect both rows.
The decoration can be woven from elastic lace or fabric and decorated with stones or beads, and clasps can be attached on both sides.
Some needlewomen even knit. At the same time, it can look no worse than an expensive designer necklace. The main advice to those who are thinking about how to make a choker around their neck is to use your imagination and imagination. Then the result can exceed all expectations.
Conclusion

In this article we learned how to make a choker for your neck from fishing line. In addition, other materials can be used. Threads, satin or leather ribbons, various beads and much more can truly highlight individual style and at the same time decorate the neck in such a way that this area stands out beautifully and attracts the eye.
A choker (translated from English as “strangler”, “necklace”) is a short necklace that fits tightly to the skin of the neck. The history of the accessory dates back to the 2nd century BC, when the Indians wore jewelry to protect vulnerable flesh.
The meaning of chokers has undergone changes over the centuries and has finally acquired a modern - stylish decoration for both women and men. In the 90s A fashionable accessory at that time could be bought on every corner, but not now. Fashionistas had to think about how to make a choker with their own hands.
Types and materials
The variety of chokers is impressive. The following materials can be used for their manufacture:
- Wood;
- Smooth leather and suede (artificial or natural);
- Spikes and rivets;
- Beads and beads;
- Semi-precious and precious stones;
- Fabrics, in particular satin and velvet ribbons;
- Elastomeric threads;
- Wires from electrical appliances.

The color scheme can be absolutely any, but the traditional choker is black. By the way, one of the most famous is the “choker tattoo”, which imitates a pattern on the skin of the neck.
How to make a choker?
Regardless of the material chosen, be it fishing line, spandex or headphone cord, the technology for making the simplest choker is the same.
You will need the following:
- Beading line or medium-thick elastomeric thread;
- Paper clip;
- Book;
- Lighter.
You need to determine the length of the thread. It should be approximately 2.5 meters.
LOOPS technique
- Fold the cut thread in half.
- We fix the fold with a stationery clip to the binding of the book.
- Place the right thread under the left one, and return the end of the right thread under the right thread.
- We move the resulting loop closer to the clamp, as if tightening it.
- Similarly, we place the left thread under the right one, and return the end under the left thread, tightening it. Now the loop is located on the other side.
- Let's alternate. Having reached the middle of the choker, you can insert a decorative piece - for example, a pendant. You can add beads to each loop.

Try on the result of your labor - ideally, the jewelry should fit snugly to the neck and be worn over the head without a fastener (if it is made of an elastic base). Having convinced ourselves of this, we come to the final stage:
- We thread the loose ends into the first loop;
- We tie knots;
- Cut off the excess;
- Seal it with a match or lighter.
Be careful! Use metal tweezers as a thread holder to avoid getting burned.
Headphone choker

We take a cut cord from a faulty charger or from headphones, make a longitudinal cut in the middle, and tear it off.
This will be your thread - use the technique "LOOPS" and do not forget that such an accessory will look rougher.
Ribbon choker
In order to make a choker from a ribbon, you do not need to weave fancy patterns - you just need to take a ribbon of the required length, purchase a clasp and decide on the decorative elements.

The “collar” can be made from a strip of lace, satin ribbon or from any other fabric embroidered with beads and beads. A choker made of black velvet ribbon with a small pendant in the middle would be laconic:
- Use scissors to cut the required length.
- Using pliers, secure the fastener at the ends of the tape.
- In the middle we fix the selected pendant or pendant.
Tattoo choker (video instruction)
Don't know how to make a choker with your own hands? Well, make yourself comfortable =) The word “choker” comes from the English “choker”, which means strangler. It is no wonder that this short decoration acquired such a name; it is elastic, easily stretches and tightly wraps around the neck with thin weaves. This fashionable accessory has many varieties, and young needlewomen, in pursuit of originality, are trying to make a designer necklace with their own hands.
Choker tattoo
Information sources claim that necklaces have been worn since time immemorial. Among the leaders of the Mayan tribe, short chokers served as jewelry with deep semantic connotations. Made from precious metals, wood and leather, velvet and satin, form-fitting necklaces have been worn throughout time, from the ancient kingdoms of Egypt to the noble ladies of Versailles, from the Native Americans to the opulent Renaissance.

Today, young teenagers often wonder how to make a choker with their own hands. And in these creative impulses they can be helped by: detailed job descriptions, necessary materials, a reserve of perseverance and patience.
The color range of exclusive jewelry can be very diverse, but real fashionistas prefer a traditional choker in an elegant black color.
Choker tattoo - make a stylish decoration yourself!
A popular necklace is made from fishing line, spandex, or any scrap cord. The weaving process is so simple that any smart first-grader can handle the job.


For the creative process you will need:
- fishing line or any elastic cord of medium thickness;
- beads optional;
- stationery clip;
- base for weaving;
- matches or lighter.
The length of the working thread should be approximately 2.5 meters. For manufacturing, the “Loops” technique is used, which means loops.
Progress:
- The working thread is folded in half and fixed with a clamp to any surface, for example, to a book.
- The right thread wraps around the left, forming a beautiful loop, the weave is pulled closer to the clamp.
- The next turn, the left thread twists with the right one and the loops look in different directions.
- If desired, you can put small beads on the fishing line, and then twist the elegant loops.
- Exactly halfway through the work, you can skip a decorative pendant or any symbolic pendant.

 DIY choker tattoo: photo how to make
 As you work, you can try on the necklace to determine the desired length. The elastic choker stretches easily and the head fits through without additional fasteners.
To complete the work, you need to pass the loose ends into the first loop, tie, cut off all excess and solder using a lighter flame.
Choker made from old headphones. Easy and fast
A similar “Loops” technique can be used if the question arises of how to make a choker with your own hands from broken headphones.
The process begins by eliminating unnecessary parts and separating the two long wires. Next, following step by step instructions, as in the photo, you can weave an original choker in half an hour, and carefully complete the work with the help of knots and a fastening lighter.

For clarity, it’s worth watching a 2-minute video, where the young craftswoman will demonstrate step by step how to turn used headphones into two fashionable and necessary things.
Weaving chokers from colored elastic bands
Elementary school students and young teenagers are increasingly interested in weaving from multi-colored rubber bands. This simple activity has grown into a youth hobby and a huge number of exclusive jewelry are created using this popular and unusual technique. Even representatives of the older generation are interested in how to make a choker with their own hands from small colored rubber bands.
To work you will need:
- a bunch of colored rubber bands;
- plastic fastener;
- a little patience.

Among the numerous weaving techniques among young needlewomen, the most popular is the “Fish Tail” method.
Progress:
- The first green rubber band, as in the photo, crosses between two fingers.
- Next, pink and blue rubber bands are put on, and the green one will serve as a fastening link. To form the first knot, it is enough to remove the green elastic band through your fingers so that it wraps around the pink and blue ones.
- the next step is to add the yellow elastic and remove the blue for a new elegant weave.
- Thus, green, pink, blue and yellow rubber bands are added one at a time for repeating color transitions.
- Having reached the required length, the elastic bands can be removed from the fingers. Remove the last two, and attach a clasp to the resulting loop.
 Note for beginners! If you have a weaving machine and a special hook, the work process will be much more convenient and faster. For full-fledged creativity, it is better to get a special set, which includes all the special devices and a bunch of multi-colored rubber bands.
Ribbon and lace chokers. Peak of elegance

 DIY openwork chokers
 Original necklaces made of velvet ribbons, delicate ribbons and the finest lace have been popular among lovely ladies since the times of magnificent balls and social events. Any modern fashionista will want to have in his arsenal a black velvet collar or a lace garter with a cute bow. The question immediately arises of how to make a choker with your own hands from an ordinary ribbon.
It's simple!

For work you will need the usual available materials:
Progress:
- The tape must be cut in half.
- Pass the two ends of the ribbon into a ring and glue the lapels together with super glue.
- Singe the other ends of the ribbon so that they do not unravel, and tie it around the neck with a small bow.


The choker is ready, you can wear it with pleasure and catch the interested glances of admiring men.
For clarity, we present you a short video tutorial on how to make 2 fashionable velvet chokers in 5 minutes:
Lace choker
Lovers of antiques are often interested in how to make a choker with your own hands from the finest lace.
There is one little secret here, so that delicate laces lie beautifully on the neck, it is better to sew a beautiful ribbon or strip of fabric to them on the front or back side.
If the lace is dense and may not bend under heavy pendants, then additional decorations can be used. Openwork chokers go especially harmoniously with retro-style pendants or vintage aged medallions.
The simplest lace choker can be made in 3 minutes.
For work you will need:
- a piece of unnecessary lace ribbon;
- clips with clasps for jewelry;
- scissors and pliers.


Fashionistas, wondering how to make a choker with their own hands at home, can give free rein to their irrepressible imagination. Any cord, piece of ribbon or strip of denim combined with additional embellishments can become a designer necklace with its own personal touch.
Braided thread choker. Hippie style

Another hobby of young needlewomen is weaving jewelry from multi-colored threads.
The work uses:
- floss threads of different colors;
- scissors and pliers;
- silver pendant;
- scotch.
Progress:
- The creative process begins with measuring the volume of the neck, adding 2-3 cm to the resulting figure for the tips of the choker.
- 6 threads of the same color are tied in a knot and secured with tape.
- Threads of other colors are tied to each of the 6 threads using simple knots; the color scheme is selected to the taste of the needlewoman.
- Sticking threads can be cut and hidden in the next weave, or you can leave short ends and get a nice fringe.
- The pendant must be inserted exactly in the middle of the thread, a clip-clasp must be attached with pliers, or the long ends must be left for free tying.
Advice! To prevent the pendant from darkening over time from contact with the skin, it can be pre-coated with colorless varnish.

In conclusion, a short video tutorial that will clearly demonstrate how to make a fashionable choker with your own hands from black floss threads.