Kigurumi pajamas pattern
Children love big, funny little animals, which we often see in parks and children's entertainment centers. They With...
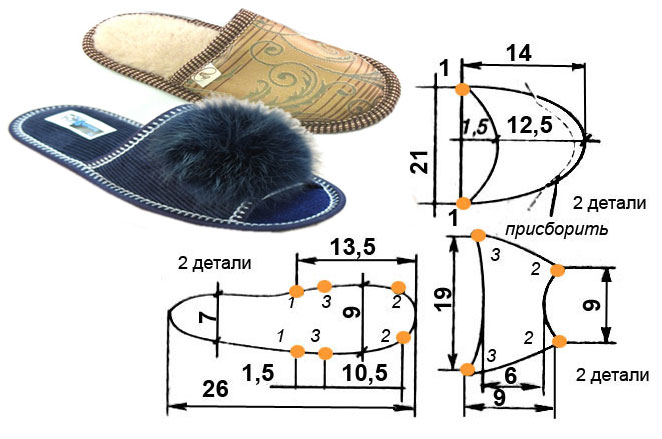
You can make slippers with your own hands. For this we need: natural or faux fur, coat fabric, felt for the sole or a felt boot boot.
Fur can be taken from a used fur coat. For many people, such a product hangs in the closet, collecting dust and taking up space. Surely many people have a coat left over from their grandmother. It’s a shame to throw it away, but no one wears it. This outerwear can be used to give a second life to good things. If there is no beautiful coat fabric for the top of the slippers, then you can find any dense material, cut a cut from it, and sew a beautiful and thin one on top of this unsightly cut. You can always find a way out if you want.
A little about fur for slippers. It is best to use natural. Sheepskin is the best material! This is an excellent antiseptic, and it wicks away moisture perfectly. In sheepskin products, it is recommended to go without socks!
Patterns for our slippers are made from used slippers or boots. Carefully spread out the product chosen for the pattern. Trace the resulting details on thick paper and cut out. On the side of the patterns that you just traced, mark 1 with a pencil. This is so as not to make a mistake with the future cut (right or left slipper). The reverse side of the patterns is therefore for a paired product.
Place the made patterns on the selected fur. Holding the pattern with one hand, trace it and cut it out. We will do the same work with the coat fabric.

You can sew the parts (cut) by machine or by hand. The fur parts of the cut need to be sewn together overlapping. This is done so that the seam in the finished product is invisible to the touch and does not rub the leg.

The cut of the top of the sneaker is sewn with a “butterfly”.
When the fur and the top of the sneaker are sewn, we insert the fur into the top and sew the parts to each other along the shaft and bottom.

The next stage of our work will be the manufacture of the faucet. It is best made from leather. Cut out strips of length equal to the circumference of the sole of the slipper and add another one or two centimeters for overlapping stitching. The width of the strip is 3 centimeters. We cover the bottom of the workpiece with this strip.

You can grab the sole. It is recommended to cut it from thick felt or from the boot of a felt boot. It can be purchased at the store. A store-bought felt insole will also work. You need to cut the sole with a sharp knife. Let's trace the sole of the sneaker we disassembled, if its size suits you. In order to sew the sole evenly, we sew from the heel! We mark the middle of the heel of the sole with chalk and apply it to the back of our workpiece in the place where the transverse seam is. We pierce the fender and the felt sole with an awl. We sew a thick nylon thread up to the toe along one side of the sneaker. We make a knot in the toe of the product. We sew the product on the other side, also to the toe. The sole is sewn.


The soles of your sneakers will last even longer and will not get wet or slip if they are hemmed with corrugated shoe rubber, which can be purchased at the store. When hemming the sole with rubber, hold it firmly and evenly with your fingers along with the felt sole and carefully sew it on.
The last stage is as follows. Let's give our product a “marketable appearance”. To do this, you will need a metal brush or large comb. The fur on the boot needs to be combed and fluffed. Bend the top of the sneaker to the height you like, and comb the fur at the bend with a comb. From under the threads of the seams, use a needle to remove the fur pile and fluff the fur with a metal brush. The seam will become invisible. Now we can say that one slipper is ready. It doesn’t take long to sew the second one, the work is the same. Mirror image of the first.

It takes 3-4 hours of working time to make such a warm, light and soft pair of shoes during training.
A child and an adult will feel comfortable in such shoes. These slippers are comfortable to walk at home in cold weather. Having straightened them, you can go outside.
Nowadays it has become very fashionable to wear not only slippers, but also house boots at home. They sew not only women's slippers, but also men's ones. In order to understand how to sew boots correctly, you need to read our tips and instructions.
While working on house boots we will need:
The work is divided into three stages:
Let's start making parts:
It is necessary to cut double elements that are not cut in the front part.
We cut out double tops of the required size from fabric. You need to cut 2 of them. The cut should be on the heel side.
Following our instructions, you can sew boots for home use. If you are not yet ready to sew boots yourself, make home slippers. You can take detailed instructions
There are many situations when you need to sew boots. For example, for a carnival costume, for an insulating insert in rubber boots, or for transforming your favorite but already worn-out shoes. Homemade booties will come in handy for kids on walks if they don’t walk yet.
House shoes are made from different materials: fleece, velor, knitwear, felt, corduroy and drape. The fabric for sewing can be sheepskin coats and sweaters. Depending on what material you choose, the product will turn out to be shape-holding or soft.
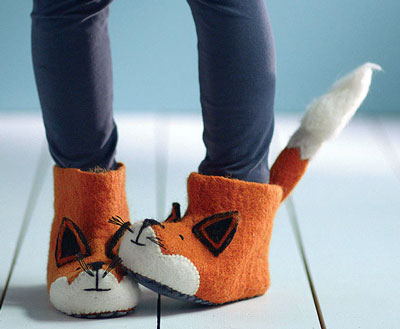
Self-sewn boots can be complemented with various elements: applique, embroidery, lace, bows. Boots with the image of an animal's face look great: a bunny, dog or kitten. In addition to embroidery, the resemblance to the animal will be conveyed by separately cut ears, a tail and antennae. For lovers of glamor, the ideal finish is rhinestones or sequins. If you plan to give shoes as a gift, then, using your imagination, you can make something with meaning, that is, take into account the interests of the recipient. For example, decorate it in a football style, with biker elements, in the form of Minions - whatever you want! Such a gift can be made for a birthday or for another occasion, and it will be doubly pleasant.
To make the result pleasing, you should create a pattern for the boots. For convenience, it is recommended to use a plastic material such as polyethylene. If you don't have one, paper will do. The pattern of boots made of fabric is constructed in different ways:

After constructing a drawing of future boots from fabric, you can prepare the necessary materials for sewing. Depending on the model you will need:
Making home boots is easy. To do this, you only need a little skill in working with a needle. The only condition is to strictly follow the instructions on how to sew boots from fabric. The pattern is offered for sizes 24-27. If necessary, it can be adjusted to any leg, but it is worth considering that when changing the size, the pattern changes more in length than in width.

For UGG you will need:

If the boots are made by hand, then all seams can be made external by overcasting them with finishing stitches.

Nylon or denim threads are useful for this. When sewing boots from other materials, all details are cut out separately for the lining and main fabric. So that the lining does not subsequently peek out from the face, it is made 2-4 mm smaller in all sections than the main parts. The manufacturing technology is similar to sewing fur ugg boots: first stitch the top and inner parts separately, then stitch the top edges, leaving a small hole for turning them inside out.
This season, stocking boots are especially popular. In production, such models are made from thin materials: suede, nubuck, thick stretch fabric and knitted fabric. The peculiarity of these boots is their tight fit along the entire length of the leg. If you really want to get fashionable stocking boots, you can remake your existing shoes. The first option is to cover the tops of shoes, shoes or boots with fabric.

The disadvantage of this option is that it is difficult to perform without distortions and creases in the area of the instep of the foot. Or use only thin, highly stretchable fabric. To work, you will need the shoes themselves, or textiles to secure the fabric to the shoes.

The second option is to flog the old boot from the boots and instead sew a new one from the selected material along the remaining punctures from the unraveled stitching. For this model, you can use a leggings pattern, making the desired shaft height. At the top of the boots you need to sew an elastic band so that the stocking does not slip down.

An extravagant option is lace stocking boots. Lace can also transform sandals. If the material does not stretch, the boot should be made loose, but an elastic band should hold it at the top.
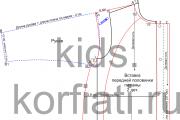
On graph paper, the pattern is given for size 37-38 of two main parts. The dimensions of the remaining parts are in the description here.
This is what the pattern itself looks like:

Foot-sole, toe-heel part, circle - flower (with a bead in the center) for decoration. The elongated part is a bunny ear for the “Bunny” slippers.
Attention! This same circle is also a bunny tail, if someone wants to sew “Bunny” slippers, the basic pattern is the same.
Construction of the pattern:
1. Sole. We take a sheet of paper, put it on the floor, stand with our feet and trace our foot :) We trace along the edge, keeping the pencil straight, perpendicular to the surface, no need to bend it under the foot. We add about 1.5-2 cm to the length, you can outline autumn shoes without heels, shoes are best, then without adding centimeters. The length from the center of the toe to the center of the heel for sizes 37-38 should be 25.5-26 cm, for sizes 38-39 approximately 26.5 cm. Specify these dimensions in accordance with your foot and shoes. We build a template for the sole, focusing on the photo, level it, round it, etc.
An increase in centimeters is needed because we will insert padding polyester (or other insulating material), and it “takes up” no less than a whole size, plus the leg needs some freedom.
2. Toe-heel part . The length from the center of the sock up the leg to the shaft (the center of the front of the detail) is equal for all sizes from approximately 12.5 to 14.5 cm, as desired!! The height from the center of the heel to the boot is 6.5 - 7 cm. Next, we measure our sole (foot) pattern around the perimeter, divide by two (at the same time we make reference marks for the center of the heel and toe on the sole itself - this will be very useful when assembling parts) and add Approximately 1-1.5 cm for the fit of the sock and a slight fit at the heel. The resulting length should be equal to the bottom line (where we sew it to the sole), line up the bottom line approximately as in the photo. The top line is 16-17 cm.
3. Circle for a flower or tail Mine are 9-10 cm in diameter. The ears are optional in length and width, I make them 4x14 cm.
And this is a pattern of the main parts on graph paper for size 37-38. Up to size 39 or 36 is quite easy to adjust. Keep in mind that when changing the size, the pattern changes more in length and less in width, that is, not proportionally.

Now about the number of parts for the “Snow White” model, it is sewn from fleece of the same color
Sole- 4 parts made of fleece, 2 parts made of raincoat fabric, 2 parts made of synthetic padding (or other insulation but not hard and not very thick, for example thin batting)
As an option: instead of raincoat fabric and padding polyester, you can use ready-made quilted jacket fabric, artificial leather (not thick, soft)
Heel-toe part- 4 parts made of fleece, 2 parts made of padding polyester
Bootleg- rectangle 18*32 - 4 fleece pieces
Note . 32 cm - width and does not change
18 cm - height and varies at will (and the shape of the top may not necessarily be straight either, use your imagination)
Flower- circle with a diameter of 9-10cm, 6 fleece parts
This is roughly what it all looks like after cutting, don’t forget to mark the centers and other points of the parts for assembling the boots in the future:


We begin assembling parts
When assembling, we combine the designated points - the centers of the parts with the corresponding marks of another part
First, we connect the upper toe-heel part with padding polyester (insulation) and fasten it with a machine stitch along the edges. Then we assemble the sole like a puff pastry simply :) I fasten the sole by hand over the edge, making sure that nothing gets warped. You can do this on a machine, but then leave a little more in the allowances to even it out, trim off the excess, if you can’t sew it evenly, there are still a lot of layers and they are voluminous. Parts with padding polyester are lightly steamed through a damp cloth, lightly!! We crush the synthetic winterizer with an iron.


Then, as in the photo, we connect the toe-heel parts with the boot, you get 4 connected parts. Then we sew the back seams, leaving small sections unsewn in the lining, see photo, through which we will turn our boots inside out. And after that we sew the soles into all 4 parts.


We turn the upper part of the boot to the right side, leaving the inner part - the lining - on the left side. Just like in a puppet theater, we put the top, front boot on our hand and insert it into the lining, matching toe to toe, heel to heel, accordingly. We also combine the upper sections starting from the back seam, chop them off and sew them together.

Through the left, unsewn sections of the lining, we turn it inside out, pull it out from the inside, align it, stretch all the seams, and sew the open unsewn area in the lining edgewise.


Now we insert the lining inside, align everything, put it directly on the leg, pull and pull wherever necessary :). From the inside, I make four thread fastenings on the upper part of the boot with the lining so that the lining does not fidget :))
2 fasteners in the sock: at the center of the toe and at the boot, and two fasten on the heel, where the back seam connects with the sole and boot.


All!!! Next is your will: flowers, beads, in the center, along the cuff (bend it if you want) on top, etc. In this model "Snow White" there are three flowers in the center, you mark the center directly by putting the boots on your feet. When sewing on flowers, under each flower I make a tuck of 1.-1.5 cm, which results in an easy gathering in front.
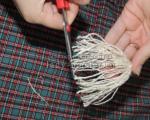
The flowers are assembled very simply: you gather them in a circle with a needle and thread, and pull them together. Pull the needle through the center and over the edge (from the center around the flower and again into the center, pierce the needle and pull the thread to form petals. This must be done 4 times to get 4 petals. Sew a bead into the middle.
This model fits more closely to the foot. But the sequence of assembly of parts and the sewing technology are the same. The other is just a pattern. I give it to you in size 38-39 on graph paper. Changing the pattern according to the same principle as with the Snow White slippers (see above). Here in the toe part you need to use a very thin padding polyester or other thin insulation.

From the same pattern, lengthening it to about 50 cm (from the floor) and widening the top (at the top 1/2 of the top is about 23 cm), you can make house boots. The length and width of the boot varies according to your wishes. The sewing technology is the same as described above. The boot is assembled by gathering on 4 transverse elastic bands, the elastic bands are sewn at approximately the same distance from each other, the distance depends on the length of the boot. The distance from the last (or first) elastic to the upper edge of the boot is 4 cm.

My boots are made of thin fleece; thinner fabric is generally suitable for such boots, but they will look better made of velor.
If you like to make original and unusual bags, cases, mittens and other products with your own hands, then making home slippers will not be difficult for you. Moreover, you can sew slippers, warm children's boots, and UGG boots from any available materials, for example, from an old sheepskin coat or the tops of women's leather boots.
Don't forget that old things, clothes, shoes are free material for sewing new clothes and handicrafts. See What can be sewn from old.
This article provides two types of patterns for slippers, as well as the technology for sewing them. Advice is given on what and how to make home slippers and warm children's boots with your own hands.
To make a pattern for flip-flops with open or closed toes, take a piece of paper and trace the outline of your foot. You can take old slippers (without heels) of a suitable size, put them on paper and outline the soles.
If you draw your foot on paper, it is better if it is in a sock or stocking and it is advisable to sit on a chair to reduce the load on the foot. Then the pattern will not distort the size of future slippers.
Draw the outline of the foot, and then check it. To do this, you need to measure the distance from the edge of the big toe to the heel with a measuring tape or ruler. This value should correspond to the size of your shoes, for example, for size 43 shoes this distance will be 28 cm with an error of half a centimeter.
To create a pattern for slippers, you can use the above calculations, adjusting them to your sizes. If you have slippers of the style you need, and you would like to sew exactly the same ones with your own hands, then you do not need to create this pattern.
Wrap the top of the slippers tightly with paper or fabric, draw the outline of this part with a pencil or felt-tip pen and allow seam allowances. After this, you can cut out this part, once again attach it to the top of the slippers and check whether it exactly follows its contour. Adjust if necessary.
To sew home slippers you need to use various materials. The right and left parts of the bottom of the sole are cut from shoe leather, split leather, or leatherette. The insoles (the upper part of the sole of the slippers) are made of split leather, suede or cloth. There should be another pad between the insole and the sole. Usually it is cut out of cardboard and batting (sintepon or thin foam rubber are also suitable).
The details of the top of the slippers are cut from leather and lining; they can also be duplicated with soft pads, then quilted.
If the top of the slippers consists of two halves, grind them down or join them with braid. They are glued to the gasket and lining, edged or braided around the sections (closed slippers have one cut, open slippers have two). Then decorative finishing is performed.

In order to sew durable slippers, you need to use special, especially strong threads. For sewing slippers, cotton threads in 6,9,12 folds No. 30, 40, 50 are suitable. Cotton lavsan threads No. 44 LH-1, 65 LH-1 or lavsan threads No. 22 L, 33 L, 55 L, 90 L. For stitching parts For the top of the slippers, nylon threads No. 65 K, 95 K are best suited. To attach the sole, stronger nylon threads No. 470 K, 565 K are needed.

The details of the top and the edging of the sections can be done on a sewing machine, but you will have to stitch the top and edging to the sole by hand. Therefore, purchase a special awl from a hardware store. With its help you can sew strong and durable slippers from any materials.
Once the pattern for the sole and top of the slippers is ready, you can begin cutting out the parts. When cutting soles, allow an edge allowance of 0.5 cm.
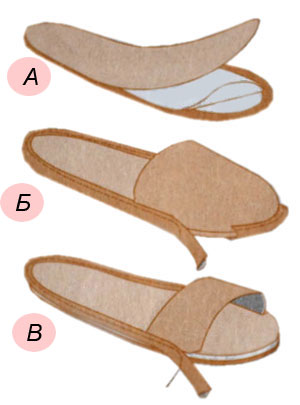
The gasket pattern is reduced by 0.7 cm along the entire contour so that the gaskets do not unnecessarily thicken the seam. Glue soles cut from leather, cardboard, batting, split wood and trim the edges evenly (Fig. A).
Glue the sole along the edge to the top of the slippers with the seam facing out (Fig. B), aligning the control marks. On a closed model, the excess length of the upper part is pre-fitted along the toe part. If with a closed top you can allow some freedom for the leg, then in a model with an open toe it is necessary to adjust the length of the upper part so that it fits snugly around the leg.
The upper is connected to the sole using edge braiding, edging, and straight stitching. The welt can be made in the form of an edging or lining along the edge of the sole made of a narrow leather strip (Fig. B). The seam can be closed with a decorative braid woven from thin leather straps, cords, ribbons, etc. To secure finishing elements, you can use a craft glue gun.
As in any work with paired products, operations are performed simultaneously on one and the other slipper.
 For those who prefer warmer house boots to slippers with an open back, the work will be more difficult. You already know how to make a sole pattern; just outline the foot and add a seam allowance along the contour. But to make a pattern for the top of such slippers (like Uggs) you need complex calculations. Therefore, we’ll better use the “wrapping” method.
 Since house shoes do not require a tight fit to the foot, but on the contrary, shoes or boots with flat soles can serve as a template for removing the pattern of the upper part and further modeling.
First, you need to crumple the paper so that it lays out better on the convex surface of the shoe. Then wrap it around your chosen shoe or foot. Wrapping the leg is not very convenient, but the pattern is more accurate. If you are satisfied with loose and spacious boots, then use shoes for the template.
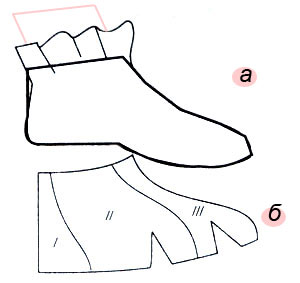
While wrapping the template, you can add folds, securing them with glue or paper tape or pins. Outline the line of connection with the sole, the middle line along the front of the boot and along the heel, the contour of the upper edge of the boots (Fig. a).
Remove the paper (without splitting the pins) if it does not lie flat. Notches are made along the line of connection with the sole in the toe area, and the pattern lines are adjusted. The resulting pattern can be divided into several parts depending on the model you have developed (Fig. b).
The details of the top of house boots are cut from leather, split leather, felt, thick cloth, leather set (from different pieces of leather). Pieces of tapestry, corduroy, cloth, and fur can be included in the details of the top. Don't forget about seam allowances of 0.5-0.7 cm.
The lining is cut using the same patterns, using split wood, cloth, flannel, woolen knitwear, and fur.
Sew together the top and lining parts separately. To prevent the heels from creasing, a leather heel pad is attached to the lining inside the boot. Along the edge of the boots, connect the lining to the upper part with an internal seam, then turn it right side out and add a securing stitch.
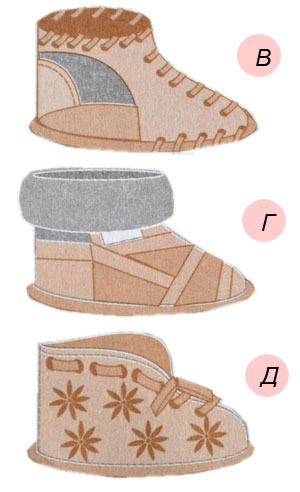
The edges of the neckline can be trimmed with braid or edging strip made of leather, leather braiding if the lining is made of split leather, fur or knitted cuffs (Fig. D).
The upper part of the boot is secured to the sole in the same way as slippers, placing the upper part in the toe area and slightly in the heel area. The seam is laid from the toe to the heel in both directions. If you sew in a circle, then due to the fit, the shape of the boot may become deformed and skew in one direction.
If the circumference of the upper part of the boot is larger than the sole, then the excess is taken into the heel seam.
To prevent children's house boots from falling off during active movements, sew ties to them or tighten them with a strap pulled through the holes punched in the upper part. If the lining is made of fabric, then place metal blocks in the holes.
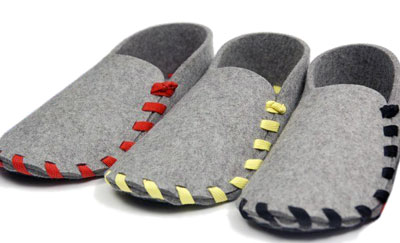
It’s not at all difficult to make these slippers with your own hands from felt or coarse cloth or suede. To do this, you just need to remove the upper pattern from any shoe and buy several meters of colored braid. Holes can be punched with a special flat punch or cut with a narrow and sharp knife blade. You can use any materials as a material, insulating them and strengthening them with pads, including sheepskin coat fur, and for the protective lining of the bottom of the sole - leather from the tops of women's boots.
It will be a little more difficult to make warm house boots like these, but they will not only look original and stylish, but will also reliably warm your feet. First sew ordinary slippers, after you have studied the technology and working methods, it will be easy for you to sew other models of slippers with your own hands.
Children love big, funny little animals, which we often see in parks and children's entertainment centers. They With...

If a doctor orders a pregnant woman to undergo such a serious examination as fluorography, she immediately has many problems...

The most impressive carnivals in the world can be found in several cities, which will be discussed in our today's...

The ex-husband of TV presenter, designer, and since 2017 singer Olga Buzova, midfielder of the leading Russian championship...

There are many different kinds of paper crafts. It’s not surprising, because this material is very convenient - you can...

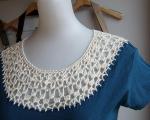
Good afternoon dear friends! The first gift for a teacher is so exciting. Do you agree? We figured out what bouquet...

We knit 3 lifting stitches and 13 double crochet stitches into the amigurumi ring. Then we close it into a ring, fastening...
You can make slippers with your own hands. For this we need: natural or faux fur,...
How to weave bracelets from rubber bands? If you are asking this question, it means that you have already purchased...

The long-awaited spring is approaching, and with it our favorite holiday - March 8th. This is the International Women's...
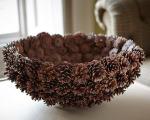
Cones are a beautiful and durable natural material for creativity. They are often used to make children's and New Year's...

For different materials there are usually different care instructions. Here you will find, for each material, 3...

When assigning old-age benefits, the full time of work is taken into account. If such a period...
Its design, as a rule, differs little from a round or square napkin. Only inside there is room for...

If a doctor orders a pregnant woman to undergo such a serious examination as fluorography, she will immediately...

The most impressive carnivals in the world can be found in several cities, which will be discussed in our...