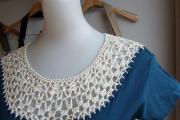
Postcard dress from origami
The long-awaited spring is approaching, and with it our favorite holiday - March 8th. It's International Women's Day. He...
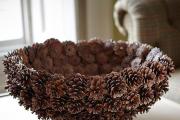
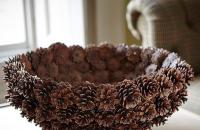
Cones are a beautiful and durable natural material for creativity. They are often used to make children's and New Year's crafts. But cones can also become the basis for more serious and complex products that will become the highlight of the interior of a house or cottage. The basket of pine cones in this material will allow you to make such a product yourself step by step. The basket can be used both for its intended purpose - storing any small items and souvenirs, and as a basis for making autumn and winter ikebana.
The number of cones that will go into making one basket depends mainly on its size. On average, this ranges from 50 pcs. for a small basket up to 200 - 300 pcs. and more for large ones. Most often, already opened cones are used, but the combination of open cones with closed ones also looks interesting. In this case, it is necessary to take into account that closed cones open over time under the influence of heat, which can cause the shelf to lose its shape or even crumble. Therefore, such elements are coated with liquid wood glue, which prevents the scales from opening and even adds shine.

If there are quite a lot of cones, you will have the opportunity to select them by size and shape. It is important that the buds are fully opened.
Wire or flexible wire will need to be wrapped around the cones.
At the beginning of our master class, we cut pieces of wire and wind one on each cone. We begin to fasten the cones as shown in the pictures below:

We assemble a “chain” of pine cones and fasten it into a circle. The result is a design like in photo number 6.
For the basket you need to make 3 rings of cones, slightly different in diameter. We connect with one row of wires. For the bottom, select 3 cones of the appropriate size and insert them into the structure. To make it stronger, you can secure them with wire. Another option is to make the bottom out of cardboard. Of course, such a basket will look less natural, but it all depends on your taste and the purpose of the craft.
All that remains is to build a handle for the basket and attach it to the base. To do this, it is recommended to make two rows of wire - this way the handle will hold its shape better and, in general, will be stronger. Having fastened a suitable number of cones, we leave tails of wire of several centimeters on each side to attach the handle to the upper ring of the basket. In addition, the cones can be additionally fastened together with glue. You just need to do this carefully, applying glue from the inside where it cannot be seen.

We collect all three rings of the basket together and fasten them with pieces of wire in a vertical direction. We tighten the top and bottom rows and attach the handle. The pine cone craft is ready! It will look good with flowers, especially as a base for an autumn or winter composition. If desired, the craft can be painted and varnished, and decorated with any decorative materials that suit the style.
The next version of the basket is interesting in its own way and more practical than the previous one. The shape of the basket can be square or rectangular. To work, you will need a wooden box or drawer, a vine about 2 m, hot glue and a large number of cones (according to the size of the basket). Review the detailed instructions for making it.

First, the prepared box must be fastened with a wicker handle. This can be done in any convenient way: using nails, metal staples, wire, the main thing here is strength and reliability of fastening.
After this, you can begin to paste over the walls of the future basket with pine cones. It is advisable to alternate cones of different sizes and shapes; the cones can be fully open and closed, darker or lighter shades. There is no need to glue the bottom of the basket, since they will not stick there firmly. The basket needs to be dried well and then can be used at your discretion.
To make the buds lighter, you can soak them in laundry bleach for 7-9 hours.

Cones prepared in this way will become discolored, but the scales will close. To open them again, you need to dry them on a hot radiator or in the oven.
A decorative basket made with your own hands from pine cones will become an original addition to the interior. However, you can also make a functional basket that is suitable for carrying or storing vegetables, fruits or other items.
For those who want to learn how to make baskets from pine cones with their own hands in more detail and get new ideas for creativity, we have prepared a selection of video lessons:
We recently showed how to make children’s crafts from pine cones, and today we bring to your attention a quite worthy home decoration in the form of a basket, which can also be made from pine cones.
To make a basket of pine cones you will need:
Pine cones;
Wire/wire;
Wire cutters.
Basket of pine cones step by step:
It is advisable to collect more cones so that in the future they can be selected according to size, while the cones should be open.
You will also need an easily bendable and fairly strong wire/wire that will be used to hold the pine cones together. The wire needs to be wrapped around the pine cone.
So, cut the wire into pieces and wrap one around each pine cone. Then follow the method for attaching the pine cones shown in Photos 2-5.

Fasten the cones for the basket in a circle, as a result you will get the design shown in photo 6.
Make three rings of slightly different sizes. Connect the cones on the rings with one row of wire (photo 7). To create the bottom of the basket, insert three cones in the center of the ring - it will be quite tight. They can also be secured with wire (photo 8). Also, the bottom of the basket can be made of cardboard.

In the same way we will make a handle for the basket. It is better to connect the cones on the handle of the basket with two rows of wire so that they hold their shape well. Leave tails along the edges so that the handle can then be attached to the top ring (photo 9-10). Also, in addition to binding, the pine cones can be additionally glued to give strength, and so that the glue is not noticeable, pour it from the inside.

Place the rings tightly on top of each other and pull them vertically with wire at the lower and upper cones. Then fasten the handle - the basket of cones is ready!
Cones are not only durable, but also a very beautiful material for crafts. They have a wonderful shape that is ideal for creativity. And the most interesting thing is that products made from pine cones can be beautiful interior items, and some other things can also serve in everyday life, for example, such a thing as a basket! You can store all sorts of little things in it. This master class will tell you how to make a basket, and the photos and video materials provided will help you understand the work process in more detail.
To make a basket you need to prepare:
Cones. It is better to take pine cones with a reserve, since during the creative process additional decorative elements may come in handy or the material may simply be damaged.
Wire. You need to take two wires: one will go into weaving - thinner, and the second is needed thicker for the frame, but you can also take a wire.
Wire cutters.
Hot melt adhesive.
The number of cones used for work depends on the size of the cone itself and the size of the basket, but on average, about 60 cones will be required. For a small basket, you usually take from 25 to 30 cones, and the larger the product, the more cones you need to take.
Needlewomen use open cones in combination with closed ones, where the number of open ones is much greater. When using unopened material, it is necessary to take into account that such cones will subsequently open and then the product will lose its appearance. Therefore, you need to apply them in the place where the open cone will then look great.
But if you need to avoid opening the cone, then simply cover it with liquid wood glue. By the way! When used, the product will have a beautiful shine and gloss.

First, we make pieces of wire and wrap one around each cone, then secure them. We collect a string from the cones and secure everything in a circle. You need three of these mugs of different sizes. Next we connect them together.
For the bottom, take 3 cones of the required size and stick them into the frame. For strength, we fix them with wire. You can also make the bottom out of cardboard.

Now let's start creating the handle and fixing it to the body. To do this, you need to make a couple of rows of wire; in this form, the handle will better hold its shape and be stronger. Having combined the required number of cones, we leave literally a few centimeters of wire tips from all parts. This is necessary to secure the handle to the top tier of the basket. If you are afraid that the craft will fall apart, then you can fix everything with glue; to do this, it is enough to spread glue between the cones on the back side so that it is not visible on the front area.
Now we connect all three circles together, secure them with wire cuts, but always vertically. Now we tighten the upper and lower tiers well and fasten the handle.
The basket is done!

This basket looks very beautiful if you put flowers in it as an autumn composition. You can varnish the basket or decorate it with various decorative elements. If this is a winter option, then you can use artificial snow; in the summer and spring options, you can use spruce branches and additional unopened cones.
You can make a basket not only from pine cones, but also using other natural materials, such as wood. These two components combine perfectly with each other.
In addition, this option is very practical and it is easier to choose the shape of the basket. It can be not only round, but also square and even triangular.
We will need:
Any box or box made of wood.
The grape vine is about two meters.
Hot melt adhesive.
To begin with, we attach a vine in the form of a handle to the box or drawer. This can be done with nails or staples, or wire, the main thing is that the resulting structure is strong.
Now you can start gluing the walls of the basket with cones. It is better to change cones of different shapes and sizes; you can also alternate them: open and closed, not forgetting to process the closed ones, if necessary. The bottom of the product does not need to be decorated.

If you need light buds during your work, you can put them in bleach for about 9 hours.
As a result, the cones will become discolored and the scales will close, and in order for them to open again, you need to place them in a hot oven or place them on a radiator.
Baskets made of pine cones are a truly original item in the interior; people of any age will be happy with such a gift.
Happy creativity!
So, for work we will need:
1. Pine cones;
2. Acrylic paints, brush;
3. Ball shape;
4. Glue - gun;
5. Green sisal;
6. Varnish;
7. Foil.


We take out the ball and get a foil figure in the form of a hemisphere. 


This is the basket of cones we got. 


We paint several cones in different colors. 
When the paint has dried, use a brush to carefully paint the centers of the resulting flowers. 
If you have matte acrylic paints, then the finished pine cone flowers can be varnished. To do this, you can use a varnish spray, 

After the varnish has dried, place the finished flowers in a basket, hiding the empty spaces between them with sisal. 
Very soon we will have to bring crafts made from natural materials to school; I would like to offer you a basket of pine cones.
We made this basket from pine cones. To do this, you need to collect more cones, so that when working you can easily find cones of the same size, the cones should be open. I wrapped the wire around the cone.
Unfortunately, my step-by-step photos were not preserved, so I present to your attention photos from the Internet.
1 First you need to connect the cones in a circle. The cones are fastened together using thin wire in a circle. It is best to use wire that matches the color of the pine cones so that it is not noticeable later. We wrap the short end of the wire around the first cone, and then twist it around the second, long end. /li>


It’s that easy, in just half an hour you will have a handmade basket of pine cones.

Source: http://womanadvice.ru/korzina-iz-shishek-master-klass#ixzz4Jer1v5TZ
After making the basket, outside, I laid some newspaper under the basket and spray-painted it with silver paint.
From rowan, I made “Beads” for decoration.
I painted small bumps with gouache together with my daughter. This is a very exciting activity for a child! After our basket was ready, we put a sponge for flowers in it, which is sold in flower shops, put oilcloth on the bottom of the basket and a damp sponge on top, then we stuck autumn flowers into this sponge.
Now let's start making the “autumn napkin”. For this we need autumn leaves and fabric. We cut out the shape of a napkin from the fabric (in my version, it’s a round napkin) and start sewing the leaves from the edge of the napkin, gradually approaching the center! Well, our napkin is ready, now you can safely put our basket of cones on it.

The long-awaited spring is approaching, and with it our favorite holiday - March 8th. It's International Women's Day. He...
Cones are a beautiful and durable natural material for creativity. They are often used to make children's and New Year's crafts. But...

VEB has the right to invest citizens’ pension savings in two investment portfolios: – basic: formed from...

For different materials there are usually different care instructions. Here you will find, for each material, 3 simple...

When assigning old-age benefits, the full time of work is taken into account. If there is no such period...
Its design, as a rule, differs little from a round or square napkin. Only space is left inside for an armhole...

Hats are worn for protection from the cold or sun and for beauty. Universal headdress - beret. IN...

A knitted jacket is one of the irreplaceable things in a child’s wardrobe. The ideal children's jacket - well-fitted...

Coral color is one of the shades of red, but it is usually perceived by fashionistas as an independent and...

Size: for 6 (8) years. Head circumference: 50 (56) cm. You will need: 500 (600) g peach yarn (50%...

With crochet techniques, many craftswomen note the obvious advantage of the latter. Crochet skills...

Everyone treats freckles differently. Some call them “angel kisses” and love them dearly, considering them a highlight...

Concealer is indispensable, because it hides many skin imperfections: wrinkles, circles and bags under the eyes, pigmentation...

The body of the thief in law, covered with tattoos, is, first of all, oddly enough, a linguistic object. The tattoo is...
Cones are a beautiful and durable natural material for creativity. They are often used to make children's and New Year's...

VEB has the right to invest citizens’ pension savings in two investment portfolios: – basic: formed...