Crochet yoke for a children's dress: patterns with photos and videos
Its design, as a rule, differs little from a round or square napkin. Only space is left inside for an armhole...
A knitted jacket is one of the irreplaceable things in a child’s wardrobe. The ideal children's jacket is a well-fitted item, knitted from high-quality yarn, in harmony with the rest of the clothing. A jacket for a boy or girl should not restrict movement and be light, because children move actively. For a boy, a sporty style will be relevant; girls will prefer something more romantic. A knitted jacket for a girl with knitting needles with a description, presented in this article, is made with a simple pattern from mixed threads. This is no coincidence - it is this composition that perfectly holds the shape of the pattern and does not stretch when worn and washed.
The model is calculated for a boy's height 104/110 (116/122) 128/134 (140/146) cm.
We will need:
We knit a children's jacket with patterns:
Techniques:
After each decrease/increase, the placket of a boy’s jacket expands by 2 points, and the front section narrows by 1 point. The total number of points increases by 1 point.
The bar expands by 2p. and the total number of items increases by 2 items.
Density: face. Ch. on knitting needles No. 4.5 25.5p. for 40 rub. equal to 10cm by 10cm; on the distribution of loops in the center of the back on the sp. No4.5 32.5p. for 40 rub. equal to 10 cm by 10 cm; on spacecraft and HF sp. No4.5 12p. for 40 rub. equal to 3.75 cm by 10 cm.
We cast on with knitting needles 81 (95) 111 (117) sts. and continue the children's jacket with an elastic band for 17 rubles. (4cm). Next R. add 1 from. p., untying it from the broach. At the same time we distribute the loops: 1 cr., 1 (7) 16 (19) p. l. Ch., *1p. i.g., 1 increase, 2p. l. ch., 1p. from. Ch., 1 ave., 12p. KA* – from * to * twice, **1p. purl ch., 1 ave., 2p. l. Ch.** – from ** to ** repeat 4p., 1p. purl Ch., 1 ave., ***12p. KV, 1p. And. ch., 1 ave., 2p. l. ch., 1p. p.ch., 1 inc. *** – from *** to *** repeat 2p., 1 (7) 16 (19) p. l. Ch., 1 cr. We have 94 (108) 124 (130) p. After 105 (114) 125 (139) rubles, which corresponds to 26 (28.5) 31 (34.5) cm from the bar under the armhole closing. 1r. 3 p. and in even p. 1r. 2 p., 1 (2) 3 (3) r. 1 p. It turned out 82 (94) 108 (114) p. After 52 (58) 64 (72) rub. (this is 13 (14.5) 16 (18)) cm from the bottom of the armholes, closing. knitting center. 14 (14) 18 (20) p. for rollout. Finish each side. separately. For a smooth transition inside. edge closed in even p. 1r. 3 p., 1 p. 2 p., 1 p. 1 p. Still needed in 4 rubles. (this is 1cm) from the bottom of the rollout, closing it. under the shoulders on the outer edge 1p. by 8 (10) 13 (13) p. and in even p. 2 rub. 10 (12) 13 (14) p.
Make the second side a mirror image.
For this part of the product for a boy, we cast on with knitting needles 52 (58) 67 (70) sts. First r. – purl, in it we distribute the loops of the strap thus: 1 cr., 14i. (this is a plank), elastic band, 1 rub. After 1 (2) 3 (2)cm, which is equal to 4 (8) 12 (8)r. from the first p. make holes for buttons. Considering that we will turn the bar inward, holes must be made on the lapel side as well. For the 1st, close the 3rd and 4th stitches from the beginning of the plank and the 3rd and 4th stitches from its end. And next. R. dialing again. The remaining 4 holes. We place them at intervals of 6.5 (7) 9 (9.5) cm. In terms of rows, this is 26 (28) 36 (37) rubles. After 17p. (4cm) we add 1p. from the broach purl. cross. and distribute p.: 1 cr., 1 (7) 16 (19) p. l. Ch., *1p. i.g., 1 increase, 2p. l. ch., 1p. from. ch., 1prib., 12p. KA* – from * to * twice, 1p. purl ch., 1 approx., 2 p. l. ch., 1p. inside out ch., 1 approx., 14 p. l. Ch., 1 cr. Total 58 (64) 73 (76) p. After 92 (104) 124 (146) p. (this is 23 (27) 31 (36.5)) cm on the inside. For the roll-out edge and the shawl collar, we make 1 decrease/increase each (see “Techniques”). We duplicate them in 8th p. another 5 times (in the 6th p. 5 times) in the 6th p. 7 times (4 times 8 times). Then at 8 p.m. another 3 times (in the 6th p. 4 times) in the 6th p. 4 times (4 times 4 times) perform only increases, using the description in the “Techniques” section. In 105 (114) 125 (139) rub. (this is 26 (28.5) 31 (34.5) cm) on the opposite side of the bar, make an armhole, as on the back. In 56 (62) 68 (76) rub. (this is 14 (15.5) 17 (19) cm) from the bottom of the armhole on the same side we perform the shoulder according to the back algorithm. On the loops of the shawl collar, knit 4 (4) 4.5 (5) cm. This is 16 (16) 18 (20) r. persons Ch. Closing P.
Knit mirror right, with KV, but without holes for buttons.
We cast on with knitting needles 50 (52) 54 (56) sts. and knit an elastic band for the strap for 17 rubles. (4cm). Next R. : 1 cr., 14 (15) 16 (17) p. persons ch., 1p. purl Ch., 1 rib., 2p. l. ch., 1p. purl ch., 1 approx., 12 p. KA, 1p. And. ch., 1 approx., 2 p. l. ch., 1p. And. ch., 1 approx., 14 (15) 16 (17) p. l. Ch., 1 cr. We have 54 (56) 58 (60) p. For expansion we add 11 rubles on both sides. 1 p., then in 10 p. 5 rub. 1 p. (in the 10th 5 rubles for 1 p. and in the 8th 2 rubles for 1 p.) in the 10th 8 rubles. 1 p. (in the 10th 5 rubles for 1 p. and in the 8th rubles 5 rubles for 1 p.). Total 66 (72) 76 (82) p. After 71 (85) 99 (109) p., i.e. 17.5 (21) 24.5 (27) cm to create a closed edging. on both sides 1p. 3 p. and in even p. 1r. on 2p., 13 (17) 20 (24) r. 1 p., another 1 p. 2 p. Total 26 (24) 22 (20) p. At 34 (40) 46 (54) rub. (this is 8.5 (10) 11.5 (13.5) cm) from the bottom of the closed edge. P.
We knit it with knitting needles like the left sleeve of a jacket for a boy, but with KV.
We connect the postponed sections of the shawl collar with a buttonhole stitch. We sew the shoulders. We turn the collar inward half the width and sew it on. At the same time we sew it to the back rollout. We make sure that the junction of the collar coincides with the line of the middle of the back. We sew the holes for the buttons with a scalloped seam. We sew in the sleeves. Sew the sleeve seams and the seams on the sides. Sew on the buttons. The boy's jacket is ready!
The model is designed for a 2-3 year old girl.
We will need:
We knit a children's jacket with patterns:
We start knitting a children's jacket with a set of knitting needles 170p. Complete 6p. shawl pattern. Go to faces. Ch. and knit 5cm. In the last r. decrease 84p. 86p remains. Let's switch to openwork. Using this pattern we knit a children's jacket using 14cm knitting needles. Closed under armholes on both sides in even R. 1r. 3p., 2p. 2 p.
We continue the blouse for the girl straight. Closing the armholes by 12cm. for roll-out central 16p.
We finish the resulting two parts of the work separately. For a smooth transition when rolling out, turn down from the inside. sides in even r. 1r. 5 p., 1 p. 3 p. The armholes are closed at 16cm. the remaining 20p. shoulder We perform the second part in a mirror way.
We cast on 86 stitches with knitting needles, knit 6 stitches. handkerchief drawing. Let's go to L. ch., considering that from lev. sides first 4p. we knit a scarf all the way to the top. drawing. This will be the bar. 5 cm from the 1st r. l. Ch. we decrease 42 points, distributing the decreases evenly. There are no decrease bars on the loops. Total in work 44p. Then for the plank on the left. on the sides we additionally dial 5p. We received 49p. We perform knitted openwork: repeating P 6 times. We are finishing the river. 1l., 1i., 2l., 1cr. We continue to perform the plank with a handkerchief. drawing. We knit the armhole 14cm from the frill - see the description of the back. 10cm armhole for roll-out to the left. closed side in even R. 1r. 14p., 1p. 3p., 2p. 2 p., 1 p. 1 p. The remaining 20p. closed for the shoulder.
This detail of the model for a girl is made in a mirror image of a lion. half. The difference is the need to knit 4 holes for buttons. The distance between the first/last and the end of the bar is 1cm.
The rest are distributed evenly in height between them. For each we knit 2l, 2p from the edge. in 1l., 1n. We finish the row.
Dial. 42p. and do 6 rubles. scarf pattern. Then - l. ch., to expand, add on both sides in 8th p. 7 rub. 1 p. We have 56p. 19cm from the bottom plank under the rim closed. on the sides in even numbers rows 1p. 3p., 2p. 2p., 7p. 1 p., 2 p. 2 p., 1 p. 3 p. Total per sp. 14p. Last paragraphs closed at once.
We sew the shoulders and sew in the sleeves. We sew seams on the sides and on the sleeves. Along the edge of the rollout we raise evenly 74p. We knit 6p. (this is 1.5 cm) handkerchief. drawing. Closed loops. Sew on the buttons. We thread ribbons through the holes in the openwork and tie bows. Children's knitted jacket is ready!


To knit a beautiful sweater for a boy you will need interesting yarn and a step-by-step description of the work. When knitting a sweater for a boy, relief patterns are used, which in combination with iridescent yarn look very stylish.
Sizes: 6/8/10/12/14-16 years
You will need: 8/9/10/12/14 skeins of Jean Bleached Phil Degrade section dyed yarn (100% cotton, 80 m/50 g); knitting needles No. 3.5 and No. 4.5; 1 aux. knitting needle for braids
 Knitted children's sweater with hood will protect the child from wind and light rain. The jacket is knitted from tweed yarn in a simple pattern of knit and purl stitches.
Sizes: 86-92 (98-104) 110-116
Differing data for larger sizes are given in brackets and, accordingly, outside brackets.
You will need: yarn (85% wool, 15% Angora wool; 85m/50 g) - 250 (300) 350 g mustard: knitting needles No. 4.5; long circular knitting needles No. 4.5; hook No. 4.5.
 Warm, comfortable knitted set knit for baby - a jacket with a shawl collar and panties
. For knitting a children's blouse, we used: a braid pattern and pearl knitting. Knitting a blouse and pants according to this description can be used for a boy or a girl, you just need to take yarn of the appropriate color.
Warm, comfortable knitted set knit for baby - a jacket with a shawl collar and panties
. For knitting a children's blouse, we used: a braid pattern and pearl knitting. Knitting a blouse and pants according to this description can be used for a boy or a girl, you just need to take yarn of the appropriate color.
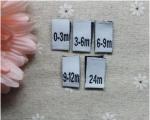
Sizes: 3/6/12/18/24 months.
You will need: 2/2/3/3/3 skeins Poudre bebe 10191, 1 skein Ecru bebe 20058 Bergere de France Merinos 2.5 yarn (100% merino wool, 225 m/50 g); knitting needles No. 2.5 and No. 3; 1 additional knitting needle; 4 buttons.
 Based on the detailed description, even a novice needlewoman can knit children's mittens.
Children grow quickly, so every season they need to knit new warm clothes for the winter, increasing the size. Let's start knitting with the smallest mittens for children 3-4 years old, whose palm measures 6-7 cm wide and 10-11 cm long.
Based on the detailed description, even a novice needlewoman can knit children's mittens.
Children grow quickly, so every season they need to knit new warm clothes for the winter, increasing the size. Let's start knitting with the smallest mittens for children 3-4 years old, whose palm measures 6-7 cm wide and 10-11 cm long.
To knit children's mittens for 3-4 years you will need about 50 gr. children's acrylic or wool blend yarn, 6 stocking needles No. 2.
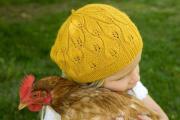
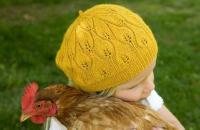
 You can knit a hat and snood with knitting needles for a child 3-5 according to this description. In such a warm set, your child will be protected from the most severe frosts.
You will need: Novita Naava yarn (60% acrylic, 20% alpaca, 20% wool, 117 m/100 g) - 150 g gray, knitting needles No. 3.5.
 Warm jacket for girls knitted, it can be worn as a winter jacket, and also in spring or autumn as a short coat. The jacket is decorated with “braids” from the shoulders, and a structural “rice” pattern is used for the bottom.
For 3-4 years
You will need: yarn “Natasha” (50% wool, 50% acrylic, 250 m / 100 g) - 300 g emerald color, knitting needles No. 4.5, 3 buttons.
 Knit a sweater for a boy Warm and fashionable is quite simple, using a simple pattern of knit and purl stitches and making a stylish shawl collar.
Size 98/104
You will need: 350 g of turquoise (No. 450) Adelia Fiona yarn (50% wool, 50% acrylic, 90 m / 50 g); knitting needles number 3.
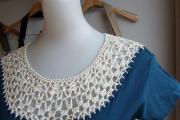
 Children's vest with hood- warm and comfortable. Knitting a vest with a hood for a child is easy, since to complete it you just need to follow the description of the work and the knitting pattern.
Size: for 5-6 years
Materials: 300 g of coral yarn, 100 g of milky yarn, 20 g of gray yarn (50% wool, 50% acrylic, 240 m/100 g), knitting needles No. 4, buttons - 7 pcs.
 This one is warm jacket with hood you can knit according to the description for a baby from six months to two years, for each size there is data in the description. How to conveniently protect your child from the cold by simply putting a hood on him while playing.
A blouse, jumper or jacket for a one-year-old girl can be knitted in different ways. Some craftswomen prefer to knit individual parts, which will then be sewn together, while others like raglan. The jacket can be openwork and thin or warm with buttons. In any case, knitting children's clothes is a very interesting activity.
A blouse for a girl can be knitted in different ways
Things knitted by mothers cannot but delight. A 3-year-old girl needs a warm product of a beautiful model, be it pink or another color. It is better for a novice craftsman to use ready-made schemes in this matter.

A 3-year-old girl needs a warm product
Description of work:
Then the sleeves and sides of the blouse are sewn together.
Knitwear is always and will remain in trend. The first year of a baby's life is the most difficult for his parents. Knitted items for children aged 6 months should be made using the raglan method.
So, the scheme of work:
Here is the raglan diagram:

Knitted blouses and sweaters for 2-year-old girls should be bright and creative, for example, you can make a blouse with ears on the hood.
Here is a diagram of this work:

Instructions:
At the last stage, the product is stitched. You can sew buttons on the front placket.
Scheme of work:
Instructions for use:
It is important to make the sleeves the same length. They should also be striped.
A 5-year-old girl will definitely like this product.
Pattern diagram:

Master Class:
At the last stage, the parts are stitched together.
You should never be afraid to make a mistake. The world of knitting is far from simple, but that doesn't mean you should give up right away. Anyone who learns to make beautiful things with their own hands will certainly please their loved ones and raise their own self-esteem.
A jacket based on arana and braid patterns, knitted with knitting needles, will suit both a little girl and a teenager. Quite thick and warm, it can be used as outerwear, home or everyday wear. Looks better than classic blouses, and much more interesting.
If desired, the same knitting principle can be applied to an adult jacket. Because it has a very interesting shape. And if you create a hood instead of a collar, you will get a very cozy street item.
Arana plus cut - the result is magical. We provide patterns, as well as descriptions. Any decoration can be invented. From fur to elongated loops imitating fur. It's about the collar.
Buttons also give room for imagination. Covered with knitwear will give one style, large wooden ones will give another.
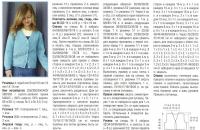
Sizes 128/134
Materials:
Types of knitting: garter stitch, stockinette stitch, purl stitch.
Pattern A “floral motif” : knit on 15 loops according to pattern A, knit in even rows as the knitting looks, knit yarn overs as indicated below, knit in height once from the 1st to the 32nd row.
Pattern B: knitted on the number of loops, a multiple of 8 + 2, according to pattern B, in even rows knit loops, as the knitting looks, start with loops before the first arrow, repeat 8 loops between the arrows all the time and finish with loops after the second arrow, knit 1 time in height from the 1st to the 16th row.
Pattern C: knit according to pattern C, in even rows knit all stitches purlwise, knit in height once from the 1st to the 10th row, then repeat all the time from the 3rd to the 10th row.
Pattern 0: knitted on the number of loops, a multiple of 20, according to the pattern ABOUT, in even rows, knit loops, as the knitting looks, knit the cone loops, knit in height once from the 1st to the 22nd row, then repeat all the time from the 3rd to the 22nd.
Legend
0 - make a yarn over on the front row, purl it on the purl row
O crossed out
- make a yarn over on the front row, knit it on the purl rowN- 1 knob: knit 5 loops on the indicated loop, alternating knit and knit crossed, turn the work, purl 5, turn and pull through, pulling the second loop over the first, the third over the first and so on until one loop remains
Set aside 6 stitches for additional stitches. knitting needle before work, wrap these loops 3 times, carrying the thread from front to back, then knit according to the symbols.
Knitting density:
All samples are knitted using size 4 knitting needles.

Cast on 103 stitches and knit 1 cm = 2 stitches in garter stitch.
Continue like this:
1 chrome, 7 purl stitches, * 15 stitches of floral motif, 9 purl stitches * 2 times, 15 stitches of floral motif, 7 purl stitches, 1 chrome.
At a height of 11.5 cm = 32 r from the beginning of the patterns, knit on all loops in satin stitch,
in the 4th row, decrease 11 loops, knitting 2 knits together = 92 loops.
For the stripe at the waist, continue knitting like this:
1 chrome, 90 stitches with pattern B, 1 chrome.
After 16 rows, knit 2 rows of satin stitch on all stitches, adding 6 loops in the first row = 98 loops.
After 2 rows, continue like this: 1 edge, 10 sts in satin stitch, 6 sts in pattern C, 20 sts in pattern 0, 6 sts in pattern C, 12 sts in satin stitch, 20 sts in pattern 0, 6 stitches in pattern C, 10 stitches in satin stitch, 1 edge.
After 42 r (= 15 cm) from the beginning of this distribution of patterns for the armholes, close 4 sts on the sides and continue to close 2 sts and 2 times 1 st = 82 loops in every 2nd row.
At a height of 15 cm from the beginning of the armhole = 42 rows, bind off all loops. 40 central loops belong to the neck, 21 stitches along the edges belong to the shoulders.
Cast on 53 stitches and knit 2 rows in garter stitch.
Continue like this:
For the stripe at the waist, knit like this:
1 chrome, 10 stitches of purl stitch, 6 stitches of pattern C, 20 stitches of pattern 0, 6 stitches of pattern C, 3 stitches of satin stitch, 3 stitches of satin stitch, 1 chrome.
Make the sleeve armhole in the same way as the back.
At a height of 9 cm = 26 r from the beginning of the armhole for the neck, close 6 sts on the left and continue to close 4 sts in every 2nd row, 2 times 3, 2 times 2.1 loops.
Cast off the remaining 21 sts.
Symmetrical to the left, but with 6 button holes.
In the first row of the stripe at the waist on the right, stepping back 3 stitches from the edge, bind off 3 loops and cast them on again in the next row.
Place the remaining 5 holes at a distance of 15 rows from each other.
Cast on 64 sts and knit 2 rows in garter stitch.
Continue knitting in satin stitch and
in the 12th row = 4 cm from the edge, decrease 10 loops = 54 sts.
Continue knitting, distributing the stitches like this:
1 chrome, 1 purl stitch, 50 stitches in pattern B, 1 purl stitch, 1 chrome.
At a height of 5.5 cm = 16 r from the beginning of the pattern, start knitting like this:
1 chrome, 7 stitches in satin stitch, * 6 stitches in pattern C, 10 stitches in satin stitch * repeat 1 time, knit 6 stitches in pattern C, 7 stitches in satin stitch, 1 chrome.
At a height of 7 p from the end of pattern B, start adding on the sides in every 6th row 9 times 1 p = 74 p.
Attention
New stitches are knitted gradually like this: the first 3 increases in satin stitch, the next 7 stitches in satin stitch, knitting the first 6 with pattern C.
At a height of 24.5 cm = 68 r from the end of pattern B to round the sleeve, close on the sides 4 sts and continue to close in every 2nd row 2 times 2 sts, 8 times 1 sts, 1 time 2 sts, 1 time 3 p, 1 time 4 p.
In the next row, cast off the remaining 24 stitches.


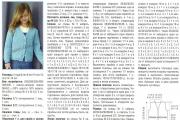
Blouse for a girl from Pelykh Natalia
http://knitting.com.ua/olga_garter_yoke_cardi.html
Blouse for a girl from Pelykh Natalia
Size 110
You will need: Mondial Vai - 200g; Mondial Superwool - 25g; knitting needles No. 4; 5.
Knitting density: 20 p x 29 p = 10x10cm, knitted with stockinette stitch.
Front stitch: front rows - front loops, purl rows - purl loops.
Garter Stitch: Knit in knit and purl rows.
Description of work: cast on 60 stitches on needles No. 5, knit 8 rows in garter stitch and then continue knitting, forming raglan lines:
Row 9: edge loop, k9. loops, add a loop from the previous row, place a marker, k2. loops, place a marker, add a loop from the previous row, k6. loops, add a loop from the previous row, place a marker, k2. loops, place a marker, add a loop from the previous row, k20. loops, add a loop from the previous row, place a marker, k2. loops, place a marker, add a loop from the broach
previous row, 6 persons. loops, add a loop from the previous row, place a marker, k2. loops, place a marker, add a loop from the previous row, k9. loops, edge loop.
Row 10: edge loop, k10. loops, 2 p. loops, 8 persons. loops, 2 p. loops, 22 knits. loops, 2 p. loops, 8 persons. loops, 2 p. loops, 10 persons. loops, edge loop. (2 stitches knitted in stockinette stitch form a raglan line).
Repeat rows 9 and 10 17 times, increasing the length of the blouse and leaving 2 stitches in stockinette stitch for raglan lines, the length of the piece is approximately 17cm, there are 196 stitches in the work.
Next, separate the loops for the sleeves onto additional knitting needles and continue knitting the back and front panels in a single fabric. Knit this piece to a total length of 41cm. Finish knitting with 5 rows of garter stitch. Do not close the loops. Temporarily put off knitting.
Proceed to tying the sleeves. To form bevels, evenly decrease 1 stitch on both sides of each sleeve twice in every 12th row. Having knitted 23cm from the separation of the parts, finish knitting with 5 rows of garter stitch.
Assembly and completion of work: along the front shelves, cast on edge loops on needles No. 5 (3 loops from two edge loops) and knit 5 rows in garter stitch for the fastener strips. On the right shelf in the last row, make 5 holes for buttons (knit 2 together, yarn over), evenly distributing them in height. Sew the loops of one bar onto circular knitting needles, pick up the loops along the neckline, then transfer the loops of the second fastener bar and the loops along the bottom edge of the product.
Finish knitting by closing the loops using the cord method using a thread of superwool yarn. To do this, cast on 3 loops and then knit a lace of three loops, closing the first of the 3 loops and moving the loops from the right to the left knitting needle, pulling the thread behind the knitting. Sew buttons.
Its design, as a rule, differs little from a round or square napkin. Only space is left inside for an armhole...
Hats are worn for protection from the cold or sun and for beauty. Universal headdress - beret. In different...
A knitted jacket is one of the irreplaceable things in a child’s wardrobe. The ideal children's jacket - well-fitted...

Coral color is one of the shades of red, but it is usually perceived by fashionistas as independent and completely...
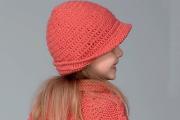
Size: for 6 (8) years. Head circumference: 50 (56) cm. You will need: 500 (600) g peach yarn (50% wool,...

With crochet techniques, many craftswomen note the obvious advantage of the latter. Knowing how to crochet simplifies many...

Everyone treats freckles differently. Some call them “angel kisses” and love them dearly, considering them a highlight...
Concealer is indispensable, because it hides many skin imperfections: wrinkles, circles and bags under the eyes, pigmentation...

The body of the thief in law, covered with tattoos, is, first of all, oddly enough, a linguistic object. The tattoo is...

What is a football section? We are often contacted by parents whose children want to play football, but are not ready...
Online shopping is becoming an increasingly popular form of shopping. One of the famous foreign trade...

Remember the most IMPORTANT rule during chemical experiments - never lick the spoon... :). And now...

“I really am the mother of two daughters (Diana 7.5 years old and Milana 3.5 years old), a happy wife and...

What is it like to be a legend during your lifetime, and with a very happy fate? French actress Catherine Deneuve knows...
Hats are worn for protection from the cold or sun and for beauty. Universal headdress - beret. IN...
A knitted jacket is one of the irreplaceable things in a child’s wardrobe. The ideal children's jacket - well-fitted...