Kigurumi pajamas pattern
Children love big, funny little animals, which we often see in parks and children's entertainment centers. They With...
There are many different kinds of paper crafts. It’s not surprising, because this material is very convenient - you can make anything from it: from applications to things you need in everyday life. In this article you will learn how to make a paper basket in several ways. Such a thing is useful because you can store some useful items in it, plus, such baskets perfectly complement any interior.
The final product will have an unusual beauty, and even a novice needlewoman can handle its weaving.
In order to make such an unusual decorative element, you need to stock up on the following materials:

In order to make a paper basket with your own hands, you need to make as many paper tubes as possible - this is necessary in order not to be distracted by this task during the entire work procedure.
In order to make paper straws, you need to follow this algorithm:
Important! It is desirable that the length of the strips be the same, so it is better to use newspapers or magazines of the same type.
Important! Keep in mind that one end of the paper tube should be smaller in diameter than the other end - this will help to grow the tubes later.
So, the tubes are made.
Important! If you have a desire, you can immediately paint them in the desired color with gouache or acrylic paint; if not, you can do this when the basket is completely ready, or not paint it at all.
There are two ways by following which you can achieve the desired result.
This method is the easiest. To make a paper basket, you must follow the following procedure:

This method will differ in its complexity. If you want to follow exactly this, then it is better not to paint the paper tubes in advance.
In order to make a paper basket with your own hands, you must follow the proposed algorithm:
Important! In order for the parts to stick better, it is recommended to use a press or a glue gun.
Important! It is necessary that the bottom of the container coincides with the cardboard bottom of the future product.
The basket is ready! Subsequently, it can be used as a vase for dried flowers or as a box for necessary little things.
In order to weave a basket from paper or cardboard, you will need the following materials:
To make such an interesting basket, you need to follow these instructions:
Important! If the paper is ordinary, thin paper, it is better to fold the strips in half; if it is cardboard, then it is better not to fold it. For this reason, it is better to cut strips of plain paper twice as long as needed for the job.
Weaving existed in ancient times; almost the first people practiced it. However, over time, more and more new methods appeared that made it possible to create incredible crafts. However, in the near past, handicraft masters began to use an unusual material, which opened a new movement - weaving paper crafts.
The best part is that for this type of needlework you don’t need to spend any money at all, since the necessary materials can be found at home: old magazines and newspapers, used or new A4 paper and even candy wrappers will be used. Just follow the tips in this article and in just a few hours you can make a basket, box and other paper products.
What paper should I use for weaving?
First of all, we suggest you pay attention to old newspapers; the density of such paper is very small, which allows you to easily roll them into tubes or cut them into ribbons and only then use them for weaving. Magazine sheets are very thick and often glossy, this will complicate the work, but at the same time the craft will be stronger.
An unusual type of paper is cash register tape; it is easy to use, as it is soft and strong. In addition, it is very easy to repaint it in a different color, as well as twist it into identical and even tubes.

A4 office sheets are also suitable, although they are quite thick and rough. The big advantage of this material is that it comes in different colors, which means that you don’t have to additionally paint it in the desired color.

Basic methods of weaving paper crafts
There are two main options for weaving, for example, such crafts as: basket, box and piggy bank - made from paper vine or small strips. To create a vine, just roll a newspaper into a thin and dense tube. More complex crafts, in the form of snakes or abstractions, are still better made from strips.

In addition to cellulose materials, you need to prepare a few additional tools, such as: wooden or iron knitting needles, some glue, scissors, a long ruler, a simple pencil and clothespins.
How to prepare tubes for products?
As we mentioned earlier, before you start weaving, you need to prepare several tubular blanks. Get started using newspaper sheets, they make the simplest paper vine. Be sure to lubricate the ends with glue so that the tube does not unwind.

Use a thin knitting needle for the base; wrap a paper strip about 9 centimeters wide around it. This way, each piece will be as thin as possible and similar to each other. Try to pull everything as tightly as possible, do not forget to lubricate the edges of the vine. Immediately after finishing twisting, pull out the knitting needle, otherwise it will stick.
How to prepare strips of paper?
You can make crafts with your own hands not only from tubes, but also from strips. It is necessary to prepare strips up to 15 mm thick - if they are magazines, and up to 30 mm - if they are newspapers, but be sure to fold them in half.

Did you get short strips? No problem, just glue them together, then you won’t have to add new pieces while weaving.
The first work will not be straight, in the future this can be easily corrected with a ruler. Measure and cut all ribbons to the same width and with sharp scissors so that there are even edges.
You already know how to create tubes for weaving; prepare 10 of them. Try to make them as long as possible, you can even combine several pieces into one, you can always cut off the excess.

To create the bottom, place four tubes, and three more on top of them, then start braiding the bottom one in a circle. When everything is fastened with one skein, start the second, but first straighten all the vines into separate rays. Continue wrapping, you need to make another 4-5 turns so that the bottom is flat and strong. From this moment, start bending all the rays to the top; for convenience, place the workpiece on a jar or flower pot and braid it.


To finish the basket, fold the edges inward and make a loop to connect to the adjacent tube.

The basket is almost ready, all that remains is to build a handle; it is made separately and then glued to the basket or sewn with thread. For the handle you need four vines, two lie parallel, and the other two intertwine them.
We weave a basket, but from strips
As in the previous version, you need to make blanks. For one side you will need 8 strips 32 cm long and 2 cm wide. In total you have 16 strips on both sides, it is advisable to make 8 of one color and 8 of another, this will make the basket more beautiful and easier to weave.

Intertwine all the strips so that you have a square in the center. The loose and outer strips must be lifted up and weaving continued. To keep the sides in place, secure the sides with a clothespin or paper clip, as shown in the photo.

You have small pieces of loose strips left on top, cut off the excess and make them the same length, then all that remains is to bend the flat branches and glue them with glue.

We suggest combining business with pleasure and making unusual bookmarks for your child; by the way, the children themselves can help you. The work is quite simple, follow the step-by-step photo tutorial.


You need to prepare two, preferably colored, strips of paper 1 cm wide and fold them in half, but at an angle of about 45 degrees. Connect the folded corners, but so that they do not touch the edge of the strip on the opposite side. The beginning has been made, all that remains is to repeat the weaving.


Perhaps something didn’t work out for you the first time, try again, experiment with colors and soon you will get an excellent bookmark for your favorite book.
First of all, decide on the size of the shoe sole. The base is made of thick cardboard, and to secure the paper tubes, make holes along the edges using an awl. The distance between the holes is about 1.5-2 cm.

Insert the prepared paper vine into the prepared holes and secure them with glue. In our case, about 20-30 tubes were needed.

Paper is the most affordable and versatile material that is used both for children's creativity and for serious design work. A paper basket can be an interesting addition to the interior, gift wrapping for a loved one, or just an excuse to do some DIY creativity with your child. In this material you will find a selection of original ideas for making paper baskets.
Even a child can handle this craft, and most importantly, it will take very little time. To work you will need a square sheet of paper or cardboard. It’s good if there is a beautiful design on the outside of the paper.
First, you need to draw a square piece of paper into 9 small squares (3x3) and make 4 cuts, as shown in the photo:

We bend the workpiece so that two opposite squares along the middle line stand parallel to each other. The remaining side walls will be inclined at the same angle.
Apply glue to the middle squares and glue the entire structure. Cut out a strip of paper for the pen and glue it on. The craft is ready!

Baskets made from brown wrapping paper will look very stylish in almost any interior. They can be used as a stand for artificial flowers or a container for storing small items.
To work, you will need brown craft paper, scissors, glue and tape, a sheet of cardboard (or other thick paper).
At the beginning of work, you need to prepare strips for weaving, 30 cm in length. To do this, cut strips 4 cm wide and fold them in half lengthwise. One basket requires about 50 strips.
We select 16 paper strips, 8 of them are laid horizontally, the other 8 are laid vertically. We start weaving from the bottom, crossing the strips with each other. Then we bend the strips up and move on to weaving the walls.
We braid the vertical ones with a “working” strip. At the end, we bend the remaining ends inward and glue them. The result is a square-shaped basket.

If you want to make a round basket, you will need to cut a circle for the base from cardboard or very thick paper. To weave the base, we take 8 strips, first fold them crosswise in pairs, and then connect them together in the shape of a star with one center. Glue a round base to the center of the star. We bend the strips up and begin to braid them with another strip in a circle. At the end, leave 2.5 cm of base strips, bend them inward and glue them. The round basket is ready!
Another option for a round basket. For it you will also need a cardboard circle of any suitable size and strips of kraft paper. Using instant glue, glue 12 strips (5 mm wide) to the base circle at an equal distance from each other. We bend them upward and begin to braid them with a working strip, as in the previous example. We leave 2.5 times the height of the strips free at the end, fold them inward and glue them.
A basket made of paper using the origami technique.To work, you will need a square sheet of paper for the basket and a strip of paper for the pen. We fold the base of the origami basket according to the diagram:

We bend the strip of paper for the pen 4 times lengthwise and glue it. The basket is ready!
Basket using 3D appliqué technique.Three-dimensional applique is an effective and interesting technique, popular in children's creativity. In order to make a basket you will need 2 sheets of colored paper of different colors, PVA glue, scissors, a ruler and a pencil.
Let's analyze the work on the craft step by step. First, cut both sheets of paper into thin long strips 0.5 cm wide. We intertwine the strips together to form a rectangle equal to the desired size of the basket.
The rectangle needs to be given a slightly inclined shape. To do this, slightly stretch out the two sides of the rectangle - the space between the stripes on this side should expand slightly.

If you are completely satisfied with the size and shape of the future basket, we begin gluing the joints of the strips. We turn the rectangle inside out and apply small drops of glue to the joints and dry. We cut off the excess length of the strips, retreating 1.5-2 cm from the basket, bend the tails and glue them.
We cut the remaining lighter strips in half, and divide the dark ones into 3 parts. We roll them into tight bundles (“barrels”). You can wind it on a simple sewing needle and glue the ends. Glue the blanks along the bottom edge of the basket, alternating colors.
Glue the basket to the flower applique. First we glue the bottom edge, then the sides (separately), so that the top edge moves slightly away from the surface. We lay out the handle of the basket with the remaining “barrels” of paper strips, also alternating them.

The craft is ready. If desired, you can add a butterfly or bow to the basket.
For those who want to get new ideas for creativity and analyze the making of baskets in more detail. We have prepared a selection of video master classes:
I used a glue stick, but PVA cardstock works well too.

First you need to correctly draw the necessary lines of folds and cuts on a sheet of cardboard. I used the standard cardboard size - A4, based on this I indicate the data.
Look at the photo, on it a sheet of orange cardboard is lined up like this:

Cut as shown in the photo, that is, the lines between the small sectors, cut out the triangles. Make folds along all lines. The result is this basket frame.

To make the basket bright and colorful, 12 small sectors can be covered with colored cardboard. If you are more interested in a single-color basket option, you can skip this step.
For a multi-colored basket, cut 12 rectangular strips of colored cardboard, exactly matching the size of each sector. My stripe is 7 cm long and 3 cm wide.

Glue the cardboard strips onto the sectors of the orange frame of the basket on the outside of the folds.

Now start forming the paper basket into a single whole. To do this, turn the basket with a triangle towards you, glue the bottom strip to it, first on one side and then on the other. As you can see in the photo, the orange triangular part overlaps the yellow stripes.

In the same way, glue two stripes on the second row, mine are pink.

And then the last green third row. All parts must overlap each other so that there are no voids. You also need to adjust the symmetry of the sides in the process. One side of the basket is ready.

Glue the sectors on the second side in the same way.

A basket cannot be without a handle. Cut it out of cardboard. The length of my strip is 28 cm, and the width is about 2 cm. Also cut out two circles, the diameter of each can be 5 cm.

Fold the circles in half and glue them to the basket so that part of the circle is on the outside and the other half is on the inside. Glue the tips of the pen inside onto the halves of the circles. The basket is ready.

Now you know how to make a paper basket. Various toys, flowers, as well as Easter eggs, bunnies or, for example, will look impressive in it.

Chocolates are a favorite treat for many children and adults. They look especially festive in a decorative basket. Its production will not require much cost or your time. And such creativity will also bring peace and pleasure from the result obtained.


The basket is now ready for use. It is useful for storing many useful things. Such a souvenir will be a valuable gift at any event, because the soul and efforts of the master have been put into it.
Paper baskets are made using different techniques: origami, from newspaper tubes, woven from strips of paper. One of them is presented in the following video.
Children love big, funny little animals, which we often see in parks and children's entertainment centers. They With...

If a doctor orders a pregnant woman to undergo such a serious examination as fluorography, she immediately has many problems...

The most impressive carnivals in the world can be found in several cities, which will be discussed in our today's...

The ex-husband of TV presenter, designer, and since 2017 singer Olga Buzova, midfielder of the leading Russian championship...

There are many different kinds of paper crafts. It’s not surprising, because this material is very convenient - you can...

Good afternoon dear friends! The first gift for a teacher is so exciting. Do you agree? We figured out what bouquet...

We knit 3 lifting stitches and 13 double crochet stitches into the amigurumi ring. Then we close it into a ring, fastening...
You can make slippers with your own hands. For this we need: natural or faux fur,...
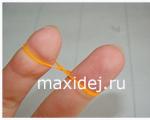
How to weave bracelets from rubber bands? If you are asking this question, it means that you have already purchased...

The long-awaited spring is approaching, and with it our favorite holiday - March 8th. This is the International Women's...
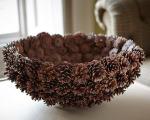
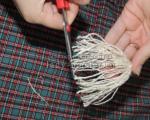
Cones are a beautiful and durable natural material for creativity. They are often used to make children's and New Year's...

For different materials there are usually different care instructions. Here you will find, for each material, 3...

When assigning old-age benefits, the full time of work is taken into account. If such a period...
Its design, as a rule, differs little from a round or square napkin. Only inside there is room for...

If a doctor orders a pregnant woman to undergo such a serious examination as fluorography, she will immediately...

The most impressive carnivals in the world can be found in several cities, which will be discussed in our...