How children learn mental mathematics: from what age, what are the advantages, why is it useful Mental arithmetic development
All parents dream that their heirs will succeed in dancing, sports, games, and music. Why not? Parents are ready...
All girls love to play with dolls. They dress them up, make houses for them, show off their dolls to their friends, and, of course, every girl dreams of having as many dolls as possible. Creative parents won't immediately rush to the store to fill the empty spaces in their child's toy box, but will try to make something themselves. For example, sew, mold, knit from improvised means. Sometimes such unusual things as nylon tights can be used as materials. In this article we will learn how to make dolls from tights with our own hands, and your daughter will certainly be delighted with such a toy. In addition to dolls, you can make animals, flowers and many other interesting things for children from nylon.
For example, a cute goat will do a great job as a doll for beginners. To make it you will need:
The process of making a doll is shown step by step in the photo:


So, as a result of this MK you will get such a wonderful goat.
Now we invite you to take a master class on sewing a doll. We will describe the entire process in detail.

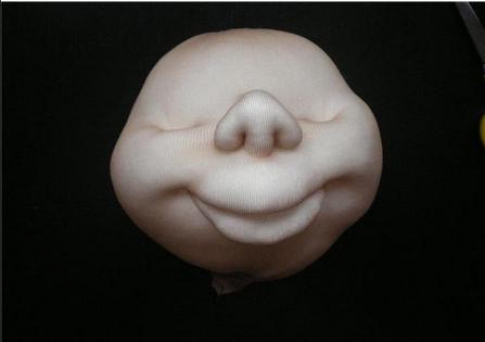
Step 1: make the head. To do this, a piece of padding polyester is placed in a nylon bag. Another piece of padding polyester is placed into this bag separately - approximately in the middle - this is the future spout.

Step 2: work with the spout. First of all, you need to form the bridge of your nose:

Then we form the nostrils:


A loop is pulled from the bottom of the nose, the needle is brought out to the back of the head, the thread is not cut - in the end we almost have a doll's face:

Step 3: straighten the padding polyester inside the nylon bag so that plump cheeks appear on the sides of the nose. We also make a small rope of padding polyester and insert it under the spout - the basis for the sponges:


Step 4: using the second needle, we begin to shape the lips - we make the corners of the future mouth and dimples for the eyes. A loop is pulled through the corners of the mouth to create a smile. You need to make sure that the padding polyester is uniformly placed throughout your head, so that there is enough of it in the right places, and constantly adjust it. While embroidering the lips, the needle is constantly brought into the eye area, and the eye sockets become deeper and wider, beginning to resemble boats, and not dots, as originally. To make the lips look like a “bow”, the needle must be brought to the middle of the lower lip. To obtain the desired shape of a smile, you need to stretch the thread and needle from the corner of the lips to the eye until the desired result is achieved.


Step 5: The bridge of the nose lengthens relative to the eyes.


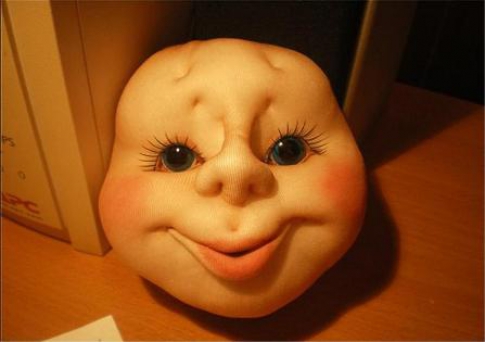
Step 6: glue the eyes. You can purchase eye-shaped accessories by purchasing them at a hobby store. It is also possible to use the eyes of an old broken doll. In addition, you can take buttons and color them like eyes. If you insert rollers under the nylon above each eye, you will get eyelids.

Step 7: makeup. The doll needs to have her cheeks flushed and her lips painted. You also need to draw eyelashes, if there are none with the eyes, and eyebrows. All this is done with pencils.

Step 8: doll hair. Many hairdressers use wigs from children's fancy dress costumes for their hair. Of course, it can be used for more than one doll. The wig needs to be cut apart to create separate strips of hair from which it is sewn. This strip needs to be twisted and sewn in this state, and then sewn to the doll’s head.
Creative people do not stop at mastering already known types of needlework - they constantly come up with new creative ideas. Many needlewomen already know how to sew a tilde doll with their own hands, and from the moment products made from thin nylon became cheap and accessible to everyone, ideas appeared on how to create a doll from nylon tights.
Since master classes describing how to make a doll from nylon tights appeared relatively recently, there is no clear classification of toys for this type of creativity.
However, soft dolls made of nylon and padding polyester can be divided into several types, depending on their appearance and manufacturing methods.
To create a doll, not only nylon tights are used - stockings and socks are also great for this. At the end of the work process, the master receives small soft toys of a round or oval shape with conventionally designated limbs.
Simple master classes on creating this type of doll are great for teaching novice handicrafts.
Another simple way to create a doll from nylon tights. From the name you can understand the peculiarity of the doll - the face and butt are especially prominent in the work process. Masters jokingly call this toy a fortuneteller - which side it turns to you in the morning, such a day awaits you.
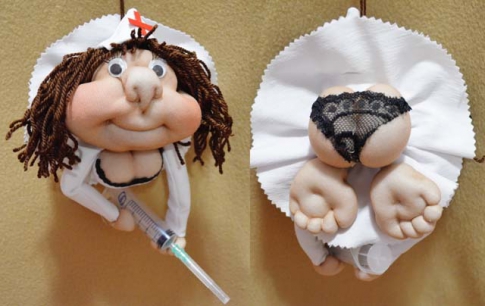
The doll needs to be made in parts: first make all parts of the body (head, hands, feet, butt), and then sew them to the clothes.
Frame toys take longer to make than previous types; they become taller and take appearance, close to human.

The main material for the frame is considered to be rigid wire wrapped with filler, but in addition to it, plastic bottles can also be used.
If this is your first time deciding to make a nylon soft toy, take note of the method of creating a product from stockings. Such a master class will not take you much time at all - after practicing several times, you will learn how to make a cute tumbler doll in just an hour!

After the preparatory work with the body is completed, the doll made of nylon tights needs to be endowed with emotions, giving conventional facial features.

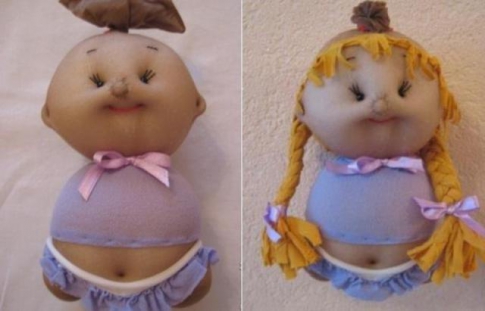
Sew to the head if desired long hair from yarn so that the baby turns into a girl. To finish a doll from nylon tights, you need to make her into toy clothes at your discretion.
Control the tension of the working thread and nylon yourself: for example, the cheeks need to be tightened more tightly to better highlight them, but the navel can barely be defined. But do not overdo it, otherwise you may tear the working material.
If the previous master class seemed too simple to you, try making a doll from nylon tights on a wire frame. Thanks to the rigid wire, the toy's limbs can take different positions.
Typically, the most time spent on creating the head and shaping the facial features.


For hair, put an old toy wig on the doll or buy a new one at a specialty store.
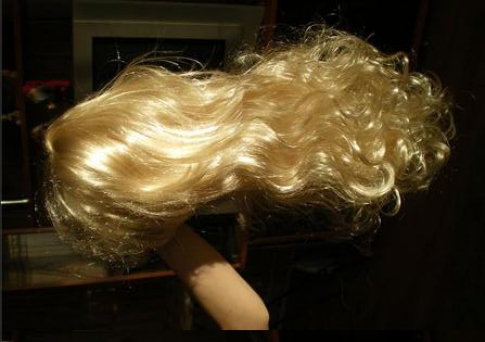
The hair can be made from yarn and floss in the same way as for a Waldorf doll.
After working on the toy head, the doll needs to be equipped with a wire frame. Take as a basis a ready-made diagram with the approximate dimensions of the limbs.

Even a novice needleworker can easily make a wire base, but it will take patience to calculate the length of the limbs and bend the proportional sections.


This doll made from nylon tights can be dressed up in any doll clothes that suit her size, or you can sew a costume yourself. Thanks to the fact that the toy suits many different outfits, you have the opportunity to complement her look in any way - braid her hair, decorate her with beaded bracelets or a hairpin with flowers made of cold porcelain.

In conclusion, watch the video tutorial that will tell you how to make a cute brownie doll from nylon tights.
Widget from SocialMart
Take it for yourself and tell your friends!
Read also on our website:
show more
Who are gnomes? These are fairy-tale characters, dwarfs who live underground and are famous for their countless riches. They are also great masters and almost magicians. Previously, it was believed that they all had beards, but now this version has been revised because a gnome cannot be born with a beard.
Previously, people thought that all gnomes were evil, greedy and treacherous, that they sat on their chests of gold and did not give them to anyone. Now this characteristic of them has been revised. Every year we make gnomes to bring us gifts.
But for all times there remains one constant sign by which you can immediately recognize him - this is the cap! If the toy has a cap with a bell, then it is a gnome! Therefore, now we will make dolls with caps.


Bright New Year's gnomes They can not only hang one at a time on your Christmas tree, but also dance in circles on their fluffy green paws. To do this, you just need to sew a few of these funny little men out of fabric. This garland will be as long as you want. It can be placed on the Christmas tree or by the fireplace; this cheerful trinity can be attached to a canvas, placed in a frame and hung on the wall.

Copy the patterns, make paper patterns, and then cut out as many parts from the fabric as shown in the photo. These parts are enough for three gnomes.

Cut out the body from white fabric, leaving seam allowance. If you want to make a torso flesh-colored, you can soak the fabric for half an hour in tea leaves.

Sew the cut out pieces along solid lines and turn them right side out, tucking the unstitched hem inside.

The legs and Christmas scarves need to be sewn in the same way.

Fill the sewn parts with padding polyester or other filler, pin the legs to the body with pins, and then sew.

Next you need to make doll clothes. It can be sewn from bright colored or plain fabric. First we sew the shirt along the shoulder seams, then we sew the neckline, sew down the side seams and turn up the sleeves.

We sew the top seams of the pants first, and then the legs. We hem the length, tuck the belt and put the gnomes in their outfits.

You can add pleats to the waistband of your shorts to make them sit tighter at the waist. Tie a scarf to the rag dolls and glue synthetic yarn hair onto their heads.

New Year's gnomes must have caps. Start by cutting out a felt cone. Then try them on, sew them, turn them inside out and dress the little people in them.

We sew bells to felt hats.

Every New Year's gnome should bring Christmas gifts to the house. Therefore, we will give everyone a bag and make a small garland of gnomes.
If you have open, seeded pine cones, you can make fun gnomes out of them. Take a large bead or any suitable size ball and glue it to the top of the cone.

You don't need a pattern, just cut a cone out of felt and sew the cap. Make a scarf, sew on a bell, draw eyes and dress up the gnome.

Such a holiday gift will not only be pleasant, but also useful. After all, in a bag made of bright cotton fabric there will be the most medicinal herb in the world. Glue a wooden ball to the bag. This will be the head, so draw a funny face on it. And again sew and put a felt cap on the ball so that our little man can rightfully consider himself a gnome.

This video shows how easy and simple it is to sew a tilde gnome, the funniest gnome of all. To do this you will need:
This tilde gnome can sit or hang on the Christmas tree.
Another option in the video below and the pattern:

Here is the most detailed and understandable master class on how to make a wonderful toy out of nylon. And it’s okay that he’s sleeping and, actually, not really a gnome. But, firstly, gnomes also sleep. And, secondly, we have already decided that the status of a gnome is determined by his headdress. Therefore, if you put on this charming nylon doll not a cap cut from a sock heel, but a cap with a bell, then it will be a real sleeping gnome.
Finally I’m posting the promised MK on gnomes. The height of the finished doll is 34 cm.
Materials: 2 types of green fleece, green felt capron, faux llama fur, eyes, white and 2 types of green threads, padding polyester, wire, moment glue, hairspray, powder and always a good mood.

Let's start making the head: cut out a circle with a diameter of 10 cm from the nylon and put a stitch along the edge, form a ball with a diameter of 12 cm from padding polyester for the face and a small ball for the nose. First we put a small ball on the nylon, then a large one and tighten the nylon, leaving a hole measuring 4-5 cm.
3.
You should get a blank for the face with a diameter of 10 cm.
4.
We make tightening - we stitch the nose, mouth and upper eyelid.
5.
Glue in the eyes and stitch out the wrinkles.
6.
Apply makeup and spray your face with hairspray.
7.
Let's start making ears: cut out 2 ovals 5x7 cm from nylon, tear off 2 pieces measuring 5x7 cm from padding polyester, then put a smaller piece inside each.
8.
We lay a line along the edge of the nylon - fold the padding polyester in half and put it inside the nylon - tighten the nylon.
9.
From what we received, we form an ear by stretching it. Using small stitches we sew the inner part. Then we sew the lobe.
10.
11.
We sew the finished ears to the face.
12.
We make the back of the head from nylon with a diameter of 10 cm and a padding polyester ball with a diameter of 12 cm.
13.
Now we sew the face and back of the head together.
14.
We cut out the beard - a strip of fur 2x25 cm - and sew it around the perimeter of the face.
15.
We make the frame of the doll from wire 60 cm long. We bend it as in the photo - neck 5 cm, shoulders 5 cm, distance from shoulder to bottom 18 cm.
16.
We screw ready-made handles to the frame - you can see how to make handles in my MK on the Snow Maiden http://stranamasterov.ru/node/847907. - wrap the places where the handles are screwed with tape.
17.
We wrap the frame with a strip of padding polyester.
18.
We bend the wire as in the photo - the length of the foot is 5 cm.
19.
Now wrap it with padding polyester again - the thickness should be 1.5 cm.
20.
We take white and light green threads together and wrap them around the legs to imitate stockings.
21.
We cut out and sew a jumpsuit from green fleece - we fold the bottom and hem it.

Pattern in life size on a sheet of A4 format.

We put the finished overalls on the frame - then we stuff the tummy area tightly with synthetic padding and sew the shoulders together.

We cut out boots from felt - sew them together in front and turn them inside out - bend the cuffs and put them on the feet - be sure to take into account that the boots should be left and right - in the photo you can see that the inside is narrower than the outside.

We glue the sole to the doll's foot - at the back the sole should protrude 1 cm beyond the heel - then we sew the upper part to the sole. In the area of the heel we put a lump of padding polyester so that it is not empty. We twist the cord from the threads and sew it along the bottom of the boot.

We cut out, sew and put on the jacket - we glue the sleeves to the wrist.

We sew the cap - sew the top and the inside, then connect them together and turn them inside out. We trim the edge of the cap with cord.

We sew a line and tighten the cap to the desired size. We lay a couple of folds and sew them.

30.
We sew the finished cap to the head.

Then we decorate the cap with a strap with a buckle. We sew the finished head to the body. We put the scarf on the doll and voila, our gnome is ready!

33.
Back view.

Do you want a unique collection of dolls for your child, or maybe you have an idea for creating a home puppet theater? Dolls made from tights handmade– a great idea for any creative project. It’s easy to find a couple of unnecessary tights in every apartment, and padding polyester can be bought at a fabric store or taken from old jackets. The finished doll is very plastic and realistic. We offer you several master classes on making dolls with your own hands using hosiery techniques.
Materials:
- scissors;
- wire;
- glue;
- tights;
- needle;
- Knitting;
- ordinary threads;
- scraps of fabric.
If you are new to making dolls, we suggest you start with the simplest thing - a baby doll made from tights. This toy has a fairly simple shape, so it is ideal for mastering how to work with nylon.
1. Take a nylon sock, fill it with filler and tie a knot.
2. Mark the neck area and sew with a basting stitch. After this, tighten the neck and wrap it several more times with thread.

3. Sew circles around the legs and pull them together.
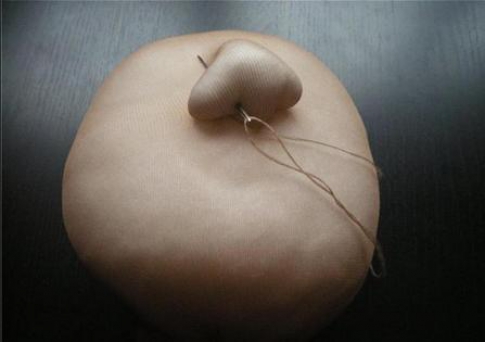
4. Sew a small circle on the head and pull it off - this will be the nose.
5. Now, in the seam area of the tights themselves, insert a needle up to the baby doll’s tummy and grab a few nylon threads to create a navel-shaped hole. Also separate the buttocks without tearing the thread.
6. You can make ears on your head; to do this, pull the thread in two places. Embroider eyes and eyebrows with threads

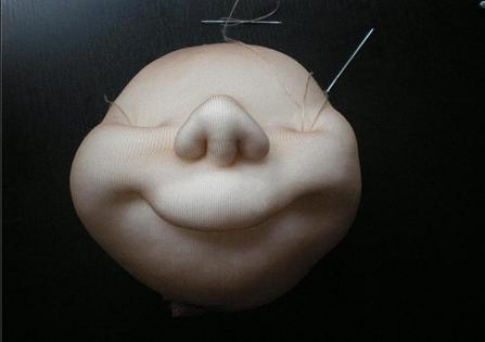
7. Pull the cheeks from the corner of the mouth to the eye and immediately sew on an eye bead.
8. In the area of the top of the head, stick a needle with a red thread and make a mouth so that the baby smiles. Make a knot on the top of your head so that you can hide it later with your hair.

9. Cut off the excess from the knot on the head and make handles for the baby doll from this piece of nylon. Sew the arms to the body.
11. Clothes can be made from scraps of fabric or colored socks.

Dolls made from nylon tights master class
Baby doll is ready! Using the same principle, you can make several boys and girls. After you have practiced the stocking technique on these babies, start making more complex dolls.

2. Now start shaping the face. To do this, roll a ball out of padding polyester, insert it into a bottle covered with nylon and use a needle and thread to form a nose. After this, you can add more padding polyester to form the cheeks, forehead and chin. Glue the eyes, embroider the mouth and give the doll a suitable facial expression. To make the neck line stand out, drag it with threads.

3. Pull the remaining bottom part of the tights up and through the neck. Use thread to secure the tights at the top. Sew hair using threads.
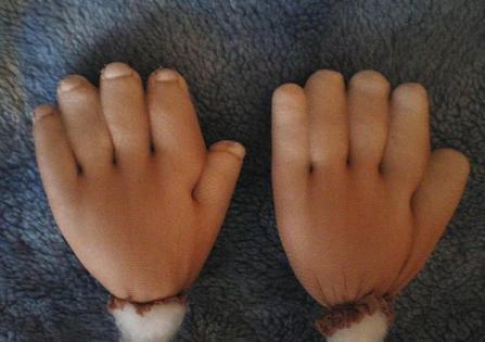
4. Hands are made of wire. Cut pieces for fingers, wrap them with padding polyester and gradually connect them. You need to wrap the entire handle from palm to shoulder, and then put a “skin” of nylon on it. Highlight the fingers with thread. 
It is not necessary to sew legs for such a doll, especially if you plan to dress her in a long skirt. You can come up with an outfit for your grandmother using tights yourself.
Frame made of plastic bottle Great for making not just a doll, but a warmer for a teapot or a cap for a sugar bowl. You can make such a heating pad according to the previous master class, the main thing is to correctly calculate the length of the skirt. 
Today, when making toys, mass production is often used and all dolls are similar to each other. That is why interest in has recently increased. It is quite possible that children do not take care of store-bought toys because they do not see their value, so parents can make some kind of toy out of tights with their own hands together with their child. Even though the product may not be perfect the first time, it will teach the child to appreciate the work of others and help reveal his or her abilities for needlework.
Frame children's dolls made from nylon tights are the pinnacle of hosiery craftsmanship. These toys are pleasant to hold in your hands, they are quite plastic and look like real dolls.

For their base, a wire frame 30 cm long is made. It consists of a 12 cm loop for the head, an oval body 12 cm and legs 16 cm. Separately, the handles are wrapped with electrical tape and loops are made at the ends of the legs for shoes.
 First you need to make the head separately and form the face of the doll. The head is made from a piece of tights, and then the individual parts are pulled together with threads. The eyes are either embroidered or glued on. You can use threads or an old wig as hair.

For a doll about 50 cm in size, you will need 1.5 m of wire from which the frame is twisted.
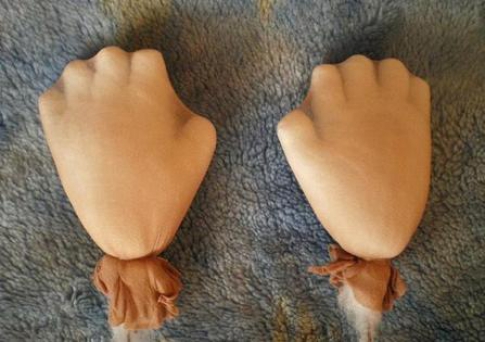
The palms are made from pieces of wire wrapped with padding polyester. A piece of tights is put on top. Fingers and nails are embroidered with threads.

The palms are screwed to the frame and it is completely wrapped with padding polyester to the required thickness. After this, the body is covered with padding polyester and the head is sewn on.
All that remains is to sew Nice dress for the doll and dress her.
 It is advisable to disguise all seams. If you are sewing a child’s toy, then the ratio of the body to the head is 3:1 for a doll, 6:1 for a schoolchild, and 8:1 for an adult.

The frame is made of aluminum or copper wire, and you can combine wire of different thicknesses. Dolls on the frame can sit and stand, because the wire makes individual parts of the body movable. Keep in mind that the smaller the doll, the more difficult it will be to sew clothes for it.
Watch the video: dolls made from stockings
You can use nylon tights to sew characters from children's fairy tales, who will decorate the interior and become good.

All parents dream that their heirs will succeed in dancing, sports, games, and music. Why not? Parents are ready...

Soap bubbles are one of the most favorite pastimes of children and adults, known to mankind since ancient times. At high...

Summer is in full swing - and I want something like this... Something fun, simple and - a sea of real summer sensations! One of...

Quitting smoking is not easy, but it is definitely worth all the effort - for example, you know that non-smokers live 14 years...

Year after year, the famous Forbes publication publishes ratings of the richest and most successful people on our planet. Everyone's condition...

Some species of fish and marine animals feed on plankton. They filter water through special organs that...

Briefly: The godfather, or godfather, must be an Orthodox Christian. The godfather cannot be a Catholic...

This article will be a separate paragraph, since it is very important and touches on many issues that are here...

With the approach of the most important holiday of all mothers, coming this year on November 26, download from us...

Nose piercing tools: nose tube, needle stopper, piercing needle catheter No. 18. Jewelry for...

The ability to count in your head is a useful skill not only at school, but also in everyday life. With its help you can almost...

Hickey is one of the side effects of lovemaking. This feature occurs quite often when it comes to...

Your man (spouse) turned 50 yesterday... You really want to know what is “hidden” in it and what...

It looks like you've gone a little astray since you opened an article with that title. You may be worried and panicking, but...

Soap bubbles are one of the most favorite pastimes of children and adults, known to mankind since ancient times....

Summer is in full swing - and I want something so-and-so... Something fun, simple and - a sea of real summer...