Patterns for knitting hats with braids and gradient knitting needles
Recently, a gradient pattern has been used quite often when knitting hats. What does this super...
Recently, a gradient pattern has been used quite often when knitting hats. What does this super popular gradient mean? This is all just a smooth transition between different colors of yarn in one product. Gradient knitted hats can differ dramatically from each other due to the chosen colors and patterns. This accessory can be knitted in bright or pastel colors, but in any case, a smooth transition between colors will give the product originality. Let's look at how to connect a header with a gradient using an example.
We will need:
- yarn (2 skeins of 50g each);
— knitting needles 2.5 (5 pieces);
- additional knitting needle or pin;
- scissors;
- tape measure.
With a two-strand gradient, first measuring the volume of the head. Be sure to knit the sample to correctly calculate the number of loops.
This article shows how to knit a gradient on a size 56 hat.
100 stitches are cast on the knitting needles. If you want to get a hat with a lapel, then knit 30 rows with an elastic band (2*2, 1*1). If without a lapel, then 15 rows are knitted with an elastic band.
After the elastic band, you need to add 40 stitches evenly.
From one loop we will make two, if we take a loop from the previous row. Since our knitting is divided into 4 knitting needles, we need to add 10 loops to each one.
Now we have a total of 140 loops. We knit them in knit stitch for 3 rows and continue knitting the gradient hat according to the pattern:


Pattern repeat: 4 knits, 8 crossed, 4 knits, 8 crossed, 4 knits.
Let's look at how to knit a hat pattern with a gradient according to the description:
1 rub., 5 rub.: facial;
2p, 4p, 6p: purl;
3rd: now we knit the pattern. You should get five rapports: 4 knits, 8 knits crossed to the left, 4 knits, 8 knits crossed to the left, 4 knits. etc.
7p.: 8 knits, 8 knits crossed to the right, 4 knits, 8 knits crossed to the right, etc.
We knit this way until the 19th row.
In the 19th we begin decreasing: we knit the crossed loops together in twos.
To get a hat with a gradient, change the thread in the 13th row, and then again after 13 rows change the thread color.

After knitting 27 rows, try the hat on your head. Whether the height of the cap is enough for you is determined only by your desire.
How to finish knitting a hat with a gradient:
31 r.: 2 knits., 2 knits. together, 2 persons., 2 persons. together until the end of the row.
In the 32nd row we knit two loops together.
Decrease stitches until there are 12 stitches left on the needles. Pull the thread through the loops and tighten.

I think that after this master class it will not be difficult for you to create such an original hat with a gradient. She will always look bright and stylish. The main thing is not to overdo it with other accessories and colorful clothes.
We make a pompom like this: Cut out 2 circles from cardboard, wrap yarn around them and cut them.

Became popular not long ago knitted hats with a gradient (a fairly smooth and colorful transition from one color to another). In addition to the fact that such hats are very stylish and beautiful, they are also warm, as they are knitted in 3-4 threads. The ideal yarn for creating such masterpieces is merino wool, but Alize Lanagold 800, Alize Baby Wool, Kartopu Crystal, etc. are also in great demand.
For a master class on knitting such a hat We used soft and fairly thin Fiesta Elegance yarn (100% acrylic) in two shades: pink and gray. All calculations are given for a head volume of 48 cm.
We begin to knit an elastic band in 3 threads from the cast-on 74 loops.
We knit 14 rows of elastic, and then knit 2 more rows in stockinette stitch without any increases. After that we start knit braids according to the scheme.
There should be 9 rapports.

In the next row (after the first crossing): we introduce one pink thread, and break one of the 3 gray ones.

We knit another 7-8 rows. We get the beginning of the transition. After the second crossing, we replace another gray thread with a pink one. We get two pink and one gray threads. So we continue for another 10 rows.

Now we finally replace the third gray thread with a pink one and continue knitting. We knit 10 more rows and make 9 decreases (in the intervals between the braids you should get 1 purl loop).

Then we knit 2 rows of 2 loops together and transfer the knitting to the thread using a needle or hook. Then we tighten the thread and sew the cap.

The result is a hat with a beautiful gradient. Now we do like this pompom By this master class(from two colors of yarn) and sew it to the top of the hat.

cap with gradient, associated knitting needles, ready to go out!

Beanies, knitted with braids, this is perhaps the most common pattern for children's hats. Braids are not gender specific; they are good for both girls and boys. Braids add volume to the product and, accordingly, warmth.
Especially for the site Handicraft Lessons o_rybka1.
In 2020, the trend will be a gradient pattern. It is actively used by designers to create clothing and accessories. Essentially, it represents a smooth transition between colors. In our article we will tell you about a stylish and sophisticated accessory - a hat with a gradient.
A hat with a gradient using the lalo technique is another hit of the new season! This complex technique involves a gradual transition of shades and a large number of braids. Not every master can take on such work, but in the end the product turns out luxurious!
The gradient can be made in both bright colors and pastel colors. If you want to be on trend, be sure to buy a stylish accessory - a hat with a gradient or, in other words, a hat in the Lalo style.
Experts advise choosing brighter, lighter threads in rainbow colors for a baby’s hat. It is worth noting that this palette goes well with each other and makes the product juicy and elegant. Any of the colors can be successfully combined with a white shade.


Today, designers offer a huge selection of hats. The trend is for comfortable beanie hats with a lowered top.


Another fashionable youth option is a stocking cap with braids.

A knitted hat with a gradient and braids can significantly transform the image and warm the owner. This pattern adds volume and texture to the headdress. This model is a win-win option for ladies with large facial features. As an option, you can choose an accessory with a pompom.


The model of a hat with a lapel looks no less stylish. Such models appeared every now and then in fashion collections 2019-2020. Volumetric braids can be present on only one lapel. It is often knitted separately and then sewn to the finished headdress. In this case, the main part is made with elastic or satin stitch. This hat suits everyone and also goes with any outfit.


If you decide to knit a hat yourself, you need to take into account two parameters: head circumference (to do this, you just need to measure the circumference of your head in the widest area) and height.


A hat with a gradient does not suit everyone. Due to the numerous large braids, this accessory is quite voluminous. Stylists recommend wearing it to ladies with a square or round face shape, as well as girls with a dense body build.
If you decide to knit such a hat or order it from a craftsman, be sure to add a large pompom to it. This technique helps to visually elongate the shape of the accessory.


A headdress with a gradient is always bold, stylish and bright. Such an accessory is sure to attract attention, and therefore it becomes the main accent in the image.
When choosing outerwear, you need to choose thin jackets and down jackets. In a fluffy down jacket you can look like a snowman. One voluminous item in the image will be enough!

You cannot combine a hat with a bright color gradient with colorful clothing items and scarves. It is better that the remaining elements of the image are of a single color.
Stylists suggest combining the accessory with pastel shades of a straight-cut coat. It can be gray, pink or caramel. You need to understand that if you bought a coat, for example, pink, then the hat should have similar shades.

Lovers of the “Lalo” style can complement the hat with a scarf of the same color scheme. However, Lalo's hat and cardigan of this style are too much!


Braids are very popular this winter! Hats with braids, snoods, scarves, even mittens: everything with braids and arans! And color! If you like a gradient, then for the hat you need to take yarn as thin as possible in 3 colors in order to make a smooth transition from one color to another. We knit in several threads. The transition is carried out by gradually replacing a thread of one color with a thread of another color.
We will need circular or sock knitting needles No. 3 (for the elastic, it should be knitted more tightly) and No. 4, a marker to indicate the beginning of the row.
The thicker the yarn and knitting needles, the fewer braids there will be in the hat. In my opinion, a hat looks more interesting when there are more braids.
This hat is knitted with braids according to this pattern. The braid consists of 12 loops. The number of purl loops before and after the braids can be adjusted. You can knit without any purl stitches between the braids. This pattern is called differently: royal braid, braid with shadow, braid.

Knit a sample. It must be said that the braids greatly tighten the fabric, so for the elastic we will cast on a smaller number of loops, and then add loops for the braids. The sample was knitted, washed, and dried flat. Now we count how many loops you need to cast on. Measure your head circumference. If you knit a hat that fits tightly to the head, then subtract 3 cm; if it is looser or you knit a spandex thread, then there is no need to subtract.
Decided on the number of loops. Remember that the number of loops must be even if we knit with an elastic band of 1*1, and divided by 4 if we knit with an elastic band of 2*2. We cast on 1 more loop so that. We knit an elastic band, knit 1, purl 1. or k2, p2 6-7 cm or 12-15 cm if the hat has a lapel. A hat with braids will be warmer if you knit the lapel.
Next we will knit the pattern. To do this, we make increases and switch to larger knitting needles. If I cast on 96 loops on the elastic band, that’s 8 braid repeats, then I’ll add 1 more repeat (12 loops) and between the braids 1 purl loop on both sides (more is possible) +18 loops. Total: 96+12+18=126 loops. Now we knit according to a pattern of approximately 20 cm.
Row 1: *P1, knit 2 together, knit 1, knit 2 together, knit 1, knit 2 together, knit 1, knit 2 together, knit 1, purl 1* Repeat ** 9 times
2nd row: knit 2 purl loops together, knit knit stitches
3rd row: We knit a braid from 9 loops: where there were 4 loops, there will be 3 loops
Row 4: knit according to the pattern (all knits)
Row 5: *2 together, knit 1, k2 together, k1, k2 together, k1.* Repeat ** 9 times
Row 6: knit according to the pattern (all knits)
Row 7: braid of 6 loops (2 loops each)
Rows 8 and 9: knit according to the pattern (all knits)
Row 10: 2 stitches together until the end of the row
Row 11: braid of 3 loops
Row 12: 2 stitches together
Row 13: knit 1, knit 2 together until the end of the row
We tighten the remaining loops on the needle, cut the thread, and hide the tip. We send it to the WTO.
You can shape the crown in another way: We close each braid with wedges on both sides (you will have 9 wedges). We decrease as follows: we knit 2 loops together with a slant to the left, 10 knit stitches, then again 2 knit loops with a slant to the right, and so on until the end of the row. In the next row we decrease again in the same way until 2 stitches remain from each wedge. We tighten it with a thread and the braided hat is ready.
Sew on the pompom. To prevent it from dangling, we sew its ends at a distance of about 5 cm from each other.

Size: 53-55
Yarn: BBB full in two threads
Color: 409
Knitted in the round, without seams.
Knitting needles: hat - No. 6.5; snood - No. 8
I cast on 60 loops for the hat, after 14 rows with a 1x1 elastic band I added 4 loops (every 15 loops), for multiplicity - 4 reports of 16 loops. Knit to the required length (mine is 21 cm). Next, form the crown (4 cm), and close the loops.
Hat height 25 cm.
For the snood I cast on 76 stitches, 2 rows with a 1x1 rib, and then stockinette stitch with elements of the hat pattern.
I finished with 2 rows of 1x1 ribbing and closed the edge with a needle.
Snood dimensions: width 28 cm (folded), height 38 cm.
Consumption: approximately 7 skeins
Pattern:


An original hat with seven braids.
To knit it, you will need NAKO Nakolen yarn 100 g / 210 m, No. 5 circular knitting needles with a shortened fishing line.
We will knit without a seam from the bottom up.
We cast on 81 loops, close. There are 80 loops on the knitting needles. We knit with an elastic band * 1 knit crossed, 1 purl * 7 rows (a different number is possible).
In the next row we add loops for braids. We will knit all the braids, starting with the front one, in the middle we will knit 2 from one loop. That is, the first braid of 4 loops: the front one, no longer crossed, 2 knit ones from the purl loop, the front one. The second braid of 6 loops: 2 knit, 2 knit from one, 2 knit. Next we knit according to the pattern for 40 rows.

Now we form the top of the head. Decrease 6 stitches evenly in each row. First, one at a time in intervals of 5 purl loops and in garter stitch, then in wide braids, loops in the middle, then in narrow braids. Pull the remaining 6 loops, cut the thread and hide the tip inside the hat.


Fashion. It all depends on the choice of colors to create such an accessory, which is quite important for any girl. A gradient hat with braids, the knitting pattern of which is located in the article, can also become a warm element of your wardrobe, thanks to its voluminous pattern. You don’t even have to think about whether to knit it or not. Start preparing for winter right now and pick up your knitting needles. The description of the hat is designed for knitting on two needles; if you want to knit in the round, then it is worth considering that you will not have edge loops and purl rows.
To knit a hat with gradient knitting needles with braids you will need:
- yarn of two colors (100g/280m);
- knitting needles 4;
- spool of thread;
- scissors;
- additional knitting needle;
- needle;
- hook;
- a device for a pompom (if you want to make one);
- tape measure.
Yarn is needed in 4 skeins, two skeins of each color. You can share your skeins 
Before you start knitting a hat with gradient braids, you should understand the pattern. The braid consists of 3 parts, each with 4 loops and a total of 12 loops in width. The hat is knitted without intermediate loops between the braids.

Rows 1-5 are knitted in stockinette stitch. The sixth row is already starting to weave. We remove four loops onto an additional needle before work. Next, rows 7 - 11 are knitted in satin stitch and then we make the second weave - 4 loops are removed on an additional needle while working.
Consider the repeat of the braids. Using the sample, you can calculate how many stitches you need to cast on in total. It is best to knit two braids side by side in the pattern.

In this example, 12 loops are cast on for one braid, 6 for purl stitches (three on each side) and 2 edge loops. There are 20 loops in total.
The first five rows, as mentioned above, are knitted in stockinette stitch: on the wrong side - purl, on the front side - knit. The weaves are made on the front side, so you need to start knitting from the purl row.
Remove the edge, 3 knit (on the front side - purl), 12 purl, 3 front, edge.


Turn the product over and knit the front row

So we knit 5 rows. The 5th should be on the wrong side.
In the sixth row there will be the first weave. 1 edge, 3 purl, which will not be part of the braid).
Remove 4 loops of the braid from an additional knitting needle and leave it before work, and the working thread behind work.

We knit 4 loops that are on the left knitting needle.
Return the loops that are on the additional knitting needle to the left knitting needle.
We knit 8 braid loops and finish with 3 purls and 1 edge stitch.
This is how we got our first weave.

Using rapport we knit 5 rows according to the pattern
Rows 7-11

In the 12th row there will be a second weave
Remove the edge, purl 3, 4 stitches. Thread before work, and on the additional knitting needle there should be 4 loops for the braid after work. We knit 4 loops of the braid and return the loops from the additional needle to the knitting needle, knitting them. at the end of the row 3 purl, 1 edge.

We have received a repeat of the braid, it will be repeated vertically and horizontally.

Now you need to start calculating the gradient cap itself with braids, the description of which is described below.
First you need to make a 2*2 elastic band sample. Knit the sample, the number of loops should be a multiple of 4 + 2 edge stitches. Knit several rows. Now you need to lay out the knitting and measure how many centimeters the pattern itself occupies. For example, 19cm = 24 loops.

Now continue knitting the pattern with braids, at least repeating in height. This pattern requires 12 loops +2 edge loops per braid.
For example, we make three braids and 3 purl loops around them. Total 44 loops with edge stitches.
By knitting rapport, you will get 36 loops of the pattern = 12 cm in height, 12 rows = 5-5.5 cm.

For a head volume of 56 cm, we calculate the proportion.
We calculate the sample. We get that for an elastic band:
24p.=19 cm.
X = 56cm.
X = 24*56/19 = 71p. Round to a multiple of 4 and add 2 edge stitches = 74 loops.
For braids we calculate in the same way. We get: x = 144 loops. 12 braids But for a hat this may be too much and we will reduce it by 1 braid. We get 144 -12 + 2 edge loops = 134 loops.
That is, after the elastic you need to add another 60 loops (134-74 = 60).
Now let's calculate the height. Based on the old hat, roughly estimate what height you want. Let's say 22 cm. This is 6.5 cm of elastic and the rest is the braid pattern = 15.5 cm. just three rapports.
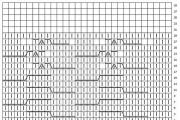
The figure shows schematically the color transition. The lower part of the hat is knitted from blue threads. (6.5 cm elastic band and braids)

To decrease the cap you need to leave 5-9 rows.


From the pictures you can see that 8 rows are knitted in blue. 13 rows - 1 blue, second gray. 16 rows in gray with two threads. To better smooth out the transition in rows 4-8, you can tie a gray thread from the spool. Can also be done in rows 22-25, but with blue thread.
We cast on 74 loops according to our calculations and knit an elastic band. In the picture it is 7.5 cm, but stretched, and if the product is pulled wide, we get 6.5 cm.

Let's increase the loops to 134 pcs. It is better to do this on the front side. The first loop is knitted from the bottom row, do not remove the loop from the left knitting needle, but knit the second one from it as usual. 
You can add 5-6 loops at once. And then knit 1 without adding and again 5-6 at once.
Received 134 loops
![]()
There is an elastic band, you can start rapport with braids. After three such rows, add gray thread from the spool. Knit up to the 8th row.

9th row. We tear off the thread from the spool and the blue thread, adding gray. We knit rows 9-21.
In the 22nd row, tear off the blue one, replacing it with the second gray one.

Knit until the row in which decrease 9 begins, approximately row 29)

In the table you can see the scheme for decreasing loops for our hat with a gradient with braids.

According to the pattern, in the 30th row you need to make weaves when an additional needle remains before work.
Add three loops to each braid. You will get 33 loops, since there are 11 stitches.
We do decreases like this: we knit the weave according to the pattern - remove 4 additional loops. Leave the knitting needle before work. The 4 loops are as follows: 2 usually, the last two together.
Let's return the loops from the additional needle to the left one. We knit the first 2 stitches together and the second two loops as usual.
We will knit the third part of the braid in the same way.

According to the decreasing schedule: cutting the loops in the weaves, we knit two rows 31-32 according to the pattern. In 33 we knit 2 loops as usual, 2 together, 2 as usual, and 2 together, continuing to the end of the row.
34-35 rows according to the drawing.
There should be 10-20 stitches left on the knitting needles to get a beautiful crown of the hat with gradient braids. The description of the hat is quite detailed, so it should not create problems when recreating such an interesting accessory.
If after the 35th row there are still many loops left, then continue decreasing according to the same principle.

19 loops left.
Cut the thread, leaving the end for stitching. Pull it through the remaining loops with your crochet hook.
Using a needle and this thread, carefully pull it together and sew it along the wrong side.

Thus, our gradient hat with comas will be ready. But you can decorate it with a pompom and add originality. 
With the help of a special device, the pompom will turn out smooth and neat.
But you can also use a cardboard template. 

Elastic with half double crochets (for the back half loop). This type of elastic gives a more interesting, expanded pattern, which many people mistake for knitting. Its degree of elasticity is less than that of the previous version, but the knitting itself is more flexible and flat, so it is more convenient to tuck it when making a hat with a lapel.
The height of the half double crochets is greater than the width of the future columns in the main part of the hat. Therefore, for every two rows of elastic, there are three columns in the “body” of the hat. Ratio 1:1.5.
For a future hat with 88 stitches in a circle, we knit an elastic band in 58 rows:
Connect rows 58 and 1 by knitting them together with connecting half-columns. The main part of the hat, the braid pattern technology. The hat is knitted in braids using embossed double crochets. Each row ends by joining the last column to the first of the same row using a connecting column, and the next row begins with a chain of three lifting air loops.
This hat is knitted in strict rows, not in a spiral, so that the level of the braids is the same height everywhere.
A double crochet is knitted, clinging not to the loop, but to the leg of the column of the previous row. Depending on which side the hook bends around the leg of the column, you get either a curved (front) column or a concave (back) column. For those who are completely unfamiliar with this knitting, it will be easier to watch some video tutorials on this topic. It's simple, but as they say, it's better to see once than to hear a hundred times.
To draw with braids, the number of columns in a row must be a multiple of 8.
Since repeating the “braid + indentation between the braids” pattern = 8 columns. In my case, the circumference of the header is 88 columns. The first row of the hat is knitted with simple double crochets (without relief), clinging to the side surface of the elastic band. As we remember, for an elastic band with single crochets the ratio is 1:1; we knit 1 double crochet on the side of each row of elastic. If you, like me, knitted 84 rows in rib instead of 88 for extra elasticity, add 4 double crochets, distributing them unnoticeably around the perimeter of the hat.
For an elastic band made from half double crochets in the side surface of the elastic, we knit 3 stitches for every 2 rows of elastic, getting the output: 58 x 1.5 = 87 double crochets + add 1 more stitch somewhere for a multiple of 8.
At the end of the row, we connect the first and last double crochets with a connecting loop and knit 3 lifting chain stitches. Starting from the second row we knit embossed double crochets.
Pattern step: 2 purl stitches - 6 knit stitches - 2 purl stitches - 6 knit stitches -... and so on.
During knitting, the lifting chain of air loops takes on the appearance of a “purl stitch.” Therefore, the beginning of each subsequent row is: Raising chain + 1 purl stitch - 6 knit stitches - 2 purl stitches - 6 knit stitches -... and so on.
The height of the braid step is 4 rows:
Of the six knit stitches with double crochets, the first three (in the direction of movement of the hook) are knitted into the last three knit stitches of the bottom row, and the second three stitches are knitted back into the first three stitches of the bottom row.
That is, we knit: 1st knit in the bottom 4th knit 2nd in the 5th 3rd in the 6th 4th in the 1st 5th in the 2nd 6th in the 3rd and then purl to bottom purl, in the direction of movement.
Thus, we must knit up 6 steps of “braids” in 4 rows (we get 5 crossing braids), of which 4 steps are full-size, and starting from step 5, the columns decrease to reduce the circumference of the hat.


Finish knitting and tighten the top of the hat with thread. Pom pom optional. The top of the hat looks quite decent without it!
In total, there were 6 steps of “braids” in height: 4 full-size steps, at the 5th step in the top row of the cross the decrease begins, the 6th all decreases and ends at the crown, without the cross.
The height of the hat can be changed by adding or decreasing the number of vertical steps. There are 11 braids around the circumference of my hats. Again, by reducing the number of stitches in a row or increasing it (depending on the thickness of the yarn), you can get larger braids or many small ones.
I hope the description will help you start crocheting braids and believe that it is beautiful and, certainly, no less interesting than knitting!
The variety of knitting patterns and methods is endless. These include simple patterns and complex volumetric ornaments. In this master class we will knit a hat with a voluminous braid pattern.
For knitting we will need:
We collect a chain of VPs, the number of which must be a multiple of 12. We collect 12 VPs each and try them on the head. We connect the ends of the chain. 1st row we knit a dc all around the circle.

So we will alternate 3 LRS and 3 IRS until the end of the row.


Next we again have purl stitches, but now we will not subtract, but add 2 more IRS. In the first column we knit 2 IRS, then 1 IRS and in the 3rd column we knit 2 IRS again. Then again 3 LRS. Now we skip the 1st IRS again and knit 1 IRS in the 2nd column. We also skip the 3rd one. The next row is knitted the same way.
That is, 3 LRS, 1 IRS, 3 LRS, 5 IRS.
2nd row. 3 PP, 2 LRS. We skip 1 IRS and knit 3 LRS again. Next we knit 7 IRS, adding to the 1st and 5th columns. Then again 6 LRS in a row.


4 row. 3 PP. We find the LRS that are behind. We knitted them first, but because of the cross hair from the braid, they are hidden at the back. We pull them out with our fingers and knit 2 IRS in them. 1 column is replaced by 3 PP. And we knit 1 more CC1H immediately after the 2nd IRS between the stitches. And we knit 3 LRS, since next we have LRS. Next come IRS. There are 7 of them, we need to make 5. We skip the 1st and 7th columns, and knit 1 IRS into the rest. Continue as at the beginning of the row.
5 row. This series is very simple. We knit strictly according to the pattern. Where IRS we knit 1 IRS, where IRS I knit 1 IRS.
6th row. It will be exactly the same as the 2nd row was. 3 PP, 2 LRS. We skip 1 IRS and knit 3 LRS again. Next we knit 7 IRS, adding to the 1st and 5th columns. Then again 6 LRS in a row.
Recently, a gradient pattern has been used quite often when knitting hats. What does this super...

There are more than a hundred shades of caramel hair color, so every girl before buying dye or visiting...

When your lover ignores you for a long time and does not call, many suspicious thoughts flash through your head and...

A kite is one of the favorite toys and outdoor activities of our parents, as well as grandfathers and...

The fight against crime, an unusual character, a unique appearance - all this tells us about an unusually exciting...

Slide 1 Municipal budgetary preschool educational institution kindergarten No. 15 “Spikelet” p. Rozhdestveno Project:...

Koltun is a skin disease in horses (usually under the mane) and in humans (on the head), in which the hair becomes tangled and...
Growing long hair is not as easy as it seems. When they reach 30 cm or more, there is no natural lubrication...

A beautiful manicure should be flawless in everything. It is not enough to monitor the shape and condition of the nails, caring for...
Russian national costume is a traditional complex of clothing, shoes and...

Every girl should have beautiful and well-groomed hands. Since doing a manicure at home is very...

Children adore big funny animals, which we often meet in parks and children's entertainment centers....

If a doctor orders a pregnant woman to undergo such a serious examination as fluorography, she will immediately...

The most impressive carnivals in the world can be found in several cities, which will be discussed in our...
There are more than a hundred shades of caramel hair color, so every girl before buying dye or...

When your lover ignores you for a long time and does not call, many suspicious thoughts flash through your head...