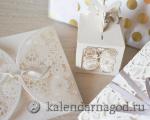
Congratulations on the anniversary of the kume
The old legend says: When a man is born, a star in the sky will light up, To shine for him forever. So let the star...
Kinusaiga is a Japanese type of creativity, which consists in creating bright and original paintings from fabric flaps without using a needle. This type of creativity is quite simple, however, to make paintings from fabric pieces, you need to know a certain technology for attaching them.
Kinusaiga is a Japanese type of creativity, which consists in creating bright and original paintings from fabric flaps without using a needle.
History says that modern patchwork, as well as Japanese needlework kinusaiga, developed under the influence of economy. The process of emergence of this type of creativity is due to Japan. Previously, such patchwork embroidery was made on the basis of silk left over from a worn kimono. Since only expensive fabric was used for sewing a kimono, after this garment was worn out, it was reshaped, and the remaining pieces were used to create paintings that decorated the house.
Previously, wooden planks served as the basis for creating paintings. The needlewomen drew a sketch on paper, and then transferred it to a tree using a copying canvas. Further, slits were made along the contour of the image, into which silk pieces of fabric were tucked. In the process of creating a patchwork masterpiece, bright shiny volumetric objects were obtained on the basis.
The most popular kinusaigi plots among the Japanese were:
It is interesting that the skills of the Japanese were enough to create canvases from the smallest patches so that they looked more like a pictorial work of art or even a photograph.


Kinusaiga has retained its performance technique since ancient times. To create a picture, it is necessary to impose an ornament of patches on a flat or voluminous substrate, the edges of which should be carefully tucked into the prepared slots (grooves) in the base.
In European countries, kinusaiga is also called a patchwork without a needle. This art has several distinctive features:
To create a panel using the kinusaiga or patchwork technique without a needle, you will need the following materials:
 To create a panel using the kinusaiga or patchwork technique without a needle, you will need certain materials
 It is also advisable to prepare a sketch of the future picture before starting work.
To make the first painting in the kinusaiga technique, you need to choose a simple motif, consisting of understandable shapes and color relationships. If creating a sketch turned out to be a rather difficult stage for beginners, you can find ready-made schemes or templates before starting work. The sketch is drawn at 100% scale, corresponding to the size of the future picture. Further, the general forms are divided into several parts, each of which will have a separate piece of shred.
One of the most important stages of working on a sketch is the distribution of color spots. This step is mandatory for beginners, because if some colors are mixed up during the work, their replacement will take a lot of time.
 To make the first painting in the kinusaiga technique, you need to choose a simple motif
 After the sketch is completely ready, you can begin the main work on creating crafts:
Many needlewomen prefer to make without a needle. Basically, this technique is used when depicting flowers. To do this, under the desired piece of fabric, you need to put a cotton pad or synthetic winterizer in one layer, and only then fill the edges of the material into the grooves.
In the kinusaiga technique, there is no limitation in topics, therefore, absolutely any drawing in which all forms have a closed structure can be taken as a template.
The most popular templates for the following topics:
Each template is a linear representation of the objects in the picture without drawing the smallest details.
To create a patchwork-style house, you need the list of tools and materials already described above. Once prepared, follow step by step recommendations, which gives a master class.
 It is not very difficult to make a house in the style of kinusaiga
 After the base is fully prepared, and the fabric is selected, you can proceed directly to work with the flaps.
In order to make a frame, you should lay the material in the cuts made in advance along the edge, and then fix it along the edges with the help of buttons in the form of carnations.
TOTAL
The patchwork technique itself involves the sewing of various products from patches of squares, with which you can create a whole picture from the material. This technique has been going on since ancient times, and it is considered folk - decorative methods for making household items and everyday life. If you perform a patchwork without a needle, this is already, it has a literal translation from Japanese, like "so many". What are such products? The kinusaiga technique involves the production of paintings not from silk or even from batik - this is something completely unusual and unforgettable.
In the original version, the patchwork technique without a needle, the drawing is transferred to a wooden board, using a special stick, it is necessary to do this so that the outline is in the form of small grooves or grooves. Further, the Japanese took real silk fabric from an old kimono and cut out shreds that matched the color of the picture, and laid the edges of the material into the previously obtained grooves.
The needleless patchwork technique helps to create "works of art", admiring which creates the feeling of not just a picture, but a three-dimensional 3D model. 
In our case, not a wooden board will be used, but a simple foam sheet, and the main elements will be multi-colored ribbons and fantasy. First you need to choose on the Internet or, if possible, draw a picture yourself, a photograph that you would like to see on your wall in a frame, then transfer this fragment from a leaf to a foam sheet with a pencil, or, possibly, using a carbon paper, and then already lay out a picture with pieces of matter that are suitable in color and shade.

Patchwork without a needle, although it does not require special training, nevertheless, it is still worth having some knowledge, and you also need to have some tools and materials on hand.
So, a little inspired and ready to get to work - a patchwork without a needle!
We pick up the drawing or photo that you have chosen and using a felt-tip pen (or carbon paper) we transfer the outline of the drawing onto the foam plastic, actually making the borders of our picture. 
Also note that a frame will be placed on the foam, so the drawing itself must be translated at a distance of 5-6 mm from the edge of the foam.
Now, like in the movie: “Sister, scalpel. . .". We take the prepared scalpel or cutter slightly, gently squeeze the foam, along the contour of the picture that you have just translated. But in no case do not allow a through hole or a break in the base. 
Patchwork technique, which will be performed on polystyrene, it is recommended to use PVA, it is necessary to coat your drawing with a light layer.
Take the shreds in your hand that fit your masterpiece, apply them to one of the fragments of the picture and carefully tuck the pieces of fabric into the pressed contours with a nail file, if there are remnants of the shred, it is best to cut it with nail scissors. 
And thus, select the color of each fragment of your picture and perform the above steps.
Any such picture in style will acquire the missing “shine”, there is only one stroke left - a beautiful frame, for the manufacture of which it is necessary to prepare a piece of fabric and make cuts in the originally left place. Now, just as before, lay the fabric along the contour of the frame in specially made slots, make it in the form of a frame. If it will be easier for you, such a frame can be made at the very beginning of work.

A patchwork without a needle looks quite original and unusual, which does not require any specialized tools and does not take a lot of time and effort. It will be interesting for both adults and children of senior school age.

The author is Nadezhda-Esperanza. This is a quote from this post.
PATCHWORK WITHOUT A NEEDLE - KINUSAYGA, MK + video (a lot of photos)I thank the author of the post BAGIRA-63, but her diary is closed, and I couldn’t get the link from liliya23, it doesn’t work ... so I copied it.
today I discovered a stunningly interesting decoration technique
 Do you know that origami, kusudama and tsumami kanzashi are far from all types of needlework presented to us by Japanese masters? They have, for example, a completely unusual the art of creating pictures from silk shreds. A sort of patchwork without a needle! And such a stunning type of needlework is called “kinusaiga”. And how European craftswomen managed to interpret this Japanese needlework - you just wonder! But first things first…
Kinusaiga as art
Like the English patchwork kinusaiga is the result of the ability to save, this is art from the category of "need for invention is cunning." And if European patchwork appeared due to the high cost of Indian chintz, then the high cost of kimono silk contributed to the emergence of kinusaiga. The hereditary kimono was never thrown away, but was torn open and other, smaller products called komono were made from the fabric. The remaining patches also went into business - they were used to “paint” pictures on wood.
First, a sketch was made on paper, and then the drawing was transferred to a wooden board-canvas. Deepenings were cut along the contour of the drawing, and after that, with silk patches, like pictures were painted with paints. That is, the flaps were applied to the elements of the pattern, tucking the edges of the fabric into the cut grooves. Thanks to the scrupulous selection of colors and shades of silk, as well as the volume of the resulting image, the paintings came out stunningly beautiful, similar to a painting, batik and photography at the same time. This is such wonderful art!
Patchwork without a needle
In the European version, the art of kinusaiga is more applied. We call it “patchwork without a needle”, because it is used not only for “picturesque” paintings and colorful panels, but also for decorating various household items, as well as for souvenir crafts. This technique is still quite young, but it already has its adherents and even managed to get the professional name "incrustation method in patchwork".
The technology is based on the application. Here, as well as in kinusaig, fabric flaps are superimposed on a flat or voluminous surface, their edges are tucked into pre-made slots-grooves, and as a result, some kind of pattern is obtained. In order to decorate the work in the "patchwork without a needle" technique, they are decorated with braid, cords and ribbons.
What is a needleless patchwork used for? First of all, this is all kinds of panels and pictures that serve as interior decoration. Caskets, boxes, covers of albums, notebooks and books are decorated with such an application. This technique has become very widespread in the field of making souvenir Easter eggs, Christmas decorations, valentines. And a patchwork without a needle is used to decorate lampshades and even furniture. How exactly do they do it?
 Materials and tools
To work in this technique, you will need, first of all, foam blanks. Flat sheets can be cut from packaging containers, and voluminous (with a flat surface) can be purchased at specialized needlework stores. Actually foam and serves as the basis for working in this technique. It is on it that a drawing is applied, contour cuts are made on it, and multi-colored patches are superimposed on it.
Naturally, for work you will need a variety of fabrics. Anything can come into play. Suitable silk, velvet, chintz, velor, satin, wool (and so on). The sizes and colors of the flaps can also be anything - it all depends on your idea and on the drawing. In addition to fabrics, you will need braid and ribbons of any width, texture and color, as well as cords and, possibly, beads, buttons or rhinestones. Some craftswomen use pins with heads in the form of pearls and beads to decorate bulky products.
Tools needed for this technique:
Work technique
Having prepared materials and tools, you can proceed directly to the manufacturing process. What kind of product you conceived is not important. The technique for making flat paintings and voluminous souvenirs is the same. For example, you are going to make a souvenir Easter Egg. To do this, draw a sketch, defining the pattern and colors. However, it is not necessary to draw, you can experiment right along the way.
So, take a foam blank in the shape of an egg and draw the borders of the drawing on it with a pencil: it is best to divide the egg into sectors with meridian lines radiating from the center of the sharp end of the egg and connecting in the center of the blunt end. Then cut out from the fabric (preferably shiny silk or satin) patches in the shape of sectors, but a little larger. By the way, you can use wide satin ribbons, which are simply cut into pieces of the desired length.
Then put the first flap on the workpiece, securing its end to the top of the egg with a pin. And after that, carefully tuck the edges of the flap into the slots on the foam, slightly stretching and straightening the fabric - one sector is “painted over”. In the same way, close all other parts. Having covered the entire shape with patches, decorate the slots with a beautiful braid, putting it on glue, and decorate the egg with beads and rhinestones. That's all!
By the way, the technique of decorating volumetric forms may be somewhat different. To do this, you do not need to make cuts in the workpiece, but overlap the flaps on it, tucking the edges of the fabric and securing it with pins. As for paintings and panels, they are performed using the first method, that is, cutting through the contours of the picture. But for such a product, a frame is also required.
When making a rectangular frame, a large piece of fabric is cut out, the dimensions of which on each side are about five centimeters larger than the picture itself. Then the fabric is placed face down on the table, and the picture is laid on it. Along the edge of the picture, slits are made along the borders of the frame and, wrapping the free edges of the fabric onto the picture, they are tucked into the slits. For the durability of the images, you can “plant” the flaps on glue or glue only the slots with glue. And for the relief of the pattern, you can put a synthetic winterizer under the flaps of fabric, which also needs to be pre-fixed on the foam with glue.
This is such a surprisingly simple technique and an original way of making souvenirs. Patchwork without a needle will completely satisfy your needs for creativity, even if you do not know how and do not like to sew, but are a fan of patchwork. Create, create and enjoy the process and the result!


8.
9.
10.
11.
12.
13.
14.
15.
16.
17.
18.
19.
20.
21.
22.
23.
24.
25.
26.

2.
3.
4.
5.
6.
7.
8.
9.
10.
11.
12.
13.
14.
15.
16.
17.
18.
19.
20.
Master class "Fabric panels on polystyrene"
Wall panel "Puss in Boots"
The progenitor of the foam application technique is Japanese art.
Culture, art, traditions of Japan never cease to amaze and delight us to this day.
What the inventive and incredibly sensitive to the beauty of the Japanese did not come up with! And here is another amazing phenomenon: patchwork paintings - the so-called kinusaiga.
Kinusaiga is a kind of synthesis of several techniques. This is, firstly, the application technique, secondly (it was this technique that gave reason to call kinusaiga patchwork paintings), thirdly, mosaic, fourthly ... wood carving.
In other words, kinusaiga is a technique of mosaic patchwork application on a tree.
Kinusaiga is an artistic genre that arose, so to speak, on the basis of economy. Or rather, Japanese frugality. It was originally a way to "recycle" old worn-out kimonos. Kimono silk is an expensive and beautiful fabric, I wanted to come up with a “second life” for it. And they came up with!
Patchwork pictures of kinusaiga are created like this. Firstly, the draft of the future patchwork picture is drawn on paper. All lines are transferred to the tree. And along these lines, grooves-grooves 2 mm deep are cut in the tree.
Then the paper picture is painted - each fragment is a certain color. These fragments are numbered (both on paper and on wood), and according to the shape of each piece of fabric, exactly the same piece of the same color is cut out, only a little more. The technique of application on wood requires that a 1 mm allowance be left along the edges of each piece. This edge will tuck into the groove cut in the tree when the fragment itself is glued to the appropriate place.
Kinusaiga is a rather rare genre: not all Europeans who have visited Japan were lucky enough to look at patchwork paintings. But for those who manage to see them, they make an indelible impression.
Instead of wood, foam can be used as the basis for the panel. This greatly simplifies the process of getting the job done. And it allows even elementary school students to engage in this type of creativity. For the implementation of the panel, material costs are practically not required. For the base, you can use the remains of building foam. Well, for the "coloring" of our panels, unnecessary children's clothes or things that are out of fashion are suitable. It is better to use fabrics that stretch well.
Materials and tools:
Styrofoam
Scraps of fabric
Marker
Stationery knife
Nailfile

Panel making process
Prepare a piece of Styrofoam of the desired size. In this case - 80x50. The thickness of the foam is 3 cm. We use a clerical knife to cut the foam. We apply the drawing you like on the foam with a marker.

With a clerical knife, we make cuts along all the applied lines. We put forward the knife blade by 1-1.5 cm.

Well, now the fun begins! We take a flap of fabric larger than the area to be filled

Gently tuck the fabric into the prepared slots with a nail file.


We tuck the remaining fabric into the slots so that the edges are even. Some craftsmen recommend smearing the slots with glue for strength. It is absolutely not necessary to do this. If you do all the work correctly, the fabric will hold tight even without glue. In addition, it is much easier to work without glue, especially if children are involved in the work.


The old legend says: When a man is born, a star in the sky will light up, To shine for him forever. So let the star...

Do you know my gossip, how many years have we been friends with you? Although sometimes life breaks us, beats and spins. But...
Nobody is forgotten, nothing is forgotten. Many decades have passed since the last shot on that one, it seemed ...
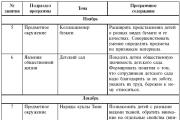
Nomination: abstract of the lesson on the topic tools. Abstract of the lesson in the senior group on familiarization with the environment ...
For many kindergarten teachers, the question of how to properly and interestingly hold an open ...
Lunar wedding calendar for July 2019 indicating the days of the new moon, full moon, quarters of the moon, the location of the moon in ...
Lunar calendar of weddings for July 2019 indicating the days of the new moon, full moon, quarters of the moon, location ...

Why should you improve your memory? Ridiculous question, you say. After all, everyone knows what a good memory is.

The patroness and mistress of the year will be the Yellow Earth Dog. This animal is endowed with prudence and ...
Every woman wants to be beautiful, well-groomed, different. In this sense, well-groomed hair is of great importance and ...

ON THE. KRASNOV, school number 48, Krasnoyarsk Words of praise and censure in a pedagogical speech “How terrible they are ...

This thing can become one of the most indispensable in your wardrobe. Recently, this style of dress has become ...

The shirt dress is incredibly relevant this spring and summer. Its distinguishing features are a straight, uncut cut,...
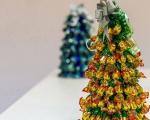
Contents A handmade candy Christmas tree is a good gift for friends and relatives....

23 Dear readers, spring always tells us that it's time to take care of ourselves. Of course, you always want...

Today, a wide selection of curlers of different shapes, sizes and materials is on sale. They are all entitled to...