Fashion legend Hubert de Givenchy Hubert Givenchy personal life
Yesterday, March 10, Hubert de Givenchy passed away. The famous couturier, founder of the fashion house of the same name, classic died in...
This article provides patterns and descriptions of knitting vests for boys. Choose a model and feel free to get to work.
The vest is a universal item. In spring, when it is still cool, you can wear it instead of a sweater. In the fall, if it gets sharply cold and it’s too early to put on a warm sweater, a vest will help out - soft and cozy. Every mother can knit such a product for a boy. Buy suitable yarn or select from what you have in the house, and also prepare knitting needles. Below you will find patterns and descriptions of knitting different models of vests for boys - choose and get to work.
The hood can serve as both decor and an additional part for insulation. But on a vest it often performs a decorative function. If you like a certain vest model, but you don’t want to knit a hood, knit without it. Just make a collar in the form of a 2x2 elastic band, like on the armhole.
Schemes, patterns and descriptions of beautiful, fashionable children's vests for boys with a hood with knitting needles:
A simple but warm vest with a hood and pockets. Threads can be chosen in any color. Make the buttons a tone lighter than the color of the yarn.
Original vest with drawstring. Knits quickly and easily. Scheme and description below.


If you knit such a vest in a different color, then the lace should be the same shade.


Clothing with buttons is convenient for small children. After all, it’s difficult for them to put things on over their heads. Therefore, if your baby is very tiny or you just want to knit a beautiful vest with knitting needles with buttons, study the diagram below and get to work.
Knitting pattern for a children's vest for a boy with buttons:
This sleeveless vest is easy to do. It should be a little loose for your baby so that he feels comfortable and cozy in it.


You can knit such a vest in a couple of hours, and for your baby it will become a favorite thing - warm, comfortable and cozy.
Many mothers think that the Braid pattern is only suitable for women's knitted items, but this is not so. In a vest for a boy, you need to use one voluminous braid or several thin braids. In this case, the product will turn out stylish and beautiful.
The main pattern is pearl. Follow the diagram for a fantasy pattern with braids. Knit the elastic according to the 1x1 pattern.

This sleeveless sweater is knitted from fine yarn. The main pattern is the front stitch, make braids and flagella according to the pattern.

 Knitting a vest for a boy with braids - diagram
 Knitting a vest for a boy with braids - description
  Knitting a vest for a boy with braids - description part 2
 The neck can be made round, or you can knit a V-neck. It all depends on your preferences and tastes.
Blue is a traditional color for a boy. Since childhood, parents have been dressing their baby in things of this color and decorating the children's room in this shade. Therefore, a blue vest should be in your son's wardrobe. Make a blue sleeveless vest using knitting needles - simple, easy and quick.
We knit a blue vest for a boy:

 Knitting - blue vest for boy
  Knitting - dark blue vest for boy
 Another knitted vest model, but in a light blue shade. This color refreshes and adds a positive mood to the image.

 Knitting - light blue vest for boy
In our country's schools there is a strict dress code: children can go to classes either special form, or in things in school colors. These colors include: white, brown, black, blue, green, gray. Therefore, before the onset of the new season, parents stock up on children's clothes in these approved shades. Knit your son an interesting vest that he can wear every day.
A simple knitting pattern: 2x2 rib, main pattern: knit rows - alternately 4 knits, 4 purls, purl rows - according to the pattern. Above we described how to make a V-neck.


Another stylish model of a gray vest. But you can knit it with yarn in any school shade - blue, brown or even black. This sleeveless vest will look great in any color.


 Knitted school vest for a boy - diagram
 In fact, any discreet pattern will work for a school vest. Do it only from the front. Let there be a stockinette stitch on the back - this way the vest will look stylish and businesslike.
White has always been considered a festive color. If your boy is too active, and after half an hour his elegant clothes turn into wrinkled and slightly dirty clothes, knit him a white festive vest. Such clothes are suitable if you are going to visit or, for example, to the cinema. Wear this piece over a regular shirt for a neat and festive look. Upon arrival to the guests, the sleeveless vest can be removed so that it does not interfere with the tomboy’s frolic and play.
A sleeveless vest with voluminous braids and a hood is fashionable, stylish and beautiful.


 Knitted festive vest and cape for a boy - description
  Knitted festive vest and cape for a boy - diagram
Items combined with a tie also add a festive touch to the look. This could be a shirt, suit or sweater. Knit a boy's vest with a tie using knitting needles. This combination item will help you out when you need to outfit your boy for a matinee or other holiday. Add a white shirt underneath and you're ready for a smart look.


 Boy's vest with knitted tie - description
Teenagers are capricious, and not only girls, but also boys. They refuse to wear the children's sweaters that their mothers used to buy for them. Boys want to look like real men, and this is justified, because soon this is exactly what they will become. Make a vest for your son that will become his favorite thing for every day.


Newborn babies are always very tender and cute, and if you also knit a vest for the baby with your own hands, then you can arrange a real photo session as a keepsake. Do you want something unusual and beautiful for your child? Below are patterns that can be knitted by newborns. These are interesting vests in a simple knit.
The main pattern is the front and back stitch. Knit the braids according to the 3x3 pattern.


Such a vest can be knitted with the “Putanka” pattern: 1 knit, 1 purl in each row - so knit all even and odd rows.
Another similar vest model, but with hearts knitted in stockinette stitch.

At 6 months, boys can already crawl and sit well. Therefore, it will be convenient for the baby to develop in a vest, but at the same time he will not freeze. How to knit a vest for a 6 month old boy? Scheme, description:
Your boy is growing up, and he is no longer that baby who just cries and lies in his crib all the time. He had already begun to be aware of everything around him and understand everything that was happening. He was 2 or 3 years old. Knit an interesting vest for your child and replenish your little one’s wardrobe with clothes to create extravagant looks.
How to knit a vest for a 2-3 year old boy with knitting needles? Scheme, description:
A blue vest with a jacquard pattern on the front is fashionable and beautiful.


The combination of red and blue is suitable for knitting things for a boy. 


If you don't like to knit, but you're great at creating crochet items, make a fashionable tank top for your little one. This vest can be knitted for any age. The description shows a diagram for a 9 month old baby. If your baby is a little older, add a few loops.


Now you can add a few new things made by yourself to your little one’s wardrobe. A vest knitted by your mother is much warmer and more comfortable.
05.11.2015

This model of a comfortable one-piece sleeveless vest for a baby is made with knitting needles from dark blue wool blend yarn with a simple relief pattern. Thanks to the double-sided button closure, it is easy to put on a child. This versatile seamless vest is easy and quick to knit. It will suit both boys and girls.
Age: 6-9 months.
Size:
68-74.
Measurements: height - 68-74 cm; chest circumference ‒ 49-51 cm; waist circumference - 47-49 cm.
Required:
100 g of dark blue yarn Gazzal (Turkey) "Baby Wool" (40% merino wool, 20% cashmere, 40% acrylic, 175 m/50 g); knitting needles No. 2.5 and No. 3; buttons - 8 pcs.
Abbreviations:
n. = loop;
persons = knit (loop);
purl = purl (loop);
chrome = edge (loop).
Elastic band 2x2: In the front rows, knit 2 knits alternately. and 2 purl; In purl rows, knit loops according to the pattern.
Garter stitch:
knit faces in all rows. loops.
Pattern "Wattle":
1 row: 1 chrome; * 1 yarn over; 2 persons (and pull the yarn over with the left knitting needle and throw it over 2 persons.); repeat from * to the end of the row; 1 chrome
2nd row: purl loops.
Repeat from 1st to 2nd row.
Single crochet:
Insert the hook into a loop of the chain or bottom row and pull out a new loop, then grab the thread and knit 2 stitches on the hook in one step.
"Rachy step": without turning the work, knit single crochets
in the opposite direction from left to right (insert the hook under both edges of the loop away from you, hook the thread from below and pull it out so that it is in front of the loop that is on the hook, then knit both loops together).
Button Holes:
1 buttonhole = knit in the front row: 1 yarn over, 2 stitches together; in the next purl row yarn over according to the pattern - knit yarn over. Make the first buttonhole 3 cm from the beginning of the armhole, the rest - every 5 cm.
Attention! The front and back are knitted in one piece.
On knitting needles No. 2.5, cast on 66 stitches and to begin with (so that the bottom does not stretch), knit 3 rows with a double elastic band: slip 1 knit. (thread at work), 1 purl. (and so on until the end in each row).
Next knit as usual rubber band 2x2.
At a height of 3 cm from the cast-on edge in the purl row, add 6 stitches evenly (= 72 stitches)
Switch to needles No. 3 and knit, distributing the loops as follows: 1 edge; 7 p. garter stitch; 56 p. pattern "Wattage"; 7 p. garter stitch; 1 chrome
At a height of 17 cm from the cast-on edge (1 cm before the armholes), knit a placket in garter stitch at the beginning and at the end of the row, not in 7 stitches, but in 15 stitches.
At a height of 18 cm from the inlaid edge for armholes close on both sides with 7 sts (= 58 sts) Continue knitting: 1 edge; 8 p. garter stitch; 40 p. pattern "Wattage"; 8 p. garter stitch; 1 chrome
At a height of 5 cm from the beginning of the armholes for neckline
close off the middle 22 stitches and then knit each part separately from two skeins of yarn.
After 7 cm from the beginning of the neckline, cast on the missing 22 stitches and knit, combining both parts.
At a height of 15 cm from the beginning of the neckline for armholes add 15 stitches on both sides and include them in garter stitch= 88 p. Don’t forget to do button holes
.
After 1 cm from the beginning of the armhole, knit in the following order: 1 edge; 15 p. garter stitch; 56 p. pattern "Wattage"; 15 p. garter stitch; 1 chrome
After 15 cm from the beginning of the armholes in the last purl row, evenly decrease 6 stitches (= 82 stitches)
Switch to knitting needles No. 2.5 and knit 3 cm rubber band 2x2, ending with 3 rows of double ribbing.
At a total height of 56 cm, close the loops.
Moisten the finished canvas, straighten it and let it dry. Crochet the neckline in a crayfish step. Sew buttons.

made with a large pearl pattern in combination with stockinette stitch, garter stitch and 2x2 rib. The description of the vest is given for sizes 56/62 - 68/74 - 80/86 (92 - 98/104) cm.
Size:
1/3 – 6/9 – 12/18 months (2 – 3/4) years
56/62 - 68/74 - 80/86 (92 - 98/104) cm
Knitting density: 24 p x 32 p in stockinette stitch = 10 x 10 cm
Garter stitch (straight and reverse rows): knit all rows of faces.
Double Rice Pattern:
Row 1:*K2, P2*, repeat from *-*.
Row 2: knit over knit and purl over purl.
Row 3: purl over knit and knit over purl.
Row 4: like Row 2.
Repeat rows 1 - 4.
Button Holes: close the loops for pet. faces on the right bar. 1 buttonhole = knit the second and third stitches together from the edge and make 1 yarn over.
Close the buttonhole loops at the height of the part:
All decreases should be made with LS.
when the last n must be persons: 2 vm. persons
when the last p should be purl: 2 vm. purl
when the first loop should be knit: remove 1 stitch as when knitting, knit 1, broach.
when the first loop should be purl: 2 together crossed. purl (i.e. knit behind the back wall of the loop).

knitted in straight and reverse rows on circular needles from the middle front.
Cast on 148-168-184 (204-224) sts on 2.5 mm circular needles. Work the first row of the trail in the RS pattern: 5 sts (= placket) - see explanation above, * k2, p2 *, repeat from *-* until 7 sts remain, finish with k2 and 5 sts in garter stitch (= bar). Continue ribbing in the same manner with 5 stitches in garter stitch on both sides until the piece is 3-3-4 (4-5) cm high - Don't forget the button holes on the placket - see explanation above. Switch to 3 mm circular needles and knit in stockinette stitch, but continue the stripes in garter stitch as before.
At the same time, in the first row after the elastic, evenly decrease 32-36-40 (44-52) sts (do not decrease on the bars) = 116-132-144 (160-172) sts. Insert a marker at 31-35-39 (43-45 ) sts on both sides (= 54-62-66 (74-82) sts between markers on back).
Remember the knitting density!
At a piece height of 7-7.5-8 (9-10) cm, knit a trace, a row of a trace, in the manner with RS: 5 sts in garter stitch, 21-21-27 (27-31) sts in stockinette stitch, remove the last 16-16-20 (20-24) sts, which were knitted, on the stitch holder for cutting the pocket, knit until 10-10-12 (12-12) sts remain on the knitting needle, remove the last 16-16-20 (20-24 ) sts that were knitted, onto the stitch holder for the pocket cut, knit 5-5-7 (7-7) sts in stockinette stitch and finish with 5 sts in garter stitch. In next row, cast on 16-16-20 (20-24) new stitches over each of 2 stitch holders = 116-132-144 (160-172) sts. Continue in stockinette stitch and garter stitch until piece height is 13-14- 16 (16-18) cm. Now knit 4 rows - all knits on all stitches (= 2 scars). Then knit the Double Rice pattern - see the explanation above (continue the stripes in garter stitch as before).
Important! Read the next section to the end before continuing to knit!
At a piece height of 15-17-18 (20-21) cm, knit 2 sts in garter stitch on the first 5 sts on the knitting needle (do not knit the remaining sts on the knitting needle), then knit 1 row on all stitches before knitting 2 rows in garter stitch on the first 5 p on the knitting needle on the other side of the part (this is done for a neat V-shaped neck). Then turn it down for V-neck: Decrease 1 st every 2nd row (i.e. every row with RS) 12-13-16 (16-16) times in total.
At the same time, at a piece height of 16-17-19 (20-22) cm, knit 4 p in garter stitch on middle 18-20-20 (20-20) sts on both sides (i.e. on 9-10-10 (10- 10) sts on both sides of each marker) - knit the remaining sts as before. In the next row, bind off the middle 8-10-10 (10-10) sts on both sides for the armhole and finish the front and back separately.
46-52-56 (64-72) sts. Knit Double Rice pattern with 5 sts in garter stitch on both sides (= sleeve edges). At the same time decrease for armholes: decrease 1 st every 2nd row (i.e. in each row with RS) a total of 5-6-6 (6-6) times = 36-40-44 (52-60) sts. Continue with the Double Rice and Handkerchief pattern knitted until the piece measures 24-26-29 (31-34) cm. Now knit in garter stitch on all stitches until the desired length is achieved. At the same time, at a piece height of 25-27-30 (32-35) cm, bind off the middle 16-18-20 (20-24) sts for the neck = 10-11-12 (16-18) sts left for each shoulder. Now finish each shoulder separately. Continue with garter stitch until piece measures 26-28-31 (33-36) cm, bind off sts.
continue with the Double Rice pattern and garter stitch, at the same time decrease for the armhole as on the back and continue decreasing for the V-neck as before. After the last decrease, 10-11-12 (16-18) stitches remained on the needle. Work in garter stitch on all stitches until the piece measures 26-28-31 (33-36) cm and bind off the stitches.
knit like the left front, but mirrored.
return 16-16-20 (20-24) sts from one stitch holder to the needles. Work ribbing k2/p2 with 1 st in garter stitch and k2 on both sides (as viewed from RS). When the length of the pocket cut is 2.5-2.5-3 (3-3) cm, loosely bind off the stitches with knit over knit and purl over purl. Sew the pocket opening. Sew the pocket opening to the slit (where the loops were placed on the loop holder). Make the second pocket cut in the same way.
Items associated with warmth and care are better for keeping you warm in cold weather. Therefore, you need to knit only with positive thoughts and in the most pleasant mood. If you are a happy mother of a boy and want to give your son a pleasant surprise, then a knitted sleeveless vest will be perfect for him in the cool season the best gift. To complete this model of a sleeveless vest for a boy, you do not need any special skill. It is enough to have a little knowledge of knitting needles and be able to alternate the front and back rows.
To knit this model of a sleeveless vest for a boy with knitting needles, it is better to choose yarn that contains natural wool, because this time we are knitting a winter model of a sleeveless vest. If you want to make the same pattern for the warm season, then it is better to use 100% cotton for knitting. Just keep in mind that to knit a summer version of a sleeveless vest, you will need much less yarn, and you will need to cast on more loops.
Size: for 5-6 years. If you plan to knit for a boy of a different age, you can easily adjust the number of stitches cast on yourself.


ALIZE Cashemira yarn, which has all the benefits of cashmere. The yarn contains 100% merino wool. One hundred grams of yarn corresponds to a length of 300 meters. For knitting you need: 100 grams of white, 100 grams of blue and 50 grams of dark blue yarn.
Knitting needles No. 3.5 for knitting. Pattern: knit stitch: knit rows - knit stitches, purl rows - purl loops.


In order not to make a mistake in the size, you need to knit the sample with knitting needles. It’s better to spend an extra 10 minutes on this than to then re-knit the entire sleeveless shirt, if suddenly the knitted product is not suitable for your boy. We knit a sample with knitting needles measuring 10 x 10 cm. On this segment you should get 30 rows of 20 loops. If your number of loops or rows does not meet the requirements, then simply change the number of knitting needles, depending on the density of your knitting.
 Gray vest for a boy with a braid pattern
 Cast on 72 stitches with blue thread and knit 14 rows with 1 x 1 rib. In the last row, evenly add 2 stitches. Then alternate the threads as follows: *2 rows with white thread, 2 rows with blue thread*, repeat from * to * 2 more times. Then we knit 8 rows with white thread, 12 rows with dark blue thread, 8 rows with white thread, 2 rows with blue thread, repeat from * to * 2 more times, 8 rows with white thread, 12 rows with dark blue thread, 8 rows with white thread, 2 row with blue thread, repeat from * to * 2 times, 8 rows with white thread, 2 rows with blue thread, repeat from * to * 2 times, 10 rows with white thread.
At the same time, after 27 centimeters (i.e., after 74 rows) from the edge of the sleeveless shirt, decrease on both sides for bevels: 1 time x 6 loops, and then, in every 2nd row 5 times x 1 loop. After knitting 41 centimeters from the cast-on edge, leave 53 loops open. Is knitting really addictive??
We knit it like the back, but bind off the middle 3 loops after 27 centimeters for the neckline, and you should finish both parts separately. Decrease on both sides as follows: in every 4th row 7 times x 1 loop and in every 2nd row 5 times x 1 loop. After 41 centimeters from the cast-on edge, leave 13 loops on each side for each shoulder.
Sew one shoulder seam on either side. Then cast on 112 stitches along the neck using blue thread and knit 12 rows with a 1 x 1 elastic band. At the end, close all the loops.
 A brown vest for a boy is knitted with a bear pattern and a clasp on the shoulders
  The back of a children's vest with a bear pattern
 After tying the neckline, sew the second shoulder seam. Grab the edges of the neck of the placket as well.
Now all you have to do is tie the armholes of the boy’s sleeveless vest. To do this, cast on 90 stitches along each armhole with blue thread. Knit the armhole straps in the same way as the neck strap: with a 1 x 1 elastic band. When finished, all that remains is to sew the side seams. It is best to use a back stitch.
 Orange vest with openwork "flowers" with button closure
All! The knitted sleeveless vest is ready!
The finished product should be washed in a special detergent. After all, woolen items require delicate care. Under no circumstances should this sleeveless vest for boys be wrung out too much and hung to dry on a line. Lightly wring out the product and lay it out to dry on a cotton cloth in a horizontal position. As the fabric becomes wet, it is worth changing. And only at the very end of drying, when the product remains only slightly damp, can it be carefully hung on a rope to dry. Knitted items are delicate, handle them carefully.


Depending on your preferences, you can easily knit several things for boys using the above pattern. Change the colors of the yarn, the number of rows of a particular color, as well as the alternation of front and back rows. Each time you will get a new knitted item, different from the previous one. And working on this model for a boy will not be boring and will bring you only positive emotions.


 Black and white knitted vest for a boy with a tailcoat pattern
  Knitted boys' vest with diamond pattern and V-neck
  Pattern and description for knitting a vest for a boy with a diamond pattern
  Knitted vest with a hood for a boy and a “frog” pattern
 Due to the versatility of the relief patterns used for knitting, such a vest is suitable for both boys and girls, it all depends on the color of the yarn and your preferences.
All calculations are given for three sizes: 62/68 (74/80) 86/92, which corresponds to the age of babies from 6 months to 2 years.
To knit a vest you will need:
— wool yarn with a thickness of 105 m/50 g (100% superfine wool was used in the original; 105 m/50 g, pink) depending on the size – 200 (250) 300 g;
- straight and circular knitting needles No. 4 and straight knitting needles No. 4.5
— 2 buttons in tone.
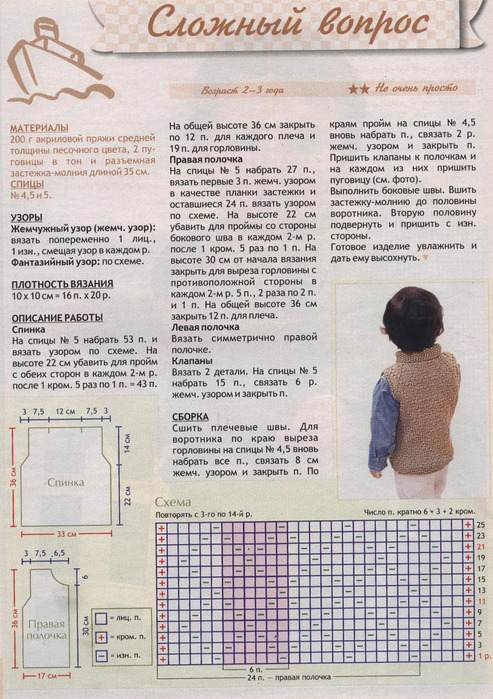
Knitting patterns
Garter stitch: Knit all stitches in knit and purl rows.
Pearl pattern 1x1: alternately knit 1 knit, 1 purl, shifting the pattern in each row by 1 loop. The knitting density of the pattern is 19 sts x 34 r. = 10 x 10 cm.
Volumetric braid of 30 loops: knit according to the proposed pattern, repeating the pattern from the 1st to the 12th rows. The width of the pattern is approximately 11 cm. The diagram shows only the front rows in the purl rows of knitting according to the fabric pattern.

Volumetric braid pattern diagram:
Row 1: purl 2, knit 6, cross 6 stitches to the right (slip 2 stitches onto an additional needle and leave BEHIND the work, knit the next 4 knits, and then knit 2 from an additional needle), purl 2, cross 6 stitches to the left (slip 4 stitches on an additional knitting needle and leave BEFORE work, knit the next 2 loops - knit, and after 4 knit from an additional knitting needle), 6 knit, 2 purl;
2nd and all even rows: knit 2, purl 12, knit 2, purl 12, knit 2;
3rd row: purl 2, knit 4, cross 6 stitches to the right, knit 2, purl 2, knit 2, cross 6 stitches to the left, knit 4, purl 2;
5th row: purl 2, knit 2, cross 6 stitches to the right, knit 4, purl 2, knit 4, cross 6 stitches to the left, knit 2, purl 2;
7th row: purl 2, cross 6 stitches to the right, knit 6, purl 2, knit 6, cross 6 stitches to the left, purl 2;
9th and 11th rows: purl 2, knit 12, purl 2, knit 12, purl 2.
Repeat the pattern from the 1st to the 12th rows.

vest pattern diagram
Operating procedure
BACK
On needles No. 4, cast on 52 (60) 66 stitches and knit 5 rows in garter stitch (all knit stitches) to form the bottom bar. Then switch to needles No. 4.5 and knit, distributing the loops as follows: 1 edge loop (slip without knitting), 4 stitches in garter stitch, 42 (50) 56 loops in pearl pattern, 4 stitches in garter stitch, 1 edge loop ( knit purl).
Adhering to the given pattern, knit 17 (20) 23 cm from the cast-on edge.
To form armholes, (at a height of 17 (20) 23 cm) close 3 loops on both sides, in this case it is necessary to shift the pattern, extending the garter stitch by 3 loops to the middle of the product (on both sides of the vest). In each 2nd next row, decrease 1 loop 3 (5) 5 times, on both sides, in a special way, knitting together the loops of the pearl pattern and garter stitch. Namely: at the beginning of the front row, the last loop of the garter stitch together with the 1st loop of the pearl pattern with a slant to the left (slip 1 stitch, knit 1 knit stitch, and pull it through the removed loop), as well as knit the last loop of the pearl pattern together with 1 th stitch in garter stitch. After all the decreases, there should be 40 (44) 50 stitches left for the armholes.
After 26 (30) 34 cm from the cast-on edge, close off the middle 12 (12) 14 loops for the neck, and finish both sides separately. First, knit on 14 (16) 18 loops along the left edge, while closing and at the beginning of each next front row, close 1 time 4 loops and 1 time 2 loops.
After 28 (32) 36 cm from the cast-on edge, knit another 1.5 cm for the placket on the remaining 8 (10) 12 loops in garter stitch and bind off all the loops.
Next, knit on 14 (16) 18 loops along the right edge, at the beginning of each next purl row, close 1 more time with 4 loops and 1 time with 2 loops. After 28 (32) 36 cm from the initial row, bind off the remaining 8 (10) 12 shoulder loops.

BEFORE
On knitting needles No. 4, cast on 54 (62) 70 stitches and knit 5 rows in garter stitch, evenly adding 4 stitches in the last row.
Then switch to needles No. 4.5 and knit, distributing the loops as follows: 1 edge stitch, 4 stitches in garter stitch, 9 (13) 17 stitches in pearl pattern, 30 stitches in voluminous braid pattern, 9 (13) 17 p. pearl pattern, 4 p. garter stitch, 1 chrome p. = 58 (66) 74 loops.
After 17 (20) 23 cm from the cast-on edge, begin to form armholes, decreasing the loops, as on the back.
After 22 (26) 30 cm from the cast-on edge of the vest, close off the middle 14 (14) 16 loops for the neck and finish both sides separately.
First, knit on 16 (18) 21 loops along the left edge, and at the beginning of each next front row, close 1 time 4 loops, 1 time 2 (2) 3 loops and 2 times 1 loop.
After 28 (32) 36 cm from the cast-on edge, bind off the remaining 8 (10) 12 stitches of the shoulder. Then continue knitting 16 (18) 21 stitches along the right edge, at the beginning of each next purl row, close 1 more time with 4 loops, 1 time with 2 (2) 3 loops and 2 times with 1 loop.
At the same time, after 26.5 (30.5) 34.5 cm from the starting row, continue knitting for the placket in garter stitch. After knitting 2 more rows, evenly distributed, make 2 holes for buttons (= 2 stitches knit together, 1 yarn over). In the purl row, knit yarn overs. After 28 (32) 36 cm from the cast-on edge, bind off the remaining 8 (10) 12 shoulder loops.
ASSEMBLY
Moisten the vest parts and lay them out on the pattern, stretch them slightly if necessary, pin them with pins, and leave them on the pattern until completely dry.
Sew the right shoulder seam and side seams. To finish the neckline, use size 4 needles to cast on 76 (76) 84 stitches along the edge and knit in garter stitch. After 1.5 cm, loosely close all the loops. Sew buttons.
Knitted vest for babies from 6 months to 2 years – ready! Have a nice walk in a warm new thing!

we knit for children, a vest with knitting needles, a knitted vest for kids, patterns for knitting a vest

Yesterday, March 10, Hubert de Givenchy passed away. The famous couturier, founder of the fashion house of the same name, classic died in...

Which dishes should be included in the menu and which ones should you avoid? What do nutritionists advise? - During the cold season, the body...

Lavender, bacon, foie gras and white wine pancakesAsian fadBlack ThaiFor Maslenitsa in Thai style they offer...

Expectant mothers will be interested in learning about spring-summer 2017 fashion for pregnant women. Every pregnant woman wants to look...

golden beige hue! * low price, mattifies the skin, is dense, does not spread well Good afternoon! and so...

When I wrote about the mistakes that women over forty make, many were indignant: what about men? Really...

Facial skin needs regular cleansing. But to preserve youth and beauty, it is important to pay attention to...

KenzoKi Belle de Jour Dream Night Mask Night care from the main cosmetic sybarites The Japanese KenzoKi came out...

I'll start with the basic rule: you don't have to take sports nutrition, but the right supplements will help you...

Essentially, there is nothing wrong with any emotion, but some of them can cause problems, if not...

It would seem that something new can be invented in the field of tableware production: here is a kettle, here is a frying pan, a bicycle...

At least once in their life, every person begins to think about why they have a lot of money, while others, working all day...

CONSULTATION FOR PARENTS “FUN EXPERIENCES IN THE KITCHEN.” Prepared and conducted by: MDOBU teacher...

State budgetary educational institution of the city of Moscow Secondary school with...

Which dishes should be included in the menu and which ones should you avoid? What do nutritionists advise? - During the cold season...

Lavender, bacon, foie gras and pancakes with white wineAsian fadBlack ThaiFor Maslenitsa in Thai style...