The best gels and creams for dry, problem, oily, sensitive, combination, normal skin
Facial skin needs regular cleansing. But to preserve youth and beauty, it is important to pay attention to the components...
Bracelets made of rubber bands can be seen on almost every girl’s hand, because these types of jewelry have become quite popular lately, and weaving them is not so difficult and exciting. Due to this, many little girls create a large number of such interesting jewelry for their hands. In addition, there are a huge number of techniques for making such bracelets; every small and adult needlewoman will be able to choose something to suit her taste. One of the most interesting and beautiful techniques is a heart bracelet made from rubber bands. For many years, the symbolism of the heart has been present in the life of every girl and woman, which is why such jewelry is extremely popular.
Below will be presented master classes with which beginners can learn how to make bracelets from rubber bands in the shape of a heart.
A woman who always wants to be on trend must have as many different accessories as possible. But many decorations cost a lot of money, but accessories made independently from rubber bands are not expensive, but look very interesting.
This master class shows how you can make a delightful “Angel Heart” bracelet from rubber bands, which combines combinations of the most delicate flowers and hearts, so it’s not for nothing that the bracelet began to be called that.
What we need to prepare:

We take the slingshot so that the inner part is directed towards you, and you should also decide what color your hearts will be. In this tutorial, the hearts will be yellow and the inner chain itself will be green.
We take a green rubber band and twist it in the shape of a figure eight, put it on the slingshot, namely on each column. You need to take a rubber band of a different color and attach it without crossing it onto the slingshot. We put on subsequent elastic bands in the same way.


Using a hook, we hook a green rubber band on the left column and drop it between the columns. Now you need to hook the yellow rubber band on the post on the right and throw it to the opposite one. Take the next yellow rubber band and put it on as before, without twisting it. Next, we need to hook the green elastic band on the right and throw it again between the posts. Remove the yellow rubber band from the left column and hook it onto the opposite column. We should get it as shown in the photo below:


Next, put a green rubber band on two columns without twisting. Throw the yellow top rubber bands into the middle. This will be the beginning of weaving our bracelet. Afterwards, we repeat everything we did before.
We put the yellow elastic band on the slingshot without twisting it. We take the lower yellow rubber band on the left side, we must remove it and leave it in the center again. But on the right we must remove the top yellow one and move it to the opposite column. We put the yellow elastic band back on without twisting. On the right side we need to remove the lower yellow rubber band, again leaving it in the center.


We throw the yellow rubber band, which is on top, from the left side to the opposite. In the usual way, we put the green rubber band on the slingshot. Next we need to throw two yellow rubber bands off the slingshot and lower them one by one into the middle. We take the hook and insert it inside the yellow elastic band on the left, while we grab the lowest green elastic band and throw it into the center. We repeat the same on the other side. Repeat the entire sequence until we weave the desired length.
Now you should finish the bracelet in this way: the posts should have two rubber bands on each side. We take the bottom ones and throw them into the center. And then, we must transfer one of the rubber bands to the opposite side of the slingshot so that we get two rubber bands on one column. Now we stretch and hook the fastener onto them. And the second part of the clip should be attached to two buttonholes on the other side of the bracelet. And now our decoration is ready!


The heart-style bracelet looks very beautiful and openwork. And making such a bracelet will not be difficult.
When weaving, it is important to be careful and strictly follow the description in the master class. In addition, every craftswoman needs to remember that such bracelets are made on two posts, and for this it is not necessary to have a standard loom; you can weave on a mini loom.
What you need to take to weave such a decoration:


We start weaving with a yellow elastic band, which we hook onto two columns, and twist so that we get a figure eight. Now we put a pink elastic band on top, but we won’t twist it anymore. Next, you need to use a hook to pick up the elastic band on the left column and lower it between the columns.
Afterwards, we need to pick up the pink rubber band from the right table, and then transfer it to the opposite side. Again, remove the pink rubber band without crossing. And then with a hook we pick up the yellow elastic band from the bottom right and then move it to the center.


On the left side, take the top pink elastic band and move it to the opposite side. Now we put on the yellow one in the usual way. On the left side, pick up the top pink elastic band, and then move it to the central part. Do the same with the pink elastic band on the right side.
Next, throw a pink elastic band over two columns in the usual way. Then, on the left side, remove the pink rubber band located at the bottom, then throw it into the middle. On the right side, remove the top pink elastic band and put it on the column on the left.


Repeat the same steps on the other side. Next, you need to put on and hook the bottom elastic band from the post on the right, and eventually remove it to the center. From the left column, remove the pink rubber band that was on top and transfer it to the right one.
We put the yellow elastic band on it without twisting it, then pick up the pink one, which is on the top left, and lower it between the posts. The next step is to insert the hook inside the pink elastic band on the left, now we pick up the yellow one and begin to bring this elastic band into the middle of the weaving.


We repeat the same actions on the other side. Grab the pink elastic band from above and remove it to the center, and then remove the yellow one and lower it to the middle. We weave this way until the entire length of the bracelet is woven; we need to attach the clasp. We take turns intercepting the pink rubber bands and lowering them to the middle part.
And then we transfer the yellow rubber band to the other side so that there are two yellow rubber bands on one column. And then we have to put on the clip. And now our bracelet is ready!


This article presents a video collection with which you can learn how to weave a cute bracelet from rubber bands.
A romantic accessory - the “Heart” bracelet: a method of weaving on a collapsible loom.
An intriguing feature of rubber band baubles is, of course, their unusual appearance. Intertwined in diverse patterns, rubber bands form very unusual products. In today's lesson we'll talk about one of the most romantic bracelets, made in the style of intertwining hearts.
For a product consisting of three hearts, you will need:
1. Rubber bands in blue and pink colors.
2. Plastic fastener.
3. Hook.
4. Collapsible machine, or rather its first two rows.
The machine is rotated so that the recesses in the columns are directed to the right.
The middle row is moved back, and the far one needs to be removed, since it will not be needed.
And so, on the 1st column, located on the bottom row, the first pink elastic band is wound in 3 turns.

Two pink elastic bands are now placed on the two outer columns.


From the 1st to the 2nd table of the row from the bottom, you need to wear one pink elastic band. The same steps are performed for the row on top.

From the first columns of the bottom and far row, the very last rubber band rises to the center.


1 pink elastic band is added to both pairs of columns.


The last two actions will alternate until seven rubber bands are formed on the second columns of the bottom and top rows.

Now the first 4 rubber bands are removed from 2 columns and changed onto the first columns.


All the elastic bands are carefully pulled off from the 2nd column on the bottom row and put on the 2nd column in the top row.


From the 2nd upper column, three lower elastic bands are pulled from the inside. They need to be changed to the 1st bottom column.


The remaining elastic bands are stretched in a triangle (we also put them on the 1st column on the far row).

The rubber bands are removed from the second columns in 2 rows.


Now the first heart is ready, you can start weaving the second. From the first to the second columns, one blue elastic band is put on.

Absolutely all the pink rubber bands from the first columns are removed from the center.

On top - again the first blue elastic band.

Now you should remove the 1st lower blue elastic band from the second pair of columns.


When all actions with the blue heart are completed, parallel pink elastic bands are thrown on again.


Absolutely all pink ones can be removed with blue elastic bands.

Another blue elastic band is put on the first columns, on which all the others will be removed.


Now the blue rubber band is removed from the hook.

To fit the bracelet to the wrist, the simplest chain is woven.
Blue and pink rubber bands (6-7 pieces) are put on one by one.


The design with three hearts is changed onto the last column.

Now the rubber bands are removed one by one from one column and changed onto the one in front.

A matching clasp is attached to the first pink elastic band.

The bracelet is on the last step towards completion. It can be removed from the machine. Now all that remains is to secure the free edge of the clasp to the first pink heart. That's all!

Final view. Photo 1.

Final view. Photo 2.

Final view. Photo 3.
Our website also presents another interesting bracelet weaving pattern called
If you are wondering how to weave a heart from Fanny Lum elastic bands, stock up on rainbows in three colors and prepare a universal Rainbow Lum loom along with a classic crochet hook. This is all you need to implement simple instructions for making a beautiful romantic heart from elastic bands.
To understand how to weave a rubber band heart, read all of the instructions below in their entirety. Make sure you are clear about the progress of the work - and go for it!

How to weave a heart out of rubber bands on a slingshot? It is made in almost the same way as a figured gold key for an accessory created on a traditional Rainbow Lum machine.

To make a romantic heart, take thirty-three red and three black rubber bands. This instruction will also help you figure out how to weave a bracelet from rubber bands. “Angel Heart” is the most famous option with an ornament of hearts. The romantic pattern proposed in these instructions can also be used as a basis for weaving jewelry, but in this case you will need several identical heart blanks.

To make the heart look voluminous and not flat, throw two elastic bands on two empty columns in the bottom row, transfer them to the right peg, then add another pair of Fanny Lum to both of these columns. Throw another rubber band over the last right column, wrap it around the figure eight twice and make sure you have three rings. Insert the hook into the hole, pull the elastics to the right and knit the bottom two Fanny Lums onto the post directly in front. Repeat with the remaining rings.

The unusual thing is ready, and now you know how to weave a heart from rubber bands on the classic Rainbow Lum loom.
In just a few minutes, you can create a stylish “Angel Heart” rubber band bracelet with a beautiful pattern! The product is very voluminous, and the surface of the bracelet is decorated with openwork hearts! When making an accessory with such a pattern, it is best to use contrasting shades of elastic bands so that the inner chain does not merge with the hearts themselves!
The weaving pattern for this decoration is quite interesting and simple.
So, it’s worth preparing the following materials:
— rubber bands in two different colors;
- any hook for weaving;
— small machine “Slingshot”;
— S-shaped clasp.
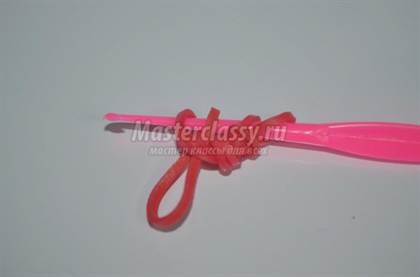
To begin with, it’s worth deciding on the shades to use and preparing them. In this case, the main chain will be green, and the outer hearts will be yellow! Put a rubber band twisted in a figure eight on the slingshot.

Almost every bracelet weaving begins in this way. Add another one on top, put it on both posts of the machine in the usual way.

Drop the bottom one on the left side, placing it in the center.


But carefully grab the top one on the right and move it back to the left column of the machine.


On this side of the slingshot, you need to perform the same actions.

To the elastic band in the center, in the future you will need to hook the clip.

After that, another elastic band is added, but this time green, for two columns at once!

The second loops on the posts (yellow) must be dropped to the center between the two “horns” of the machine.


As necessary, lower the product down the columns to make room for adding new rubber bands. Then, add a yellow elastic band to both posts of the machine.

Grab the bottom elastic band on the left with the hook and remove it.

Throwing the top right loop over to the side of the machine from which the bottom one was removed!

You need to move it very carefully so as not to confuse the top and bottom loops. To do this, you can hold them with your finger until the next removal. With the next elastic band thrown on, you should do the same steps.

As a result, three rubber bands remain on the machine on each side.

After this, you need to add green.

Remove the first yellow one from the column.

Place the hook under the remaining yellow elastic band and hook the last one.

Afterwards, reset it to the center. Do the same on the opposite side.

These actions are the main ones in weaving the “Angel Heart” pattern. By doing them, your jewelry will soon reach the desired length that suits your wrist.


You need to finish the weaving in the following, very simple way. When there are two rubber bands left on the machine, remove the bottom one from the “horns”!


Place all four stitches onto one stitch.

Then, fix the clip on them!

Now all that remains is to find the first elastic band at the beginning of the product and also attach the S-shaped fastener to it.

This is the bracelet we ended up with!

Final view. Photo 1.

Final view. Photo 2.

Final view. Photo 3.
We also published a detailed master class on how to make your own machine for weaving from rubber bands, which is functionally no different from the factory ones.
Silicone rubber bands have become very popular recently. Absolutely everything is woven from them: bracelets, keychains, various figures and much, much more. In today's article, we invite you to consider a detailed master class on weaving cute and charming hearts from rubber bands.
There are several ways to weave rubber bands: on a machine, using a hook, or on a special slingshot.
Of course, it is most convenient to weave from high-quality material and on special equipment - on a machine, but if it is not difficult for you to find the material itself, since there are numerous fairly high-quality Chinese fakes on the market today, then there may be problems with the equipment. That is why we invite you to consider a method of weaving hearts without a machine and other specialized tools. And for greater clarity, detailed videos of the main weaving styles will be provided at the end of the article: machine, crocheted and slingshot.
The most affordable option is crochet weaving, although you won’t get a voluminous figure, but these hearts are also very cute. For example, from such hearts you can weave an original bracelet or keychain.

But before you get started, it’s worth considering a few simple rules:
Completing of the work:


This is how it should turn out in the end.


Facial skin needs regular cleansing. But to preserve youth and beauty, it is important to pay attention to the components...

KenzoKi Belle de Jour Dream Night Mask Night care from the main cosmetic sybarites The Japanese KenzoKi entered the market with...

I'll start with the basic rule: you don't have to take sports nutrition, but the right supplements will help you faster...

Essentially, there is nothing wrong with any emotion, but some of them can cause problems if not controlled...

It would seem that something new can be invented in the field of tableware production: here is a kettle, here is a frying pan, here is a bicycle...

At least once in their life, every person begins to think about why they have a lot of money, while others, working day and night,...

CONSULTATION FOR PARENTS “FUN EXPERIENCES IN THE KITCHEN.” Prepared and conducted by: MDOBU teacher...

State budgetary educational institution of the city of Moscow Secondary school with...

Crafts from sponges for washing dishes are easy to make, since the material is soft, has a smooth surface, good...

Hello, mother country! I want to talk about something that is very close and dear to me, to share my experience, so...

Modeling is a useful and exciting activity not only for kids, but also for parents. This is an opportunity to spend...

MOSCOW, February 20 - RIA Novosti, Irina Ovchinnikova. Summer camp is a traditional format for children's recreation:...

"TROPICAL RAIN". Participants stand in a circle. The presenter stands in the center: “Now we will all call a warm...

Homeschooling (homeschooling, from the English homeschooling - home education) is popular in the USA and Canada, has...

KenzoKi Belle de Jour Dream Night Mask Night care from the main cosmetic sybarites The Japanese KenzoKi came out...

I'll start with the basic rule: you don't have to take sports nutrition, but the right supplements will help you...