
The husband left the family: is it sunset or sunrise?
Breaking up relationships after years of life is not uncommon. After the departure of her husband, a woman experiences a range of negative ...
The manicure, as usual, did not last even a week, the coating cracked and began to chip off in the corners. And a friend has been wearing her jacket for almost a month, and at least something. Do not complain, but read how to properly apply shellac to show off your perfect nails.
We divide the whole process into three steps:
Every process starts with preparation. necessary materials. It is better to have everything at hand at once than to waste time looking for the necessary gizmos.
To correctly apply shellac and forget about manicure for up to 4 weeks, you will need:
It is important not only to gently apply shellac, but to create all the conditions for it to last as long as possible.
Don't rush to apply nail polish. Pay attention to their shape and regrown cuticle. The first is to correct, the second is to get rid of.
Always start with the cuticle. The need to remove it is easily explained. You won't be able to gently apply shellac without touching it. With further growth of the nail, it is she who will cause the peeling of the coating. Therefore, either cut it with special tweezers, or soften it with cuticle oil and push it back with an orange stick or spatula. Remains (keratinized layer) touch up with a manicure hatchet.
Don't forget about form. Even if it is perfect, the nail will still have to be sanded for better adhesion to the coating.


Do not use metal files. They destroy the structure of the nail. Give preference to sapphire, sand and finely abrasive.
After filing, brush off the nail dust with a special manicure brush.
After giving the nails the correct shape, proceed to the next step - degreasing.
Pay special attention to this procedure. Degreasing and removing excess moisture from the surface of the nail is necessary so that the shellac lasts for a long time, does not peel off and does not roll off during wear.
First, disinfect your nail with an alcohol wipe. It will remove the remaining dust and partially remove greasy deposits. Carefully treat the sides and the space around the cuticle.


After that, degrease the surface of the nail plate with a bond and remove excess moisture with a dehydrator.
Treat all your nails one at a time, rather than waiting for one to dry before moving on to the next. The faster you complete the procedure and move on to the next step, the more likely your nails will not have time to get greasy again.
Don't apply too much. The thickness of the layer does not affect the quality of the degreasing. Rather, on the contrary, an excess of a substance adversely affects the coating.
If you did everything right, then the nail will look matte.
The nails are prepared, the remnants of dust and fatty deposits are removed, which means you can proceed to the most important stage - applying shellac.
Surely, you have already taken out your favorite bottle of shellac, unscrewed the brush and brought it over the nail. Wait. First, create a base. It will be the key to a durable coating.
As a base, use a special transparent gel. Usually on it it is indicated that it is suitable for shellac. It is better not to select analogues and not to experiment with alternative means. At the basic level, the best option is the original remedy.


Carefully cover the entire nail, leaving no gaps. Otherwise, shellac will begin to slide off unpainted areas.
After applying the gel base, be sure to dry your nails in a UV or LED lamp for 10-60 seconds. The waiting time depends on the manufacturer and composition of the coating, as well as the lamp used.
Pay attention to the labeling of the shellac bottle. LED is used to indicate quick-drying varnishes. To dry such under force only LED lamps. UV - on the contrary, it polymerizes only under the influence of ultraviolet radiation. For LED lamps, they will be unsuitable.
Did you notice that there was a sticky layer on the nail? Under no circumstances should it be washed. This is done only at the end of the entire manicure, and not in the early stages.
Is the base dry? Great, you can start applying shellac. There is no fundamental difference from applying conventional varnish.
Start with the little finger and work your way up to the thumb. You can dry each nail separately or make up all at once and put your hand in a UV lamp. The only difference is the availability of free time.


Fill the nail with shellac in three steps. First, put a small point at the base, near the cuticle, and draw a line for the entire length. Then go over the left edge of the nail, and then along the right. Don't forget to seal the tip when applying the last layer.
The number of layers of shellac depends on its color and density. Some light shades are revealed only on the third or fourth layer, while two will be enough for saturated colors.
Finish your manicure with a top coat. It will protect shellac from exposure to aggressive environments, prolong its durability and protect it from fading.
Remember that each layer must be dried in the lamp for at least two minutes.


After polymerization of all layers, a sticky layer remains, which can and should be removed. Many women use alcohol for such purposes without spending money on special products, such as clinser or degreaser. It is not advisable to repeat after them. Alcohol will de-coat the gloss and devalue all your work.
Do not rush to remove the sticky layer immediately after drying. A minute should elapse between these two stages. So you protect the shellac from tarnishing. Use only lint-free wipes so as not to leave unnecessary marks on the coating.
It is better to see once than to re-read several times. Therefore, watch the video instruction for applying shellac at home:
The coating will last longer if you take into account a number of popular mistakes and do not repeat them.
To prevent shellac from chipping, peeling or wrinkling, follow 4 rules:
If you carefully followed all the rules and strictly followed the instructions, and the varnish still broke off, then the reason is in the characteristics of your body. Maybe you have flaky nails. A nail file and vitamins will solve the problem.
Often, removing the cuticle is long, tedious and sometimes even painful. But without this, you will not get a lasting manicure. Imagine, the nail is constantly growing, and the cuticle remains in place. Capturing it when painting, you doom the coating to peeling off.
Look carefully at the composition of cuticle softeners. Prefer bases based on fruit acids, avoiding alkaline ones. They do not leave a specific plaque, which means they minimize the risks of coating damage.
It is difficult for beginners to decide which tool is of high quality. I would like to buy an inexpensive shellac and quickly start creating beautiful marigolds. This approach is wrong, it will not be possible to save on cheap coatings. They spoil the nail plate and are consumed 2 times faster.
Find a trusted seller and buy all manicure products in specialized stores.
Pay attention to the expiration date and storage conditions. Do not use shellac that has been exposed to direct sunlight. Such a manicure will not last long.
Gel polish has long revolutionized the beauty industry. This unique material combines the best qualities of varnish and gel. The easy brush application technology combines with the strength and durability of the polymer, while the base coat provides evenness and good adhesion. But not many people know how to properly apply shellac, so you first need to familiarize yourself with all the rules of this procedure.
Any salon master will make an excellent manicure with shellac without difficulty. But what to do if there is not enough money for a permanent visit to the salon, but you always want beautiful nails? The solution is to manicure gel polish at home.
At first glance, it seems that a salon procedure is much cheaper than purchasing the necessary materials and tools, but this is not the case. The coating lasts an average of two weeks, the consumption of a bottle is very small, so a manicure at home will pay off in two or three applications.
There are, of course, other options to make your nails beautiful, for example, doing extensions that are harmful to nails for four hours, or painting with ordinary varnish, redoing it every day. With gel polish, everything is much easier and faster.
Choosing a shellac coating, a fashionista receives a two-week manicure in one hour, which does not lose its gloss, does not chip or crack. But such a result is possible only if you know all the subtleties of application. Otherwise, the finish of the socks will come in a few days.
To make pens beautiful, you need to stock up on time, patience and the necessary materials:
So that a manicure at home does not disappoint, you need to pay attention to the base and top coats. It is best to choose proven well-known companies, since, chasing profits, you can come across low-quality material. The consequences of such savings can be not only in a short-lived manicure, but also in the harm to shellac nails. The finish and the base must be of a uniform consistency, without lumps and foreign matter. When buying, be sure to check the expiration date of the material.
This is necessary so that the nail plate rests and recovers. During this period, it is better to influence it at home with various strengthening agents.
To properly remove a manicure at home, you need a gel polish remover and sponges on foil. To save money at home, you can take ordinary cotton pads and food foil. The nail top should be cut off before removal, so the coating will come off faster.


A trip to the salon pleases any female person. Everyone will pleasantly relax in the hands of the master, and trust his experience. Often this pleasantness is relatively expensive, given that such a procedure needs to be done twice a month. Unfortunately, not everyone can afford it, someone does not have enough finances, someone has time. The best solution can be a manicure at home, the main thing is to know how to go through these steps correctly.
After preparing the tools, a very important moment of preparing the hands and nails comes. From this stage depends on how long the coating will not give detachments:
It is best to do a cleansing manicure with a soak a few days before applying shellac.
- Even beforehand, you can remove the cuticle at home by circumcision. This will save at home on a special tool that softens the cuticle.
- If such a tool is already available, you need to apply it to the cuticle area, smoothing it with an orange stick, and leave it for a few minutes to soften.
It is important to remove all dead tissue from the nail, otherwise early detachments cannot be avoided.
- No need to apply various oils, masks and other products before applying gel polish, the surface of the nail must be absolutely clean and dry
- Next, you need to cut off the shiny layer of the natural nail plate with an abrasive file, and sand it with a buff.
In order not to harm your nails in vain, you need to read the instructions for shellac, as some brands do not require washing down and grinding.
- Remove the resulting dust with a soft brush, degreaser or cotton swab moistened with water. Be sure to wait until dry.
- If your nails are naturally damp, or your hands were exposed to water before application, it is best to use a dehydrant. It deeply dehydrates the surface. But if everything is fine with the nail plate, you can do without it.
Further, at home, many make the mistake of skipping the application of primer and bonder, or interchanging them. Of course, at home it is difficult to do everything right, but, nevertheless, you need to try to do it. Primer is applied first. It protects the natural nail plate from harmful effects and pigmentation, removes moisture and degreases. It dries in the air in a couple of minutes. Using a primer, you can not use a degreaser.
After the primer, immediately before painting the base coat for nails, you need to cover the surface with a bonder. It serves for better adhesion of coatings. Of course, at home it is not always possible to use it, so you can get by with just the base, but the period of wearing such a manicure will not be so long. After thorough preparation, you can start applying gel coatings. This technique is simple:
- A very thin layer of base coat is applied. It levels the nail plate and promotes adhesion.
If you paint too thick a layer, then it may simply not dry out under the lamp.
There will also be problems when removing a manicure, since it will take more time to destroy the layer, therefore, there will be more harm from the remover
- Colored shellac also needs to be painted thinly, otherwise the coating will not only dry out, but will also shrink and bubble. Usually, for brightness and good staining, it is simply applied in a couple of layers, polymerizing each. The sticky layer does not need to be removed, it serves as an additional grip
- The finish can be painted with a denser layer than the first two. The topcoat will serve as a shield throughout the wear of the coating. It will protect against tarnishing, scratches and minor damage. Despite the fact that this is the most durable layer, you should not once again check the finish for strength by picking something or using your nails as bottle openers.
Dry each layer for a couple of minutes in a UV lamp, and 30-40 seconds in LED. After the last layer has dried, a dispersion is formed, which can be removed with a nail polish remover, a special liquid or a degreaser. After removing the sticky layer, the finish will shine with gloss, which means the manicure is ready.
Before you start a manicure, you need to find out the nuances of the work. Even self-taught beginners should know some subtleties that will help to do a manicure correctly. We all know that craftsmanship is in the details.
- Be sure to apply moisturizing oil to the skin around the nails and cuticles. At home, you can use ordinary vegetable oil
- If at home, in the process of applying a layer, the substance gets on the skin, you need to carefully remove it. To avoid such troubles, you need to paint the nail, retreating from the skin one millimeter
- When lubricating, you can twist your finger, aligning the gel. In extreme cases, you can remove the uncured coating with a lint-free cloth and a degreaser.
- After the preparatory stage, you should not touch your nails with your fingers, otherwise the sebum will again fall on the surface.
- When applying each layer, you need to brush along the edge of the nail, and a little from the bottom, especially if it's a finish.
Having familiarized yourself with the basics of applying shellac, you can safely begin to practice. After proper application, a manicure can become not only a visual complement to the image, but also a source of pride. This coating will surely appeal to any fashionista, and will take its rightful place on the dressing table.
Due to the fact that now on the Internet you can find a lot of video tutorials "how to do manicure with shellac for beginners at home", every girl can make a stylish and fashionable manicure on her own.
Shellac coating has many advantages. Firstly, the manicure is durable, secondly, it can be used to implement a wide variety of ideas, and thirdly, shellac coating has now become available, multi-colored bottles and all auxiliary materials can be bought at every shopping center.
The appearance of shellac is a huge breakthrough in the nail art industry. Despite the fact that the novelty was widely known only 5-7 years ago, the history of the company that gave the fashion world such a convenient product begins in 1979. Shellac was able to embody the qualities of gel and varnish.
The principle of fashionable shellac manicure is ease of application, durability, impeccable appearance, quick removal.

Application technology is identical to conventional varnish. However, there is one caveat. In order for the coating to "grab", it must be dried in a UV lamp. It takes no more than two minutes to dry one nail.
The peculiarity of the shellac coating is that it does not lose its glossy sheen even when exposed to detergents. Colors are rich and deep. Using this coating, it will be possible to easily grow your nails, even if they previously exfoliated and had increased fragility. Shellac manicure can have any design. Using gel polish available unique opportunity combine different techniques, create interesting images with moon, Japanese, French manicure.
In order to make a beautiful manicure with gel polish, you need free time, accuracy and suitable tools. What do you need for beginners? Be sure to buy a UV lamp, as well as a standard set of tools, colored gel polishes.
A shellac manicure set can be purchased through a specialized online store or ordered at any retail salon that sells manicure accessories.
How to make a shellac manicure at home different ways. The standard way looks like this:


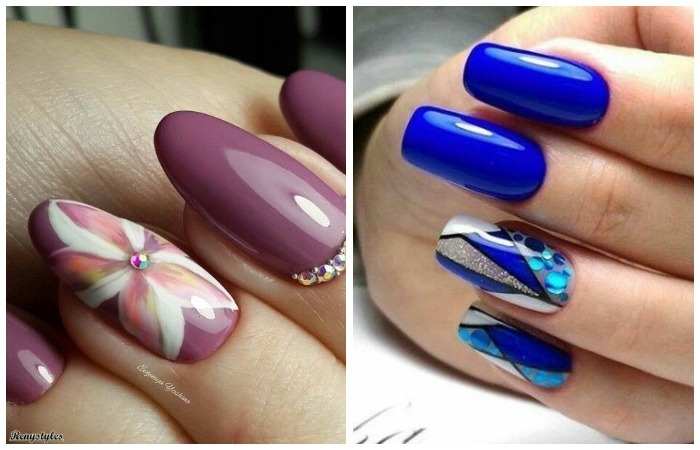
Creating a beautiful, original design with shellac will work on both short and long nails. It can be an interesting painting, drawing, various elements of rhinestones, sequins, komifibuki, colored and velvet sand, etc. Matte manicure is incredibly popular this season. Its peculiarity is that it can be combined with gloss. Such a combined technique will harmoniously look at any length. On short nails, a monochromatic coating of a rich color looks good: wine, purple, blue, emerald, etc.

Short nails are not only practical and convenient, but also very fashionable. Fashion trends Shellac manicure for short nails is very diverse. Today you can not limit yourself in anything, you just have to follow the main rule: observe the measure in the decor.

Insanely beautiful on short nails looks like a gradient in any form. It can be horizontal or vertical. For spring manicure, a gentle combination of shades is suitable.

The oblique jacket looks original. The contrast line can be made in any color scheme: black, red, blue, lilac, pink.

On short nails, the “cat's eye” effect looks amazingly beautiful. Usually the shades of such a gel polish are rich, juicy and noble.

Manicure design for short nails can contain various decorative elements. The “drop effect” or a pattern sprinkled with velvet sand looks creative.

Shellac manicure for long nails can combine various techniques, color schemes. Owners of long nails will be able to apply absolutely any design technique. Lunar manicure looks good on long nails. Its essence lies in the selection of the hole. It can be left colorless or, on the contrary, emphasized with a contrasting colored gel polish.

Painting is always appropriate on long nails. It can be combined with sequins, rhinestones. The design, in which the “aquarium” technique was used, will certainly cause admiration from others. Also, to create an original design, you can use a design called "broken glass".


There are many options for nail design. Despite this, the classic types of manicure never lose their relevance, because they are appropriate for any occasion.
This is an ageless classic that has always been and will always be in demand. True, now modern girls prefer to add various decor to the jacket. French jacket with sand is now popular, with a variety of patterns, inlaid with stones, with “broken glass” foil, which creates beautiful play of light, etc. Plenty of decor options. A classic jacket with a reasonable decor is a great option for a manicure for every day, because such a design is universal, you can “both in a feast and in the world”.


A great alternative to the classic french. For decoration, both delicate and catchy, bright shades are used. The trend is geometry (for example, holes in combination with triangles) or shellac manicure with negative space. No less popular is the lunar design of rhinestones, sequins and microbeads.


The fashion trend of the new season is a manicure with a pattern in the style of the Impressionists. The design consists of colored or plain blots. Also, various geometric shapes do not lose their popularity. In summer, bright floral prints are relevant. You will find the most fashionable and current drawings on nails in the photo.


A small overview of seasonal trends in gel polish nail design. What is relevant in summer and what is in winter? Popular drawings, shades, techniques, etc.
Spring shellac manicure
Spring is always associated with something tender, light and airy. Therefore, most girls in the design of nails choose delicate colors. Floral motifs, abstract patterns are chosen as drawings.


Summer manicure shellac
Summer is a wonderful time. Season of holidays and recreation. A beautiful manicure can have various thematic drawings. Are you going on a cruise on a boat? Try the "a la Sailor" design.


Autumn shellac design
With the onset of autumn, you want brighter, more saturated colors. Relevant this season autumn manicure in red, orange, yellow. It can be a red-yellow, lilac-black, black-yellow, orange-green gradient.


Winter (New Year) design
Winter manicure may include various design elements. If we are talking about a beautiful manicure for a New Year's party, then in this case you can use techniques such as broken glass, mirror shine. A mirror red metallic sheen will look stylish and wintery, while white or gold plating can be added to the design. For winter, the Sweater shellac design is relevant, as well as the use of various thematic stickers (snowflakes, deer, Christmas trees, Christmas ornaments).


Shellac manicure ideas and their implementation are shown step by step in the photo. Having decided to do a shellac manicure in the salon, be sure to take a photo with you. So it will be easier for the master to understand exactly what you want. The price depends on the chosen design. Masters working at home will be able to make a stylish manicure inexpensively.


shellac coating
Coating nails with shellac at home has recently become popular, so instructions for performing this procedure will be given in this article. Performing such a coating yourself will give you the opportunity to save quite a lot of money and time, because now you do not have to adjust your schedule to the schedule of the master. The video and photo instructions given in this article will tell you how to properly make shellac yourself.

Necessary materials
The video reveals in detail how to properly paint with shellac. However, despite the availability of this material and the apparent simplicity of the procedure, the popularity of salon manicure with shellac does not decrease. Perhaps this is due to the fact that you need a lot of tools to create a beautiful manicure.
If you decide to do it at home, and wondered what you need to apply shellac gel, then for you below is a list of the necessary tools and tools for covering nails with shellac.

This is a complete list of what you need to apply shellac and the list is not small. However, without all this, you will not be able to get a result comparable to a professional one. However, even when summing up the cost of everything you need, doing a manicure on your own is much more profitable than in a salon.
If you already have everything for shellac, then you can get to work. You can learn how to learn how to properly manicure and apply shellac at home from the training video. But equally important is the preparation of nails before application. It consists in carrying out a number of familiar procedures and several specific ones.

We repeat separately, it is better to remove the cuticle as much as possible. The coating lasts for quite a long time, and therefore, the closer to the edge of the plate you get when painting, the longer the nail growth will not be noticeable. Now the hands are fully prepared. You can move on to how to directly cover your nails correctly and do a manicure with shellac at home.

Application technology
Below we will consider the technology and technique of coating nails with shellac gel polish in one color. By mastering this process, you will be able to create more complex designs. For example, a French manicure is not much more difficult. Drawing and patterning can also become flawless with a little practice. In addition, it is easy to apply glitter on such a gel, which will also last a long time and not lose aesthetics.
The technique of applying shellac manicure is not so different from painting with ordinary varnish.
This application avoids an excessively thick coating layer, which can wrinkle during drying. The technology of applying shellac for nails, which is presented in the video, is much more complicated, since it requires a large number of materials and devices. The technological process of how to properly make shellac gel at home is described step by step below.

This is a complete answer to the question of how shellac is applied to nails, as well as the rules and application technology, with a video clip, knowledge can be visually fixed. Do not expect that on the first try you will get the same result as in the salon. But after a few workouts, you will already know exactly how to use, work with shellac, and therefore get an excellent result.

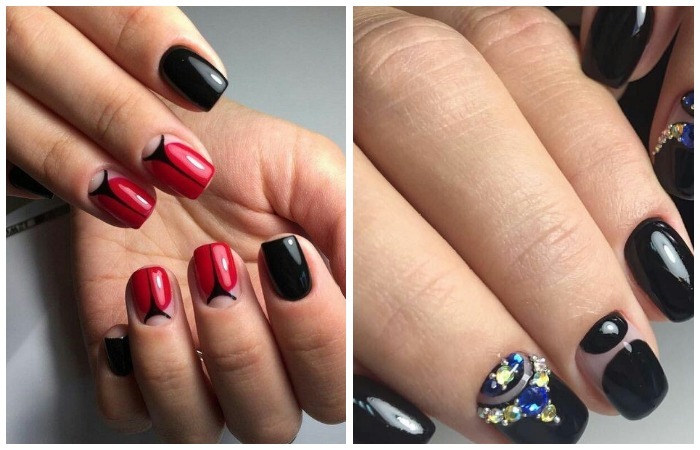
Black gel polish shellac
Often, even with full adherence to the instructions, the results of beginners leave much to be desired. They may not seem as aesthetically pleasing or less durable. Many training videos show only the sequence and technique of applying shellac varnish, but some secrets are not revealed. And they can often have a decisive influence on the quality of manicure.
For example, how to properly apply glitter on shellac, the video does not fully reveal. Everything seems to be very easy. However, many women of fashion are faced with the fact that lumps form and the radiance is distributed unevenly. After applying the first color layer, you need to pour a little coating onto the palette and pour sparkles into it, constantly stirring with a special thin brush. Apply this mixture as a second layer.
There are some peculiarities in how to build shellac at home. According to technology, it is not much different from the standard gel extension. But there is still a significant difference. There is no need to almost completely cut off the nail plate, it only needs to be carefully sanded. Thus, own nails suffer much less.

French shellac
You can apply a French-style shellac coating at home step by step similarly to a simple manicure, but using shellac coating technology, that is, drying under a lamp, etc. The only and important difference is that stencils cannot be used. After drying, it will not be possible to remove them, and if removed while the coating is wet, the border will blur.
In any case, we can talk about how to properly apply shellac - nail coating or shellac - extension, for quite some time. But there are some subtleties that you can only learn in the process of work. In addition, materials of different brands have different specifics.
In conclusion, how often you can apply shellac gel depends on the initial state of the plates. Especially if you do it yourself. After all, despite the fact that now you know what the instructions for applying shellac at home are, experience is still not enough. Therefore, a violation of the technological process is possible, which will make the harm from such a gel even more noticeable for nails.
Shellac is a real find for modern women who do not have time for everyday nail care, but have a desire to look fashionable and well-groomed.
This type of manicure is a combination of varnish and gel, which gives the coating durability. He keeps firmly enough on the nail plate, so that a woman can safely do household chores without worrying about her manicure.
Such nail art is beneficial on long business trips or at a resort, because it will make you forget about the frequent updating of manicure and pedicure. Since each layer is cured with a UV lamp, the beauty of the nails can last for more than two weeks. You can master shilak on your own. Step by step application at home will help to cope with this task.
 Shellac makes manicure a work of art
 Note! With such a coating, the nails are almost impossible to break, and the delamination of the nail plate does not threaten. In addition, shellac does not crumble, is durable and perfectly holds the shape of the nails.
Despite the fact that, as mentioned above, shellac has a durable coating, the timing of its wearing depends on some features:
This beautiful and fashionable manicure will delight its owner for about 3 weeks.
At the same time, this type of manicure should not be used if the nails are infected with a fungus. Also, experts recommend to wait with shellac for the period of antibiotic treatment. And, of course, the condition of the nails is important.
Before using the shilak, follow the step-by-step application at home, and conduct a series of restorative and strengthening sessions.
All processes in cosmetology have both pluses and minuses. Before deciding on a shellac procedure, you should carefully study the positive and negative aspects of this type of manicure.
Shellac Benefits:
 Variation of manicure with shellac
 Shellac Disadvantages:
Shellac decorates, but does not heal fragile nails.
And the general situation will not be corrected, medical procedures will be needed.
 Gel polish shellac
 To make shilak at home, you need to know its step-by-step application.
You need to purchase the necessary tools:
The quality of a manicure using shellac depends on the quality of the materials. First of all, attention should be paid not to the price, but to the proven brand of the product.
Shellac, base coat and top coat must be made under the same brand
Then they will be perfect for each other.
In order not to make a mistake in choosing, it is worth buying sets for shilak, which have everything you need, including a UV lamp.
It is easy to master shilak at home.
You just need to study its step-by-step application.
 Shaping nails
 The process of coating nails with shellac is almost the same as the manicure procedure using ordinary varnish.
The main difference between this type of nail art is the use of a UV lamp, it is necessary to dry each applied layer with it. Only with well-dried shellac, the manicure will be even, smooth and durable.
We will analyze the technique of shilak in stages. Step-by-step application at home will help you quickly master this practical type of manicure.
The most important procedure Without a base tool, you will not get a beautiful and even manicure. It is important that the base tool is of excellent quality, then it will not harm the nail, and strengthen it, protect it from the harmful effects of external factors. The base is applied in a thin layer twice, each thoroughly drying in a lamp for about 10 seconds.
Before applying, the bottle is twisted, holding it with the palms, for half a minute. But shaking is not recommended due to possible damage to the structure of the gel polish. Cover the nail with shellac, making sure that it does not stain the skin (in case of contact, wipe off with a smooth cloth).
 Coating prepared nails
 The initial layer should be almost transparent. After its application, the nail is placed under the lamp, where it polymerizes for 2 minutes. After this time, a second layer is applied, thicker, and also dried under the lamp for the same amount of time.
Topcoat application, thorough drying under the lamp for 2 minutes. An ordinary fixer will not work, it is a special coating that guarantees a stable and long-term result.
After all procedures, wipe the nails with a liquid to remove stickiness applied to a smooth napkin. You can also use alcohol, but it’s worth checking the shellac’s reaction to it in advance so that the alcohol doesn’t “eat” the mirror shine.
Interesting fact! To protect the skin of the hands from the negative effects of ultraviolet radiation, it is necessary to apply sunscreen on the brushes before the manicure procedure.
If shilak is applied correctly at home, its step-by-step application is strictly observed, then it will not harm the health of the nails.
 Caring for nails makes it possible to strengthen them
 However, one should remember the individuality of each organism. Someone's nails will not react in any way to fashionable nail art, while for someone they will lose strength and begin to exfoliate. In this case, wellness procedures that can restore the nails to their former strength will come to the rescue.
To improve the nail plate, apply:
 Sea salt is known for its medicinal properties.
 Those who decide to master fashionable nail art on their own need to know about the nuances of applying a manicure called shilak.
Step-by-step application at home will allow you to quickly and efficiently carry out this procedure.
 Do not leave varnish on the skin, it is better to remove it immediately
 Since this type of varnish is different from the usual one, the removal procedure is a bit more complicated than usual.
It is necessary to carefully file the surface of the shellac with a nail file. After that, wrap each nail with cotton pads with nail polish remover, wrap foil on top. After 10 minutes, everything is removed along with shellac. If there are painted areas left, carefully scrape off the gel polish with a stick.
 Conditioning with Foil to Easily Remove Shellac
 The procedure for creating nail art using shilak at home is complicated only at first glance. Strict step-by-step application, compliance with all the subtleties, guarantees a fashionable and durable manicure without harm to the health of nails.
How to apply shellac at home? Watch a helpful video:
Step-by-step technology for applying shellac yourself at home. Watch video instruction:
How to remove and apply shellac at home? Find out from the video:

Breaking up relationships after years of life is not uncommon. After the departure of her husband, a woman experiences a range of negative ...

We save, save, add up and think that someday it might come in handy. But life passes very quickly .. We must not regret ...

There are so many single guys, but you chose a married one. It doesn't matter who was the initiator: he took off the ring in time or you...

Creating strong and joyful relationships is not an easy task. Only mature, mature ones can do it ...

Every woman is familiar with this type of men. He is adored by his mother, but at the same time is under her strict control,...

She stands in front of me - a young, pretty woman - and cries: - Father, I'm scared ... I want to get married, have children, a family ... Years ...

How to get your wife back if she fell in love with another? This question is asked by many men who have a relationship with ...

Servant of God Lyudmila was a member of the Baptist and Pentecostal Protestant sects for more than ten years....

If you constantly think about a person, many questions arise. For example, why is this happening, how, being on ...

Text: Readers' responses analyzed by Sasha Gluwein Just recently, we asked you, our readers,...
world-famous quotes about the sea and relaxation, vacation and freedom ... I asked the mighty sea, What is the great covenant ...

These vices are manifested in those who are unhappy, in whom it is highly developed in those who consider themselves defective ....

People talk about money matters with the same deceitfulness that they talk about sexual problems. In psychoanalysis, both...

I wasn't a freak; and, more importantly, was an orphan - and any walker knows how flawlessly this affects women ....

We save, save, add up and think that someday it might come in handy. But life passes very quickly .. It is necessary ...

There are so many single guys, but you chose a married one. It doesn't matter who was the initiator: he took off the ring in time or you...