Do-it-yourself bouquet of money: photo, step-by-step instructions for making, interesting ways to give money
Everyone knows this situation when you go to a birthday party and give money in an envelope? Do you want your gift...
How to make Santa Claus with your own hands?
New Year"on the nose", but under your Christmas tree there is not enough Santa Claus? I propose to make a grandfather out of a plastic cup from yogurt (actimel or imunele).
We also need cotton wool, cotton balls, cotton pads and a paste. Well, paints-brushes-scissors-glue of course :)
So, where to start making our favorite New Year's guest?
Perhaps first weld the paste.
1 st. dilute a spoonful of starch in a small amount of water and pour in, stirring continuously in 250 ml of boiling water. Bring to a boil, but not to a boil, cool. This, of course, is a job for adults.
We take cotton balls and discs, bathe them one by one in a paste and lay them out on a plate. After drying, they are easily separated. If you don't want to get your hands dirty, you can use a wooden straw. But it’s impossible to do without getting your hands wet. Sometimes it is necessary to squeeze out excess paste, and some parts from disks need to be formed immediately before drying. For example, we got the sleeves for Santa Claus's fur coat from discs folded into a bag.
And for children, it’s a pleasure to tinker and get dirty in a paste with cotton wool! The paste is very interesting to the touch, slippery, warm and, most importantly, not harmful! This is not glue for you, smear on your health :)
This is how we got a head from a cotton ball, two cones of a sleeve for a Santa Claus fur coat, a hat (from half a cotton ball).
Santa Claus himself It turned out by gluing a cup with cotton pads using a paste.
When all the details are dry (and this happened to us the next day), you can start painting. I chose the colors - gouache. It is easy to apply, opaque and hides small bumps on the grandfather's sheepskin coat. This work is quite capable of doing the child.
When the paint is dry, glue the body, head and hat to each other with PVA glue. And then we decorate Father Frost's sheepskin coat with cotton wool. The child liked this activity the most! Collar, sleeves, hat, beard and mustache :) Red nose - from a ball of cotton wool, black eyes - and voila :) 
It would also be nice to embellish our Grandfather. For example, stick snowflakes on his sheepskin coat. They are very easy to make by painting star pasta with white gouache. When the pasta is dry, it is easy to glue them on the PVA glue. Like this:
Santa Claus must certainly have a golden staff in his hand! Let's take a twig (my child and I found it on the street), glue a paper star on one end, and paint it with gold paint. 
Well, and most importantly, without which it is impossible to imagine Santa Claus? Ask any child about this. Of course, without a bag of gifts!
We have to make a bag from corrugated paper Red. Pay attention - it is from the corrugation, because it is soft, even somewhat reminiscent of fabric.
Cut out a square of paper of the required size (I took 20x20 cm). 1 cm from 3 sides we bend inward, fold the square in half and glue the bag. (To put it simply, imagine that you are sewing a bag of fabric, you need to remove seam allowances, turn it inside out ... well, everything is exactly the same, only with glue and you don’t need to turn it inside out)
We fill the bag with GIFTS! (with cotton, of course)
We tie and solemnly hand over to Santa Claus! 
The most important guest
Who is in an elegant warm coat,
With a long white beard
Comes to visit on New Year's Eve
And ruddy, and gray-haired?
He plays with us, dances,
With him, the holiday is more fun!
- Santa Claus on our Christmas tree
The most important of the guests!
(I. Chernitskaya)
Santa Claus under your Christmas tree is already ready, waiting for the New Year's Eve, but the trouble is - he is alone. Isn't it time to think about his granddaughter Snegurka?
How to make it?

From:
- a plastic cup from yogurt (actimel or imunele)
- cotton wool
- cotton balls
- cotton pads
- yellow woolen threads
- starch
- glue
- paints
- and pasta :)
The basis of the Snow Maiden is a bottle covered with cotton pads using a paste.
To work with the paste, it must be cooled, poured into a plate.
Prepare in advance wadded widths and disks, a clean plastic bottle.
This action may well be performed by a child. We take cotton pads and lower them one by one into the paste, glue them on the bottle. It took me 6 discs to cover the entire bottle. The seventh disk was glued on top of the neck. Then it will be very convenient to attach the head of the Snow Maiden to it.
The head and hat are made from a cotton ball dipped in a paste, the hands are made from cotton pads rolled into a cone. All cotton elements need to dry thoroughly before you can work with them further.
When all the details are dry (and this happened to us the next day), you can start painting. I chose gouache paints, blue. Gouache is easy to apply, opaque and hides small irregularities on the Snow Maiden coat. This work is quite capable of doing the child.
The paint has dried up, so you can take your head ... snow maidens :)
We paint the dried cotton ball in pink, draw the face of the Snow Maiden on it. We braid the braid from yellow threads and glue it with PVA glue to the head, glue a hat on top, which we decorate with cotton wool.

While the head is drying, we work with the body.
We glue the hands with glue, decorate the fur coat with cotton wool and white snowflakes.
Snowflakes are small pasta that was pre-painted with white gouache and dried. Pasta is perfectly attached to PVA glue or ordinary clerical glue.
Now it remains to connect the head with the body and here it is, our Snow Maiden:


Snow Maiden
I live with Grandfather, Grandfather Frost
Cheeks are ruddy and tender, like roses.
The blizzard braided my fair-haired pigtails,
The winds made the sled to roll down the mountain.
I congratulate you all on a happy holiday,
Happy and magical New Year!
When using the materials of this article, an active link to the site www.SuperTosty.ru is required.
Santa Claus under your Christmas tree is already ready, waiting for the New Year's Eve, but the trouble is - he is alone. Isn't it time to think about his granddaughter Snegurka?
How to make it? Same as it is :)
From:
- a plastic cup from yogurt (actimel or imunele)
- cotton wool
- cotton balls
- cotton pads
- yellow woolen threads
- starch
- glue
- paints
- and pasta :)
The basis of the Snow Maiden is a bottle covered with cotton pads using a paste. Read how to cook it.
To work with the paste, it must be cooled, poured into a plate.
Prepare in advance wadded widths and disks, a clean plastic bottle.
This action may well be performed by a child. We take cotton pads and lower them one by one into the paste, glue them on the bottle. It took me 6 discs to cover the entire bottle. The seventh disk was glued on top of the neck. Then it will be very convenient to attach the head of the Snow Maiden to it.
The head and hat are made from a cotton ball dipped in a paste, the hands are made from cotton pads rolled into a cone. All cotton elements need to dry thoroughly before you can work with them further.

When all the details are dry (and this happened to us the next day), you can start painting. I chose gouache paints, blue. Gouache is easy to apply, opaque and hides small irregularities on the Snow Maiden coat. This work is quite capable of doing the child.
The paint has dried up, so you can take your head ... snow maidens :)
We paint the dried cotton ball in pink, draw the face of the Snow Maiden on it. We braid the braid from yellow threads and glue it with PVA glue to the head, glue a hat on top, which we decorate with cotton wool.

While the head is drying, we work with the body.
We glue the hands with glue, decorate the fur coat with cotton wool and white snowflakes.
Snowflakes are small pasta that was pre-painted with white gouache and dried. Pasta is perfectly attached to PVA glue or ordinary clerical glue.
Now it remains to connect the head with the body and here it is, our Snow Maiden:


Snow Maiden
I live with Grandfather, Grandfather Frost
Cheeks are ruddy and tender, like roses.
The blizzard braided my fair-haired pigtails,
The winds made the sled to roll down the mountain.
I congratulate you all on a happy holiday,
Happy and magical New Year!
Comments
Elena 2011-12-14 10:38:19
Thank you very much! In kindergarten they told me to do some kind of craft, I got on the Internet for a long time, I decided to try it and it turned out, the child in the kindergarten was praised and said that it was the best!
AnswerHow to make Santa Claus with your own hands?
The New Year is "on the nose", but Santa Claus is not enough under your Christmas tree? I propose to make a grandfather out of a plastic cup from yogurt (actimel or imunele).
We also need cotton wool, cotton balls, cotton pads and a paste. Well, paints-brushes-scissors-glue of course :)
So, where to start making our favorite New Year's guest?
Perhaps first weld the paste.
1 st. dilute a spoonful of starch in a small amount of water and pour in, stirring continuously in 250 ml of boiling water. Bring to a boil, but not to a boil, cool. This, of course, is a job for adults.
We take cotton balls and discs, bathe them one by one in a paste and lay them out on a plate. After drying, they are easily separated. If you don't want to get your hands dirty, you can use a wooden straw. But it’s impossible to do without getting your hands wet. Sometimes it is necessary to squeeze out excess paste, and some parts from disks need to be formed immediately before drying. For example, we got the sleeves for Santa Claus's fur coat from discs folded into a bag.
And for children, it’s a pleasure to tinker and get dirty in a paste with cotton wool! The paste is very interesting to the touch, slippery, warm and, most importantly, not harmful! This is not glue for you, smear on your health :)
This is how we got a head from a cotton ball, two cones of a sleeve for a Santa Claus fur coat, a hat (from half a cotton ball).
Santa Claus himself It turned out by gluing a cup with cotton pads using a paste.
When all the details are dry (and this happened to us the next day), you can start painting. I chose the colors - gouache. It is easy to apply, opaque and hides small bumps on the grandfather's sheepskin coat. This work is quite capable of doing the child.
When the paint is dry, glue the body, head and hat to each other with PVA glue. And then we decorate Father Frost's sheepskin coat with cotton wool. The child liked this activity the most! Collar, sleeves, hat, beard and mustache :) Red nose - from a ball of cotton wool, black eyes - and voila :)
It would also be nice to embellish our Grandfather. For example, stick snowflakes on his sheepskin coat. They are very easy to make by painting star pasta with white gouache. When the pasta is dry, it is easy to glue them on the PVA glue. Like this:
Santa Claus must certainly have a golden staff in his hand! Let's take a twig (my child and I found it on the street), glue a paper star on one end, and paint it with gold paint.
Well, and most importantly, without which it is impossible to imagine Santa Claus? Ask any child about this. Of course, without a bag of gifts!
We have to make a bag of red corrugated paper. Pay attention - it is from the corrugation, because it is soft, even somewhat reminiscent of fabric.
Cut out a square of paper of the required size (I took 20x20 cm). 1 cm from 3 sides we bend inward, fold the square in half and glue the bag. (To put it simply, imagine that you are sewing a bag of fabric, you need to remove seam allowances, turn it inside out ... well, everything is exactly the same, only with glue and you don’t need to turn it inside out)
We fill the bag with GIFTS! (with cotton, of course)
We tie and solemnly hand over to Santa Claus!
The most important guest
Who is in an elegant warm coat,
With a long white beard
Comes to visit on New Year's Eve
And ruddy, and gray-haired?
He plays with us, dances,
With him, the holiday is more fun!
- Santa Claus on our Christmas tree
The most important of the guests!
(I. Chernitskaya)
Santa Claus under your Christmas tree is already ready, waiting for the New Year's Eve, but the trouble is - he is alone. Isn't it time to think about his granddaughter Snegurka?
How to make it?
From:
- a plastic cup from yogurt (actimel or imunele)
- cotton wool
- cotton balls
- cotton pads
- yellow woolen threads
- starch
- glue
- paints
- and pasta :)
The basis of the Snow Maiden is a bottle covered with cotton pads using a paste.
To work with the paste, it must be cooled, poured into a plate.
Prepare in advance wadded widths and disks, a clean plastic bottle.
This action may well be performed by a child. We take cotton pads and lower them one by one into the paste, glue them on the bottle. It took me 6 discs to cover the entire bottle. The seventh disk was glued on top of the neck. Then it will be very convenient to attach the head of the Snow Maiden to it.
The head and hat are made from a cotton ball dipped in a paste, the hands are made from cotton pads rolled into a cone. All cotton elements need to dry thoroughly before you can work with them further.
When all the details are dry (and this happened to us the next day), you can start painting. I chose gouache paints, blue. Gouache is easy to apply, opaque and hides small irregularities on the Snow Maiden coat. This work is quite capable of doing the child.
The paint has dried up, so you can take your head ... snow maidens :)
We paint the dried cotton ball in pink, draw the face of the Snow Maiden on it. We braid the braid from yellow threads and glue it with PVA glue to the head, glue a hat on top, which we decorate with cotton wool.
While the head is drying, we work with the body.
We glue the hands with glue, decorate the fur coat with cotton wool and white snowflakes.
Snowflakes are small pasta that was pre-painted with white gouache and dried. Pasta is perfectly attached to PVA glue or ordinary clerical glue.
Now it remains to connect the head with the body and here it is, our Snow Maiden:
Snow Maiden
I live with Grandfather, Grandfather Frost
Cheeks are ruddy and tender, like roses.
The blizzard braided my fair-haired pigtails,
The winds made the sled to roll down the mountain.
I congratulate you all on a happy holiday,
Happy and magical New Year!
When using the materials of this article, an active link to the site is required.
We have already made a lot of Christmas trees and Santa Claus with our own hands. The turn of the Snow Maiden has come. In today's article, we bring to your attention a master class on making a Snow Maiden from cotton wool. You will learn how to do do-it-yourself snow maiden.
Prepare the following materials:
1. Take a plank for the stand from a piece of plywood and make a frame out of wire.

2. Paste the frame of the Snow Maiden with cotton wool.

How to make a starch paste: take one tablespoon of starch, dilute in a small amount of cold water, stirring constantly, pouring a glass of boiling water so that there are no lumps.
3. Disassemble the cotton into strips. Then, with a large amount of paste, soak the cotton wool with a wide brush and wrap it on the frame. Bring the figure to the desired volume, smoothing with your fingers.
If the surface of the cotton wool is densely covered with a layer of paste, the figure should become covered with a fairly strong crust as it dries. You can glue the Snow Maiden with tissue paper. Dry should be at least two days near the battery.
3. In the meantime, you can make the head and face of the Snow Maiden. To do this, coat with PVA glue six layers of tissue and corrugated paper. Just moisten the first layers with water so that they do not stick to the face. When it dries, remove this mask and, having smeared it with a paste, add cotton wool to the head. Shape the hat out of cotton too.


4. Dry, prime with white acrylic, and when everything is dry, paint with acrylics and varnish.

5. Decorate the finished figure of the toy with sparkles and mica, smearing the surface with a paste.


And here is a simplified version of the Snow Maiden made of cotton wool!

For such a snow maiden you will need:
1. Make a figure frame out of wire. The frame of the Snow Maiden consists of two parts, in the center the figure must be tied with a thread.
2. Little by little, tear off the strips of cotton wool, dip them in a paste and wind them on the frame.

3. Braid a pigtail from three strips of cotton wool to the Snow Maiden, attach it to the head and moisten it with plenty of paste.
4. Make a hat and paint the Snow Maiden with paints.
Now you know how to do snow maiden from cotton wool with your own hands.
It’s not the first year, before the New Year holidays, my child and I have been making Christmas toys from cotton wool. This material for children's crafts is convenient, affordable and safe. This time we made a Santa Claus wizard so that ours would not be bored.
1 . Pour one tablespoon of cold water into a bowl. We fall asleep 0.5 tablespoon of potato starch.
 2
. Stir until dissolved.
2
. Stir until dissolved.
 3
. Gradually pour 1 cup of boiling water into the resulting mixture, constantly stirring the potato paste. Leave for 15 minutes for the glue to cool to room temperature.
3
. Gradually pour 1 cup of boiling water into the resulting mixture, constantly stirring the potato paste. Leave for 15 minutes for the glue to cool to room temperature.
 4
. Pierce a plastic bottle of yogurt (this is easily done with ordinary scissors), making holes at the same level on both sides for a plastic tube, which will then be pulled through. Leave segments of the same length on both sides - this is a blank for the hands of Santa Claus.
4
. Pierce a plastic bottle of yogurt (this is easily done with ordinary scissors), making holes at the same level on both sides for a plastic tube, which will then be pulled through. Leave segments of the same length on both sides - this is a blank for the hands of Santa Claus.
 5
. In the lid, you need to make two holes and thread a piece of a beautiful ribbon through them. Tie a knot on the inside of the lid.
5
. In the lid, you need to make two holes and thread a piece of a beautiful ribbon through them. Tie a knot on the inside of the lid.
 6
. Remove the wrapper from the chocolate Santa Claus. Cut out the face piece. Attach an image to the bottle. Secure the top edge by screwing the foil on with a lid.
6
. Remove the wrapper from the chocolate Santa Claus. Cut out the face piece. Attach an image to the bottle. Secure the top edge by screwing the foil on with a lid.
 7
. Now we begin to “sheath” our Santa Claus with cotton wool. We tear off thin, long cotton rags, moisten them abundantly in starch jelly and put them on the bottle, without touching the area with the image of the face. The ends of the flaps should lie crosswise. When you wrap Father Frost's hands with cotton wool, try to ensure that the ends of the flaps end not on the palms, but on the torso.
7
. Now we begin to “sheath” our Santa Claus with cotton wool. We tear off thin, long cotton rags, moisten them abundantly in starch jelly and put them on the bottle, without touching the area with the image of the face. The ends of the flaps should lie crosswise. When you wrap Father Frost's hands with cotton wool, try to ensure that the ends of the flaps end not on the palms, but on the torso.
 8
. Thus, we gradually make a fur coat, beard, hat, hands. To make the beard lush, just put a few flaps (not one thick one, but several thin ones on top of each other, from different trajectories). Wet cotton wool abundantly!
8
. Thus, we gradually make a fur coat, beard, hat, hands. To make the beard lush, just put a few flaps (not one thick one, but several thin ones on top of each other, from different trajectories). Wet cotton wool abundantly!
 9
. While the starch jelly is wet, you can attach various accessories to it, such as sequins, light braid, sparkles. If, after drying, some of the jewelry falls off, it can be fixed with a glue gun or thread.
9
. While the starch jelly is wet, you can attach various accessories to it, such as sequins, light braid, sparkles. If, after drying, some of the jewelry falls off, it can be fixed with a glue gun or thread.
 10
. The finished craft should be left to dry at room temperature. Do not put Santa Claus on a window or radiator, the cotton wool will turn yellow and the external festive look will deteriorate. It will take at least a day to dry completely. Santa Claus will significantly lose weight and the Christmas tree toy will become light, suitable for decorating a festive tree.
10
. The finished craft should be left to dry at room temperature. Do not put Santa Claus on a window or radiator, the cotton wool will turn yellow and the external festive look will deteriorate. It will take at least a day to dry completely. Santa Claus will significantly lose weight and the Christmas tree toy will become light, suitable for decorating a festive tree.

Prepare the craft kindergarten for the new year? An excellent solution would be to make a magical grandfather from cotton pads. By the way, in the course of work, you can discreetly and unobtrusively find out what gift the child is waiting for for the New Year.
For crafts you will need:
disposable plate;
cotton pads;
red colored paper;
half of a kinder egg case;
shifty eyes;
PVA glue, scissors, a simple pencil.
Start with a Santa hat. Cut out a half circle from red paper. You can use a disposable plate as a stencil. Let the child try to independently cut the part along the contour. Glue the hat to the plate. Decorate the edge of the cap with halves of cotton pads. Make a pom-pom out of the whole disc.
For the nose, take a half of a kinder egg case and carefully wrap it with red paper. Try to make as few folds as possible. Glue the paper and attach the red nose in the right place. Glue on the eyes.
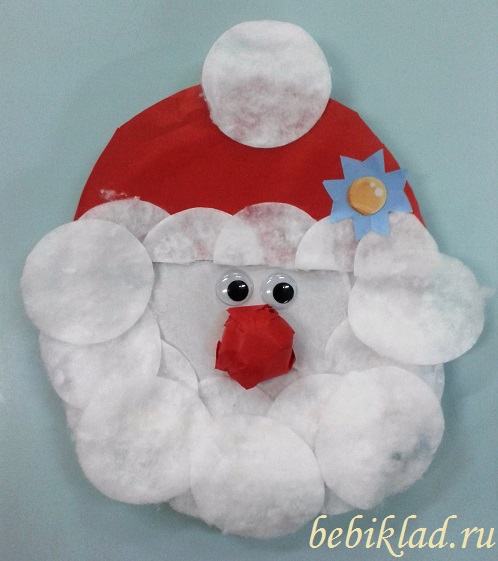
Divide the cotton pads into two parts. By the way, this is a great exercise for development fine motor skills child. Glue the discs so that the fleecy (inner) side is on top. After all, Santa Claus has a fluffy beard. Make sure that the circles are located exactly, along the circumference of the plate. For volume, you can make several layers.
Glue a paper snowflake, Christmas star, brooch, or other decoration onto the hat. Dream up. This will give personality to the craft.
If you glue a loop on the back side, you get Christmas tree decoration or simply Christmas decoration. The craft will become an interesting gift if you write on the free side New Year's greetings. From disposable plates and cotton pads, you can make a Snow Maiden and other fairy-tale characters. Perhaps you will have actors for a real New Year's performance. It's great to create with kids!
It may seem that New Year's celebration existed at all times. Moreover, it is in this form as it is now - a fun winter vacation with decorated Christmas trees, children's round dances, the beautiful Snow Maiden and, of course, Santa Claus. However, this was not always the case.
In Rus', the arrival of the new year was celebrated either in spring or in autumn, and no one ever decorated a Christmas tree. Peter the Great tried to get people to celebrate the arrival of the next year on the first day of January just over three hundred years ago. True, the glorious tradition was not immediately entrenched. And if in Germany Christmas trees appeared a long time ago, then in Russian cities - only by the middle of the nineteenth century. In village houses, the new custom took root for decades.
The character, without which the modern New Year is unthinkable, did not exist at all. The image of Santa Claus was outlined somewhere at the beginning of the twentieth century. By this time, Zimnik with its cold and snowfalls, and the harsh Frost-voivode, and the perky Morozko, and foreign Santa Claus were known, but our favorite hero was not.
Some researchers are inclined to believe that the Russian Father Frost was borrowed from European culture, and St. Nicholas is his prototype. Others are sure that this New Year's hero was invented precisely by the Russian people. In any case, by the beginning of the last century, the purpose and image of this character was finally formed. His character was also determined: a handsome and kind grandfather, at the same time strict and fair, inspiring confidence and able to fulfill innermost desires.
In pre-revolutionary Russia, both Santa Claus and a decorated Christmas tree symbolized well-known biblical events. The tree was dressed up for Christmas, the golden star of Bethlehem served as the main decoration, and the kind Santa Claus gave gifts to children for the holiday. In those days, our character was not particularly popular.
The revolution and wars postponed all kinds of celebrations “for later”, and the anti-religious campaign launched in 1927 completely canceled everything related to Christmas. In 1935, with the personal permission of Comrade Stalin, the government returned everything to Soviet citizens at once: the holiday, the Christmas tree, and Santa Claus. True, the new winter holiday symbolized only the arrival of the calendar year, and its original meaning was lost.
Santa Claus has become one of the main symbols of the New Year celebrations. Now he has loyal assistants: a cheerful and beautiful granddaughter Snegurochka, as well as a snowman, always ready to help out in difficult situations. Over time, our character also acquired personal transport: a traditional Russian troika harnessed to a painted wagon or wide sleigh.
The order of Santa Claus and the Snow Maiden at home was already possible in those years. Thousands of Soviet children carefully prepared for an exciting meeting, learning songs and poems.
The nationwide recognition and respect won by our hero in the Soviet country survived even after the collapse of the state. In Russia, the New Year (including the old one) and Christmas are loved and expected, a large country begins to prepare for the celebrations almost from mid-November. Not a single New Year's event is complete without a kind, fair and generous magician, whether it be the Kremlin Christmas trees or office corporate parties.
The New Year's character is also used for pedagogical purposes: every child knows that a gift from an attentive and fair Santa Claus can only be received in case of good study and decent behavior during the year. However, on wonderful holidays, all children receive gifts from a good grandfather - both obedient and not very.
The main residence of our hero is located in Veliky Ustyug, in the Vologda region. There, Santa Claus rests, receives guests, answers letters, and on November 18 celebrates his birthday.
For many Russians, the annual meeting with their favorite New Year's heroes is another opportunity to return to a serene childhood and believe in all that is good.

Everyone knows this situation when you go to a birthday party and give money in an envelope? Do you want your gift...

Currently, piercing is widespread among young people - a specific decoration of various parts of the body ....

In everyday life, there are many opinions about the age difference. Some categorically deny the possibility of "unequal" marriages, but ...
Every girl dreams of having beautiful legs. But not always nature gives every girl beautiful legs at birth. Not...

The likelihood of getting mercury poisoning is much higher than we might think. Basically, it can happen to anyone...

Question to a psychologist: I am 36. She is 34. I have been married for 14 years. They dated for 2.5 years before getting married. 12 year old son, 4 year old daughter.

Memories from deep childhood are inaccessible to people, as well as the memory of the moment of their birth. What is it with...

In order to provide themselves with competent, qualified employees, many enterprises use...
Our world is so arranged that a person must overcome many difficulties during his life, especially this ...

Every woman in her life had or will have a moment when she begins to be proud of her rounded figure, ...

A baby at the age of seven months not so long ago ate only mother's milk or formula, but some time ago in ...

Your baby is growing, becoming more and more active, which means that it's time for a change in his diet. Menu...

Pregnancy is a very important moment in the life of a woman, and of the family as a whole. She not only brings...

Reasons for the lack of ovulation, symptoms and signs The ovulatory function for a woman is the meaning laid down ...

Currently, piercing has become widespread among young people - a specific decoration of various ...

In everyday life, there are many opinions about the age difference. Some categorically deny the possibility of "unequal"...