
The value of hCG for a child’s health
Human chorionic gonadotropin is the main hormone produced in the body of a pregnant woman. He...
Do-it-yourself needle bed: photos, diagrams, master classes, very easy and beautiful, we tried to collect all this just for you in this article. The pincushion part is created not so much for a practical purpose. The decorative component plays a role, being decisive. I want the pincushion to not just be a place for needles, but to be pleasing to the eye.
The shapes can be very different, but in this article we have collected the simplest and most understandable master classes on how to make a needle bed easily and quickly with your own hands. A large number of photographs will help to better understand the basic manufacturing process of the product.
Photos, do-it-yourself needle bed diagrams
From a can
What do you need:
Small jar (suitable for baby food);
Glue gun (you can just use super glue);
Filler;
Cardboard;
Upper fabric;
Ribbons, flowers for decoration;
Needle, thread, scissors;
You will need to cut a circle out of the fabric and match it to the diameter of the lid: the circle should be twice its size. Sew simple seams and pull together, add filler.
Cut a circle out of cardboard that will be exactly the same size as the lid. Place filling and tighten with thread. You will get a pillow that needs to be carefully secured to the lid with glue.


Now take a strip of fabric, glue its edges together, turning it inward. Glue the rim around the can in the pad area. There should be no space between the two types of fabric. Decorate the side by sewing ribbons or lace, and additionally decorate the lid itself with flowers, beads, and buttons. In the jar itself you can store buttons and other small items for needlework.

Made from fabric in the form of a hat
What do you need:
Cardboard and fabric;
Ribbons and decorative flowers, ;
Compasses, scissors;
Decorative needles, needle and thread;
Glue and filler for the pincushion;
If you look at the photo, making a needle bed with your own hands using this scheme is extremely simple. A 10.5 cm circle needs to be cut out of cardboard. Cut two circles from the fabric with a diameter of 14 cm and 22 cm. Take a large circle and put a circle of cardboard in the middle, trim it around the perimeter, making beautiful folds.


Place filler in a circle of fabric, connect the edges of the fabric and sew. Now sew two parts of the hat, as shown in the photo. All that remains is to tie ribbons around the crown, secure them with pins, and pin the flowers. The pincushion is ready! There is more that can be done.


Pincushion chair
Quite an interesting version of the product. Inside the chair you can store the needles themselves, or you can put various little things for needlework.
What do you need:
A piece of thick fabric;
Scissors and cardboard;
Filler;
Glue;
Transfer the details of the chair that are in the pattern photo onto the fabric (don’t forget to leave room for seams). You will get two parts for the back and four for the sides of the chair. Cut everything out and pin it together with two pins.


Next, sew the material along the curved edges. Cut out parts from cardboard following the pattern diagram. There will be one piece for the back and two pieces for the sides. Turn out the sewn fabric parts and steam the seams. Now insert cardboard into the parts and fold the chair, sewing all the parts together.
Wrap the front part of the product with fabric and sew on the sides. All that remains is to make a cardboard box. The bottom is made from a 7.8 cm square and 4.5 cm deep. Turn the side parts outward and then insert them inside the chair.

Next, cut out three squares of 8 cm sides and wrap one with fabric. Cut the same squares from the filler, place them on cardboard and make a seat. All that remains is to cover the seat and secure the edges with glue. Glue ribbons on top. Fasten the ends of the tape. You will get a chair with a secret box in it.
In the form of a comb
You can make a pincushion with your own hands very easily and beautifully in different shapes. For example, give it the shape of a comb. The work requires threads and scissors, a needle, filler and felt. Take a regular comb and trace it along the contour of the fabric.

Two parts are made of fabric and one of filler. Now the oval of filler is sewn to the main part of the comb, then you can add more filler if required. Next, sew the two parts together.
From felt
Any figures cut out
tools and materials
:First, print and cut out the pattern, transfer it to the fabric and cut it out with small seam allowances.

Then, using an overcast stitch, we sew the muzzle and back together, and then sew the resulting parts together. Turn the workpiece inside out.


Sew on beady eyes. We cut out a mushroom with a leaf from yellow, red and green felt, sew on the applique with the same overcast stitch: the mushroom cap with red thread, the stem with yellow thread, the leaf with black or dark green.


We sew on the belly of the hedgehog, leaving a little space for turning it inside out and stuffing the pincushion with holofiber.


We stuff the toy tightly and sew up the hole with hidden stitches.
We embroider the hedgehog’s nose, draw or embroider the eyebrows.

The pincushion is ready! Funny little animals can serve not only for storing needles and pins, but also as a toy for your baby;)

To work we need the following tools and materials:

We start with the pattern. We print it out or simply redraw it from the computer screen onto paper. The second option is even preferable, since this way you can easily scale the size of the parts. Cut out the pattern.

We transfer the pattern of the dragonfly wings to the fabric and stitch it, leaving a little space at the top for turning it inside out. We cut out one wing blank from non-woven fabric and glue it to one side of the wings using a hot iron.

We transfer the patterns of the snail and dragonfly to the fabric, sew them or sew them by hand, leaving small holes in order to turn them inside out and stuff them with holofiber. We leave the entire bottom of the shell unstitched.

Having retreated 3-5 mm from the stitches, we cut out all the blanks and turn them inside out using a knitting needle, hook or sushi stick.

Let's start filling the parts: first we stuff the dragonfly and immediately sew up the hole. Don't forget to sew up the hole in the wings with a blind stitch! Sew the wings to the back, as shown in the photo:

Next, you should stuff the snail’s body with holofiber and sew up the remaining hole with hidden stitches. Then we stuff the shell tightly, apply it to the body and pin it with pins. We sew the shell and body with hidden stitches in a circle.

We hide the seam with lace, like this:

Sew buttons on both sides, piercing the body of the snail. This is done for better stability of the needle bar.

There's just a little bit left to do: draw the snail's eyes, apply blush, and sew the dragonfly onto the shell. You can safely stop there, but if you want, you can sew a couple of pillows.

That's it, the snail pincushion is ready! 😉

To work we need the following tools and materials:
We print or redraw the pattern from the monitor.

Cut out the parts as shown below. You should get two patterns of a pear and petioles, one pattern of a leaf.

Cut a rectangle as shown below. This will be the sepal. We roll it into a tube so that the fringe is on one side, and the flat part is on the opposite side, and sew it together.

Using a simple overcast stitch, we sew the two parts of the pear together, leaving the upper part unstitched.
In order to sew the stalk, we roll the remaining rectangle into a tube and sew it along the side line.

Turn the pear right side out and fill it with holofiber. We sweep the top of the needle bed along the edge and, pulling it a little, sew it up.

We pass the needle through the central axis of the needle bar and tighten it slightly. We repeat several times, creating a small depression for the stalk and sepals. We sew them into the pear. We sew a leaf to the stalk.
The DIY pear pincushion is ready!

To work we need the following tools and materials:
We print or redraw the patterns from the monitor, then cut out the dog’s body, head and paws from paper. The legs should coincide with the bottom of the body part.

Using brown felt, cut out the dog's paws. We redraw the muzzle and body onto beige felt. We prepare all parts in quantities of 2 pieces.

Using a seam “over the edge” we sew the brown blanks of the legs to the body, like this:

We fold the stitched parts so that the brown parts are in contact and the beige parts are located on the outside. Sew the upper body.

We sew the muzzle from two blanks, leaving a little space for stuffing.


We fill our heads with holofiber.

Sew it to the body using beige threads.

There's only one small thing left to do: decor. Sew black beads in place of the eyes, and another one in place of the nose. We tie a bright red satin ribbon around the neck, tying it with a bow. A simple felt pincushion is ready! Here's how it turned out for us:

Its dimensions are 7 cm in height and 6.5 cm in length.
If desired, you can sew a loop to the toy, and then the dog can also serve as a keychain.


To work we need the following tools and materials:
To begin with, print out or redraw the pattern suggested just below. Its size can be changed, making the owl a little larger or a little smaller, at your discretion.
Part A is the body of the bird, B is the tummy.

We transfer the patterns from paper to fabric and cut them out.

We place workpiece A, on top of it - workpiece B face to face and sew it together, like this:

Then fold the larger triangle in half and secure it with pins. Sew on the other side of the small yellow triangle.


Turning the owlet inside out:

We secure the end of the triangle with a pin and stuff the owl with holofiber, avoiding the place pinned with a pin - this is where the beak will be located.

We slightly tighten the bottom of the cone using basting stitches.


We fill the pincushion with holofiber more tightly to give the owl a more plump and, at the same time, stable shape.

Pull the thread and tighten the hole. We tie a knot.


Remove the pin from the tip of the triangle and sew the end of the beak to the owlet's belly.

All that remains is to sew on the button eyes:

First the larger white ones, then, on top of them, the smaller black ones.
Instead of buttons, you can use special eyes for toys. If desired, cut out a small triangle from felt and glue or sew it in place of the beak.

To work we need the following tools and materials:
As always, we start by creating a diagram. On paper we draw a round base, the top of the pincushion, the middle and the petal of the flower. Cut it out.

Applying the pattern, we cut out a base circle of white fleece and 10 sectors.

We sew all 10 sectors together, like this:

We sew the sectors one by one in the same way as shown in the photo below. We fill the resulting pockets with holofiber.

And this is what our workpiece looks like on the inside:

Cut out five petals from orange felt.

Cut out a small circle in the middle from the same orange felt.

Sew the petals and the center onto the needle bed, as shown in the photo:

Cut out a circle with a diameter of 11 cm from thick cardboard, and a circle of 13 cm from blue fabric.

We take a base piece cut out of white fleece, gather it along the edge and put a cardboard circle inside.

We sew the base part so that the cardboard circle is well fixed inside.

We assemble a base of blue fabric and put a cardboard circle covered with white fleece into it.

We fill the part of the upper part of the pincushion with sewn petals with holofiber.

Sew the base to the top.

We trim the edge of the pincushion with sequins and beads.

Making a butterfly: cut out the wings from blue felt.

We sew beads along the back of the butterfly, and sequins on the wings.

Place the butterfly in the desired location on the pincushion and sew it on.


To work we need the following tools and materials:
As usual, we start with the pattern. You can print what we offer or redraw it by hand. We transfer it first to paper and then to fabric.


We need two cat blanks, two eyes and two tails. Do not forget to retreat 3-5 mm for seams!

We sew the main part (directly, the front and back pattern of the cat) with a blanket stitch, leaving a little space.
We do the same with the tail.

We set aside the two cut out circles for now - these will be the cat’s eyes, we will sew them on a little later.
Now we’ll make small cuts in places where there will be bends or sharp corners.


We turn the tail and the cat right side out through the holes that we left earlier, stuff them with holofiber, then sew up the holes with hidden stitches.


All that remains is to sew on the pupil beads and embroider the nose, eye contour and mouth with contrasting thread.

Now we sew the tail into its proper place using the same hidden seam.

That's it, the funny pincushion is ready!
Our master class on sewing pincushions has come to an end. We will be glad if it turns out to be useful for you! We wish you creative inspiration and see you again! 🙂
Every needlewoman, regardless of whether she is a professional seamstress or knitter, or just someone who likes to make something unusual with her own hands, over time acquires a variety of tools, accessories and little things necessary for work. There is a need to organize the workspace in such a way as not only not to lose all sorts of “needs,” but also to find them at any time if necessary. This especially applies to needles and pins, which tend to be found in the most unexpected places. A variety of needle beds, which are easy to make with your own hands, are well suited for storing them.


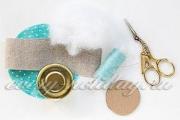
We make an original needle bed from shirt fabric, thick linen fabric and filling. Master class for beginners.
We all try to create comfort in our home. In this matter, every little detail matters, from the choice of interior to the smallest details. That’s why we consult with professionals and listen to our own whims. Some decorative elements can be made with your own hands. It's quite exciting and doesn't require much investment, and the material for crafts can most often be found among unnecessary things.
One of these decorative elements will be a pincushion mug, which we propose to make with us. Such an original pincushion is not only a beautiful thing, but also useful. The needles will not get lost throughout the house, this is especially important if you have a child. We will make a pincushion from plastic bottles that lie idle in every home. You don't even need the whole bottle, just the caps. What size the finished product will be depends on their height and width.
Let's prepare in advance scissors, glue, white pharmaceutical plaster, cardboard, caps from plastic bottles (2-3), foam rubber, wooden skewer, cocktail tube, light fabric (the color of the mug depends on it), brown fabric that will imitate coffee.
Now that you are fully equipped with everything you need. Take the lids and place them one on top of the other. Then unwind the patch and glue it so that the caps stay together. You can even seal them completely so that the color is not visible through the fabric.
Then we take a straw. We will need exactly that part of it that bends. This is the basis of the handle of the future mug. Cut off the part you need. Then cut a circle out of light fabric, fold it in half and make about 6 small cuts in the middle at a distance of 3 mm from each other.

They will help you wrap the tube with fabric without any problems. To do this, the remaining piece of tube must be made flat, placed in the middle of the prepared piece of fabric and wrapped.

If during the twisting process, after you have bent the tube, a crease in the fabric appears, you can easily get rid of it: make a couple of cuts in this place, and cut off the fabric that sticks out. After this, glue the edge of the fabric, and tuck the two ends into a tube so that the product is neat.

Next we move on to making the mug itself. We measure out a rectangle measuring approximately 5x11 from a light fabric, coat its center well with glue, and leave the edges untouched. We take the fixed lids and wrap them in this piece of fabric.

The closed side of the lids will serve as the bottom of the cup. To decorate it, cut the protruding edge of the fabric on this side several times so that you can conveniently lay it on the lid. Then coat the fabric thoroughly with glue and, carefully laying it down, glue it to the bottom.

Let's move on to the second edge of the mug. Lubricate the edges of the top cover and the hollow with glue, then wrap the free edge of the fabric with a wooden skewer, gluing it.

The bottom of our product is not finished yet. To bring it into the desired form, cut out a cardboard circle with a diameter slightly smaller than the bottom, and a circle from a light fabric, larger than the previous one. Place them one on top of the other. Cut the loose edges of the fabric towards the cardboard circle (this will allow you to conveniently lay the edges on the cardboard). Spread them with glue and glue them one by one, folding them inward.
A pincushion is a cushion or case for storing needles and pins. Working with it eliminates the possibility of losing these sewing accessories during the needlework process. Today you can buy a pincushion in any store, but it’s much nicer to make it yourself.
This piece of furniture, made with your own hands, will delight all family members and serve as a source of inspiration for the hostess.

A pincushion is an indispensable assistant for any needlewoman. Today there are a large number of different options for this kind of accessories, differing in size, shape, and materials.

What can you make a pincushion from? For this purpose, any improvised or discarded items are suitable: scraps of fabric, lace, leftover felt, etc. The main thing is to come up with an unusual idea, and you will find the materials to bring it to life.


Of all the patterns for sewing needle beds with your own hands, the simplest is considered to be a cushion-shaped needle bed. To create it, no patterns or special tools are required.

You will need a scrap of fabric, stuffing and a needle and thread. But even when making such a light piece of sewing accessories, you can show your imagination.

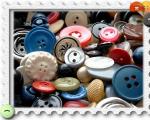
Sewn buttons, beads, beautiful braid, embroidered initials, flowers made from ribbons - all this can transform such an ordinary needle case.

Here are instructions on how to make such a pincushion with your own hands:

If desired, you can make hats in various styles - classic, sporty, rustic, modern.

As you can see in the photo of the original needle cases, many craftswomen use jars to make such sewing accessories. Containers should be intact, small, convenient and beautiful. The most important thing here is to skillfully decorate the jar, turning it into a “girlfriend” for the needlewoman.


The advantage of this model is the following: it is not only a stand for needles, but also a storage system for buttons, spools, beads and other small items.
Felt and felt are ideal materials for making homemade souvenirs, including pincushions. Such crafts depicting animals, household items, and flowers look quite cute and funny, bringing smiles to others.

The most popular model is the cactus in a pot. Every housewife can make such a thing, especially since there is more than one master class on the Internet on how to make a pincushion in the shape of a cactus. And the product looks simply wonderful.

Let's look at one of the unusual ideas for pincushions with a description, namely the book-shaped pincushion. It can also be sewn from felt. But you can use other fabric. The main thing is to correctly decide on the material of the main frame and choose the right decorations.

The book can be made whole or it can be divided into two halves. In addition, such a needle bed can be sewn by hand, or you can use a sewing machine. It is of fundamental importance to have a piece of felt in the middle of the book for more secure fixation of the needles.

Needle beds crocheted or knitted are in no way inferior to their sewn counterparts. Colorful, unusual knitted figures of animals, birds, plants and mushrooms can become a very interesting place for needles and pins.

If you have high skills and abilities, you can knit a real work of art that you won’t be ashamed to show to friends and colleagues.
Note!

In conclusion, we note that absolutely anyone who has basic skills in handling a needle and thread or a crochet hook can make an original and unusual pincushion.

Since a homemade item is always better than a store-bought one, a handmade needle stand will make a wonderful gift for a birthday, wedding, name day, New Year, etc.


Note! 


Note! 


Human chorionic gonadotropin is the main hormone produced in the body of a pregnant woman. He...
29th week of pregnancy: what happens to the expectant mother and child? Week 29 – the moment of birth is getting closer. It's getting harder...

Thyrotoxicosis and pregnancy are a rather rare combination. Such cases are registered approximately 1-2 times per 1000...
Do-it-yourself needle bed: photos, diagrams, master classes, very easy and beautiful, we tried to collect all this just for you...

The whole world celebrates No Bra Day on October 13 - as part of a flash mob, thousands of girls post on social networks...

Goals: To continue to develop in children a sense of collectivism and a friendly attitude towards each other; Download:...

Jeggings are figure-hugging trousers that combine jeans and leggings. Jeggings are tight...

Compiled by: Batueva S.A., primary school teacher MBOU "Secondary School" No. 25, Balakovo They say that lovers...

Your baby's birthday is approaching - it's time to give yourself a little exam and make sure that none of...
Back Forward Attention! Slide previews are for informational purposes only...

Eyelash lamination is a safe and healthy alternative to eyelash extensions. After the procedure, the eyelashes do not look...
Features of crocheting and knitting children's sundresses for girls from 6 months to 5 years. More feminine dresses...

Knitting is an ancient occupation of women. For some it is just a hobby, but for others it is the meaning of their whole life. But in...

Valentina Zaitseva The spring holiday is approaching - Women's Day on March 8th. Teachers and children prepare crafts...

29th week of pregnancy: what happens to the expectant mother and child? Week 29 – the moment of birth is getting closer. All...

Thyrotoxicosis and pregnancy are a rather rare combination. Such cases are registered approximately 1-2 times...