
Master class on making a paper vase with your own hands
Valentina Zaitseva The spring holiday is approaching - Women's Day on March 8th. Teachers and children prepare crafts for...
In the modern world, pagan and Christian traditions are closely intertwined. The interaction of ancient customs is especially felt when celebrating such outstanding dates as Christmas, New Year, Easter and others. New Year and Christmas are just around the corner.
Back in pagan times, our ancestors wove so-called amulets - motanka dolls. Such a doll acted as a guardian of the house, protecting it from evil forces.
The history of the doll goes back to the distant past. The first motanka doll was made about 5 thousand years ago. This is a very ancient art, which not everyone can do today. In Ancient Greece, Egypt, and Rome, there were similar toys made from fabric or thread with your own hands.

The motanka doll was especially popular in Ukraine. In ancient times, it was timed to coincide with various significant events in a person’s life.

With the advent of Christianity, the history of the motanka doll did not come to an end. On the contrary, amulets began to be made to resemble biblical characters from the New Testament:
How to quickly make such a doll?
They also played the role of guardians and usually coincided with Christmas. The secrets of how to make such a doll have been passed down from generation to generation. There is one rule that is strictly observed: You need to make a winder without the participation of scissors and a needle, otherwise all its miraculous power will be lost. Bereginya must be made with your own hands. 
And today, folk amulets are becoming fashionable and occupy a place of honor in homes next to Christian icons. Our time is tolerant, and we have long stopped reproaching each other for mixing customs. The motanka doll turns from a keeper into a souvenir, an exclusive product, which is honorable and presentable to have in your possession. However, such complex requirements are no longer imposed on the souvenir. The doll is made using scissors, needles and threads, since beauty rather than symbolism comes to the fore. But if you still want to make amulets, scissors and a needle should not be involved in the manufacturing process.

Let's look at how to make a motanka doll with your own hands. In the photo and video you can watch the whole process step by step and get a master class.
To make a doll with your own hands, you will need pieces of natural fabric - calico or linen, beads, braid, colored threads for decoration. In the photo you will see how to make the head. To do this, we wind up a very tightly small strip of fabric to form something like a barrel and cover it with a square white cloth; at the bottom of the barrel we fasten the fabric with a thread. Next, in the form of a scarf, we place the threads crosswise on the head. The result is a so-called sacred cross, which gives protective properties to the doll. If you want to follow tradition, then you need to wind according to the movement of the Sun an odd number of times. Next we will make the torso and arms of the doll. Looking at the master class in the photo and video, you will see that for this you need to twist the white fabric into two tubes (one longer, the other shorter) and connect them together with a cross. The head is tied to the top of the cross.
 Options for making a doll.
The next step is to make a vest for the motanka from embroidered or colored fabric. To do this, cut the fabric in half to the middle and put it on the doll so that the cut is at the back. At the “waist” and at the ends of the sleeves we wrap the fabric to the tubes using ribbons. The lower and upper skirts are put on alternately on the lower part. The top one should be more elegant. The motanka doll is decorated with a scarf and beads. At the same time, the scarf represents a connection with the sky.

After studying the master class in detail in the photo, you will be able to make similar amulets with your own hands.

In addition to the usual motanka doll, there is also a so-called herbalist. It differs in that it is filled with fragrant medicinal herbs. The herbalist not only drives away evil spirits, but also heals, since the herbs contain healing oils that evaporate when the grass dries. This is a folk method of herbal and aromatherapy.

The grass in the capsule (doll) is changed every two years. The filler is usually mint or lemon balm. Making such a doll is quite easy. In addition, after studying the master class, you will be able to choose a collection of herbs for yourself. Of course, herbalism does not prevent all diseases, but thanks to the properties of herbs, it can cope with some ailments.

So, mint improves memory, lemon balm calms, has a beneficial effect on cardiac activity, lavender effectively reduces blood pressure, thyme is excellent for coughs. Knowing the characteristics of your body, you can choose an individual collection of herbs and fill the doll with it. If you are making a doll as a gift, try to find out the characteristics of this person’s body and prepare an appropriate mixture for him, which you will fill the doll with.
So, photos and a master class will help you quickly and effectively learn how to make motanka dolls. They can also be used in everyday life as decoration for your own home, as toys for children, as souvenirs and gifts for loved ones and friends. With a certain approach and faith in miraculous powers, the doll will become a real keeper. This is a guardian who came from time immemorial to protect your home from evil forces.
The Slavic amulet doll with your own hands is called Mommy with kids, it symbolizes fertility, love and the ability to feed everyone. Bereginya has several names: Moskovka And Family. Traditionally, she has six swaddled babies tied to her belt, and the doll is dressed in bright sundresses of natural fabrics.
If you have been looking for a doll for conception and pregnancy for a long time, then you have come to the right place. The article will tell and show how to make such a motanka doll with your own hands.
We also got a recipe for gingerbread-roe from our ancestors:
The most gratifying thing is that to make amulets dolls with your own hands, you don’t need any expensive materials or extensive seamstress experience. The main desire.
It is better to take fabric from used clothes of mothers and grandmothers. It is believed that such things carry a powerful charge of positive generic energy.
The products themselves may differ depending on the region in which the craftswoman lives, what traditions were passed down by her great-grandmothers, what is available, and so on...
It’s interesting that our grannies made Beregins and rag dolls-amulets without using needles or scissors. The fabric and threads were torn by hand so as not to prick or cut the doll. The babies were swaddled in used, washed baby diapers and baby vests. It was then that the folk amulet doll acquired its greatest power. This is no more difficult than doing it yourself for the New Year.
I deliberately do not give any dimensions of the doll or fabric cuts. Do everything by eye, choosing the size of your breasts, children, etc. to suit the height of your own toy.
1. Let's do it first a stable basis. It can be easily rolled out of an old towel and tied with thread. People believed that it was correct to make an odd number of windings and an odd number of knots. And if you can secure the threads without knots, it will be even better.

2. To shape the head You can use padding polyester, cotton wool or any soft material, wrapping it with white cloth so that the face is white. We will tie a scarf on the head. I use my grandmother's old scarves. Bereginya looks very realistic in them.


A sundress is a fabric wrapped around the neck and secured to the neck with a thread under a scarf.

3. Beregini’s breasts should be outstanding, because this symbol of great fertility, great love for all children. It's easy to do. Take a piece of fabric, roll it into a tube and tie it in the middle. We push the breasts under the sundress of the doll. It should be quite fluffy. It is not necessary to tie her up; she will not go anywhere, because the children will support her from below.
Do the job well, you can sell on Etsy.com:
4. We make the babies out of white fabric, also rolling it into a tube. And then we swaddle them like real babies and tie them with a string around the waist. We create 6 children. By the way, this may be why this toy is also called the Pelenashka - you already know how to make it.


5. We collect all the children and tie them tightly with a rope or ribbon under the chest.
We put the Mommy doll in a prominent place in the house, we admire her and ask for help. It is good that our ancestors used such methods to conceive a long-awaited baby. Here's how to make a Slavic amulet doll for pregnancy and conceiving a child.
There is no need to hide Doll Motanka Bereginya from guests, but don’t give it to anyone!).
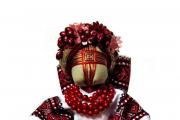
Lyalka-motanka is a Ukrainian folk lyalka, a symbol of a woman’s wisdom, a native amulet.
Long ago, in our native land, the motanka doll played the role of a talisman, was a symbol of wisdom, a guardian of the family, a symbol of the ancestor mother and a connection between generations, one of the most ancient games and sacred (sacred) sources of our people, as and thousands of thousands of deaths.
As much as humankind has played, so many fateful games have played a role in calming, indulging and protecting the child. The mother, deprived of her child, wrapped fruit and bread in scraps of fabric, tied a stick and gave it, like a toy, to the doll’s crossbone.
While preparing this sacred object, the women contributed their energy, chanting thoughts and devotions. The doll-motanka was passed on by the mother to her daughter, if she passed it on to another family, and the daughter, in her own way, passed it on to her child. Here's a thread, yak tied the whole row .
Our ancestors believed that the doll is an intermediary between the living and those who will be born again. That's why for the girls together they put dolls in the screen before the dowry, from towels and shirts. They were earnestly robbed: they dressed them in the Ukrainian folk style of the name, weaved a wreath on their heads, and boundly “added” the name to the name—musela and steam. Immediately after becoming friends with these dolls, they grew up - they admired the fact that children were born so quickly.
There is no evidence among the “fruitful” dolls - it is unknown who will come into the world.
 Beregins - another species - had ridges wrapped around their faces. And they prepared them for mass consumption: either the people were breathing, or they were eating the boards, and suddenly, they kicked back angry, sensing the storm...
Usi elementi odyagu the skeins are symbolic: the spindle separates the earth; shirt - three hours: last, present and future; headdress - otchipok, stitch and hustka - tie from the sky...
The Ukrainian doll is unique because it is the same as it was a thousand times before! The found ones - clay - are attacking the treasures of Tripill!
You will be blessed to learn how to work such motanka dolls, below the detailed master class.
The chopping doll-motanka has a magical power. Don't forget to take care of your homeland, but it may be possible to create a home. The mother gave such a doll to her daughters, giving birth to her daughters, and she, in her turn, gave Bereginya to her child.

For the preparation of a doll-reel, the following materials are required:
Do-it-yourself doll-motanka
1. Tan the padding polyester on a white fabric, wrap it with red thread.

2. Using an additional linen thread or satin stitch, create a sacral cross on the front of the reel - a vertical stitch, securing the threads at the neck, then horizontally, tying a knot at the back of the head.

3. Take the fabric for the bed from one side into the folds and wrap it to the doll. Don't cut the thread!


4. Wrap the doll with red thread from the neck to the waist, and wrap the apron.


5. Fold the fabric for the hands like an accordion and wrap it with threads.

6. Wrap the handles to the doll with threads crosswise.

7. Using additional threads, floss creates hair patches. Tie the thread at the end, and cut the skein from the opposite side with scissors.

8. Apply a skein of hair to the head, smooth it and secure it, tying it with thread at the neck.


9. Braid Beregin’s braids.

10. Knit the ruffles on the head of the stitch, or tighten the crown. Shiya can be decorated with namist.

It’s not surprising that the doll-motanka is still revered as a reliable amulet, even the ancient Bereginya, crushed with strong hands, covered with songs, caressed by fairy tales, dressed in everything at home, at home, took revenge on the powerful positive energy of the dear people - mothers, who put their soul into a toy, She labored with love for her child.
The ready-made doll-motanka can be placed on the sidewalk, or fasten it above the door, and let it bring happiness to your donkey!
The axis is still in use video:
And here you can take a look at the ready-made garni of motanka dolls:
The motanka doll, or knot doll, received this name due to a specific manufacturing technique. To create such a talisman, a needle is not used, but all parts are wound together with thread.
Another feature of this doll is the absence of eyes, mouth, and nose. On the face there is a sacred cross. In order for a hand-made motanka doll to be real, it is important to provide it with all the necessary elements. Each such element is endowed with a certain meaning and must be present in the finished doll. So, the skirt is a connection with the earth. The shirt symbolizes the connection between past, present and future. The headdress denotes a connection with heaven and god. All kinds of decorations are welcome - they symbolize fertility and prosperity in the family.
It is believed that a motanka doll in the house is a talisman that protects the family from evil spirits, and also brings good luck and prosperity. Our master class describes how to make a simple motanka doll.
a piece of white calico fabric;
green linen fabric;
lurex scarf;
embroidered ribbon;
thin ribbons (white, yellow, cherry, green);
white threads;
Take a piece of white fabric measuring 25-25 cm. Place cotton wool in the middle of the piece of fabric and form it into a ball - this will be the doll’s head. We gather the fabric around the cotton ball and secure it with thread, wrapping it tightly around the fabric.


We make a cross on the face. For this you will need thin ribbons of white and cherry flowers. First we take a white ribbon, wrap it around the head horizontally, then draw it vertically and tie it at the back of the head. We also tie a cherry ribbon over the white ribbon. It makes sense to take a cherry ribbon slightly narrower than the width of the white one.
As you can see in the photo, the ends of the ribbons go into the head winding - you can thread the ribbon under the existing winding, or you can wrap the ribbons with another piece of thread.


Our motanka has such a beautiful face. This design method is called the sacred cross.
We make hands for the doll. To do this, cut out two pieces of 15x15 cm from the same white fabric.

We twist each flap into a loose roller and secure it with thread, wrapping it around the edges, top and bottom, stepping back slightly from the edge of the roller.


We form the base of the doll. You will need a piece of fabric measuring 30x60 cm. Place a strip of cotton wool on it and roll the flap into a roller.

We wrap the roller tightly with thread along the entire length of the roller.

We straighten the piece of fabric below the head, insert the base column inside and wrap it tightly around the base. It turns out to be a torso with a head.

Then we wrap both handles with thread in the neck area.

We cut out the skirt. For it you will need a piece of linen fabric measuring 30x50 cm.
We place the fabric with the wrong side up in the “waist” area so that the skirt covers the face. With our hands we gather the edge into an accordion around the “waist” and wrap it with threads, as shown in the photo below.


We lower the skirt down - it is ready.


Let's make a shirt. For it, we cut a strip 6 cm wide, wrap it around the back of the neck and crosswise in front. We remove the remaining strips under the arms, laying the edge inward. We fix it with thread, wrapping it around the doll.


To visually separate the skirt and shirt, tie a colorful ribbon at the waist.

For the scarf, cut a triangular piece and tie it on the head, around the neck.
We fix it at the back with a knot. 


We decorate the motanka doll: we wrap the spikelets and sugar viburnum with tape, and tie a bow of yellow and green ribbon on top. And we secure our bouquet in the hands of the bereginya with a thread.


The do-it-yourself motanka doll made according to our master class is ready. Now your home and family will be under reliable protection.


Irina Usovich especially for the site
Ritual dolls, protecting the house and its inhabitants, were an integral part of the life of our ancestors. They were made from all kinds of available materials: towels, scraps, unnecessary clothes, ribbons, berries, pine cones, etc. At present, motanka dolls have not lost their popularity. Let's learn how to make a motanka with your own hands.
Before you make a doll-motanka, you need to familiarize yourself with the rules for making such a talisman. Otherwise, you will end up with an ordinary doll.

There are many different ritual dolls, such as grains, zhelelnitsy, krupenichki, etc., which any housewife can make.
First of all, you need to lay out on the table the materials necessary for work: for the head - a piece of soft fabric, for example, from a diaper, towel, old pillowcase; for the arms of the product and the petticoat - chintz fabric. You can use a children's dress, vest, etc.

That's all, the amulet is ready.
The main task of such a doll is to store wealth in the house.. It was made for the holiday of the autumn equinox, filled with buckwheat, placed near the icon, away from the lamp.
The amulet was made from pieces of burlap or canvas fabric, as well as colorful old scarves. In order to make a home amulet you need:

Creating a talisman in stages:
 Cut out the necessary details of Zernovushka and her clothes. Sew the square for the body with small stitches along the edge. Sew in a round bottom for stability of the grain. Turn the bag inside out, straighten the seams and pour buckwheat into it. Sew the neck of the bag, trying to move all the folds to the “back”. Place the bag and sew the neck again. Sew the neck folds tightly to the back.
Wrap the undershirt around Zernovushka’s body and tie the shirt with threads at the top. Embroider the apron with a protective pattern.
Cut out the top colored jersey shirt and the warrior. Tie on the top shirt, the bottom one should peek out a little. Tie the povoinik tightly around the “head”, leaving the upper edge of the scarf free. Unfold the apron with the bottom edge up and tie it inside out. Then straighten it, and slightly grab the bottom edge with a thread. Wrap the povoinik in even small folds and tuck it into the back. Then sew it to the outer shirt.
Twist a soul warmer or a piece of canvas material 15x10 cm into strong tubes on both sides - these will be “handles”. Wrap the middle part of the soul warmer around the body and secure the arms with threads. Tie red thread over the apron and make a belt with tassels.
Tie a large scarf on your head with two folds so that it fits snugly to your head. Straighten it along the back, tie the ends and secure with threads.
Often people independently read spells for made amulets or do this during the manufacturing process. The text of the plot will determine what magical properties they will have..
 Most amulets are created to protect the family from illness and trouble. You can use ready-made conspiracies, or you can come up with them yourself.
Often, our ancestors, in order to direct the energy of the amulet doll in the right direction, allocated it a special corner in the house and put things there that symbolized their desires.
If you want to make a profit, you can put a coin on the keeper, and if you have a child, you can tie the baby to the doll’s hands.
As you can see, it is very easy to make your own motanka doll. The main thing is to follow all the recommendations for making it so that it is not an ordinary toy, but a keeper of the hearth.
Attention, TODAY only!

Valentina Zaitseva The spring holiday is approaching - Women's Day on March 8th. Teachers and children prepare crafts for...
PROGRAM TASKS Enrichment of passive and active vocabulary Contribute to expanding children's understanding of the environment...

Olga Buzova was attacked by an unknown man during a concert in Dubai. The footage posted on Instagram shows...
Friends, we are starting to prepare for the next New Year season. We are putting together master classes on . The pioneer will be like this...
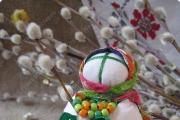
Verbnaya (Verbnitsa) and Easter rag dolls. Traditions are being revived. The folk patchwork doll is becoming the most...
In the modern world, pagan and Christian traditions are closely intertwined. The interaction of the ancients is especially noticeable...

Svetlana Markova Beauty is like a precious stone: the simpler it is, the more precious it is! Contents Often...

string(10) "error stat" string(10) "error stat" string(10) "error stat" string(10) "error stat" string(10)...

People have admired the beauty of healthy hair since ancient times. Some peoples attach special importance to them. Thai...

The question is what is more important: the proper upbringing of a child or providing him with a fundamental education...
Why are we so calm and relaxed when we are in the water, or the water flows smoothly over our body?...

Inga Mayakovskaya Reading time: 7 minutes A Some women look forward to the birth of their grandchildren, while others...

Greetings, my dear ones! Today I will tell you about an insidious and very common mistake many women make...
PROGRAM TASKS Enrichment of passive and active vocabulary Contribute to expanding children's understanding of...

Olga Buzova was attacked by an unknown man during a concert in Dubai. In the footage posted on Instagram...