Master class with step-by-step photos
If you are thinking about the question of what new and interesting things to do for your little master, then we suggest you...
Hi guys! I continue the topic on March 8, namely, I want to share my finds of beautiful and at the same time not too labor-intensive flowers using the origami technique. These flowers can be placed on a postcard or even in a vase. Or you can make a whole composition for postcards from flowers and birds, because March 8 is spring, a day of tenderness, love, warmth, flowers and birdsong in the soul and outside the window. Today on the agenda is an origami paper flower diagram and not even one.
I'll start with my favorite simple and beautiful flower, and then I'll post all the most interesting diagrams and videos that I found.
On this day there is a sea of flowers everywhere, because it is also a holiday of spring and the awakening of nature. Children begin to prepare in advance for March 8: they make drawings, postcards or make crafts with a spring theme. If your child is not yet familiar with the origami technique, you can show him how to make a beautiful paper flower. This craft will not be difficult to make if you follow our master class.

To create a flower we will prepare:

Our flower will consist of separate modules, and we will make them from small squares measuring 6x6 cm.

First, this small square needs to be bent along two diagonals.

After this we do the fold in half. 
Please note that the transverse and diagonal folds are directed in different directions.

Now we fold the workpiece in the form of a small double square.

We bend the right side of the top layer towards the middle.

Let's do the same with the left side. 
Using the same principle, we make 7 more blanks, which will be the petals of our flower.

Now let's start connecting them together. To do this, apply glue to the edge of one petal.

Apply the second petal.

Add a third one, connecting it with glue to the previous one.

This is how we collect the whole flower.

For the stem, cut out a rectangle from green paper.

It needs to be rolled into a tube. It is more convenient to do this from a corner. We fix the beginning and end of the work with glue. 
For the leaves, cut out another rectangle (about 7x8 cm). 
Let's fold it in half.

After this we will make another fold. So we can make two leaves at once.

Cut out the outline of half the leaf.

We got 2 leaves.

To attach the flower to the stem, apply a little glue to the green stick.

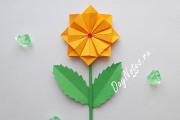
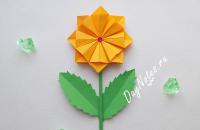
Glue the orange flower.

Below on the stem we fix a green leaf.

We place the second leaf nearby.

The core of the flower can be decorated with a small rhinestone.

Our paper flower using the origami technique is ready.


Three wonderful roses - I like them all. Click on the photo to see the full MK


The simplest rose, but very beautiful, especially if you make it small. Mk is in Italian, but everything is clear. Enjoy watching. If anything, turn on Russian subtitles in the settings
Another no less simple rose, I would say, not even a rose, but Eustoma
Almost like the real thing and not the most complicated
Beautiful rose - bud
Volumetric rose for the most patient
Magic ROSE CUBE made of paper - MOVING ORIGAMI
Lotuses come in different designs. But what I like most about lotuses is not the design feature, but the use of designer paper, velvety or patterned, or even vintage newspaper.


The rose is, without a doubt, one of the most beautiful flowers in the world, which is why it is very popular.
A paper rose is no less attractive than a real one, and the fact that you make a beautiful flower with your own hands, makes the rose even more meaningful to the person you give it to.
Learn making a paper rose is not difficult. There are many ways to do this, and you will learn about several from us.
You will spend very little time on the rose in this example, but will get a lot of pleasure. Such flowers can be used as decor in an apartment or as a symbolic handmade gift.
You will need:
Thick paper
Scissors
Beautiful vase
1. From thick paper you need to cut out a square measuring 10x10 cm.
*The color of the paper depends on the color of the rose you will be making.
2. Draw a spiral on the square (see picture).
3. Cut out the drawn spiral.


4. Start rolling the paper spiral starting from the outer end.
5. Screw the bud tightly to the end and glue the inner end to strengthen the structure.


The rose is ready, and you need to start making leaves for it.
6. Cut out a leaf and glue it to the rose.


To make the rose look more chic, place it in a beautiful vase.
You will need:
Thick paper
Scissors
Glue (adhesive tape)
1. Fold a sheet of A4 paper in half, and then in half again.


2. Now you need to cut the sheet into 4 strips. To do this, unfold it and cut along the folds.
3. Use duct tape to hold the cut strips end-to-end together, creating one long strip.


4. The strip that you have obtained needs to be twisted so that you get a rod-trunk (see picture).
5. You now need to fold the remaining part of the paper in half, while slowly turning it around the center (see picture). Continue wrapping and gathering layers until you have a rose.


*If you wish, you can paint the rose with your favorite color if you made it from white paper.

You will need:
Crepe paper (red and green)
Stick, skewer or wire
Pencil
Scissors
Floral tape or glue
1. Make a heart shaped template. The size of the template depends on the size of the flower. In this example, the height of the heart is 15 cm.

2. Cut out 5-6 hearts according to the template.


3. Making a stem. Prepare 3 wires or a stick and wrap it with floral tape.
* Floral tape can be replaced with glue.

4. Making petals. Gently stretch the paper wide. Wrap the top edge of the heart around the round handle.


Wrap the first petal around the stem and secure it with ribbon.

Do the same with the remaining petals.

5. Making leaves. Prepare 3 wires and wrap them in crepe paper. Next you need to glue the leaves to them, which must be prepared in advance.

6. Making a rose cup. Cut a strip of green crepe paper.

Attach the strip to the base of the cup using adhesive tape (you can replace it with glue).

Attach leaves to the stem. Make one common stem and decorate it with green crepe paper.


You will need:
Printable template
Printer
Scissors
Stick, toothpick, skewer or wire
Pencil
1. To make such a paper rose you need to download a flower template

2. After which you printed out the template, cut out the petals and leaves.
* Take a close look at the template, where all the petals and leaves are numbered.

3. Use scissors to bend the ends of the petals on both sides.
4. Three green leaves also need to be bent in half lengthwise.

5. Prepare a toothpick, thin wire, stick or skewer and twist petal number 1 around it. Use glue to secure everything.

6. Now around twisted petal number 1 you need to wrap petals number 2 and 3 and also secure with glue.

7. You need to glue petals 4, 5, 6, 7 together to make something similar to cones (see photo).

8. Collect and glue all the parts of the flower together!

You can find roses in other colors by clicking on the links below.
Like the previous roses, this one can be made in any color. The example shows the color red.
1. Prepare colored cardboard. Draw a spiral on it. Try to make the line that you draw from the center to the periphery not even, but a little wavy.
2. Using scissors, make a cut along the entire drawn line. You should get something similar to the peel of a peeled apple.
3. Now you need to wrap your spiral around your pencil. Try to wrap tightly until you reach the middle. After this, you need to remove the pencil and let the flower straighten out.
* Using your fingers, you can try to slightly bend the paper petals in the central part.
4. Apply a lot of glue in the center and let it flow into the central part of the spiral. In order for the glue to set well, you need to press the entire structure to the bottom.
You will need:
Corrugated paper (pink and green)
Scissors
Wire (straightened paperclip or skewer)
1. Prepare pink or red corrugated paper and fold it several times, first lengthwise and then widthwise.
2. Using scissors, cut out what looks like double petals, shaped like hearts. In this way, you can make 8 petals at once with one cutout.
* In the video, the petals are simply cut out of paper, but you can first draw them on it and then cut them out.
3. Each group of petals should be slightly crushed to give more naturalness. You can stretch it by pressing your fingers into the middle part.
4. Now you need to cut a strip 3 cm wide from a roll of corrugated paper (choose the length yourself, based on the video tutorial). Apply glue along the strip.
5. At one end of the tape you need to put a short length of wire (you can replace it with a straightened paperclip or skewer) and wrap the entire strip around it. This will give you the core of the rose. It is to this that you will further glue the petals.
6. All that remains is to apply glue to the petals and attach them to the central part.
7. At the final stage, you need to make leaves from green paper. To do this, fold the green crepe paper in half and half again, and cut the shape of the petals as shown in the video.
* In the video, a foam rubber strip is pressed against the wire, and then green paper is wrapped around the wire along with the foam rubber.
This method of making a paper rose was invented by Kawasaki, after whom it is named.
A paper rose made using the origami technique will be a wonderful addition to any gift or an excellent decorative element. The creation of this wonderful craft in itself is quite interesting and not at all difficult. Following the instructions, anyone can make this wonderful flower without spending a lot of time on the work.
Each flower is beautiful in its own way. It conceals pristine beauty, attractiveness, tenderness or passion. The aromas of these plants have always attracted attention and aroused admiration. One of the special flowers existing on the planet is the rose. It is she who is distinguished by her unusual beauty and majesty. It has many shades and types, each of which can evoke a lot of feelings and emotions.
Considering all the qualities of this wonderful flower, many artists and sculptors have depicted and depict it in their works. And craftswomen don’t shy away from it either. And, of course, the rose is an integral part when creating various paper crafts. Paper roses are sometimes impossible to distinguish from real ones.
In today's article we will tell you about one of the options for creating a paper rose using the origami technique. This simple folding process will allow you to please yourself and your loved ones with a beautiful flower that has retained its color and shape for a long time.
First we need to make a rosebud. For this purpose, you need to take a square piece of paper of the desired color. Considering that roses come in a variety of shades, you can choose absolutely any color. We need to fold the paper along two diagonal lines, as well as along vertical and horizontal lines. We will align all corners, not only the top ones, but also the side ones, towards the bottom edge. We will bend the sheet as follows: along vertical and horizontal straight lines, the so-called “valley”, and along a diagonal straight line (we use only one) - “mountain”. Thus, as a result, we will get a double-shaped square. Next, along the line that passes through the middle part of the lower side on the right and the middle part of the upper left side, you need to bend the top layer of the resulting part to the right side. You can see how to do all this correctly in the photo below.

The cut of the workpiece and the edge of the layer being bent must be aligned. The bottom corner must be placed so that it coincides with the top. We need to fold the pocket that has formed along a horizontal straight line. We will turn the resulting part in relation to the vertical axis. Now let's repeat all the manipulations necessary to fold the top layer.

While working on folding the resulting pocket, the workpiece will receive a unique shape resembling an arrow. Now we need to open the workpiece from above. To make this as simple as possible, we will focus on the following photo and the control points that we can see on it. We need to move the top corner down. If we look from above, we see that the layers radiate down from the center in the form of a cross.

Now the layers of the workpiece that diverge must be taken with your fingers so that they are between them. We will place the blank in the second hand and, using rotational movements, we will roll the flower petals into a bud. Of course, during operation the workpiece will take on a somewhat crumpled appearance. This point should not confuse you. It is this effect that will provide the texture, volume and necessary relief to the produced bud to make it more realistic. In the central part of the rose bud, all the paper layers that we have rolled into a tube must be crushed so that they cannot unfold in the future. Now let’s move the corners of the workpiece in different directions and straighten it slightly. We need to fold the inner petals of the rose. Now you need to align the edges that are marked in the photo with each other. Next we will outline the line that we will need for the next additions.

Now you need to bend the corner in the opposite direction (backward) along the fold line. Then you need to make an internal fold, rather shallow, and return the petal to its original position (vertical). We will form the next three petals located inside the bud in a similar way. All that remains is to form the outer petals. We need to roll one of these petals into a tube onto a regular paper clip, straightened out.

Using the same principle, we will shape the edges of the remaining petals. We will also secure the inner petals with a paper clip. By twisting the inner layers of the flower we will give the final shape to the bud.

We will make green leaves for the flower from beautiful green paper of the desired shape. We need to fold the paper along a diagonal straight line. Carefully fold the corners into the inside. As you can see in the photo, in one part we will fold the corners inward. As a result, the leaf will take the shape of a drop. By making small folds on the bias, we will create a relief surface of the sheet. The final, final look of the sheet will be given by a zigzag fold, not very deep, made along its length.

We will make the stem for the flower from paper of the desired green shade, which we will roll into a fairly thin tube. We will fold the edge of the resulting part, the thinner one, a little, as can be seen in the photo below, and carefully combine the two separate parts of the flower together. Scotch tape is ideal for fastening.

It remains to take the final step. In order for the flower to be complete, resembling as much as possible a real flowering plant, we will carefully connect both parts - the stem with ticks and the bud. To do this, the stem is simply inserted into the folds of the bud itself. The paper rose using the origami technique is ready.
Many people are interested in how to make a rose from origami paper. This craft can be used to decorate a wrapped gift for a birthday, Valentine's Day, or March 8th. You can make a bouquet of artificial flowers and put them in a vase, or use several origami roses to create a three-dimensional panel for room decor. And besides, in the process of such work you will calm your nerves, experience beauty and learn something new. It is also recommended to involve children in such creativity. This develops perseverance, attentiveness, accuracy, spatial thinking and fine motor skills of the fingers, which is useful for the development of the speech apparatus. This joint activity brings children and adults closer together.
Origami is the ancient Japanese art of folding all kinds of paper figures without the help of scissors and glue. The technique has its roots in Ancient China, where paper was invented. For a long time, this type of applied art was available only to the upper classes. It was considered good form to master the technique of folding paper figures.
Important! Paper cranes are believed to bring good luck and fulfillment of wishes.
Now origami is widespread all over the world, and it has the following features:
Schemes for origami can be easily found on the Internet. We will focus on how to create a paper rose using the origami technique.
Important! Rose is one of the most beautiful and popular flowers. It is a symbol of beauty and femininity, although in different countries this flower has different meanings. It can be considered a symbol of wisdom, pride and even mystery.
To create a paper rose, there are several simpler and more complex techniques. In both cases, you will receive a beautiful craft that can be used for decoration.
Using this pattern, you can make origami roses with your children, it's not difficult.
Important! If you want a larger size, you can cut the strips wider, but then in order for the strips to be long enough to form a beautiful bud, they need to be glued together.
Important! Several of these roses can be placed in a small vase. Origami rosebuds can be used to decorate panels, photo frames, gifts, and homemade cards. The rose itself can be decorated with various sparkles or sequins. Thus, it will look even more impressive.
For those who are interested in how to make a rose from origami paper for the first time, the pattern for beginners is quite suitable.
This scheme is a more complex process than the one described above. However, a flower made using this technique looks more natural and beautiful.
Important! The corners of the petals can be slightly curled using a pencil.
We suggest trying another, medium-complexity scheme for creating a paper rose. But this is already an example of modular origami, when a figure is assembled from several elements.
Important! If you want a fuller bud, cut 15 squares, then the flower will consist of three layers.
Important! If you have an origami rose of three tiers, and you have prepared 15 squares, make the third row of 7 petal modules in the same way, and glue them into a circle in the same way.
Important! For beauty, you can make tiers of petals from different shades - red, pink or any other paper. Decorate the rose with sparkles.
Origami master Toshikazu Kawasaki is known throughout the world. thanks to its very realistic models. Not everyone can replicate his masterpieces, even using ready-made designs. One of his most famous and beloved figures is the rose. She is so beautiful that she looks like the real thing. This origami model is called “Kawasaki Rose”.
It is quite difficult to repeat the creation of this rose, following only verbal instructions, so check each step with the illustrations, or even watch the video tutorial. There is not only a special technique for folding paper, but also all kinds of rotations of the workpiece.
So, how to make a rose from origami paper using the technology of master Toshikazu Kawasaki?

Important! To fix the center so that it is convenient to further collect the flower, you can strengthen this central diamond with a piece of tape.
If you acted strictly according to the scheme, checking the illustrations, then the result should be a gorgeous Kawasaki rose, which will decorate any composition. It can be supplemented with a stem and petals.
Origami rose is one of the most popular paper origami. If you don’t know how to make an origami rose, then on this page you will find everything you need to assemble this simple paper figurine.
In the first photo you can see what you will get if you follow the assembly diagram below. The second photo of an origami rose was taken by one of our site users. If you have photos of origami you have collected, send them to: This email address is being protected from spambots. You must have JavaScript enabled to view it.

Below is a diagram for assembling an origami rose from the famous Japanese origami master Fumiaki Shingu. If you strictly follow the instructions, then assembling the origami rose will not take much time, and the result will be the same as in the picture. After doing what is described in the diagram several times, you will understand how to make an origami rose quickly and without looking at the diagram.

Assembling an origami rose may seem like a daunting task for beginners. Therefore, we advise you to enter the query “origami rose video” on the largest video hosting site on the Internet, YouTube. There you will find many different origami rose videos that clearly show the steps to assemble a rose. We hope that after watching the video of the assembly master class, you will have no more questions about how to make an origami rose.
And here is also a good video on how to make an origami rose:
This video is a good example of how to make a more complex rose origami:
From a symbolic point of view, the rose has many meanings. In most cultures, the rose is considered a symbol of beauty, perfection, joy, love, bliss, and pride. In some countries, the rose is considered to be a symbol of wisdom, silence, and mystery. The meaning of the symbol depends on the type of rose. For example, a blue rose is considered to be a symbol of the impossible.

If you are thinking about the question of what new and interesting things to do for your little master, then we suggest you...

look very elegant and fashionable. But when choosing an interesting style for a child, you must definitely take into account the quality of the yarn...
Hi guys! I continue the topic on March 8, namely, I want to share my finds of beautiful and at the same time not too...

Homemade toys have always been popular. This type of toy cannot be considered obsolete, because it brings a lot...

Without love, complete happiness is impossible. Unfortunately, not everyone manages to find love and keep it for many years....

Tea tree essential oil is a light yellow or colorless liquid that has a very specific, slightly...

Women planning to have a baby are faced with many unfamiliar medical terms. Their meaning...

Useful tips The time has come when we all start to warm ourselves up and pull sweaters out of the closet. But if you...

Crocheted picot (or, as it is also called, pique) is the simplest, but at the same time, beautiful pattern...

Geox is the brand that gave the world breathable shoes. The Italian company Geox creates and produces outerwear and...

One of the most beautiful and favorite childhood fairy tales is “The Snow Queen”. Many of us several times...

Contents Introduction………………………………………………………… ………………3 Chapter 1. Theoretical foundations of the problem of organizing leisure...

Craftswomen prefer to begin their crochet training by implementing simple napkin patterns. Unfortunately,...

Spring is the time to replenish your wardrobe with bright and beautiful new items. The talented fashion designer shared...

look very elegant and fashionable. But when choosing an interesting style for a child, you must take into account the quality...
Hi guys! I continue the topic on March 8, namely, I want to share my finds of beautiful and at the same time not...