Fashion legend Hubert de Givenchy Hubert Givenchy personal life
Yesterday, March 10, Hubert de Givenchy passed away. The famous couturier, founder of the fashion house of the same name, classic died in...
Learn to draw a smart and graceful animal - a horse. The article contains diagrams and instructions for children.
Many paintings by old masters depict a horse. This animal has long served man and was considered one of his best friends and helpers. Of course, beginners and children will not be able to immediately beautifully depict this beautiful animal, but you can try to learn.
Let's start with a drawing of a running horse.
A running horse looks very beautiful and graceful. We will create the drawing in stages, starting with schematic ovals.
And here is another diagram according to which a child can draw a running horse. It is more detailed and complex.

But we will draw the standing horse, starting not with rounded figures, but with a rectangle, to which we will add other geometric shapes.

 Standing horse in pencil: step 1.
 Standing horse in pencil: step 2.
 Standing horse in pencil: step 3.
 Standing horse in pencil: step 4.
 Standing horse in pencil: step 5.
 Standing horse in pencil: step 6.
 Standing horse in pencil: step 7.
  Standing horse in pencil: step 8.
  Standing horse in pencil: step 9.
  Standing horse in pencil: step 10.
 Standing horse in pencil: step 11.
  Standing horse in pencil: step 12.
 Standing horse in pencil.
 You can also use other instructions shown in the figure below.
 Standing horse step by step.

 Horse jumping in pencil: step 1.
 Horse jumping in pencil: step 2.
 Horse jumping in pencil: step 3.
 Horse jumping in pencil: step 4.
  Horse jumping in pencil: step 5.
 Horse jumping in pencil: step 6.
 Horse jumping in pencil.
 Horse head and mane: steps 1-2.
  Horse head and mane: step 3.
  Horse head and mane: step 4.
 Horse head and mane: step 5.
  Horse head and mane: step 6.
  Horse head and mane: step 7.
 Horse head and mane.
 Today I will try to explain and show you how to draw a horse with a pencil. Here are 20 step-by-step lessons on drawing horses in different poses. There is also a great video tutorial on drawing a horse. See the end of the article.
A horse is a beautiful and noble animal. Having learned to draw it correctly, you will be able to depict other animals with much greater ease, projecting your new knowledge onto the drawing.
To depict a horse in a jump, it is important to determine the reference points of the animal. These are the chest and thigh. It is worth clearly drawing the head and legs in the foreground. First step-by-step lesson: 
The most difficult thing will be to draw correctly body, head and neck proportions. It is the relationship between these parts that will make your horse proud and correctly built. Second step-by-step lesson:  Now let's try to draw a horse that is scared of something. In the drawing, it is important to convey the emotions of a frightened horse. Pay attention to the jaw and nostrils, which convey the animal's mood. And the jaw and bones of the skull, which appear in the drawing, make the image more realistic. Third step lesson:
  Try to catch the correct proportions between body parts. A schematic representation of the horse’s head, neck, and chest in the form of circles and ovals will help with this. Fourth step-by-step lesson:
The drawing requires the correct representation of the horse's legs. Pay attention to bends, joints and hooves animal. Knowledge of horse anatomy will help you draw the picture. Fifth step-by-step lesson: 
Perspective in drawing requires a clearer depiction of parts of the body that are as close as possible, and identification of parts of the body that are hidden from view due to movement. Sixth step-by-step lesson: 
Having correctly drawn the horse's head, you don't have to worry about its appearance in other drawings. Try to see all the muscles and bulges on the animal's head once so that you can display them in the future. Seventh step-by-step lesson: 
Your task is to portray a trained horse. All her movements are polished, her posture is straight. Therefore, each step must be as clear as possible. Eighth step-by-step lesson:  A walking horse looks well-groomed, its mane is beautifully styled. Ninth step-by-step lesson:
The old horse has less muscles and adipose tissue. Accordingly, in order to convey the return, you should draw the ribs well and focus on the sad look. Tenth step-by-step lesson:  To draw a horse's face truly beautifully, you should practice a lot, because even the slightest discrepancy in proportions will make the drawing different, and your horse will not have such a bold and proud appearance. Eleventh step-by-step lesson:
A horse that has just been running, but now walks, must be tired. Your task is to draw a wet mane, a full chest, widened nostrils in order to convey increased breathing. Twelfth step-by-step lesson: 
horse jump when lifting off the ground - this is a very beautiful pose. The horse's entire body moves in one line, and its legs are parallel to each other. Thirteenth step-by-step lesson: 
A stubborn horse behaves aggressively. This can be conveyed with the help of a lush flowing mane. All movements convey stubbornness and unwillingness to submit. Fourteenth step-by-step lesson: 
When the horse rearing, her legs are bent. When correctly depicting the angle of the bend, do not forget to monitor the length of the leg from hip to knee and from knee to hoof. Fifteenth step-by-step lesson: 
The main difficulty in this drawing is to depict the horse’s belly and bent front legs. One part of the legs overlaps the other, so it will be difficult to convey it the first time. Sixteenth step-by-step lesson: 
It is worth remembering that a horse’s neck is very mobile, so when the animal reaches for food, the muscles lengthen. Therefore, the neck is a little longer than usual during meals, which may look unnatural. Seventeenth step-by-step lesson: 
You need to be able to draw a horse not only at right angles, but also with some deviations. This will help you develop perspective vision and correct proportions. Eighteenth step-by-step lesson: 
To draw sad horse, it is enough to depict relaxed muzzle muscles, half-closed eyes and slightly lowered corners of the mouth. Nineteenth step-by-step lesson: 
It is very difficult to see a horse while galloping, let alone draw one. Therefore, the drawing may seem slightly unrealistic, because it is difficult for the eye to catch such speed. The last for today, the twentieth step-by-step lesson: 
Running horses are beautiful and graceful creatures. However, they are one of the most difficult animals to draw. I'll show you how to draw these majestic creatures, providing you with knowledge of their basic anatomy so you can create a natural pose. You will also learn about horse gait and be able to draw realistic and dynamic poses.
You can look at the photo on Envato Market.
The skeleton is the basis for the entire body, so it must be studied to understand the movements and postures of the animal. But don't worry - you won't need to count the ribs. Just look closely at this picture.

Use the skeleton to see the underlying structure of each pose. Remember all the joints (circles) and bones (lines), their location and proportions between them, and you will be able to draw any horse!

It is important to remember that hooves are not feet, but toes. True feet begin at joints that look like knees and elbows. That's why horses don't have knees on their front legs - they're wrists!

A pony is also a horse. Remember that she has a shorter neck and legs - the rest is the same.

A foal is the opposite of a pony - just look at those disproportionately long legs!

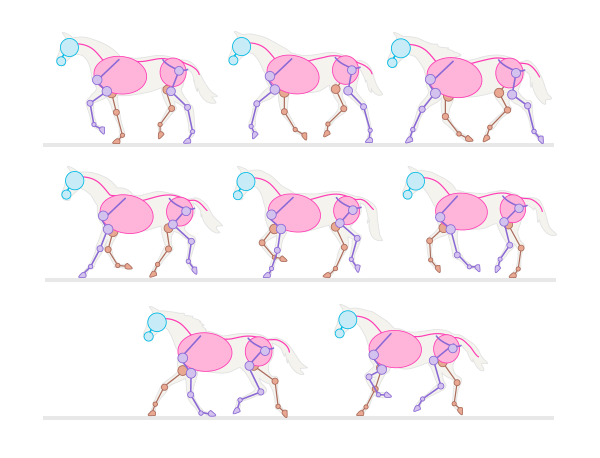
Now you know how to draw a stationary horse, but let's face it - it's boring. To bring a pose to life, you need to understand how horses move, and more importantly, how they don't move. By guessing a pose, you can suddenly confuse a trot with a gallop, making the drawing unrealistic, no matter how much time you spend drawing the muscles and light reflexes.
The "walk" is the horse's first and slowest movement. In this position, the horse stands on the ground on three legs while one leg is raised. This is a quadruple gait (you can hear four knocks).

 Step
Step The trot is a type of gait that a horse uses for long distances. In this position, the horse moves its legs diagonally in pairs, in a double rhythm.

 Lynx
Lynx The canter is faster than the trot, but slower than the canter. This is a three-step gait in which the horse uses one of its hind legs to propel the others forward.

 Kenter
 The gallop is very similar to the canter, but it is faster and its rhythm is fourfold. Painting masters made one mistake. Do you remember those pictures of horses galloping with all their legs stretched out in the air? That's not how it works. When a horse stretches its legs, at least one of them remains on the ground. The "suspended" stage occurs when all legs are bent under the body.

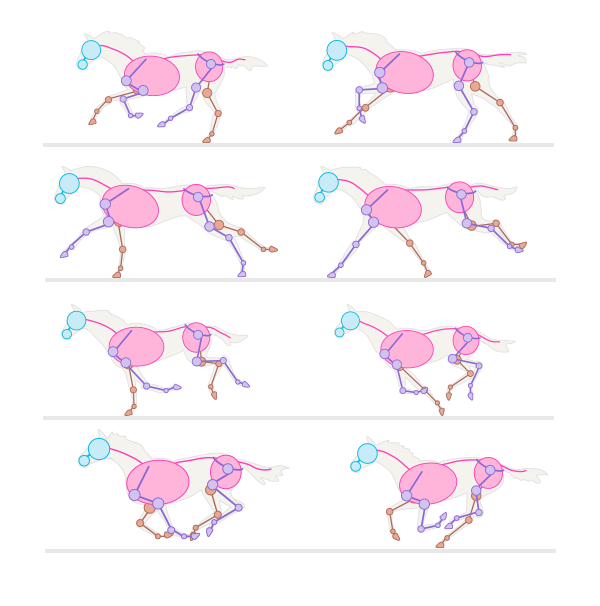 Gallop
 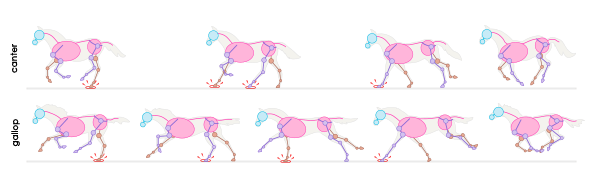 Difference between canter and gallop
  Never don't draw this pose
 A very effective, but not entirely comfortable pose for a horse is rearing. This position is difficult to maintain for a long time, and the horse makes this jump when it is excited. To draw it natural, you need to place the back legs at the right angle.

Horses can sleep standing up, but that doesn't mean they can't lie down. In fact, they sometimes need to lie down to truly rest. They usually lie on one side with their legs bent, but they can also lie "flat" with their entire body relaxed.


Horses look very graceful when they jump. Also, when the horse is suspended in the air, this pose is ideal for drawing a flying Pegasus.


That's all I wanted to tell you about the poses. Now you can choose any of them for your drawing.

Muscles give the body its shape, so they also need to be studied. Unfortunately, the muscle frame of a horse is very visible under the skin, so if you want to skip this step, your horses will never look realistic.
If you want to quickly draw a horse, here is a simplified diagram. It will allow you to draw a good body shape without going into detail.

Here's a more complex structure. This is everything you need to know to build a believable body. You may think you'll never need it, but without muscles, your skin will look flat.


Add muscles to the chosen pose.

The next stage is the skin. It covers the muscles, hiding the sharp boundaries between them. The bulges of muscle under the skin reflect light differently, making the surface uneven and full of depth.

Horse breeds are divided into hot-blooded, cold-blooded and warm-blooded. Hotblooded horses are lean, long-legged and noble-looking (like Arabian horses), fast and intelligent. Coldbloods are typical draft horses (like those from Skyrim), large and muscular, but slow-witted and quiet. Warmbloods are a mix of both breeds.

Erase the muscle lines that touch each other.

In fact, hooves are horse nails. Horses are odd-toed ungulates, which means their hooves are not cloven. Drawing cloven hooves is only acceptable if you are going to draw a unicorn.
To draw the side view of the hoof, draw a line extending the length of the leg. Then draw a diamond touching the line at one corner.

Cover the diamond with something like a cap.

Cover these shapes with an outline.

Add some hair and paint a rough nail texture.

To draw the front of the hoof, draw a rounded shape that tapers slightly at the bottom.

Cover it with a "cap".

Also cover with contour.

Add hair and textures. Ready!

Drawing the back of the hoof is also easy. Start with the same rounded shape, but this time make the “cap” large and falling.
Create an outline.

And add hair and texture again.

My horse now has hooves.

To draw the head in profile, start with three circles - one for the main part of the skull, one for the muzzle and one for the nostrils.

Connect the circles and add an ear.
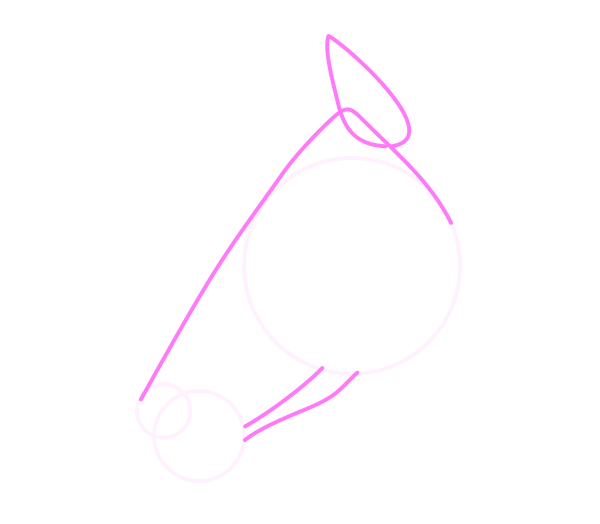
Divide the circle of the muzzle into three parts to create the lips.

Draw a nostril in the "nostril" circle and two lines from the nostril to the ear.

Draw a line across the two muzzle circles, then divide the main circle into halves and a line parallel to them.

Again, divide the top half into two more halves. Use these guide lines to place the eye. If you are drawing a foal, make the eyes bigger.

Now you can sketch out the details, including the muscles under the skin. Remember that cheeks are not actually round, but flat.

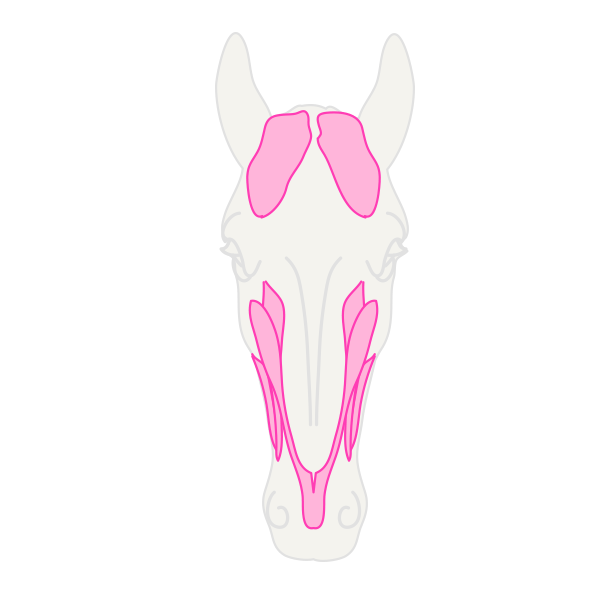
To draw the head from the front, start with an oval and a circle.

Add nostrils using guide lines across the circle.

Connect an oval and a circle, add ears and a forehead.

Add the eyes using guide lines dividing the oval into four parts.

Add details according to the anatomy of the head for a more realistic look.
Draw a circle and divide it into four sections. Divide it into halves with a line, then add another line above the previous one.

Draw the shape of a lemon using guide lines.

Draw the eyelids.

Draw eyelashes. They should be straight and thick.

The pupil should be horizontal, but most likely it will not be visible from a distance, because Horses have rather dark brown eyes. If you are drawing the whole horse and the eye is just a detail, paint it completely black. You need to draw the pupil only if the eye is blue.

Draw and shade the area around the eye. This is very important for the overall shape. To highlight your eyelashes, add shine to them.

To draw the eye from the front, start with a vertical ellipse and suitable guide lines.

Add eyelids.

Draw the eyeball covered by the upper eyelid.

Add eyelashes.

Draw the pupil.

Polish your eye.

To draw a horse's ear, start with a circle (or half a circle if it's a front view), then divide it into four sections and use them as guide lines.


Horses' nostrils are large enough to open even wider when more oxygen is needed. The easiest way to remember their shape is that they look like the number 6 or an inverted comma. Therefore, always start with an oval and place a “6” (or an upside-down “9”) inside, adjusting its roundness to the desired size.

When drawing the face, emphasize only the lower lip, leaving the corner omitted. Also don't forget about the whiskers - horses have a lot of them!

Here is my horse with a painted head.

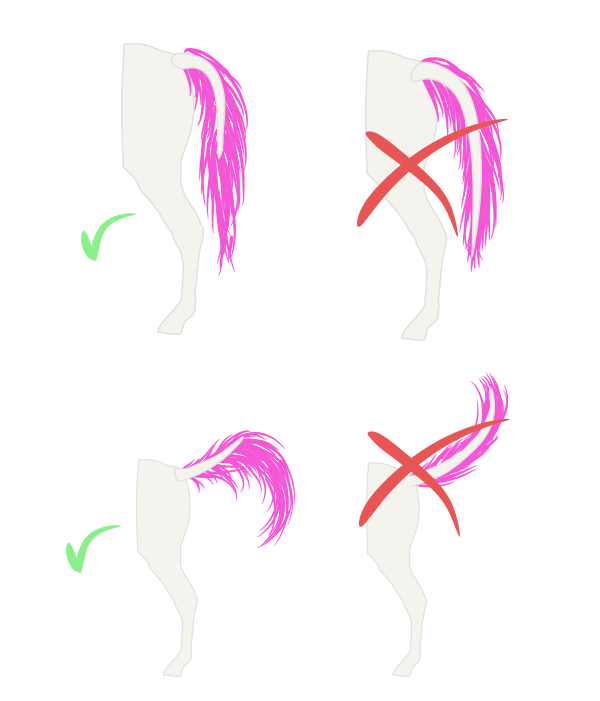
The horse's mane grows straight. The strands are usually consistent in length and thick enough to cover one side of the neck.

A horse's tail is much shorter than it looks. Long strands of hair grow from it and are driven by the tail.
Very long hair covering the hooves are called brushes. They are typical for draft horses.

The wind makes the mane look incredible!

The guide turned out to be long, but now I'm sure that you are an expert in horses!
Description:
And so the long-awaited continuation of the horse drawing lesson. For those who haven't seen the first lesson, follow the link - How to draw a horse step by step Muscles of a horse Knowing the anatomy of animals helps a lot in drawing. Therefore, I propose to dwell separately on the study of the location of the muscles of horses. This knowledge is especially important because horses have short hair and...
And so the long-awaited continuation of the horse drawing lesson.
Horse muscles
Knowing the anatomy of animals helps a lot in drawing. Therefore, I propose to dwell separately on the study of the location of the muscles of horses. This knowledge is especially important because horses have short hair and muscles are always visible and give the animal its relief.
Let's start with a simple diagram in which the main parts of the horses are drawn. This diagram will allow you to draw a good body shape without going into detail.
Now a more complex scheme. You need to remember all this in order to draw a realistic body. If you think that you won't need this, you are deeply mistaken. Without this, the horse's skin will appear flat.


Now let's draw the muscles in our picture.

Next is the skin. It covers the muscles, hiding the sharp boundaries between them. Protrusions of muscles under the skin reflect light individually, which makes the surface of the body uneven and prominent.
Horse breeds can be divided into hot-blooded, cold-blooded and warm-blooded. Hotbloods are thin, with long legs and body (like an Arabian horse), fast and smart. Coldblooded are the most common horses (like the horses in Skyrim) - large, heavy and muscular, but stupid and gentle. Warmbloods are a mixture of both.


Erase the muscle lines that touch each other.

Drawing hooves
Hooves are the nails of a horse. Horses have strange socks, which represent hooves that don't split in two. Drawing cloven hooves is only acceptable if your horse is a unicorn. To draw the hooves in a side view, you need to draw a line the length of the leg. Then draw a diamond touching the line from one corner.

roll the diamond into a cap shape.

Create a structure over these shapes.

Add some hair and create a rough nail texture.

To draw the hoof from the front, draw a rounded, slightly tapering shape at the bottom of the line.

Cover it like a lid.

Create the outline as before.

Add hair and texture. All is ready!

Drawing the back of the hooves is just as easy. Start with the same round shape as before, but this time make the cap larger and drooping.

Create an outline.

Add hair and texture.

The horse now has hooves.

Drawing the head
To draw the head in profile, start with three circles - one for the main part of the skull, one for the muzzle and one for the nostril.

Connect the circles and add ears.

Divide the "muzzle" circle into three parts to draw the lips.

Draw a nostril inside the "nostril" circle and draw two lines from the nostril to the ear.
Draw a line across the two muzzle circles, and then divide the main circle in half with a line parallel to it.

Divide the top half in half again. Use the guide lines you just created to place the eye. If you are drawing a foal, make the eyes larger.


Now you can draw in the details, including the muscles under the skin. Remember cheeks are flat, not round.

To draw the horse's head from the front, start with an oval and a circle.

Add the nostrils using a guide line across the circle.

Connect an oval and a circle, add ears and a forehead.

Add the eyes using guide lines dividing the oval into quarters.

Add details. Use head anatomy.

Drawing the horse's eyes
Draw a circle and divide it into four parts. Draw lines across it to divide it in half, then add another line directly above the first.

Draw the lemon shape using guide lines.

Draw the eyelids.
 Draw eyelashes. They should be straight and tight.

The pupil should be in a horizontal position, but most likely this will not be visible from a distance at all if horses have dark, brown eyes. If you are drawing the whole horse, then the eye is just a detail, draw it all black. You will need to add a pupil, but only if the eye is blue.

Draw the area around the eyes and shadow. This is very important to its overall shape. Also, add glitter to your lashes to make them stand out.

To draw the eye from the front, start with a vertical oval and corresponding guide lines.

Add eyelids.

Draw the eyeball covered by the upper eyelid.
 Add eyelashes.
Draw the pupil.

Add the finishing touches.


Drawing ears
To draw a horse's ear, start with a circle (or semi-circle if it's a front view), then divide it into four sections and use them as guide lines.


Drawing the face
A horse's nostrils are quite large and can also open wider when the horse needs more oxygen. The easiest way to draw is to remember their shape - they look like the number 6 or an inverted comma. So, always start with an oval and place the "6" inside. Adjust the 6 into the roundness to the desired size.

When drawing the muzzle, emphasize only the lower lip and leave an angle of fall. Don't forget about the whiskers - the horse has a lot of them!

This is my horse with a head added.

Hair
The horse's mane grows in a straight line. The threads are usually uniform in length and are thick enough to cover one side of the neck.

The ponytail is actually much smaller than it appears. There are long strands of hair growing from it, and they can only be moved with a tail.

Very long hair covering the hooves is called plumage. This is typical for working horses.

The wind makes the mane look fabulous!


That's all!
Attention! You do not have permission to view hidden text.
How to draw a horse (continued)

Yesterday, March 10, Hubert de Givenchy passed away. The famous couturier, founder of the fashion house of the same name, classic died in...

Which dishes should be included in the menu and which ones should you avoid? What do nutritionists advise? - During the cold season, the body...

Lavender, bacon, foie gras and white wine pancakesAsian fadBlack ThaiFor Maslenitsa in Thai style they offer...

Expectant mothers will be interested in learning about spring-summer 2017 fashion for pregnant women. Every pregnant woman wants to look...

golden beige hue! * low price, mattifies the skin, is dense, does not spread well Good afternoon! and so...

When I wrote about the mistakes that women over forty make, many were indignant: what about men? Really...

Facial skin needs regular cleansing. But to preserve youth and beauty, it is important to pay attention to...

KenzoKi Belle de Jour Dream Night Mask Night care from the main cosmetic sybarites The Japanese KenzoKi came out...

I'll start with the basic rule: you don't have to take sports nutrition, but the right supplements will help you...

Essentially, there is nothing wrong with any emotion, but some of them can cause problems, if not...

It would seem that something new can be invented in the field of tableware production: here is a kettle, here is a frying pan, a bicycle...

At least once in their life, every person begins to think about why they have a lot of money, while others, working all day...

CONSULTATION FOR PARENTS “FUN EXPERIENCES IN THE KITCHEN.” Prepared and conducted by: MDOBU teacher...

State budgetary educational institution of the city of Moscow Secondary school with...

Which dishes should be included in the menu and which ones should you avoid? What do nutritionists advise? - During the cold season...

Lavender, bacon, foie gras and pancakes with white wineAsian fadBlack ThaiFor Maslenitsa in Thai style...