
How children learn mental mathematics: from what age, what are the advantages, why is it useful Mental arithmetic development
All parents dream that their heirs will succeed in dancing, sports, games, and music. Why not? Parents are ready...
This article gives interesting tips on creating a paper wallet.
Adults and children love to create crafts. For example, envelopes or wallets. They can be done from various materials, but most revered plain paper And craft paper. This material is very easy to work with and does not require any special skills from a person.
Paper wallet useful in many life situations. It’s not difficult to make it, but you can do it yourself the work is unlikely to take much time. Besides, it's enough exciting activity. The craft can be used in different ways: to store clippings, money, important little things, materials for crafts, and so on in an envelope.
A finished craft made from white paper can be brightly colored, and it is not a shame to give a craft made from kraft paper to friends for a holiday.
To make such an envelope you will need:
How to make a paper wallet?IMPORTANT: Every action you take in your work must be consistent. Work carefully to ensure a beautiful product.
Work step by step:
 Simple paper wallet
 You can make a paper wallet for storing bills or other important little things from colored paper or craft paper.
You will need:
Work in stages:
In such a product you can easily store not only money, but also important items: receipts, checks, cards, business cards. Children will be able to put candy wrappers and stickers in it.
You will need:
Work in stages:
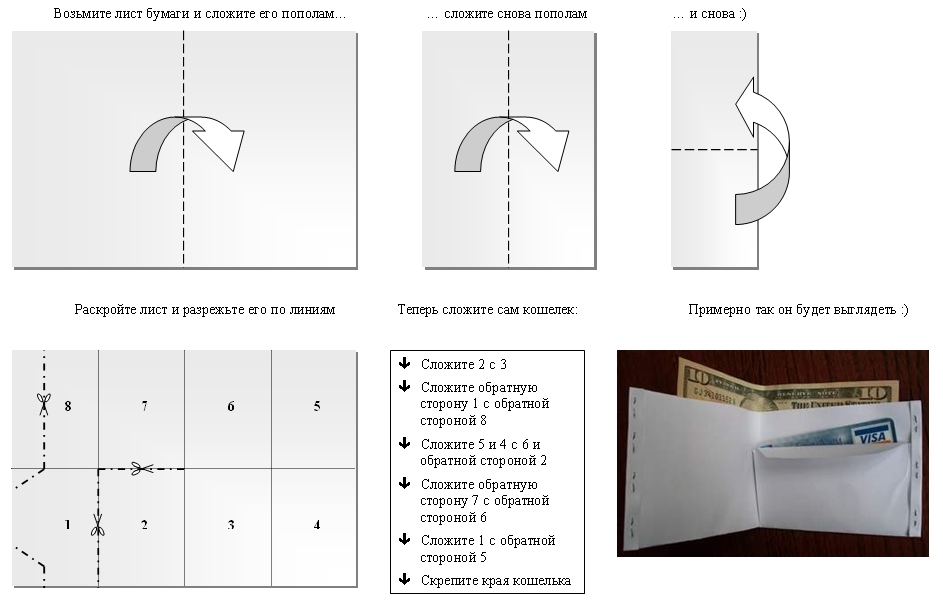
 Paper wallet diagram
 Finished product: paper wallet
 Origami is the art of folding paper to create an original and beautiful shape. This technique will allow you to create a wallet from a landscape sheet.
Work in stages:

 Origami pattern: paper wallet
 This product turns out to be very practical and convenient if it is made from used juice packaging. This paper is dense and has a clear advantage - a lid.
You will need:
Work in stages:
 Sample
 How to make a coin purse?
 In order to make this product, you will need two thick pieces of cardboard and three pieces of elastic. A wallet is called a magic wallet because it skillfully hides money inside itself without locks and is able to open in different directions.
Work in stages:

 How to make a magic paper wallet?
This article will be useful for those who are interested in how to make a wallet out of paper. You can use a paper wallet as a children's toy. You can also use it if you decide to give money to someone as a gift - banknotes placed in such a homemade wallet are pleasant to give and no less pleasant to receive.
To work, the master will need thick double-sided multi-colored origami paper. Naturally, the longer the side of the sheet, the larger the product. If you take a square with a side of 15 cm, then the wallet will have the following dimensions: its length will be 7.5 cm and its width will be 3.75 cm.
Since it is necessary to make a wallet out of paper, observing special precision (as with any thing, you should first practice on a sheet of ordinary paper in order to understand the principle of manufacturing. First, you need to fold the sheet in half towards you and straighten it - this step is called the “valley” fold in the origami technique .

Then you need to fold both edges of the sheet in half again vertically so that they meet in the middle - along the “valley” fold. The fold unfolds again. Thus, the master forms two more “valley” folds.

Now the sheet is folded in half horizontally towards itself and from top to bottom, that is, the “valley” fold is again obtained.

On the resulting rectangle, bend the upper corners towards themselves so that the fold of the vertical “valley” fold is not affected by the new fold. These folds are located at the site of the horizontal fold. The corners also bend.

Now we will describe the creation of a squash fold. Since making a wallet out of paper most often follows diagrams and descriptions where this term is used, you should become familiar with the process of performing this version of origami folding.

To do this, place your fingers inside between the layers of corners, and then push them apart, moving them to the middle of the workpiece, thereby letting the top layer of paper run along the middle “valley” fold. The squash fold at first looks like a voluminous pound, but the master presses it with his fingers, and it forms the shape of a house with a triangular roof.
At this stage of work, you need to fold two folds of a different type - “mountain”. They differ from “valleys” in that they are formed by bending the workpiece in the opposite direction from the master.
These folds run down the middle of the squash folds, dividing the so-called house roofs in half.

Now “valley” folds are formed at the corners of the first layer at the bottom of the workpiece.
Since you need to make a wallet out of paper with a lid that would cover the hole in the cavity of the wallet, it is made from the corner obtained by the last folding. The “valley” fold is formed with a slight indentation from the line of the edge of the squash fold.

Now the next “valley” fold completes the formation of the curly lid of the wallet.

At this point in the diagram, under the picture, there is a strange icon - a loop with an arrow. It means that the workpiece should be turned over to the other side. Then the second unused layer, remaining after the formation of the lid, is folded using the “valley” method - with the corners towards the middle.

And the resulting corner is bent along the edge line of the squash fold and pushed inside the workpiece.

Turning the product over to the other, front side, we get a paper wallet. Making it with your own hands, as can be seen from the explanation, is not so difficult. After the training process has been completed, you can begin making a model from double-sided multi-colored paper intended for products using the origami technique.
Does your child often lose their wallets and you don't know what to do about it? Of course, you need to teach your child to be more careful and not trust him with a lot of money. Well, as a way to keep your child’s finances safe, invite him to create an origami wallet for himself. Perhaps a hand-assembled “money safe” will help your child be more attentive to his money.
It will not be difficult to create such a piggy bank. How to make an origami wallet? You need to take a rectangle with dimensions 200x400 mm. Now you should bend it, first horizontally and then vertically. Now unfold the workpiece. These actions had to be done in order to create constructive lines. We lay the workpiece horizontally and bend the corners of the right and left sides to the center, as shown in the picture. Now the sharp tips that were formed after the previous step should be pulled up to the newly created line. We bend two parts of the workpiece towards the center and turn the paper structure over. Again, pull the sides towards the center and turn the workpiece over. Now you should take out a corner from one pocket and make a cut in the lower part. Place the sharp tip in the hole. The product is ready. If desired, it can be painted or immediately folded from colored paper.

This product is very similar to a paper folder. By the way, it can be used for this purpose as well. But we will assemble an origami wallet from this pattern. It's quite simple. You should take thick paper or cardboard. It could be something textured or textured. For example, velvet paper or paper with images of raised flowers. We print out the above diagram of an origami wallet and transfer it to the selected material. Now you can start making the product. We cut out the workpiece and use a stationery knife to make shallow cuts. You can skip this step, but then the fold lines will be uneven and the product may warp. When the cuts are ready, you can begin folding the wallet. We bend it according to the diagram and make a cut in the front part for the tongue. Such a wallet can be decorated with beads, seed beads or colored paper.

The easiest way to make an origami wallet is to assemble it from a pattern. And envelope patterns are best suited for this purpose. In such an interesting wallet you can store not only your “stash” for a rainy day, but also present money for your friends’ birthdays. How to assemble such a universal one that should be used is given above. You should choose the model you like, print it and transfer it to paper. As in the previous version, this wallet can be made not only from ordinary white paper, but also from tinted, velvet or textured paper.
All envelopes are assembled according to the same pattern. First, the side corners are bent towards the center, then the lower part is raised towards the middle, and then the upper corner is closed. To make the assembled wallet durable, you can glue the three lower parts together. Beads, beads, and rhinestones should be used as decoration. You can write a wish on such an envelope. Moreover, this can be done even if the wallet is not made as a gift, but for your own use.
She took a piece of paper and tried to fold her wallet. Yes, I had to suffer a little until I got what I needed.
I recently remembered how we made paper wallets when we were kids. In them we kept sets of candy wrappers for games, decals, and some little things we received from our parents.
She took a piece of paper and tried to fold her wallet. Yes, I had to suffer a little until I got what I needed. Of course, in our time this is not so relevant. You can buy different bright beautiful wallets for both girls and boys. But it’s also interesting to do it yourself.
Try making a paper wallet too.
|
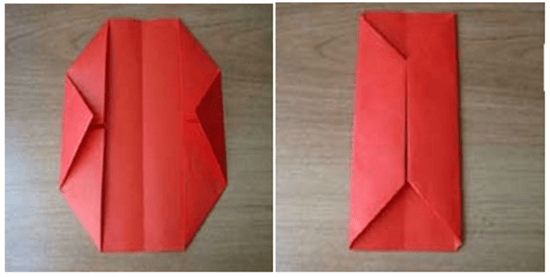
1. Take a regular piece of paper. As children, we would tear out the double leaf from the middle of a notebook. It made excellent deep wallets. Well, now I took a regular piece of A4 colored paper. Fold the sheet in half and then unfold it. |
 |
|
2. Bend the corners on both sides. |
 |
|
3. Bend the “spouts”. |
 |
|
4. Once again we bend the edges on the left and right. |
 |
|
Due to numerous requests, I am adding a photo with explanations of point 5. 1. Preparation after point 4. 2. Turn the workpiece over. 3. Fold the edges
|
|
|
5. Turn the workpiece over and fold the edges at the top and bottom. |
 |
|
6. Fold in half. Almost done. | |
What they don’t do: toys, souvenirs, and useful things for everyday life. One of these things can be called a paper wallet. What can it be useful for? Firstly, for children's games. Secondly, in order to give someone money in it. And thirdly, as a temporary option, in case a regular wallet for some reason becomes unusable. A paper wallet can also help out on the road, when the main one is hidden away from prying eyes.
Let's figure out how to make a wallet out of paper. One of the easiest ways is to create a wallet using the origami technique. For this craft we need a rectangular sheet of paper. By selecting necessary paper, you can start making a wallet.
Its scheme is quite simple:
Step one.
We bend our sheet in half crosswise and unfold it.
Step two.
Place the sheet vertically in front of you. We bend the corners from the bottom and top to the middle in the same way as when creating an airplane.

Step three.
Bend the noses at the top and bottom corners.
Step four.
Fold the resulting trapezoids to the center of the sheet.
Step five.
We turn the workpiece over and bend the edges to the center again.
Step six.
Fold the wallet in half.
Step seven.
We got two small pockets, inside each of which there is a triangle.

Step eight.
We pull one of the triangles out. This way our wallet gets a valve for closing.
The wallet is ready to use. Feel free to use it. The strength of the structure depends mainly on the paper chosen. The choice of paper also affects appearance finished product. The size of the wallet is also determined by the size of the sheet. You can decorate the finished wallet at your discretion.
 You can also make a wallet using regular appliqué, or take thicker paper and stitch all the details. If you use your imagination, the scope for creativity is limitless. Some make wallets and purses from cardboard using the scrapbooking technique, while others master many Japanese folding patterns. Some people use plastic instead of paper, for example, soft chocolate wrappers, and sew beautiful wallets. Such products are not only beautiful, but also functional. There is no shame in giving them as a main gift or using them instead

All parents dream that their heirs will succeed in dancing, sports, games, and music. Why not? Parents are ready...

Soap bubbles are one of the most favorite pastimes of children and adults, known to mankind since ancient times. At high...

Summer is in full swing - and I want something like this... Something fun, simple and - a sea of real summer sensations! One of...

Quitting smoking is not easy, but it is definitely worth all the effort - for example, you know that non-smokers live 14 years...

Year after year, the famous Forbes publication publishes ratings of the richest and most successful people on our planet. Everyone's condition...

Some species of fish and marine animals feed on plankton. They filter water through special organs that...

Briefly: The godfather, or godfather, must be an Orthodox Christian. The godfather cannot be a Catholic...

This article will be a separate paragraph, since it is very important and touches on many issues that are here...

With the approach of the most important holiday of all mothers, coming this year on November 26, download from us...

Nose piercing tools: nose tube, needle stopper, piercing needle catheter No. 18. Jewelry for...

The ability to count in your head is a useful skill not only at school, but also in everyday life. With its help you can almost...

Hickey is one of the side effects of lovemaking. This feature occurs quite often when it comes to...

Your man (spouse) turned 50 yesterday... You really want to know what is “hidden” in it and what...

It looks like you've gone a little astray since you opened an article with that title. You may be worried and panicking, but...

Soap bubbles are one of the most favorite pastimes of children and adults, known to mankind since ancient times....

Summer is in full swing - and I want something so-and-so... Something fun, simple and - a sea of real summer...