What to do if married life has become boring?
Have you been married for several years and boredom has begun to creep treacherously into your marriage? You're not so interested in being together now...
There is a very simple and easy way to make a mouse out of paper. Even children 3-4 years old can cope with such work. After all, the body of the mouse is just paper folded in half, and all the other details are circles and rectangles.

For subsequent work, you need to prepare the components of the mouse, these are:

Fold the black cardboard strip in half and glue the edges. It is very important not to press the folded middle.


Then add eyes, cut white stripes folded slightly crosswise - a mustache. And on top of the mustache there is a pink circle - the nose. And at the last stage, glue the tail.

That's it, the paper mouse is ready. Despite the black color, the mouse turned out to be bright and catchy.


The mouse is gray or white and has a curious nose and tail. The mouse loves his hole, especially looking out of it, he also loves cheese and is very afraid of the cat. Making a mouse out of paper is quite simple if you follow the simple instructions in the picture diagram.
(Click on the image to enlarge the picture)

1. Fold a square piece of paper along the dotted lines so that the edges meet in the center.
2. Fold along the dotted lines to create pleats and unfold back.
3. Open the parts indicated by the arrows and align them.
4. Fold inward along the dotted lines.
5. Roll in the opposite direction along the dotted lines.
6. Roll in the opposite direction along the dotted lines.

7. Fold in half.
8. Fold along the dotted lines. The back side too.
9. Open the part indicated by the arrow and level it.
10. Fold along the dotted lines to form a fold and unfold back.
11. Fold with a pocket along the dotted lines.
12. Fold into a pocket.
13. Fold inward. The back as well.
14. Draw the mouse’s face (eyes, nose and antennae) and the curious mouse is ready.
Paper is one of the most environmentally friendly and easy-to-use materials for creativity. Children usually enthusiastically cut and glue paper, creating various figures from it. Invite your child to make a cute little mouse, and he will willingly get to work.
To make a mouse we will need:
Operating procedure


The paper mouse craft is ready. If you increase or decrease the size of the pattern, you can make a whole family of mice. And also as a friend to the mouse you can
How to make very simple five-minute crafts without glue with mice with your own hands and sew a simple mouse from felt. Master class with step-by-step photos.
This craft is so simple that you can make it not even in five minutes, but in two minutes, since to make it you just need to cut out two parts and insert one into the other. What it will be, a craft or a toy, depends on the materials from which it is made. This can be paper, foam rubber or felt (alternatively, you can use soft viscose household napkins instead of felt).
Each material has its own characteristics.
Paper is the most accessible material that is always available in the house. If you make a mouse out of paper, then any child who already knows how to cut can easily handle the work, so it can be done with children starting from preschool age. The craft is suitable for activities with children in kindergarten or school.
You can use any paper:


A paper mouse will turn out to be a craft, since paper is a fragile material, and a paper mouse can easily tear or wrinkle while playing with it.
An excellent material for making crafts that can serve as toys, because this material has the following advantages compared to paper:
It will make toy mouse figures that will last a long time, even if children play with them a lot and actively.
Like foam rubber, it is a soft material that does not leave pronounced creases after bending. Toys made from it will last longer than paper ones, but it is very difficult for children to cut. Most preschoolers probably won't succeed.
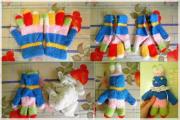
Since my daughter and I made these mice from viscose napkins when she had not yet gone to school, the photographs of the master class show the manufacturing process using this material as an example. You can use any other material.


The “mouse” craft is ready.


My daughter made a piece of paper cheese for her mice.

And I sewed a voluminous mouse for her using the same pattern.
This version of the toy mouse is more complicated than the previous one, as it requires the ability to sew with at least the simplest basting stitch. However, this option is quite feasible for children of primary school age.
To sew this mouse you will need the same template as for the previous version, but with one more part - the third part will be the lower part of the toy and is the same part as for the head with a body, but without a tail and is quite a bit shorter and a little narrower (with emphasis on the letter "y") along the edges.
Manufacturing also occurs in a similar way, only point 4 will change and points 5 - 7 will appear.
4. Decorate the muzzle: sew on the eyes and nose from, make a mustache from threads.
5. Sew the top and bottom pieces together, leaving a small area for filling.
6. Place filling inside the toy: padding polyester, holofiber, cotton wool, etc.
7. Sew up.


© Yulia Sherstyuk, https://site
All the best! If the article was useful to you, please help the development of the site by sharing a link to it on social networks.
Posting site materials (images and text) on other resources without the written permission of the author is prohibited and punishable by law.

Have you been married for several years and boredom has begun to creep treacherously into your marriage? You're not so interested in being together now...

There is a very simple and easy way to make a mouse out of paper. Even children 3-4 years old can cope with such work. After all...

Valentine's Day is an excellent occasion to say warm words of love amidst the winter blizzard and cold. A bright gift can be...

The emergence of such a craft as weaving takes its roots from ancient times. Having a minimum amount of knowledge and...
“Gnomes” “Wild and Domestic Animals” Educator: Morgun Galina Vladimirovna “The more the child saw, heard,...
Despite the diversity of companies producing children's products, the doll industry has recently become noticeably impoverished -...

Is the guy annoying you with his jealousy? Do you want to end the relationship and run away from him to the ends of the earth? Find out how...
Bedwetting or daytime urinary incontinence is a common, unpleasant and very traumatic problem. Psyche...

Crocheting is one of the most exciting types of needlework for craftsmen around the world. Diversity...
I doubted whether to stage these “creations”, but at work my fellow mothers became interested, and the process...
There is specialized sportswear designed for skiing not only...
Materials and tools: White patterned wrapping paper and mesh; - wide white silk ribbon; -...
What would a New Year's holiday be without its main characters? There are not only themed paper crafts. Eat...

Only people baptized in the Orthodox Church according to the rules can carry out treatment with conspiracies for diseases...
There is a very simple and easy way to make a mouse out of paper. Even children 3-4 years old can cope with such work....

Valentine's Day is an excellent occasion to say warm words of love amidst the winter blizzard and cold. A bright gift can...