Brothers Grimm Download presentation on the topic Brothers Grimm
To use presentation previews, create a Google account and sign in:...
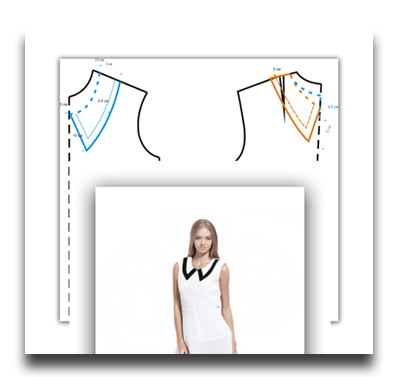
To create a collar pattern for an open collar without a stand-up collar, you need to take the Neck Circumference measurement (OS = 36 cm). The configuration of the collar edge may vary and is determined by the model and personal preference.
ADVICE! To view photos in full size, open each one in a new window!
Rice. 1. Pattern of a collar without a stand in an open collar
Construct rectangle ABCD. AC = 18 cm (1/2 of the neck circumference according to the measurement or the length of the blouse neck according to the measurement without going over the fastener). AB=7 cm (collar width + 1 cm). From point B, put 1 cm up, from point D, put 1.5-2 cm up. Divide line BD in half. Draw a sewing line for the collar along the pattern.
Draw the bisector of angle C, set aside 4.5 cm along the bisector (the distance laid along the bisector affects the configuration of the collar; the larger the value, the sharper the angle of the collar). Draw the outer sides of the collar as shown in Fig. 1. Pattern of a collar without a stand in an open collar.
Cut out 2 parts of the collar with a fold along the grain thread.
To complete this sewing operation, you need the outer collar piece, as well as both hem pieces and the back neck facing.
IMPORTANT! Depending on the model of the product, the selection can be cut separately or be one-piece. In our master class, the selection is cut out separately. We cut the upper collar on the bias at an angle of 45 degrees (designer's decision).
Rice. 1. Details of the cut of the product
Rice. 2. Connecting the shoulder seams of the product
Rice. 1. Cut out the details of the product with a seam allowance of 1.5 cm. Duplicate the upper collar, both hems and the facing of the back neck with thermal fabric.
Rice. 2. Sew the parts of the product along the shoulder and side seams, processing the allowances.
Rice. 3 Allowances at the corners of the collar
Rice. 4 Forming the corners of the collar
Rice. 3. Sew the collar pieces along the outer and short sides. Cut off the allowances, diagonally in the corners.
Rice. 4. Turn the collar out and shape the corners using scissors.
Rice. 5 Bottom and front sides of the collar
Rice. 6 Collar ready for sewing
Rice. 5. Sweep the collar cleanly, turning the seam to the wrong side.
Rice. 6. A correctly made collar should bend easily, as shown in the photo.
Rice. 7. Formation of the collar bend
Rice. 8. Equalizing collar allowances
Rice. 7. Fold the collar lengthwise and secure with pins.
Rice. 8. Align the allowances along the open edge, cutting off the excess.
Rice. 9. Fastening the collar according to the marks on the neck
Rice. 10. The collar is sewn into the neck
Rice. 9. Place the collar on the product with the right sides up, pin along the marks.
Rice. 10. Sew the collar into the neckline.
Rice. 11. Details of the hem and facing of the back neck

Collars are very different and many products cannot be imagined without them. Their appearance depends on the model and cut. Collars are divided into set-in and one-piece. Flat turn-down collars classified as set-in, although recently removable flat collars with fasteners have become very popular. Construction such collars made on the basis of the details of the back and shelf of the product.
 The name itself suggests that the collar lies completely around the neck and its stitching line coincides with the neck line. The sizes and external contours of collars can be completely different: curved, straight, curly, combined.

They are often used in children's clothing, blouses and dresses. Small flat collars look cute and neat. They can be decorated , , .

If you want, then its inner cut, adjacent to the neck, does not have to repeat the neck of the product. It is drawn as needed.

Before you start building the collar, you need to have an accurate and final pattern for the back and front of the product. If the collar model is symmetrical along the outer contour, then use one part of the front and half of the back.
By aligning them along the shoulder seam, you can draw the outer contour of the collar, designed according to the model. Please note that, in most cases, when constructing flat collars, the line of the outer contour of the collar intersecting the middle of the back is at an angle of 90° with respect to it. And when cutting, the middle of the collar coincides with the grain line on the fabric.

 After the shape of the collar is drawn, it must be transferred to a separate sheet and duplicated in two versions, since a flat collar consists of an upper and a lower one.
This is done because the collar patterns will be slightly different and need to be adjusted. Since, when sewn into the neckline, the upper collar will bend along the stitching line more than the lower one, it is expanded by 2 - 3 mm. The thicker the fabric, the greater the expansion.

The beginning of the collar does not have to coincide with the center of the front. It may be planned this way according to the model, and perhaps the collar will be decorated with lace or frill along the outer edge, or it will be provided in the center of the front. It all depends on your desire.

Flat collars are perhaps the simplest and most understandable to construct.

With half-stand and stand-up collars the situation is somewhat different. We will talk about this in the following articles.
If you find this material useful, share it with your friends and subscribe to the site news to stay updated on sewing usefulness!

Constructing a cut-off collar pattern - stand-up
Stand collars are very popular and are used in a wide variety of clothing, from formal suits to sportswear. Constructing a pattern for a cut-off collar - the stand is not...
Admin 2015-06-03 at 3:52 am
This new article is devoted to the design features of collars of various types and cuts, methods of their processing and connection with the neck. And with this post I’m opening a new section on my blog: 100 collars. I will fill it until I describe exactly 100 collars.
I don’t know if I’ll get that much in my memory - well, there’s the Internet - I’ll look there. And you, dear reader, will help, if anything. So send in your designs - I love understanding clothing designs.
Today I will describe the first collar - like this:
And I’ll tell you how I used perforated glasses for the first time today to improve my vision.
So, how many designs of collars are there, their shapes, sizes, processing methods and the number of included parts?

Studying the varieties of collars from fashion magazines, catalogs and simply samples of finished products, I always pay attention to what the shape of the collar depends on:
First, I look at the shape of the collar.
Second, I decide how it connects to the neckline (set-in or one-piece).
Third - how the collar fits to the neck - tightly, at some distance or even flat on the bodice.
And fourth - how the collar is connected to the clasp - whether there is one at all, whether the clasp is up to the top or to the bend of the lapel.
Structurally, the collar most often consists of an upper and lower collar part, as well as a gasket part.
In total, there are several varieties of collar cut: flat with different stand-up heights, set-in stands (vertical and inclined), solid stand-ups with front and back details, shirt collars, collar collars, turn-down collars with a stand-up in the middle, and collars for products with an open fastener: jacket type collars, shawl collars, apache type collars.
A lot, right? We will slowly consider all these designs in the following articles of this new column of mine.
Now let’s start with the simplest collars to design, these are:
Turn-down flat collars:
This is a collar that completely follows the shape of the neck and shoulder area of the product - turn-down, flat-lying.
A distinctive feature of this collar is the absence of a stand. That is, the collar lies flat on the figure.
The pattern of such a collar is based on the basic basis of the front and back of the product.
The shape of such a collar varies depending on the shape of the neck.
The line of sewing the collar into the neck completely follows the contour of the neck of the product. The flying part of the collar can have a different shape - rounded or pointed edges, different collar widths.

The clasp in products with such collars can be either on the shelf or on the back. There may also be no clasp at all.

Let's consider the most common model of such a collar - round or, as it is now called "Peter Pan".

The pattern of such a collar is simpler than all others - directly based on the neck of the product.
In the drawing of the shelves, set aside 6 cm along the contour of the neck in order to outline the contours of the collar. The contour of the collar's departure is rounded to the center of the neck in front of a smooth line. The width of the collar is usually the same along the entire contour and varies depending on the model. In a child's dress 4 - 5 cm, in a woman's dress or blouse 5 - 6 cm, in a coat 7 - 10 cm or more.
On the back, along the contour of the neck, you also need to set aside the width of the collar, in this case 6 cm. If there is no fastener on the back, then the collar can have a seam located in the center of the back. If there is a fastener, then the collar along the back is not sewn, but is decorated with rounded lines. And thus, two parts of the collar are formed - left and right.
The design of the collar lines on the back should be done with a closed shoulder dart. This dart can be temporarily closed and transferred to the armhole, or it can be conditionally considered closed by extending the shoulder seam in a straight line from the neckline point towards the shoulder.
There should, of course, be no seam along the shoulder line on the collar.
The contour lines of the collar are copied onto a separate sheet of paper, combined along the shoulder seam line and a collar pattern is obtained.
For the collection, I offer slightly different neckline shapes, suitable for a flat turn-down collar, without a stand-up collar:
The algorithm for constructing a pattern for such collars is simple - we change the neckline according to the model, then draw the lines of the collar.
Using the open neckline as an example, I’ll note once again that the key changes in the neckline are its width and depth. And also the shape of the neckline on the chest - round or U-shaped:

The neckline of the next dress is formed similarly to the previous model, but there is also a Y-shaped neckline on the back. The shape of the ends of the collar is also different - they are not round, but sharp. The width of the collar is figured and gradually narrows closer to the shoulder.
Detachable collar - decorated with beads and rhinestones.


The neckline is designed in a boat shape, the right collar piece is overlapped with the left one, and then sewn into the neckline as one piece.

Let's continue the topic of collars in the next article -.
My reader and training group participant Tatyana sent me an interesting letter. Quote:
“Ellen, I see you are wearing plus glasses. My mother, who is over 70, restored her near vision in three months. Her eyesight has been good throughout her life. So, she is a “non-believing Thomas,” and until she checks it herself, she won’t believe it.
I bought her glasses with perforations, like “holes.” During this time, she read for an hour a day, looked at something on the Internet, and suddenly, once again, she puts on strong glasses, and they blur everything. She went and wiped them, but there was no result.
I put on other glasses, weak ones, which I hadn’t worn for a hundred years - and then I immediately began to see! Well, we moved on. This is already the second little man who, in my presence, began to see well up close - “far-sighted.” And the first grandmother, she is 80 years old, and she has restored her vision and reads small letters calmly. The witness herself is where it all started. But I’m myopic and I can easily watch movies in them. So if you are interested, as they say, this is the result first-hand.”
My vision really began to deteriorate - I can’t see well at close range. Without glasses I can’t even see the phone button.
Thanks to Tatyana - I bought these glasses today - they have perforations - these are small holes on... I wanted to say, on the glasses. But these are plastic “Glass”. In general, here is a photo of what these glasses look like:
And now I’m reporting on my impressions: (I bought it, by the way, at an optician. They cost 890 rubles.) I ask the seller - “How do they work?” She - “You can read the instructions.” And asks to put on these perforation glasses and read. I say: “I won’t see such small letters.” She says, “put on your glasses.”
Well, I put it on - I look and see! Small letters. I see! You can read directly through the perforation and letters and objects become sharper. But it’s unusual, really - the image seems to split into two and you have to somehow align it.
Now I’m writing these lines with new glasses. And what’s interesting is that when I was reading these instructions for the glasses, I tried to bring the text very close to my eyes - almost end-to-end - 5 cm distance - and it was still visible.
Today I spent about an hour in them in total. Then I took it off - and when reading my mail, I could see the text - although it was blurry, but I could read it without glasses at all. Marvelous! Are your eyes rested in these glasses? In general, I am a Thomas believer, so I will continue to study them.
I’ll write about the results if you’re interested. So, no don't miss it. And that’s all I have for today.
The instructions for the Casket website were prepared by Nina Kuznetsova, the author of the master class and other useful sewing workshops.
1. Fold the shelf in half as in the photo, measure the length of the neck, minus 1.5 cm. (the mark to which the collar will reach, that is, the middle of the front). The important thing here is to measure accurately. You need to measure using a flexible ruler or a centimeter placed on the edge. Step back 0.5 cm from the edge (this will be the seam allowance along the neckline). In my example (size 44) neck length = 20cm
2. We start by constructing a right angle. I just took an A4 sheet and started building from the left corner, let’s designate it as point O.
From point O we put 1.5 cm up and put point B . In practice, I was convinced that this is the most optimal value.
The greater the distance OB (and it can be in the range of 1.5 - 12 cm), the flatter the collar will lie.
BB1 = 6-8 cm. I took 8 cm.

3. From point B, placing a centimeter to the intersection with the bottom line of the sheet, set aside 20 cm (neck length measured in centimeters) and place point A.
I would like to draw your attention to the following: if you measured it with a flexible ruler, then we also put it on the sheet with a flexible ruler; if a centimeter, then set it aside with the same centimeter. When I built it for the first time, I measured the neck with a centimeter and marked it on paper with an ordinary ruler. As a result, the collar did not coincide with the neckline (it turned out to be smaller). So I redid the paper pattern. If you describe everything correctly, then this should be the radius, but I didn’t have time to look for a compass and so on. I have simplified everything to the minimum.

Connect point B and point A with a straight line and divide it by 3
AA1 = BB1 + 1cm (constant value) = 8 + 1 = 9cm
We also set a perpendicular to point A1
A1A2 = 2 - 5 cm. Mine = 4cm
Connect point B1 and point A2 with a straight line.
We look at the following photos and draw a smooth line BA1
Important: so that the beginning of the smooth line runs parallel. To do this, I attached a triangle with a right angle to point B and drew a parallel line to point 0.5. Next, I will say this in scientific language: we must remember that the stitching line should approach the center line of the collar at a right angle.
We connect A1A2 with a straight line, thereby completing the construction of the collar.
5. We cut out and apply our pattern to the neckline.

To use presentation previews, create a Google account and sign in:...

This material can help in organizing systematic work on sensory education for children of younger age groups. IN...

Mom will always come first in a husband’s heart, and only then his wife. And depending on how the daughter-in-law’s relationship develops...

string(10) "error stat" string(10) "error stat" string(10) "error stat" string(10) "error stat" string(10) "error...

Beginners can sew such a charming cardigan. The cardigan is a cocoon of a loose fit, it is comfortable and...
Please rate the model/article by clicking on the star. Thank you! Cocoon: 11 inches wide x 16 inches longHat: 14-16...

If you have a free minute or two, and your son or grandson has outgrown an old pullover or sweater, the most...

Crocheted openwork booties are the very first shoes in every baby’s life. This is not only a cute accessory, because...

Hello, dear readers of the blog site. The human psyche seeks to reduce the instinctive feeling...

Seeing a lot of girls in your house is good news. To see a nice-looking girl in a dream for...

Sometimes there is a situation when guests arrive at the wrong time and stubbornly refuse to leave. If using conventional methods...
The first months of life with a child are certainly a happy time. Your baby is growing by leaps and bounds, and already...

Apple as a fruit is delicious and nutritious and most people enjoy it. But it is also called the type of constitution...

It's time to look back at the past year and decide what you want to leave there forever... December 31st is not...

This material can help in organizing systematic work on sensory education for younger children...

Mom will always come first in a husband’s heart, and only then his wife. And depending on how things turn out...