Bedwetting, treatment of enuresis in a child
Bedwetting or daytime urinary incontinence is a common, unpleasant and very traumatic problem. The child's psyche can...
Creating origami diagrams for a child is no less challenging than creating complex, detailed diagrams for large paper crafts for adults. The fact is that children do not really like to deal with complex interweavings of folds and folds for a long time, but want to quickly get an attractive result. The cute paper hedgehog that we propose to fold today is perfect for introducing little creativity lovers to the amazing art of origami.
So, to fold such a hedgehog, you will need:

The assembly diagram for such a hedgehog, which was developed by Tony O'Hare, is extremely simple. There is absolutely nothing complicated here. That is why such a craft is a wonderful instruction for children.

The finished hedgehog craft can be left as is, or you can paint it by adding bright needles, a nose, eyes and antennae. If you took two-color paper, then the hedgehog’s face will already stand out against the general background, so it will not be difficult for the child to complement it with the help of felt-tip pens or paints.

Suggest folding this simple craft your baby or the children of your friends. We hope you do too? and little origami lovers will get great pleasure from the process and the result.
An origami hedgehog consisting of 7 modules is absolutely not a complicated craft. The main thing is to carefully follow all the steps, and you will be able to do the second module from memory. In the original, the hedgehog is made of 7 sheets of paper, it turns out to be large and solid. But I made much less, I got 6 squares from one sheet (1 square of a different color).

The hedgehog consists of 7 modules, one is the head, and 6 are the body. Therefore, you need to prepare 6 identical squares of brown and 1 yellow.

Let's make a module. Take one square to work.

Fold it in half from corner to corner.

Press the fold well. Straighten and then fold the square into a triangle again, but this time from the other corner to the opposite corner. There should be 2 cross folds on the square.

Pull the top corner and bend it to the middle of the square, in the area where the fold lines meet.

Then fold the corners on the right and left in the same way. You will get an envelope like this. Let it stay that way, upside down.

Fold the upper part forward (or towards you) along the middle fold line, as if folding an envelope in half.


Therefore, straighten the corner back, the goal is achieved, the fold is visible.

Direct this corner inward, exactly along the line of the fresh fold, only bent in the other direction.

Press the sides and folds together.

Now direct the free corner of the former envelope inward as well. It should be on top of the inner right.

Also press all sides and folds.

And the final stage of creating the module is to direct it inward to the corner on the left, exactly as we did on the right side.

Turn it over as shown in the photo and the module is ready.

Using this pattern, make 6 more modules from brown paper squares.

Everything is ready, it’s time to start assembling the origami hedgehog.
First make the torso. Connect all the modules together, placing each subsequent one on the inner fold of the previous one, see photo. We need to apply glue to the sides of the models so that the parts are secured in the position we need.


Each module should converge at one point with its lower corners, as if forming something like a fan. On top, you need to try to make equal spaces between the protruding corners. Only the last 2-3 may be a little larger. Ideally, the bottom of all modules should be straight and in full contact with the surface.

Now make the head of the hedgehog. To do this, place the yellow module in the same position as all the modules at the very beginning, before connecting them.

And then bend both bottom corners up, aligning them along the edge. The hedgehog's nose was on top.

So turn your head over.

Glue it to the body. Add eyes on both sides and the origami hedgehog is ready. Despite the lengthy explanation, the craft is easy and interesting to make.


Integrated educational activities
on paper construction and familiarization with the outside world on the topic:
"Hedgehogs"
Tasks:
Material: cards with the image of a hedgehog (A4 format); "Letter from a Hedgehog"; paper rectangles (side length in proportion 1:2); colour pencils.
Preliminary work: reading N. Sladkov’s story “Fluff”, looking at illustrations in encyclopedias and albums, talking about hedgehogs.
Methodology: gaming, problem-search, activity.
Topic: “Hedgehogs”
Tasks:
Material: cards with the image of a hedgehog (A4 format); "Letter from a Hedgehog"; paper rectangles (side length in proportion 1:2); colour pencils.
Preliminary work
: reading N. Sladkov’s story “Fluff”, looking at illustrations in encyclopedias and albums, talking about hedgehogs.Methodology: gaming, problem-search, activity.
Progress of the lesson:
Guys, we received a letter today. The envelope does not say who it is from, but there is a riddle. Let's try to guess:
Lying under the fir trees
Pillow with needles.
She lay, she lay,
Yes, she ran.
Questions for children:
Guys, who are we talking about in the riddle?
(I listen to the children's answers)
(I hang a picture of a hedgehog on the board)
What do you know about the hedgehog?
(I listen to the children's answers)
I invite the children to find out what the hedgehog wrote. I take the letter out of the envelope and start reading.
Text of the letter:
“Hello dear guys. My name is Tisha the hedgehog, and I really want to tell you about myself. I live in the forest. There I run, rustle the leaves, smack my lips loudly when I eat. I eat berries, seeds, frogs, lizards, but mostly I eat insects. That's why they call me an insectivore. As soon as I sense danger, I curl up into a ball, hide my muzzle and expose my needles. During the day I see poorly, but at dusk my vision becomes sharper. In winter I hibernate in a hole, like a bear, I live off subcutaneous fat. I prepare for winter sleep in advance. I insulate my nest with straw, hay, leaves, moss, and line my bed. When frosts begin, I bury myself deep in the nest and fall asleep until spring. Guys, remember, you can’t bring me home, because I’m a nocturnal animal, I won’t let you sleep - I’ll run around the rooms at night. Let me better stay where I should live. Well, that's all, dear guys. Don't forget to take care of nature and animals. All the best to you. Tisha the Hedgehog."
Guys, now I’ll check how you remember what Tisha the hedgehog told us in his letter.
Questions for children:
Where does the hedgehog live?
What does a hedgehog eat?
What does a hedgehog do when it feels danger?
When does a hedgehog see better - during the day or at dusk?
What does a hedgehog do in winter?
(I listen to the children's answers)
I suggest the children try to make friends for the hedgehog Hush.
What do you think we will make friends from?
(I listen to the children's answers)
Let's remember what the paper folding technique is called?
(I listen to the children's answers)
Guys, today we will design a hedgehog using the origami technique. Look carefully at how we will do this.
I show you the step-by-step execution of the work. I clarify with the children the sequence of execution. I help children who have difficulty completing tasks. After the hedgehog figurine is ready, I distribute colored pencils. Children draw eyes, nose, needles.
Questions for children:
Guys, who did we talk about today?
(I listen to the children's answers)
What did the hedgehog tell us about in his letter?
(I listen to the children's answers)
Who did we do in class? How?
(I listen to the children's answers)
Examining the made hedgehogs.
In contact with
Classmates
The art of origami has its roots in Japanese traditions, but today it has become very popular in most countries. Most often, only one sheet is used to assemble paper crafts, after which you need to fold it in a certain sequence.
Traditional origami assumes that the craft will be folded without the use of glue or scissors. The second variety, in which paper sculptures are folded, is called kirigami.
Folding paper crafts is quite difficult with little ones, but this art needs to be taught from an early age. For a baby to master the process of creating paper crafts, it takes some time and patience. Start working when he is five years old, starting folding on his own, and at this moment the child can carefully observe the process. Then you can transfer part of the work to him, gradually moving on to more complex tasks.
This pastime is good for developing motor skills, coordination, creative and spatial thinking. With its help, you can make a child assiduous and help him learn the capabilities of his hands. It is also good to learn geometry with origami, since in technology they work with angles, circles, squares and other basic concepts of science.
Today we will try to make the first paper craft that the child must handle on his own. We will make a cheerful hedgehog from several flowers using the kirigami technique.
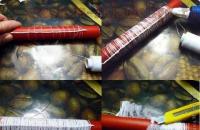
To make the figure howl bright, take three contrasting colors. At the base there will be a small square that needs to be bent diagonally to form a triangle. After this, a rectangle of a completely different color is selected; the width of the figure should be equal to the length of one side of the triangle.
From the resulting triangle you should make the muzzle and body of the future hedgehog. To do this, bend one side of the triangle up so that the edge of the other side protrudes. Then you can turn the figure over to the other side.

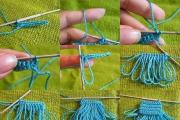
At the next stage, we create hedgehog needles from a rectangle. Let's make an accordion (corrugated model), bend the figure in the middle.

Glue the sides that are in the center. From the rectangle we get a “fan”. The origami hedgehog carries a ruddy apple on its back, which can be folded from a small rectangle according to the above principle.

Connecting the parts of the craft involves using a small amount of glue. You need to attach the needles to the hedgehog shape in the form of a yellow triangle, after which you can attach the apple to the needles. We draw eyes on the muzzle and mark the tip of the nose on the protruding half of the figure.
Master class for children over 6 years old “Hedgehog” using modular origami technique with step-by-step photos.


Bedwetting or daytime urinary incontinence is a common, unpleasant and very traumatic problem. The child's psyche can...
Crocheting is one of the most exciting types of needlework for craftsmen around the world. Variety of loops and...
I doubted whether to stage these “creations”, but at work my fellow mothers became interested, and I was interested in the manufacturing process...

There is specialized sportswear designed for skiing not only...

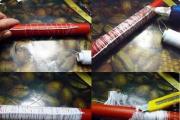
Materials and tools: White patterned wrapping paper and mesh; - wide white silk ribbon; - thin...

What would a New Year's holiday be without its main characters? There are not only themed paper crafts. There are even...

Only people baptized in the Orthodox Church according to the rules can carry out treatment with conspiracies for diseases...

While looking for outerwear for myself, I noticed a fluffy short-cropped fur coat. Her fur was...

Today, there is an abundance of care products on the shelves of cosmetic stores, in particular face powders,...
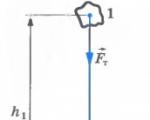
12/25/2014 Lesson 32 (grade 10) Topic. Potential energy 1. Work of gravity Let's calculate the work...

Published 01.09.17 08:41 Kurban Bayram in Moscow 2017: festive prayer takes place in the Moscow Cathedral...

However, on August 29, Vladimir Putin, speaking on television to the citizens of the country, ordered to mitigate the increase...
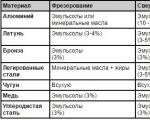
Anyone, even a novice metalworking specialist, knows that when performing turning work on a machine...

Details How to learn to curl your hair beautifully with a curling iron Gone are the days when, in order to curl your hair,...

Crocheting is one of the most exciting types of needlework for craftsmen around the world. Diversity...
I doubted whether to stage these “creations”, but at work my fellow mothers became interested, and the process...