Diet “Table 4” - features, nutritional recommendations, menu Table 4 recipes for children
Table No. 4 is indicated for acute intestinal diseases and exacerbations during the period of ongoing diarrhea. The goal of the diet is to provide...
February 8
And this year I finally knitted gloves for my beloved! 🙂 The usual ones, black and warm!
Description taken from the brochure “ Useful tips on knitting" (Compiled by Marina Yanovna Orshevska, 1991) The pictures are from the book, and the photos are mine.
So, gloves are knitted in the round on five knitting needles, starting from the wrist. Performed in various dense and openwork patterns, stocking knitting with ornaments or colored stripes. Yarn consumption is approximately the same as for mittens from 40 to 130 g. It is better to start getting acquainted with the technique of knitting gloves with a simpler option, when they are made in stocking stitch. To practice, tie your left glove. Getting Started First of all, take your measurements:

1. Hand circumference
2. The length of the hand from the wrist to the warp of the thumb
3. The length of the hand from the wrist to the base of the little finger
4. The length of the hand from the wrist to the index finger
Calculation. Knit a control sample on needles No. 12 in stocking stitch and determine the knitting density from it, for example, 3.2 loops per 1 cm. Now count the number of loops to start working: 3.2 sts x 19 cm (hand circumference) = 60.8 sts Round the result down to a whole number (60 stitches) and check whether it is divisible by 4 (by the number of knitting needles). In this example, there are 15 loops on each knitting needle. If the number is not divisible by 4 without a remainder, then it must be reduced to a multiple of four.
Start knitting gloves. On 2 knitting needles put together, cast on 60 loops and release one of them. Then knit 1 row very tightly with a 1×1 elastic band, simultaneously distributing the loops on 4 knitting needles: knit the first 15 loops with the 1st knitting needle, knit another 15 loops with the 2nd knitting needle, then knit the 3rd next 15 and finally knit the last 15 loops 4th knitting needle. All 60 loops are knitted and 4 knitting needles are put into work, the free 5th is working. Pin a pin to the loops of the 1st knitting needle - it will serve as a guide in your work. On the 1st and 2nd knitting needles there are loops on the upper part of the glove, and on the 3rd and 4th knitting needles on the lower part (palm). Close the knitting in a circle by connecting the thread from the ball with the end remaining from the set of loops. There are no edge loops. Now knit a 1×1 rib (2-9 cm) clockwise around the outside of the circle.
Knitting a wedge for the thumb. On the left glove the wedge is placed on the 4th needle, and on the right glove on the 3rd. Start it immediately after the elastic band or knit it a little with the main pattern. A wedge is made by adding loops. Make the first addition at the end of the 4th knitting needle: knit all the loops except the last one, then yarn over, knit the last loop and yarn over again - on the 4th knitting needle there are 2 more loops. Starting a new round, hold the yarn over with your finger so that it does not slip off the 4th needle. Knit the next 3-4 rounds without increments. Tie the yarn overs behind the back walls to avoid any holes. On the right glove, make the first increase at the beginning of the 3rd needle: 1 yarn over, 1 knit, 1 yarn over and then all the loops on the 3rd needle. Make the second addition without knitting the last 3 loops on the 4th needle: yarn over before and after them. There are 4 more loops on the knitting needle. Perform all the following additions every 3-4 circles, each time without finishing an odd number of loops 1, 3, 5, 7, etc. at the end of the 4th needle. When the height of the wedge reaches the base of the thumb (6 cm), stop adding, tie the loops of the 4th needle to the wedge loops, re-slip the wedge loops onto 2 pins, and then cast on air loops over them. There should be half as many of them as there are on the pins (it’s better to dial an even number). Next, knit 1 circle without changes, and in the next decrease on the 4th knitting needle: knit 2 loops together with the front ones along the edges of the hole. Continue working decreasing through the row until 15 loops remain on the 4th needle (original number):


After that, knit the glove to the little finger and distribute the loops for knitting the fingers.
Distribution of loops for four fingers. The simplest way to divide glove loops into 8 parts: 60 p.: 8 = 7 p. (4 points left). For each finger, 2 parts, one for the upper half, the other for the lower (7p. + 7p. \u003d 14 p.), The remainder is distributed equally by attaching it to the loops of the upper halves: 7p. +1 p. = 8 p. Now there are 15 loops for each finger. If the remainder is less than four units, it is added to the loops of the fingers, starting with the index. Then 2 more are attached to the loops of the index finger (15p. + 2p. = 17p.), Subtracting them from the loops of the ring finger (15p. - 2p. = 13p.). So, for the little finger - 15 loops, for the ring finger - 13 loops, for the middle finger - 15 loops, for the index finger - 17 loops. Next, in the knitting process, bridges are formed between the fingers from air loops. The result obtained is applied to the diagram and knitted, focusing on it (the numbers in the diagram, signed in pencil, are mine):

Hole for little finger. The little finger loops are located at the end of the 2nd needle and the beginning of the 3rd. Knit the stitches of the 2nd needle up to the pinky stitches and slip 9 unknitted stitches onto a pin. Place 7 stitches from the 3rd needle on another pin. After
To do this, cast 4 air loops onto the 2nd knitting needle and use it to knit the remaining loops on the 3rd knitting needle. The knitting turned out to be on three needles, the 4th working. Tie 3-4 circles to the base of the index finger:

Knitting the index finger. The index finger is knitted first. Its loops are located at the beginning of the 1st knitting needle and at the end of the 4th - a total of 17 loops. After the jumper is formed, the number of loops will become equal to 21 (17 stitches + 4 stitches = 21 stitches). The finger is made on three knitting needles (4th working needle), so the number of loops is divided into 3 - 7 loops on each knitting needle. Knit the first 9 loops on the 1st knitting needle, and transfer all the rest to pins, except for the last 8: divide them equally and place them on 2 knitting needles. For ease of use, divide the loops of the 1st knitting needle into 2 parts: transfer the first 7 loops to the new knitting needle, and leave the last 2 on the old knitting needle. Cast on 4 air loops and knit 1 loop from the next knitting needle - there are 7 loops on each knitting needle. Now knit in a circle until the middle of the nail and after that make decreases, knitting a row, at the end of each knitting needle, knit 2 loops together with the front one behind the back walls until there are 2 loops on the knitting needles. Break the thread, thread the end into the needle, remove the knitting needles, sew on the loops and pull tight:

Middle finger. It is knitted after the index (15 stitches + 8 stitches of two jumpers = 23 stitches). The loops on the knitting needles should be placed like this: 8+8+7. Transfer 8 loops from the upper half of the glove from pins to the 1st knitting needle and 7 loops from the bottom to the 2nd knitting needle. With the 3rd needle, pick up 4 loops from the jumper of the index finger and knit 4 loops of the upper half. Put the 4th knitting needle into work, knit the remaining 4 loops on the knitting needles and add 4 chain stitches to them. There were 23 loops on three needles (8+8+7). Next, use your finger in the same way as your index finger.
Knitting the ring finger. Transfer the loops from the pins to the knitting needles, starting from the top half: 7+7+3. Using a knitting needle on which there are 3 loops, pick up the loops from the jumper of the middle finger and then knit in the round in the same way as the other fingers.
Knitting the little finger. Transfer the loops from the pins onto 2 knitting needles. With the 3rd knitting needle, cast on 4 loops from the jumper of the ring finger - there are 19 loops on the knitting needles. Distribute them like this: 7+6+6. Next, knit the finger like everyone else:

Thumb. Do it like this: transfer the loops from the pins to 2 knitting needles, and on the 3rd one, cast on the same number of loops as there were chain stitches from the top edge of the hole. Now knit the finger in a circle until the middle of the nail, and then make decreases in the same way as in the other fingers. A thumb made using a gradually expanding wedge is called a raglan finger by knitters and believe that this method of knitting gives a more comfortable finger shape. At the end of knitting, bring all the threads to the wrong side, fasten and cut.
Girls, please your loved ones - knit them gloves for the holidays, because the cold is not going to subside yet! 🙂


After studying this page, you will be able to knit absolutely any gloves. Well, let's start with something simple.
Gloves are knitted in the round on 5 knitting needles, starting from the wrist.
Yarn consumption is approximately the same as for mittens: from 40 to 130 g.
To practice, tie the left glove on a woman's hand. When starting work, first of all take your measurements.
Start knitting gloves.
On 2 knitting needles placed together, cast on 60 stitches and release 1 of them. Then knit 1 row very tightly with an elastic band 1 X 1, simultaneously distributing the loops on 4 knitting needles: knit the first 15 loops with the 1st knitting needle, the next 15 loops with the 2nd knitting needle, then with the 3rd knitting needle another 15 loops and finally the last 15 loops with the 4th needle. Thus, all 60 loops are knitted and 4 knitting needles are put into work, with a free 5th working needle. Pin a pin to the loops of the first knitting needle - it will serve as a guide in your work. On the 1st and 2nd knitting needles there are loops on the upper part of the mitten, on the 3rd and 4th knitting needles on the lower part (palm).
Close the knitting in a circle by connecting the thread from the ball with the end remaining from the set of loops (“tail”). There are no edge loops. Now knit a 1x1 rib (2-9 cm) clockwise around the outside of the circle.
Knitting a wedge for the thumb.
On the left glove, the wedge is placed on the 4th spoke, and on the right - on the 3rd. Start it immediately after the elastic band or knit it a little with the main pattern. A wedge is made by adding loops.
Make the first addition at the end of the 4th knitting needle: knit all the loops except the last one, then yarn over, knit the last loop and yarn over again - on the 4th knitting needle there are 2 more loops. Starting a new round, hold the yarn over with your finger so that it does not slip off the 4th needle. Knit the next 3-4 rounds without increments. On the right glove, make the first increase at the beginning of the 3rd needle: 1 yarn over, 1 knit yarn over, 1 yarn over and then all the stitches on the 3rd needle.
Make the second addition without knitting the last 3 loops on the 4th knitting needle: before and after them, yarn over. There are 4 more loops on the knitting needle. Perform all the following additions every 3-4 circles, each time without knitting an odd number of loops at the end of the 4th needle: 1, 3, 5, 7, etc.
When the height of the wedge reaches the base of the thumb (6cm), stop adding, tie the loops of the 4th knitting needle to the wedge loops, slip the wedge loops onto 2 pins, and cast on air loops above them. there should be two less of them than are on the pins (it’s better to dial an even number).
Next, knit 1 round without changes, and in the next round, decrease on the 4th knitting needle: knit 2 loops together along the edges of the hole. continue working, decreasing through the row, until there are 15 loops on the fourth needle (original number). After that, knit the glove to the little finger and distribute the loops for knitting the fingers. 

Distribution of loops for four fingers.
| The simplest way is to divide the glove loops into 8 parts: 60: 8 = 7p. (4 left). For each finger - 2 parts: one for the upper half, the other for the lower (7p. + 7p. = 14p.). The remainder is distributed equally by attaching it to the loops of the upper halves: 7pyu + 1p. = 8p. Now there are 15 loops for each finger. If the remainder is less than 4 units, it is added to the loops of the fingers, starting with the index. Then 2 more loops are attached to the loops of the index, subtracting them from the loops of the nameless. So, for the little finger - 15 loops, for the ring finger - 13 loops, for the middle - 15 loops, for the index - 17 loops. Further, in the process of knitting, I form jumpers of 4 air loops between the fingers. The result obtained is applied to the diagram and knitted, focusing on it. |
 |
|---|
Knitting the index finger
 |
The index finger is knitted first. Its loops are located at the beginning of the 1st knitting needle and at the end of the 4th - a total of 17 loops. After the jumper is formed, the number of loops will become equal to 21 (17p. + 4p. = 21p.). The finger is performed on 3 knitting needles (4th working needle), so the number of loops is divided by 3 - 7 loops on each knitting needle. Knit the first 9 loops on the 1st knitting needle, and transfer all the rest to the auxiliary thread, except for the last 8: divide them equally and place them on 2 knitting needles. For ease of use, divide the loops of the 1st knitting needle into 2 parts: transfer the first 7 loops to the new knitting needle, and leave the last 2 on the old knitting needle. Cast on 4 air loops and knit 1 loop from the next knitting needle - there are 7 loops on each knitting needle. Now knit in a circle until the middle of the nail and after that make decreases: when knitting a row, at the end of each knitting needle, knit 2 loops together with the front one behind the back walls until there are 2 loops on the knitting needles. Break the thread, thread the end into the needle, remove the knitting needles, sew the loops and pull tight. Hide the end of the thread on the wrong side. |
|---|
Middle finger.
It is knitted after the index stitch (15 stitches + 8 stitches of two jumpers = 23 loops). The loops on the knitting needles should be placed like this: 8+8+7. Transfer from the thread to the 1st knitting needle 8 loops from the upper half of the glove and to the 2nd knitting needle 7 loops from the bottom. With the 3rd needle, pick up 4 loops from the jumper of the index finger and knit 4 loops of the upper half. Enter the 4th knitting needle into work, knit the 4 loops remaining on the knitting needle and add 4 air loops to them. There were 23 stitches on three needles (8+8+7). Next, use your finger in the same way as your index finger. Knitting the ring finger.
Transfer the loops from the thread to the knitting needles, starting from the upper half: 7+7+3. Using a knitting needle on which there are 3 loops, pick up the loops from the jumper of the middle finger and then knit in the round in the same way as the other fingers. Knitting the little finger.
Transfer the loops from the pins onto 2 knitting needles. With the 3rd knitting needle, cast on 4 loops from the jumper of the ring finger - there are 19 loops on the knitting needles. Distribute them like this: 7+6+6. Next, knit the finger like everyone else. Thumb.
Do it like this: transfer the loops from the pins to 2 knitting needles, and cast on the 3rd one from the upper edge of the hole as many loops as there were chain stitches. Now knit the finger in a circle until the middle of the nail, and then make decreases in the same way as in the other fingers.
A thumb made using a gradually expanding wedge is called a raglan finger, and this method of knitting is believed to give a more comfortable finger shape.
Now you can knit any gloves
Knitting gloves is a painstaking job that requires special attention. It has its own characteristics that are not immediately apparent to inexperienced needlewomen. But, if you have already knitted gloves, then you can easily cope with this model. It is taken from the latest Drops Design collection.
She is very smart and elegant, it is not for nothing that she was given the motto “Parisian”. A relief pattern with openwork elements covers the entire back side, the fingers are highlighted with knitting, and the elastic is organically woven into the main pattern.
They are presented in two patterns with the same horizontal repeat - 17 loops (pt). Their vertical rapport (wrap) is different:
- wrap (A.1) = 5 rows;
- wrap (A.2) = 10 rows.
Pattern A.1 is used to knit an elastic band, and A.2 shows the main pattern.
The description gives the only option, this is the size of an average female hand.
For work, the authors recommend choosing Drops Nepal (50 g/75 m), a wool blend of alpaca (35%) and sheep wool (65%). It is soft, silky to the touch, its medium-thick thread is spun from three threads, its loops are made with a pretense of rusticity, and the pattern is stable. This yarn is easy to work with, but you need to knit it with stocking needles, 4? mm and 3? mm.
We will knit samples of 10 x 10 cm on both types of knitting needles using stockinette stitch (k/s):
- 3? mm – 27 rows of 20 pt;
- 4? mm – 23 rows of 18 pt.
We will work in a circle (krg). First we knit the left glove, and then, by analogy with it, the right one, symmetrically.
Left glove
Shall we cast on 38 sts on needles 3? mm and let's immediately start knitting an elastic band.
Sl.krg:
- 3 izpt (purl pt);
- 17 pt according to diagram A.1;
- 3 izpt; 3 lcpt (knit stitches) *; repeat *-* 2 more times.
After 10 cm, we begin to increase stitches, forming a wedge of the thumb.
You need to add 1 point at a time, yarn over on both sides, starting from the last point of the circle. Subsequently, the crochet yarn over is knitted in a crossed stitch.
After the first crochet with additions, we do the same 4 more times, after 1 crig, and we end up with 48 pt.
Having passed 15 cm from the edge, we set aside 11 stitches for the thumb, transferring them to the waste thread. Instead of these pts, 1 new one will be typed and we will get 38 pts.
Having passed 17 cm from the edge, in the next circle we divide the glove into parts:
- 17 pts, the first in the circle, belong to the upper part, the back, we put them aside on the extra/sp;
- knit 9 pt, there will be a little finger on them;
- 12 pt belong to the lower part of the glove, the inner one, we put it aside for the second additional stitch.
Little finger
It is formed from 9 pt + 1 pt, a new one, which we type on from the side of the next finger - the ring finger.
We knit according to the pattern, we perform a new pt. So we go 6 cm, after which we knit all stitches in 2 stitches together. There are 5 stitches left, let's fasten them on the needles.
Palm
We transfer the postponed stitches to knitting needles 4? mm, next to the little finger we raise another 2 pts, new ones = 31 pts. We knit 2 krg on them. Then we set aside the pt, leaving it on the knitting needles for work:
- 2 newly typed pts + 5 pts on the back side + 4 pts on the inside = 11 pts.
Ring finger
To the existing 11 pt we will add one more, new one, typing it from the side of the next finger, the middle one. We get 12 pt.
Do we knit them in round 7? cm lts/hl, after which we knit all pts 2 lts together. There are 6 stitches left, let's fasten them on the needles.
Middle finger
For him we transfer to work:
- 5 pt from the back +
+ 4 pt with inner +
+ raise 2 pt from the side of the ring finger +
+ type 1 pt new from the side of the next finger, index finger = 12 pt.
Do we knit them in round 8? cm lts/hl, after which we knit all pts 2 lts together. There are 6 stitches left, let's fasten them on the needles.
Index finger
We transfer the remaining 11 pts to the working needles, raise 2 pts from the side of the middle finger, and get 13 pts on the needles.
We knit on them in a circle of 7 cm, finishing as for the previous fingers.
Thumb
Transfer the 11 stitches set aside for him to needles 4? mm, raise an additional 3 pts along the edge of the thumb and have 14 pts on the needles. We knit lts/hl 6 cm in a circle, finishing as usual.
Right glove, knitting features
It will be the same as the left one, only rotated symmetrically.
Sl.krg:
- * 3 ltspt; 3 izpt *; repeat *-* 2 more times;
- 17 pt according to A.1; 3 izpt.
Having passed 4 cm in this way, we knit with the pattern on the back side.
Sl.krg:
- 15 ltspt; 3 izpt; 17 pt ao A.2; 3 izpt.
Add 1 pt for the thumb on the sides, starting from the second pt of the krg.
We also knit the little finger differently.
Sl.krg:
- the first 12 pts are transferred to dp/sp, this is the inside of the glove;
- knit the little finger at 9 pt;
- We put the last 17 pts aside for extra/sp, this is the back part.
Yarn “Brilliant” 45% wool, 55% acrylic, 100 g / 380 m.
5 double needles No. 2.
Knitting density 2.7 loops per cm.
Hand girth 20 cm.
There are different ways to knit gloves, here we will tell you how to knit gloves in the classic way: on five knitting needles in a circle, starting from the wrist. Gloves can be knitted with openwork, jacquard, and relief patterns. But since this section is intended for beginners, we will consider the technique of knitting gloves on simple version when gloves are knitted in stockinette stitch.
Taking measurements
To knit gloves, take the following measurements:
hand circumference (OK) – 20 cm (we measure the widest part of the hand, the measuring tape fits tightly around the hand);
the length of the hand from the wrist to the base of the thumb is 6 cm;
length of the hand from the wrist to the base of the little finger – 9 cm;
The length of the hand from the wrist to the base of the index finger is 10 cm.

Taking measurements for a glove
Start knitting gloves
As always, when starting work, we knit a control sample and determine the knitting density. In our case, it turned out Pg = 2.7 loops per cm.
Define required amount loops for knitting gloves is not so simple, following a direct count. Gloves should fit your hand fairly tightly so that they fit nicely and are comfortable to wear. Therefore, gloves are knitted somewhat narrower than the girth of the hand. Exactly how narrow it is depends on the pattern, how much it stretches, and also on the elasticity of the yarn. Sometimes you have to bandage several times to achieve good result. In our case, when gloves are knitted in stockinette stitch, it is enough to take for calculation a value that is 1 cm less than the girth of the hand. We get: (Ok - 1) x Pg = (20-1) x 2.7 = 51.3. Let's round the result to a number that is divisible by 4, we get 52 loops, 13 for each knitting needle.
To make it more convenient to explain the technique of knitting gloves, let’s assign numbering to the knitting needles:

Knitting gloves: numbering the knitting needles
We start knitting the glove from the cuff. The width of the cuff can be any (usually 6 - 9 cm); we will knit a cuff 7 cm wide, using a 1x1 rib. So, we cast on 4 knitting needles with 13 loops each, close the knitting in a circle, connecting the thread from the ball with the end remaining from the set of loops and knitting 6-7 loops in two threads so that the circle is closed more tightly. We knit the cuff in the outer circle clockwise. Having knitted 4 rows with dark gray yarn, we knit a finishing strip with light gray yarn, also 4 rows, then 4 rows with dark gray yarn and another finishing strip with light gray yarn.
Knitting a wedge for the thumb of a glove
The wedge of the thumb of the glove begins to be knitted immediately from the elastic band or after knitting several rows (1 - 2 cm) with the main viscous. We will start knitting the wedge right away from the elastic.
On the right glove, the wedge is located at the beginning of the first knitting needle, on the left glove - at the end of the fourth knitting needle. A wedge is made by adding loops. Let's start knitting with the right glove. Before the first loop on the first knitting needle, yarn over, then knit one loop and yarn over again. Here and below, to illustrate the performance of some operations, we photographed the glove in a larger size than it actually is (made of blue yarn).

Beginning to knit a wedge for the thumb
We knit the next 3 rounds without increments. We make a second addition: yarn over before the first loop, then knit 3 loops, then yarn over. We perform the following additions every 3 circles, while between the yarn overs you will need to knit an odd number of loops: 1-3-5-7-9, etc.
When the height of the wedge reaches the base of the thumb (6 cm), we stop adding. In our case, we had to add 13 loops to the wedge. We knitted yarn overs without openwork and this is what we got:

Glove thumb wedge
If you want openwork finishing holes to form along the edges of the wedge, you need to knit yarn overs with openwork.
Now let’s transfer the wedge loops onto two pins: 6 and 7 loops each. Above them we cast on 6 air loops: the same number as are on one pin (it’s better to cast on an even number).

Glove thumb wedge: set of air loops
We knit one full circle, and then we start decreasing: we knit two loops together along the edges of the hole until 1 loop remains from the wedge, and there are again 13 loops on the first knitting needle.

Knitting a wedge for the thumb of a glove: decreasing stitches
After this, we knit the glove to the base of the little finger (in our case, 3 more rows) and distribute the loops for knitting the fingers.
We divide the loops of the glove into 8 parts: 52: 8 = 6 loops and 4 loops left over. For each finger - 2 parts: one for the upper half, the other for the lower half. We distribute the remainder equally, attaching one loop to the loops of the upper halves. Now there are 13 loops for each finger. If the remainder is less than 4, then it is added to the loops of the fingers, starting with the index.
Then 2 more loops are added to the loops of the index finger, subtracting them from the loops of the ring finger. We get: for the little finger - 13 loops, for the ring finger - 11 loops, for the middle finger - 13 loops, for the index finger - 15 loops. Next, we form bridges between the fingers from 3-4 (in our case, 3) air loops. We apply the result obtained to the diagram and knit, focusing on it.

Pattern for the distribution of loops when knitting gloves
Pinky hole
The little finger loops are located partly on the 2nd and partly on the 3rd needle. We knit the loops of the 2nd knitting needle to the loops of the little finger and remove 6 unknitted loops onto a pin. Using another pin, remove 7 loops from the 3rd needle. After this, we cast on 3 air loops on the 2nd knitting needle and then knit the remaining loops on the 3rd knitting needle, continue knitting in a circle 4 - 5 rows to the base of the index finger.
Now let’s distribute the loops on the pins according to the diagram:
little finger - 6 loops on the palm side and 7 loops on the back side;
ring finger, taking into account 3 jumper loops - 7 loops each;
middle finger - 6 loops on the palm side and 7 loops on the back side.
Index finger - leave 7 loops on the side of the palm and 8 loops on the back side on the knitting needles.
In general, the general rule is this: when distributing an odd number of loops, most of them fall on the back of the hand.

Finger loop distribution
Knitting the index finger
The index finger loops are located on the 1st and 4th needles, 15 loops in total. We knit 4 loops on the first knitting needle, then insert a new knitting needle, knit the 3 remaining loops from the first knitting needle and cast on one air loop; then we insert a new knitting needle again, cast on 2 air loops and knit 3 more loops from the 4th knitting needle. We got 4 loops on the 1st and 2nd knitting needles and 5 loops on the 3rd and 4th, for a total of 18 loops.

Beginning knitting the index finger
We knit the finger in a circle to the beginning of the nail or to its middle (if the nails are long) and complete the finger: at the beginning of the 1st and 3rd knitting needles and at the end of the 2nd and 4th, we knit 2 loops together across a row. When there are 1 - 2 loops left on the knitting needle, we tighten the loops with a needle or crochet, fasten and hide the end of the thread on the wrong side. The remaining fingers of the glove are completed in the same way.

Finger Completion
Knitting the middle finger
There are 19 loops on the middle finger (13 loops from pins plus 3 loops from two jumpers). We transfer the loops from pins intended for knitting the middle finger onto two knitting needles. Let's call the knitting needle facing the palm first. We attach the thread from the ball and knit 4 loops from the first knitting needle; then we insert a new knitting needle and knit the 2 remaining loops from the first knitting needle and cast on 3 chain loops for the jumper; then take a new knitting needle and knit 5 loops from the second knitting needle; then we take a new knitting needle again and knit the remaining 2 loops from the second knitting needle and cast on 3 loops from the jumper of the index finger. The loops were distributed as follows: on one knitting needle there are 4 loops and on three knitting needles there are 5 loops each. Next, we knit the finger the same way as the index finger: in a circle and then complete it.
Knitting the ring finger
We transfer the loops from pins intended for knitting the ring finger to knitting needles. The knitting needle facing the palm, just like when knitting the middle one, will be conventionally called the first one. We attach the thread from the ball and knit 4 loops from the first knitting needle; then insert a new knitting needle and knit the 3 remaining loops from the 1st knitting needle and 1 loop from the second; then reinsert the knitting needle and knit 4 loops from the second; Next we knit the remaining 2 loops from the second knitting needle and pick up 3 loops from the jumper of the middle finger. The loops of the ring finger are distributed on 4 knitting needles: on three knitting needles there are 4 loops each and on one knitting needle there are 5 loops. Next we knit the finger in the same way as the previous ones.
Knitting pinky
We remove the loops from the pins onto 2 knitting needles. Next, we distribute the loops similarly to the ring finger: we get 4 loops each, taking into account that we collect 3 loops from the jumper of the ring finger. Next, we knit and finish the finger the same way as all the others.
Thumb knitting
We transfer the loops from the pins to 2 knitting needles: on the right knitting needle there are 6 loops, on the left - 7. We attach the thread from the ball and knit 5 loops from the right knitting needle; then insert a new knitting needle, knit 1 remaining loop from the right knitting needle and 4 loops from the left; reintroduce a new knitting needle and knit the 3 remaining loops from the left knitting needle and pick up 2 loops from the top edge of the hole; Next, we cast on 5 loops from the upper edge of the hole onto the new knitting needle. It turned out for knitting the thumb 5 loops on four knitting needles, a total of 20 loops. Next we knit the finger in a circle and finish it like all the others.
Left glove we knit in a mirror image, while we make a thumb wedge on the 4th knitting needle: we knit all the loops except the last one, then we yarn over, we knit the last loop and yarn over again, then we knit similarly to the right glove.
The gloves are ready.


New gloves exactly to measure
Check out our selection of gloves and knit with pleasure!
Beautiful gloves with crossed braids.
Dimensions: cuff circumference 18 cm; hand circumference (above thumb) 21 cm. You will need: 3 skeins of 1.75 oz/50 g (each approx. 110 yards/100 m long) of Rowan/ Wesminster Fibers, Inc. yarn. Scottish Tweed DK oatmeal #25; 1 set (6) size 7 (4.55mm) double needles, or size enough to knit the pattern correctly; auxiliary needle for knitting braids; stitch markers; leftover yarn.

You will need: Mondial Extrafine yarn (100% merino wool 175 m/50 g) -200 g gray, set of sock needles No. 2.
Glove size: 7/8.
You will need: 100g of white Sockli yarn (75% wool, 25% polyamide, 210m/50g); set of double needles No. 2.
One size.
Materials: “Drops Karisma Superwash” yarn from Garnstudio (100% extra wool, 100 m/50 g): 100 g wine red, 50 g natural white, 50 g beige; double needles No. 3 and double needles No. 2.5.
Knitting density: 23 p. and 32 p. persons satin surface = 10 x 10 cm.
The knitting pattern and description below is designed for a hand with a circumference of 17 (20) cm (or 6.75 (8)”). The knitting density is 10x10 cm (25 loops and 30 rows) - for knitting with stockinette stitch.
Without knowing how to knit on stocking needles or circular needles, you can knit a wonderful thing for yourself and not only yourself! Distinctive feature This knitting method means that you can knit anything on the back of your hand. From jacquard to beaded knitting. That is, due to the fact that knitting always goes in a straight line, you can improvise the way you like. Materials and tools. Yarn 100% wool 100g=300 meters. Knitting needles No. 2.0 10 safety pins.
Sizes: S/M – M/L.
Materials: DROPS Fabel yarn (75% high quality wool, 25% polyamide, 205m/50g): 100g for gloves; stocking and circular knitting needles (40 cm) No. 3 and circular knitting needles No. 2.5 (40 cm).
Knitting density: 24 p. and 32 p. front satin stitch = 10×10 ohm.
Patterns: knit according to patterns 1 and 2. The patterns show the pattern from the front side.
To knit gloves you will need: DROPS NEPAL yarn (65% wool, 35% alpaca, 50 g/75 m) 2 skeins of color 8783, hosiery knitting needles 3.5 mm and 4.5 mm. Knitting density: 18 stitches and 23 rows = 10x10 cm in stockinette stitch on 4.5 mm needles;
20 stitches and 27 rows = 10x10 cm in stockinette stitch on 3.5 mm needles.
For knitting you will need materials: approximately 50g of yarn with a thickness of 350 - 400 m per 100g; stocking needles No. 2; knitting needles on fishing line No. 2; pin, needle.
Size: palm girth – 20 cm, slightly stretched.
Required: 100 gr. yarn (55% merino wool, 10% cashmere, 35% microfiber, 130 m/50g, “Kashmir Baby” type, knitting needles No. 3,25 and 4)
Knitted striped gloves
Fun gloves made from leftover yarn. Although you can take SUPERWASH 100 ALIZE yarn. It will probably be more expensive, but there will be no knots.
You will need: 50 g of yarn in different Fabel colors (75% wool 25% polyamide, 205 m/50 g); set of stockings No. 2.5 Stockinette stitch: knit r – knit. p, out. R. - out. p.: in a circle. R. knit only faces. P.
Dimensions: hand circumference 19 cm (at the widest part of the palm, above the thumb); length 19 cm (from the bottom edge of the cuff to the base of the fingers).
You will need: 2 skeins of Aslan Trends Glaciar Del Cielo yarn (50 g / 125 m, cotton) light pink; a set of stocking needles (4 pcs.) 3.25 mm or knitting needles corresponding to the specified knitting density; auxiliary threads or additional knitting needles, marker
Glove size: 7.5-8.
To knit gloves you will need the following materials: 150 g of smoky blue yarn and the remains of pale blue yarn (100% wool, length 160 m/50 g). Set of knitting needles for socks No. 2.5.
Size: one size, length approximately 20 cm, circumference approximately 20 cm.
You will need:
50 g of Drops “A1rasa” yarn, light gray color No. 0501, straight Drops 2.5 mm knitting needles, or a size suitable for the specified knitting density.
Long fingerless wristbands with a twisted pattern are knitted in the round. The hem is made under the openwork edge.
Dimensions: length 25.5 cm; the circumference of the hand (unstretched) is 16.5 cm.
You will need: 250 g of sand-colored thread, 5 knitting needles No. 3.
For one glove, cast on 48 stitches and distribute them on 4 knitting needles. Knit 4 rows with knitting needles in 1/1 stitches. In the 5th row on each knitting needle, evenly add 4 more loops and knit 35 cm with knitting needles in a pattern in accordance with the pattern up to the thumb.
You will need: 100 g of dark pink wool yarn; stocking needles No. 4; 3D applique in the shape of a heart - 2 pieces.
The gloves are the same size.
To knit gloves you will need: 150g of “Drops Nepal” type yarn (65% wool, 35% alpaca, 75 m/50 g) from Garnstudio, double needles No. 4.5, double needles No. 3.5 for elastic.
Glove knitting density: 18 p. and 24 r. persons satin stitch = 10 x 10 cm.


Table No. 4 is indicated for acute intestinal diseases and exacerbations during the period of ongoing diarrhea. The goal of the diet is to provide...

In the fight against excess fat deposits in the abdomen and waist, physical activity plays a significant role...
It’s one thing when your weight does not fit into the norm by 3-5 kg and you have time to sit on some correct and...

Often the cause of excess weight lies in childhood. When a child is thin, grandmothers begin to lament over him...

Diets for weight loss are a dime a dozen, but, according to psychologists, only 23% of all those who start can withstand any of them to the end...

A famous nutritionist and psychotherapist who has developed his own, original method of losing weight, which has already been able...

The abdomen and waist area are a problem area that worries many women. Often, even with regular...
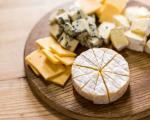
Enough! You no longer need to cook for yourself separately and count every calorie. The cheese diet is simple, tasty and...

Usually people gain excess weight over a long period of time. But sooner or later there comes a time when...
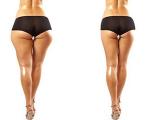
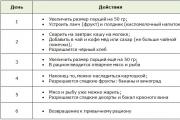
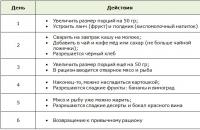
In order to lose weight in your legs, you need to use not only a set of exercises, but also reconsider your...

COMPLEXES OF GYMNASTIC EXERCISES The proposed complexes of gymnastic exercises are compiled for various...

We are starting our virtual journey through different countries of the world with the goal of getting to know street food that...

We all take vacations in the summer... Or do you prefer to stay home until the heat subsides? In general, every season...

Time in the USA has its own characteristics in terms of its perception and designation. The USA is one of the few countries...

In the fight against excess fat deposits in the abdomen and waist, physical...
It’s one thing when your weight does not fit into the norm by 3-5 kg and you have time to sit on some...