Simple crochet booties: knit in one evening
Booties are the best, practical and comfortable shoes for babies who are not yet walking. Knitting booties is not difficult....
/ 02/06/2017 at 11:51
Hello, dear knitters, friends and blog guests!
I especially want to appeal to beginner knitters - those who have tried to learn how to knit using the lessons from this blog. Thank you so much for your feedback and comments. Thanks to them, I better understand what exactly may be unclear to you, and, as far as possible, I try to improve the information conveyed to you.
This article will not be a lesson, but in some way a “guide” on how to move forward in learning for those who want to learn how to knit, and let me give you some advice. I think I have the right to this, based on my almost 40 years of experience as a knitter and the trials, errors and some experience that have been acquired over the years.
But I will also appeal to experienced knitters. My dears, if you take the time to read this article and can add something of your own or correct me, please write in the comments and share your experience!
This blog contains the most basic things you need to know and be able to do in order to learn how to knit from scratch. Some initial skills can be learned by gradually going through lessons for beginners. So, you already know how to cast on loops, knit knit and purl loops in different ways. Knit 2 and 3 loops together, yarn over, add loops, bind off loops at the end of knitting. In principle, this is already enough to start knitting the first patterns and the first simple things.
More in-depth information and further techniques and “subtleties” are described in the articles in the section “Improving knitting skills”. In particular, there you can find a step-by-step master class about offset loops (or how to knit braids), about elongated loops , armhole design And neck, knitting raglan from top, and other. Of course, these materials will continue to be updated, as well as lessons for beginners.
And you can find information about the terms most commonly used in knitting in "Glossary of Terms". Look there too, in case something...
If you are satisfied with the description given in the article, leave this article in your bookmarks so that you can return, share on social networks. If something is unclear, do not hesitate to ask directly in the comments to the article - I always try to answer, and in some cases, thanks to your questions, I supplement the article or eliminate my shortcomings.
And now - some tips for beginner knitters.
Girls starting to knit now, how lucky you are! Now there is such a huge selection of knitting needles, yarn, and various knitting accessories! When I learned to knit somewhere in the mid-70s, there was a shortage of everything.
The first knitting needles, I remember, my dad made for me himself at the factory - several pairs of different lengths, but the same thickness (approximately 2.5 - 3 mm) - from strong stainless steel wire, sharpened the ends, and attached turned wooden balls to the other ends... I have I still keep these first knitting needles, as a memory of my first steps in knitting, and a memory of my dad... It was later that they bought me a set of factory knitting needles.
What about the threads? It was not so easy to buy normal yarn in the store, especially high-quality imported yarn - it was not often that you had such luck. What haven't we knitted from? Mostly they unraveled old factory items, knitted acrylic braid, pulled thin threads from scarves, joined, tied... eh!
However, I digress. So, to begin with, I would advise you to take both knitting needles and yarn of medium thickness. Knitting needles 3 – 3.5 mm, in my opinion, are the most convenient for learning. It’s more difficult to pick up stitches with thick knitting needles, you need to knit loosely with them, use thick yarn - it’s difficult to hone the skill, it seems to me.
You should not use wooden, plastic, or bamboo knitting needles. The yarn glides on them worse, they bend in the hands (and beginner knitters can hold the knitting needles with tension). In my opinion, smooth, durable steel knitting needles are the way to start!
Take straight or circular - at your discretion. They say that on straight knitting needles the knitting is more even, that is, the loops are straighter. But it can be uncomfortable for me when their non-working ends rise up in a sweeping manner along with the knitted fabric - it’s somehow heavy on my hands, so I often knit in the round. But this is all very individual. But I think it’s still better to learn on straight, but not too long, knitting needles.
But take the simplest and most inexpensive yarn - preferably wool, or half-woolen, non-slippery (without silk, viscose, nylon in the composition). If you suddenly accidentally miss a loop, on slippery yarn it will quickly unravel down the rows, “shoot an arrow”, like on tights.

However, you should not take fluffy yarn with mohair. On the contrary, it clings to the fibers, and if you suddenly need to unravel the sample (and beginners, and not only beginner knitters, have to do this quite often) - then it will be quite difficult to do this, and the yarn will then deform, become thin and with lumps.
And don’t use multi-twist yarn at first. This is a yarn in which the thread consists of several thin threads. In knitting, it, of course, lies smoothly and beautifully, but beginners may have problems when it is difficult to “hold” all the thin threads in the loop at the same time - you can lose one or two threads from the knitting needle and then the knitting becomes tangled and has no shape.
 There are many different types of knitting patterns- both simple and more complex. To figure out how to knit them, there are diagrams and descriptions.
The descriptions describe in detail, row by row, which loops, how and in what sequence to knit, taking into account rapport(repeating combination), which is usually marked with “*” or placed in brackets.
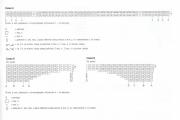
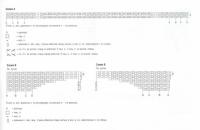
Knitting patterns are more visual, since they show better the relationships between the elements of the pattern. The patterns should be read from right to left, in the same direction as we knit the row. However, you need to take into account that in different diagrams different loops (elements) can be depicted differently, so you should always pay very close attention to the symbols and explanations of the diagrams.
The cast-on row (a row of cast-on stitches) does not apply to diagrams or descriptions. This is not the first, but a kind of zero row, and the first is the one where the loops are already knitted directly. Edge loops, as a rule, are also not mentioned in descriptions and diagrams. The first loops of the row according to the description or pattern are knitted after, as if taken for granted, the edge loop. However, there are exceptions, and then the edges are discussed separately in the description.
 So, the basic techniques have been mastered. And how you want to knit something quickly!
My advice to you is not to immediately try to knit something complex or ornate. Everything has its time. Any craft requires skills that need to be honed. And they sometimes take years to perfect, and this process has no boundaries. Everything comes with practice.
If you immediately take on something difficult for you at the initial stage, and you suddenly fail, then some may be disappointed, and the desire to continue learning further may disappear (although this is all very individual).
Therefore, try knitting samples of different patterns first, in order, as they say, to get your knitting on. If something doesn’t work out, don’t be upset: everything will work out, but a little later, or in the next attempts. Start with something that is feasible for you, so that you see the result and it brings you satisfaction. The process should bring joy!
If something doesn’t work out for you, then don’t get angry, nervous, or conclude that knitting is not your thing and that you don’t have enough patience for it. Knitting is stressful only at first while you are learning. Later you will understand how exciting and relaxing it is. It’s not for nothing that there is an opinion that this activity helps relieve stress, relaxation and contemplation.
And when the process reaches almost automaticity, you will be able to knit between tasks and combine it with other activities. And even the question itself: “Where can I find time to knit?” fades into the background...

If we talk about what products you should start with, then in my opinion the ideal option is some kind of scarf: a smooth, not too wide fabric, and you can choose a simple pattern. So what if it’s long and takes a long time to knit. But gradually your hand gets fuller, the loops are aligned, and at the end you will get a finished product about which you can proudly say: “I knitted this myself!” At least here's how this, or this scarves. Or, if for the man you love, tie English rubber band, it will be a win-win.
In general, don’t be afraid to try knitting everything! Well, if something complicated didn’t work out, okay, put it aside for now, and knit something simpler. But just don’t give up and don’t retreat if you want to learn. Remember - practice and patience, combined with your desire, will definitely bring results!
If you feel strong, start knitting something more complex: children’s blouses, hats, etc. pillow covers, simple clothes for adults, socks... And for yourself, always know:
There are no things that you don’t know how to knit - there are things that you simply haven’t knitted YET!
Many people start knitting according to ready-made descriptions from magazines. But in my opinion, the descriptions in magazines are designed for more or less advanced knitters - much is not explained in detail there. And then it’s not often that, based on the description, you can get a product that completely matches the sample in size and appearance - you need a very precise match with the yarn and
Currently, hand knitting using knitting needles is becoming more and more popular. And this is not surprising, thanks to mastery of this art you can create a great variety of different things. Moreover, this can be both clothing for different seasons, and various crafts. Learning to knit is not at all difficult, the main thing is to have the desire for it and the desire to learn something new.
The most important questions that all beginners need to get answers to before proceeding directly to the process itself are the following:
Over a long period of time, handicrafts such as hand knitting did not remain low-key, and now skilled craftsmen and craftswomen have come up with a sufficient number of both basic and auxiliary tools for convenience. It will be very useful for beginners to know about them in order to learn how to knit. Let's look at each of them separately:

The ability to choose the right yarn and knitting needle size for a future product is very important, since it is this factor that directly affects the quality of knitting and the future result.
All types of knitting needles, regardless of their purpose, have their own number and it is very good if it is indicated not only on the packaging, but also on the knitting needle itself, so as not to get confused later. The number of the knitting needle indicates the size of its diameter. There are more than ten spoke numbers in total.

According to generally accepted rules, the knitting needle should be twice as thick as the thread chosen for knitting. But in fact, it is better to choose the thickness of the knitting needles individually for each person, since everyone has their own knitting technique and density. For those needlewomen who have a freer style of knitting loops, it is better to purchase knitting needles with a diameter 1.5 times thicker than the thread, and for those who like to knit tightly, the yarn should be 2.5 times thinner than the knitting needles.
To knit an elastic band, in order to make it elastic and elastic, it is also advisable to take knitting needles with the same diameter as the thread, or only 1.5 times thicker.
Thus, if you want to knit light summer or openwork items, then thin knitting needles number 1 and 2 are best; for denser items and threads created in several folds, knitting needles with a diameter of 2.5 -3 can be an excellent option. Starting from the third number, knitting needles are used to knit dense and voluminous items created from thick threads. With these knitting needles you can create pullovers, jackets, hats, bags and even jackets and coats.
 Cotton.
With this yarn you can knit absolutely any pattern and at the same time it will turn out unusually beautiful.
Cotton.
With this yarn you can knit absolutely any pattern and at the same time it will turn out unusually beautiful.
Mohair
is a fluffy yarn made from wool. Warm winter clothes are knitted from such threads.
Fantasy yarn.
This yarn is also called melange yarn. It contains part natural and part artificial fibers. Usually it has a different texture, for example, boucle or cones.
Brilliant.
This yarn is a blend of some warp yarn, acrylic and viscose.
Fancy yarn.
This thread is obtained by mixing fibers that are different not only in color, but also in quality and is produced using a special technology.
Woolen.
Made from sheep's wool. Ideal for smooth, embossed and multi-colored patterns.
What else you should pay attention to when choosing knitting needles and yarn:
For those who want to learn how to knit and take this tool in their hands for the first time, the beginning of knitting will be learning the technique of correct placement of thread and knitting needles, as well as a set of initial loops. Loops can be cast on using one of the methods described below, with the first being suitable for the main cast-on, and the second used if necessary to lengthen the fabric or cast on additional loops:
1 main way. The loops are cast on two knitting needles, this is done so that when casting on they do not become too tight, and new loops can be easily knitted from them. The needles are placed in the left hand, and held just above their beginning with three fingers: thumb, index and middle. The thread is draped over the thumb and index finger of the left hand so that its end lies on the index finger and goes into the palm, and the other end, extending from the ball, wraps the thumb and also goes into the palm. The ends of the thread are lightly held with the rest of your fingers. Once positioned correctly, the knitting needles are first passed under the thread on the index finger, and then under the end draped over the thumb. Then the knitting needles are moved towards the index finger and the thread located on it is caught using a movement directed first up and then down, after which the knitting needles with the thread are again threaded into the loop formed on the thumb. At the end of knitting the first loop, the thread is removed from the fingers and the loop formed on the knitting needles is tightened. In order to make the second and all other loops, the threads are again placed on the thumb and forefinger and all steps are repeated in the same way as for the first loop. After the required number of loops have been knitted, one of the knitting needles is carefully removed from the loops.
Method 2. The knitting needles, as in the first method, must be placed in the right hand, after which the working thread is draped over the index finger of the left hand and the loop formed on the finger is pulled up with knitting needles and removed. After which the thread extending from the ball is tightened until an even, but not too tight loop is obtained.
After mastering the technique of knitting the first loops of the row, the next thing that beginners need to learn is to knit the main loops on which almost every pattern is based. These stitches are called purl and knit stitches. Let's consider the process of knitting each of them:
1) To knit knit stitches, a free knitting needle is inserted into the middle of the loop and the working thread is pulled out of it, thus forming a new loop.
2) Purl loops are knitted as follows. The free knitting needle is wound behind the loop wall from left to right, after which the working thread is thrown in front of this loop and pulled through the loop by moving the knitting needle from left to right.
Using the above loops, such popular knittings are made as:
In addition, by alternating knit and purl stitches, you can make various types of patterns, the simplest of which are squares and diamonds, and for more complex knitting and patterns, various patterns are invented, after learning to read which, you can create any thing you like.
Currently, a huge number of different patterns have already been invented that reveal various knitting techniques. Their purpose is to tell how the product was created and to shorten the sometimes too long verbal descriptions of the entire process. Such patterns can be seen in any fashionable knitting magazine. At first glance, they may seem incredibly difficult to parse, but in fact there is absolutely nothing difficult about reading them. To do this, you just need to pay attention to the decoding of all the symbols included in the diagram, and you can even remember some of the main ones, and also know the following few small rules for reading them:
For the main and most frequently used loops, the following designations exist:
Unlike crocheting, where at the end of the work you need to fasten only one loop, a knitted product is completed by closing all the loops of the last row. This is done in the following sequence:
The first two loops, starting from the edge, are knitted with the front one, if this is the front side, or purl on the wrong side.
After which the knitted loop is removed from knitting needle to knitting needle and again returned to the remaining loops.
Then again you need to knit two loops together and throw a new loop onto the left knitting needle. Thus, knitting the loops continues until there is one loop left on the left knitting needle, which must be secured with a hook. To do this, the hook is threaded into the loop, then it grabs the working thread and is pulled through the last loop of the row. After which the thread is cut, and the resulting loop is tightened until a knot is obtained.
Once you have fully mastered the necessary information and basic knitting techniques, stocked up on the necessary tools and materials, you can safely start creating and start dressing yourself and your loved ones in beautiful knitted items created by yourself.
If you really want to learn how to knit, but still don’t know how to do this type of needlework, first decide a number of questions for yourself. Think about how and where you will study. Of course, you can take special courses, but you will have to pay for them. And if ? On the Internet you can find many knitting technology sites, and there are also video courses that will help you gain.
If you don’t have a computer and the Internet, it’s best to find a friend who is happy to connect with her entire family and friends. She will show you the basics of this type of needlework and will be able to give you some hints later.
Have you already decided what you will knit or crochet? Sweaters, scarves, and hats are usually knitted with knitting needles. Crocheting the fabric turns out to be denser and holds a complex shape better, so it is used to knit some styles of hats, blankets, rugs, toys, as well as the edge of a finished product made with knitting needles. Lace shawls are also usually crocheted. Creating a complex drawing is much more difficult.
To knit socks and mittens, you will need 4 knitting needles. Beginners in this business probably don’t need to start with so many knitting needles right away.
Knitting needles and hooks come in metal and plastic. As practice shows, when mastering knitting, beginning needlewomen usually tighten the loops very tightly. Therefore, to begin with, it is better to choose metal knitting needles - the loops slide better on them.
It is preferable to choose good half-woolen, fairly thick threads; it is much easier to make or crochet from them. Knitting needles and hooks vary in thickness and have their own number. When selecting them for a specific yarn, remember that knitting devices should be one and a half to two times thicker than the threads.
And one more little secret. When you knit a product several times and then unravel it, the threads deteriorate, “curl”, and the piece knitted from them looks worse and worse. To prevent this from happening, when you realize that you are ready to create a good thing, unravel everything you knitted before, wind the thread into a loose ball and hold it over the steam. As a result, the thread will straighten.
Now you can start knitting. For the first time, choose a simple blouse style or simply knit a beautiful scarf. To calculate how many loops you need to cast on, knit a sample of 30 by 30 loops, steam it with an iron and see how many centimeters of the product you get with this quantity. Based on the desired width of, for example, a scarf, calculate how many loops you need to cast on.
When starting to knit, you need to be patient: not everything will turn out the way you would like, but over time you will be able to create a masterpiece that is not inferior to the samples shown on the catwalk.
The knitting process is not very fast. Previously, on long winter evenings, doing this type of needlework helped pass the time. Now, when every minute counts, you want to do everything quickly. But this doesn't happen with knitting. You will have to unravel the yarn several times, and start again, and put it aside for a while, so that the desire to continue again appears.
But there are also advantages, and there are quite a few of them. Having suffered a little, you will get, for example, a wonderful blouse that no one else has. In addition, nutritionists strongly advise learning to knit: by concentrating on work, you will be less likely to come to the table to put another cookie in your mouth. In addition, when you learn this needlework, knitting will be very good at calming your nervous system.
Remember: it's never too late to learn to knit!
Knitting starts with a set of loops. In this lesson we will learn how to cast on stitches on knitting needles in the traditional way.
1. Take the thread from the ball in the palm of your left hand and throw it over your index finger.
2. Wrap the free end of the thread clockwise around your thumb.
 3. And we pinch both ends of the thread with the free fingers of our left hand.
 4. Take two knitting needles folded together in your right hand.
We insert them from the bottom up into the loop on the thumb.
 5. We pick up the thread from the index finger as shown in the figure - from top to bottom.
We stretch the knitting needles with the thread into the loop.
6. Then we release the thread from the thumb, or in other words, we simply pull the thumb out of the loop.
 7. And, helping with the thumb and index fingers of the left hand, tighten the loop.
Hold the loop with the index finger of your right hand.
The first loop is knitted.
8. Having lowered the knitting needles towards you, we again insert them from the bottom up into the loop on the thumb.
Then we pick up the thread from the index finger from the top down and pull the knitting needles with the thread into the loop on the thumb.
9. Tighten the second loop.
If you want to learn how to knit, following step-by-step explanations aimed at beginners will make it easy to master this skill.
“Thinking is like cosmic knitting,” wrote Waldorf Rudolf Steiner almost a century ago. He developed a comprehensive curriculum for Waldorf students based on this idea, filled with knitting, sewing and woodworking, believing that "a person who is unskillful with his fingers will also be unskillful in his intellect, having fewer mobile ideas and thoughts." Today's Waldorf students still knit socks and kitchen spoons, and many Waldorf schools eschew the use of technology. These two things - handcraft and technology - may seem at first glance discordant. But there is a case where manual work and computing, and the process that links them, are more closely related than one might think.
When electrical engineering professor Dr Karen Shoop from Queen Mary University in London took over her first knitting studio, she immediately noticed that knitting was a lot like writing computer code. "I've noticed that knitting instructions are mostly binary (like computers)—in other words, knit or purl," she said. “More interesting were the knitting instructions, which read just like the codes used for string matching and coding manipulation.” Schoop also acknowledges that the earliest stages of computing were inspired by handwork: “Of course, computers eventually began partly inspired by weaving. Some of the earliest programmers were probably people making card/paper hole patterns for weaving patterns.”
It is recommended to purchase bamboo needles for beginners because they are considered the easiest to work with. Metal and plastic needles can be a bit slippery, which can cause problems for beginners if the stitches slip. If you've never picked up knitting needles, this is a great time to start.
You can learn to knit using different techniques, depending on your personal qualities:
Once you've learned the basic stitches and vocabulary, there's still tons to learn about knitting. If you don't want to choose something too difficult to start with, gradually improve your skills by trying projects that challenge and motivate you to learn new techniques and stitches.
If you get confused or stuck, just ask another knitter. Most of them are more than happy to help you.
The basics of knitting are quite simple, you need two basic stitches and everything else is a variation or combination of the two. These stitches are "knitted" and "crimped" (basically back to front knitting). Then from there it gets more complex.
When learning to knit, the most common mistake people make is not slipping the stitch they just worked with the left needle. Instead, they work on that stitch again, which increases the total number of stitches.
At the end of your row you will switch your needles so that the one with all the stitches is now the left needle. Work the crochet stitch over and over again until you become comfortable with it and create stitches that are relatively straight. As you improve, your seams will align. Once you've mastered the knit stitch, go back to start learning another basic stitch: the crinkle stitch.
Here are five tips for learning anything new based on your knitting experience:
You will make mistakes along the way. Mistakes are part of learning, so expect them. If you drop a stitch, keep moving forward. First the goal is to complete the basic knitting steps. Once you become comfortable with the knitting stitch, your hands will naturally settle into the rhythm of your knitting and you will make fewer mistakes. Think of your first ten lines as practice. Once the knitting is comfortable, consider starting a new scarf. You will be much more confident and your scarf will have fewer mistakes. Knitters since time immemorial and knitters in the future have and will make the same mistakes.
Once you've learned the basics of knitting - how to cast on and knit, how to work the knit stitch and the loop stitch - you'll be ready to start your first pattern. In the beginning, looking at a knitting pattern can be confusing. It is a special knitting language that uses many abbreviations and terms to save space and make patterns easier to read. So, the first thing you need to do is become familiar with knitting abbreviations.
Some of them are easy to understand, for example:
Basic stitch abbreviations: K or k = knit stitch, P or p = stitch.
The terms represent what you should do, for example:
With abbreviations and deadlines in mind, let's look at a typical knitting pattern. Jerseys can be worked back and forth in rows to form a flat piece, or in rounds to form a seamless tube such as socks or hats. Special needles are used to work in rounds.
The instructions will first tell you to cast a certain number of stitches. But wait - before you can begin, you must place a slip knot on one of the needles. Templates will never tell you this - they just assume you know it.
There are many ways to start. Some give a nice stretchy edge; others provide a solid foundation. Unless the pattern tells you differently, use the method you know.
Learn how to read a knitting chart with an easy step-by-step tutorial. Basic beginner patterns include both written instructions and a knitting chart. Once you understand the general structure of a knitting pattern, you'll find yourself wanting to conquer even more complex patterns and textures.
Knitting charts are a tool to help you understand how to knit a pattern. Most patterns come with both written knitting instructions and a chart. Consider a knitting chart as an additional aid in visualizing and understanding your project as a whole. The diagram itself is laid out in a grid quite simply. And this grid has small cells, like an Excel document or graph paper. Each of these boxes represents one stitch on your needle. The entire chart represents your knitting pattern.
Stitch symbols are small patterns that represent knitting techniques that can be used on each stitch of your design. Each box will be filled with either a jersey symbol or a down stitch. Each box on your knitting chart grid has a different stitch symbol in it to help you know when it's time to knit each stitch on the needle.
The overall diagram helps you see how the pattern is drawn in and the repetition portion is highlighted.
So we have our stitches on our needle. The very first stitch on your needle is here to the right of the row of stitches. When we knit our piece, we start from the bottom of our work. So that first stitch in the bottom right corner of our knitting pattern is in the same location as the bottom right corner of our knitting chart.
Knitting- a centuries-old craft, mainly practiced out of necessity; if you wanted socks or a sweater, previously you would have had to knit it yourself. Today, knitting is more of a hobby, although it is also an art form, and some might say it is becoming an obsession.
Knowing how to knit can seem overwhelming after looking at all the yarns and patterns. But don't let it get to you—even the most experienced knitter was once a beginner.
"Cast on" is the name of the technique used to get the first row of stitches on the needle, which is important for beginner knitters. There are several dialing methods. This is a versatile and durable basting that can be used for most projects.
It all starts with a loop, which is a knot that pulls up easily once you place it on the needle.
How to make a loop the right way:
How to knit: long tail method:

Now pull all the stitches out of the needle and make 20 stitches again. Repeat this process until you feel really comfortable with this technique. When you're just learning to knit, it takes time to strengthen your memory.
One of the objects of the knitting game is to move stitches from your left needle to your right needle, introducing new rows of stitches into the process.

There are several ways to achieve a knit stitch; the two most popular are the English method (also called "throwing") and the continental method (also called "gathering"). The above information refers to the English method, in which the working yarn is held in the right hand. In this method, the yarn is held in the left hand. Practice both methods to see what works best for you. There is no right or wrong way to knit. To use the Continental knitting method, follow these steps:
Once you have finished knitting you will need to remove your needles unless your stitches are reversed. This process is called binding. Even beginners will be able to communicate easily by following these simple instructions.
If you make a mistake, keep moving. You're not doing anything other than practicing knitting, so you can ignore the mistakes and just get on with knit stitching.
Once you start knitting the downstitch, you will be confident.
Why not start with a super simple scarf like the one shown above. This scarf is knitted with a super chunky yarn. To start, take a size 13 needle, place on 12 stitches and knit until you have 12cm of yarn left, then tie it off and sew it into the ends.

All knitting needles perform the same important function, but different types of needles are available in the market depending on the type of knitting project. These are single point, bi-directional and round needles.
Single needles, also sometimes called straight needles, are pointed at one end and driven into the other, allowing knitting from a single point. Are these needles used for back and forth knitting? and creating flat knitted products.
Double pointed needles are straight needles with both ends and are sold in sets of four or five. These needles are used as a kit to create tubular objects such as socks.

Circular needles are two straight, unidirectional needles connected together by a flexible cable. They can be used for both flat knitting and bulk knitting. As a result, they are increasingly becoming the preferred type of knitting needle among knitting enthusiasts who don't want to stock up on different needles for different projects. Round needles are available as fixed round needles and as interchangeable round sets, with the ability to change cable length and needle tip size to suit project requirements, giving them great value.
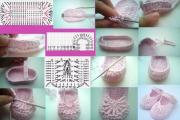
Booties are the best, practical and comfortable shoes for babies who are not yet walking. Knitting booties is not difficult....
A classic cardigan is one of the options for a knitted sweater, the main difference of which is the absence...
/ 02/06/2017 at 11:51 Hello, dear knitters, friends and blog guests! I especially want to appeal to beginners...

Working women are often afraid to tell their boss about their upcoming maternity leave. Yes, and employers, by virtue of their...

Update: October 2018 Early gray hair is an aesthetic phenomenon when gray hair appears at a young age: before 25...

You are in the New Year coloring page category. The coloring book you are considering is described by our visitors as follows...

Young people have hardly seen such units; now computer technology has taken over all the calculations, but still...

Human chorionic gonadotropin is the main hormone produced in the body of a pregnant woman...

29th week of pregnancy: what happens to the expectant mother and child? Week 29 – the moment of birth is getting closer. All...

Thyrotoxicosis and pregnancy are a rather rare combination. Such cases are registered approximately 1-2 times...

Do-it-yourself needle bed: photos, diagrams, master classes, we tried to put it all together very easily and beautifully...

The whole world celebrates No Bra Day on October 13 - as part of a flash mob, thousands of girls post on social...

Goals: To continue to develop in children a sense of collectivism and a friendly attitude towards each other; Download:...

Jeggings are figure-hugging trousers that combine jeans and leggings. Jeggings are tight...
A classic cardigan is one of the variants of a knitted sweater, the main difference of which is...
/ 02/06/2017 at 11:51 Hello, dear knitters, friends and blog guests! I would especially like to address...