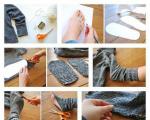
How to make a dragonfly from chenille wire
A dragonfly brooch is a fairly popular and fashionable decoration that can be seen on the collars of shirts, dresses and...
A dragonfly brooch is a fairly popular and fashionable decoration that can be seen on the collars of shirts, dresses and blouses of many beautiful women and girls. And all because it fits almost any outfit and adds zest to the image, no matter how it is presented. Today we want to tell you about how to create a brooch with your own hands and what you need to use for this. If you're ready for another handmade master class, then let's go!
Materials:
Progress:


In this way, sew the entire bead in a circle. Upon completion of the work, the number of beads must be even. 


For example, a dragonfly's wing might look like this:


First you need to sew on the first stone, decorate it with beads, then the second and then the third. 


After this, your homemade brooch will be ready to be attached to absolutely any surface, be it a blouse, bag or thick jacket. 
Well, for those who like to follow the process of creating handmade jewelry “live,” so to speak, we suggest that you familiarize yourself with a detailed video tutorial on how to make a dragonfly from beads and rhinestones:
We hope you liked this idea and you will definitely make a similar decoration for yourself. Tell us in the comments what outfit you would like to wear with this cute dragonfly brooch?
In contact with
Classmates
5 cool ideas for creating a dragonfly with your own hands.
For this option, dragonflies will need:
Cut out the wings from a plastic folder and color them with different colored markers. Glue the wings to the spoon using a dab of hot glue. Glue on the eyes, add a smile with a marker and the dragonfly can take flight.
This option for creating a dragonfly is perfect for autumn crafts, since natural materials will also be used here. Will need:
Fold one edge of the chenille, place two “airplanes” (maple seeds) and secure them with a chenille loop. String beads onto the remaining long tip of the chenille and twist the tip of the chenille around the last bead.

It will be better if the first bead is the largest bead, so it will look like a head. Do not take cuttings from maple seeds; they will become natural antennae of a dragonfly.

For such a dragonfly you will need:
Using felt-tip pens, apply a beautiful pattern to a wooden clothespin, which will later serve as the body of the dragonfly. Glue the eyes to it. Twist two figure eights from the chenille and, opening the clothespin slightly, pinch the wings.

Even if at first glance there is nothing in your house that could serve as material for crafts, know that this is not so! For example, this dragonfly can be made from regular pasta. For it you will need:
Color the paste and stick and let them dry completely. Glue two pasta to the body on each side. Glue eyes on the upper part of the body, and decorate the body itself with small sequins or flat buttons.

For such an unusually beautiful dragonfly you will need:
Glue rhinestones to a popsicle stick or coffee stick. The largest rhinestone will become the head. Using metallic chenille, twist two pairs of wings of different sizes and glue them between the first and second small rhinestones on the body.
Green dragonfly 
Materials:
* Olive beaded wire
* Green organza
*Glass beads of different shapes
* Green round rhinestones (12 pcs.)
* Green oval rhinestones (4 pcs.)
* Glitter (sparkles) large and small, green
* Decorative green pearlescent glue
* Moment-Crystal glue, PVA glue
Tools:
* Wire cutters
Operating procedure
1. Take two 30 cm pieces of wire, fold them together and twist them along their entire length. Enlarge the given template and give the wire the shape of a dragonfly wing, leaving the ends 4 cm long. Glue the wire base onto the organza using MomentCrystal glue. Trim off excess fabric. Apply PVA glue to the edge of the wing and sprinkle with large glitter. 
2. Place the wing on the template and carefully apply decorative glue to the fabric, repeating the design on the template. 
3. Sprinkle the design on the wing with fine glitter while the glue is still wet. Using MomentCrystal glue, attach rhinestones to the wing. Make the remaining 3 wings. 
4. Take a wire 40 cm long and string 2 small beads onto it, leaving one end of the wire 15 cm shorter than the other so that the long end of the wire can be passed through the beads a second time. Twist each bead. 
5. Place a large bead on both ends of the wire and pass the long end of the wire through it again. Cast on 6 more beads in the same way, passing the long end of the wire through each one twice. 
6. Use a teardrop-shaped bead to complete the manufacture of the dragonfly’s body - pass the ends of the wire through the hole crosswise, twist them and cut off the excess. 
7. Attach the wings to the body in pairs, twisting the wire so that the dragonfly has the 1st and 2nd pairs of legs. 
8. Cut off the excess wire so that the legs are the same length. Using Moment-Crystal glue, attach oval beads to the ends of the legs. From a piece of wire 30–40 cm long, make a loop for hanging, wrapping the ends of the wire at the base of the wings; by the way, this will give additional rigidity to the product. 
Advice
Using the same technology, you can make a beautiful butterfly from fabric and wire and decorate curtains or a textile lampshade with it. These lovely creatures will look charming on the holiday table. You can also make an original brooch using this technique. 
It's quite simple to do. Making it will take a little time, but you can decorate the interior with a beautiful bright figurine. If all the triangular pieces are glued together, the dragonfly can be used as a toy.
To make a dragonfly you will need 63 triangular modules: 8 red, 16 yellow, 7 green and 32 blue.

The body consists of 19 modules: 8 red and 11 yellow. First you need to connect 2 modules, putting the pockets on each other with the long side. You will need 2 of these blanks.

Using three yellow modules, you should connect the red blanks. The modules should also be put on with the long side.

You need to insert one more yellow module into the free yellow side pockets. In the future, dragonfly wings will be attached here.

The fourth row will consist of two red modules. They need to be worn with the long side.

The fifth row consists of three yellow modules. The difference here is that in the yellow pockets you need to hide not only the red modules of the previous row, but also the protruding yellow corners of the third row. Again, one yellow module must be inserted into the side pockets of the yellow modules. The second pair of wings will be attached here.

The sixth row includes 2 red modules, and they need to evenly cover all the corners of the previous row.

To finish making the dragonfly's body, you need to put on 1 yellow module in the middle.

To make one dragonfly wing you will need 8 blue modules. Each module must be inserted at one corner into the corresponding pocket.

The last module, which will be attached to the body, needs to be inserted into two pockets.

According to this principle, you need to assemble two right wings and two left ones.

The tail will consist of 5 green and 5 yellow modules. Alternating them, you need to insert them with two corners into 2 pockets. When finished, bend the tail slightly.

The mustache is very easy to make from two green modules. They need to be screwed onto a pencil or pen so that they become round.

When all the components are ready, you should begin assembling the dragonfly.
The pre-New Year bustle often includes shopping in search of decorations for the Christmas tree. But this time can also be spent making New Year’s crafts yourself. Moreover, many of them do not require significant costs. For example, you can quickly make a Christmas tree decoration from chenille wire. The process of creating such a Christmas tree toy is shown in this master class...
Simple and funny toys often attract children more than technically complex store-bought ones. Therefore, it’s worth spending a little time to make your child happy with the new crafts you make. Moreover, you can make it together with your child. We propose to make a funny little man from chenille wire, whose arms and legs can bend. Step-by-step creation of such a toy from...
You can preserve the memory of summer in various ways. Some people make a herbarium from leaves and flowers, others decorate their home with crafts reminiscent of the warm season. We propose to make a berry that is similar in appearance to strawberries or raspberries. And we will make it from chenille wire according to the proposed master class...
Making crafts from chenille wire is a very exciting activity for kids. After all, this material allows you to quickly and safely make something bright and interesting. For example, fluffy sticks make beautiful jewelry for girls. In our master class we suggest making a children's bracelet from this material...
The largest modern reptile - a crocodile, which is a merciless predator and dangerous to humans, can be made together with a child from chenille wire, which is also called fluffy, and a wooden ice cream stick. Making a crocodile from this material will not take much time and will not scare the child, as it will be in the form of a toy and look good-natured. Our master class..
This master class will help you make a spider step by step using photographs and descriptions from chenille wire. All representatives of arachnids have the same body structure. They have 8 legs and this differs from insects, which only have 6 limbs. Many people dislike arachnids, but in our case the spider does not pose any danger, because it is made of chenille wire...
Jewelry for little girls can be easily made by yourself. And this doesn’t require a lot of materials. For example, for a young fashionista you can make a ring using chenille wire. This soft material is easy to work with, so the child can handle it himself. Step-by-step creation of a simple children's ring is given in this master class...
This dream catcher talisman is designed to protect the sleeper from evil spirits. It is believed that it allows only good dreams to pass through and delays bad ones. You can make a dream catcher from various materials, but we suggest making this craft from chenille wire. Step-by-step steps for creating a dream catcher from this material are given in this master class...
The tiger's striped coloration helps it camouflage. Hiding in the thickets, he waits for prey and attacks suddenly. You can make such a predator from chenille wire, soft, pliable and fluffy, and without spending a lot of time. How this craft is made is described step by step in this master class...

A dragonfly brooch is a fairly popular and fashionable decoration that can be seen on the collars of shirts, dresses and...
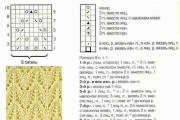
Openwork knitted bags. Description of work. Elegant knitted bags will be a pleasant gift for loved ones. Bags...

To create a stylish hairstyle, it is not necessary to change the shape or length. One detail is enough to transform...

GOST 31696-2012 INTERSTATE STANDARDCOSMETIC HYGIENIC WASHING PRODUCTSGeneral technical conditionsCosmetic...

In our large multicultural country there are many interesting New Year traditions, sometimes quite unexpected. Yes, in...

Recycling plastic is not only useful, but also profitable. DIY baskets made from plastic bottles...
The blanket is knitted in one piece, the machines are knitted using the intarsia technique - each colored section is from a separate ball....
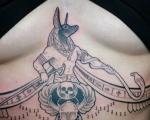
Egyptian Gods is a fairly popular topic. It's difficult to find people who haven't heard of at least one of...

Russia Day - what kind of holiday is it? How did he appear? How much do we know about its history? What events...
If you pick up an object such as knitting needles, you can knit with your own hands a whole collection of all kinds of patterns...
House slippers should be comfortable, light and soft so that your feet can rest after a hard day...
For friends and family, and have already bought it, you might want to wrap it up nicely. Make an original...

There are quite a few places in Moscow where you can buy clothes made from recycled materials, organic and environmentally friendly materials...

A high chair for feeding a child will make life easier for parents. It securely holds the baby and provides...

Openwork knitted bags. Description of work. Elegant knitted bags will be a pleasant gift for loved ones....

To create a stylish hairstyle, it is not necessary to change the shape or length. One detail is enough to transform...