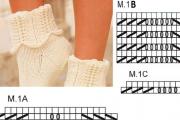
Socks with a simple raised knitting pattern
The times when jacquard patterns, braids and flowers could only be seen on a sweater are long gone. Today they successfully...
Lessons (master classes) of weaving from rubber bands for beginners: how to make a flower - a simple figure on a pencil or pen from rubber bands without a machine.
The fifth lesson in the series "Weaving from rubber bands."
This time there will be a master class on a very simple figurine, it is easier to make than the simplest “Chain” bracelet. Moreover, such figures will be a very original decoration for pencils or pens. With them, pencils or pens will become bright, unusual, and you will no longer confuse them at school with the writing materials of your desk neighbor.

These figures can be given to friends, relatives, acquaintances and even teachers on September 1st. And of course, don’t forget about yourself.
The pencil figures from this master class turn out shaggy and look like bright multi-colored flowers. They can be made from rubber bands of one color or multi-colored. Figures made from two-color rubber bands with a golden top layer, with a pearlescent or metallic coating, and with a wavy edge look beautiful and unusual.

What you need to weave pencil figures from rubber bands

Stages of work


Pens and pencils with such decorations turn into flowers, and in a pencil holder they look like a bouquet.


Such a bouquet of flowers from pens or pencils can be given on September 1, either one at a time or as a whole bouquet in a beautiful small vase or pencil holder - it will be an unusual and always necessary gift for everyone who is somehow connected with the school.


These same figures are an original decoration not only for writing instruments, but also for cocktail straws. You can create a holiday table decor made from rubber bands, for example, for celebrating a child’s birthday. This decoration can then be given as a souvenir to all children invited to the holiday.

All the best to you! Especially for blog readers "MORE creative ideas for children"(https://site), with sincere respect, Yulia Sherstyuk
All the best! If the article was useful to you, please help the development of the site by sharing a link to it on social networks.
Posting site materials (images and text) on other resources without the written permission of the author is prohibited and punishable by law.
If lately you have been living in a colorful world called Rainbow Loom, if your hands have already become adept at weaving bracelets, and your eyes have become accustomed to bright colors, all you have to do is learn how to weave a figure from rubber bands and begin to master a new stage of your creativity. Of course, at first you will have to learn to make the simplest figures.
Even a child can repeat the patterns that we want to offer you. They are intended just for beginners, and what can we say about experienced bracelet knitters who can literally make a cute heart or delicious ice cream from rubber bands in no time. In addition, we have selected for you high-quality and very accessible video lessons from which you will learn how to weave a figure from rubber bands with your own hands. We suggest you watch the video carefully and get to work.
What and how can you weave from rainbow loom rubber bands?
By the way, with tools you can also expect similar variety and freedom of choice. We we will work in different ways:
As you can see, you can make not only bracelets from rubber bands; there are simply many possibilities for imagination. Choose your favorite colors, grab your tools, and we’ll start weaving figures from rubber bands.
And the first video lesson will be demonstrated to us by an experienced and very creative master Sergey. Together with him we will weave a heart, which can serve as a wonderful romantic gift, keychain or just a beautiful talisman. The master just can’t wait to show you how to weave a figure from rubber bands on the machine, be careful and careful while working.
So you have made a cute heart keychain or souvenir for your loved one. Next, you will find even more exciting weaving of figures from rubber bands on the machine. All the schemes are very interesting, and most importantly - simple.
Try to weave a 3D cucumber or a cute teddy bear - you will simply a colossal choice for imagination. You can also weave your own products using photo instructions for beginners. In addition, it is very useful for beginners to watch a video on how to weave figures from rubber bands, since more voluminous images appear on them, plus, of course, the comments of the master are very helpful. In both cases, first choose lightweight products that you can repeat both on a regular rainbow loom machine and without it.
You decide for yourself which tools to use for work, as well as which methods and patterns of weaving figures you prefer. We have selected a couple of master classes and the maximum number of high-quality and accessible YouTube videos for every taste, so that novice craftsmen can create their own collection of masterpieces. And we present to your attention a master class on weaving an octopus on a small rainbow loom machine, understandable and accessible even to a beginner. Look carefully at the following pictures, because from them you will learn to weave animal figures from rubber bands.
 1
. We put the first 3 pairs of elastic bands on the posts diagonally, twisting them in a figure eight. We put six rubber bands of a different color in the form of a rectangle on all the main posts of our machine.
1
. We put the first 3 pairs of elastic bands on the posts diagonally, twisting them in a figure eight. We put six rubber bands of a different color in the form of a rectangle on all the main posts of our machine.
 2
. We lift the bottom layer, consisting of red rubber bands, to the top and send them to the middle of the weaving. We remove one yellow elastic band from the outer columns of the far row and place them on the auxiliary columns, on the right and on the left.
2
. We lift the bottom layer, consisting of red rubber bands, to the top and send them to the middle of the weaving. We remove one yellow elastic band from the outer columns of the far row and place them on the auxiliary columns, on the right and on the left.
 3
. We put the next layer on pairs of columns in a circle, using absolutely all the columns. Raise the bottom layer of rubber bands to the top. Add a new layer of elastic bands of a different color and lift the bottom elastic bands to the top. We should have a total of 5 knitted rows. In the sixth row we add a pair of eyes, having previously made a blank on the hook.
3
. We put the next layer on pairs of columns in a circle, using absolutely all the columns. Raise the bottom layer of rubber bands to the top. Add a new layer of elastic bands of a different color and lift the bottom elastic bands to the top. We should have a total of 5 knitted rows. In the sixth row we add a pair of eyes, having previously made a blank on the hook.
We put the eyes on pairs of rubber bands in the nearest row. Next we weave the seventh row, and on the eighth we make a mouth. To do this, we put a black elastic band on the middle elastic band of the near row.
 4
. We have made the body and therefore move on to making 8 legs, which we weave on a hook. To do this, we make a chain of 8 pairs of rubber bands. We remove each of the legs with single elastic bands and put them on the machine one by one. We weave the bottom layer to the top, add elastic bands to the cavity in the middle of the weave and carefully fasten the structure together.
4
. We have made the body and therefore move on to making 8 legs, which we weave on a hook. To do this, we make a chain of 8 pairs of rubber bands. We remove each of the legs with single elastic bands and put them on the machine one by one. We weave the bottom layer to the top, add elastic bands to the cavity in the middle of the weave and carefully fasten the structure together.

You can master other weaving methods and make your own figures from rubber bands without a machine. Video lessons carefully prepared by real professionals will help you in this matter. The schemes await you are completely different, and your possibilities here are unlimited. The result of your work and the reward for your efforts will be cute colorful souvenirs and keychains that you can give to your loved ones.
Try to do the simplest options, for example, bow, snake, strawberry, flag, dollar, flower or spider. And then you can move on to weaving a ghost, a hamster, a cola, a snowflake, a bunny, an asterisk, a handbag, a creeper, and a baby bump. By the way, in the first stages of your creativity, you can try to weave figures from rubber bands on forks. Especially if you don’t have a machine yet and you are learning how to make the lightest products. You can make this rose on two forks without much effort. Take a look at the detailed master class and get to work - an incredible adventure with an excellent ending awaits you.
 1
. Wrap the first rubber band around the pair of rightmost teeth 3 times.
1
. Wrap the first rubber band around the pair of rightmost teeth 3 times.
 2
. Add 3 elastic bands on top and pull the bottom layer up using a hook.
2
. Add 3 elastic bands on top and pull the bottom layer up using a hook.
 3
. Place a new pair of rubber bands horizontally on the nearest fork. Discard the bottom 3 rubber bands. Turn the fork over and repeat on the other side.
3
. Place a new pair of rubber bands horizontally on the nearest fork. Discard the bottom 3 rubber bands. Turn the fork over and repeat on the other side.
 4
. Place one elastic band horizontally on all 4 teeth and drop the pairs of lower elastic bands on both sides. Turn the machine over and repeat. Then slip the loops onto the hook and remove the product from the forks. You have a leaf.
4
. Place one elastic band horizontally on all 4 teeth and drop the pairs of lower elastic bands on both sides. Turn the machine over and repeat. Then slip the loops onto the hook and remove the product from the forks. You have a leaf.
 5
. Let's move on to weaving the flower itself. Secure the eight from the first rubber band between the first and third teeth of the front fork. The next “eight” goes to the second and third cloves and is fixed on the fourth clove. Turn the fork over and do the same on the other side. Secure the figure eight on the right side and transfer it to the second fork. Repeat fastening the elastic bands. After this, throw another “eight” on the left side. Turn the fork over and add a new layer. Discard the bottom 2 layers from both forks.
5
. Let's move on to weaving the flower itself. Secure the eight from the first rubber band between the first and third teeth of the front fork. The next “eight” goes to the second and third cloves and is fixed on the fourth clove. Turn the fork over and do the same on the other side. Secure the figure eight on the right side and transfer it to the second fork. Repeat fastening the elastic bands. After this, throw another “eight” on the left side. Turn the fork over and add a new layer. Discard the bottom 2 layers from both forks.
 6
. Secure a total of 5 layers and drop 2 bottom rubber bands from the outermost and two center tines of each fork. Next, alternately add one rubber band to all the tines of both forks and throw the bottom pairs of rubber bands to the top. Make 5 such layers and carefully move the rose onto the 2 central cloves and weave the stem.
6
. Secure a total of 5 layers and drop 2 bottom rubber bands from the outermost and two center tines of each fork. Next, alternately add one rubber band to all the tines of both forks and throw the bottom pairs of rubber bands to the top. Make 5 such layers and carefully move the rose onto the 2 central cloves and weave the stem.

For more information on how to make figures from rubber bands on forks, see a little lower on this page. With the help of video you will learn create three-dimensional products, which you can wear as a talisman, put on your pen or pencil and admire your masterpiece every day.
For more information on how to make figures from rubber bands on forks, see a little lower on this page. With the help of video lessons, you will learn how to create voluminous products that you can wear as a talisman, put on your pen or pencil and admire your masterpiece every day. Now the master classes are behind you, and you have learned a lot of new and useful things.
On our page you already had the opportunity to look at Sergei’s work on the machine, as well as without it, when the master made a jumper. However, other authors also demonstrate unprecedented skill in such a relatively young form of needlework as weaving from rainbow loom rubber bands. Weaving methods are completely different and the craftsmen never tire of surprising fans of “rubber” art by inventing beautiful and completely new models of figurines.
As you have already noticed, from the video lessons we have selected, you will learn how to quickly and easily work on a large rainbow loom machine, master a small monster tail machine and learn how to create without a machine at all. Masters on video show the whole process step by step, and all this luxury is absolutely free for you.
As soon as your level of professionalism increases (along with your inspiration, of course), you can conquer more difficult peaks. Master new methods, study, watch videos - there are already a sufficient number of them in Russian, listen to the masters and create with them. And let your new discovery be figures made from rubber bands on a hook.
We are moving on to a new stage of weaving rubber masterpieces - this work is on a hook. If you don’t have a machine yet or you love and know how to work without one, then a hook will be just the perfect option. Start mastering the simplest options- bones, carrots, and then you can move on to more complicated patterns, like weaving a figure on a hook from rubber bands.
Animals made from rubber bands on a hook? It couldn't be easier! In our case, these are the notorious Angry Birds. Not exactly animals, but they have plenty of fans all over the world. However, as well as fans of the rainbow loom movement, which has embraced both children and adults and even grandparents. After all, the desire for creativity is a state of mind that makes a person happy. Do what you love and give your loved ones and yourself nice gifts.
A very original decoration for a pen or pencil can be made from rubber bands even without using a machine! You can weave a cute little panda in just a few minutes, and the photo tutorial from the site will definitely help you with this. In order not to miss new interesting master classes with photos, subscribe to our VKontakte and Facebook groups, and also watch video lessons on our Maximum Ideas channel on Youtube.
So, let's get down to photo mk - rubber band panda on a slingshot on a pencil.

We will perform panda weaving in two stages. First we will weave the body and pencil mounts, and then we will move on to weaving the head. To simplify the work, use the weaving pattern shown in the photo.

The panda's body will consist entirely of black rubber bands. We wind the initial black one onto the right column in two turns. We continue with pairs of rubber bands. For this part, and this will be one of the panda pencil mounts, we will need 5 black pairs. Throwing the first pair of elastic bands on both posts,

throw the initial double into the center.


When one of the fastenings is ready, move the elastic bands from the left to the right column.

We insert a hook into the initial double elastic band and throw it on the left side of the slingshot.

For the next chain you will need 3 pairs of black elastic bands. We throw on the first two elastic bands, and then send the middle double from the left column.

We weave two more pairs using the already known fishtail technique.

We transfer the rubber bands to the right side. Again we put the double initial one on the left column.

Next we throw a couple of black ones on both columns.

We throw the rubber bands from the left pin to the center.

We throw the second pair on both parts of the slingshot, and throw the previous ones on each side into the middle of the weaving.

Once again we transfer all the elastic bands to the right side and lower them lower.

The next chain consists of three black pairs and is woven similarly to the previous pieces. We begin to perform it by throwing the initial elastic band onto the left pin.


And the last chain of rubber bands, related to the body, consists of 5 pairs of black rubber bands and is woven similarly to the previous ones. This will be the second panda mount on a pencil. We again put the double initial elastic band on the left pin, and then we put a couple of elastic bands on both posts.

We throw off the rubber bands on the left and continue with the fishtail.

Now let's combine all the woven parts with a pair of black elastic bands. Let's throw it over two columns and lower all the rubber bands on the slingshot onto it.


We weave two more pairs of white ones in the same way and change the left elastic bands to the right side.

Let's make an eye for the panda. We wind one black elastic band on the left column 4 turns. We usually wear two white ones.

We throw four black turns and two white pairs into the center so that the black rubber band lies between the posts on the left side.

Now let's weave a panda's ear. We transfer the white rubber bands from the right to the left side. On the right pin we will wind one black rubber band three turns, and then we will throw on a pair of black ones in the usual way.

We lower the black three turns to the center and put on a pair of white ones.

We send all the rubber bands from the slingshot to the middle so that the black panda ear is on the right side.

We move the rubber bands to the right column. We insert the hook into the black loop with which we connected the parts of the body.

Throw a couple of white rubber bands onto the hook, pull them out and throw the second part onto the hook.

Now let's lower them to the left column, and then throw a white pair on both columns.

We throw the white two pairs of elastic bands on the left into the middle. Then we put on another white pair.

We lower the previous elastic bands to the center and release the left pin, moving the white pair to the right.
We again insert the hook into the black loop from which we started weaving the head. We put a pair of white ones on the hook, pull them through the black loop and put the second part of the white pair on the hook too.

We lower the elastic bands from the hook onto the left side of the slingshot, and put a white pair on both pins.

We throw off both parts of the white pair from the left column and put another pair of white ones on both parts of the slingshot.

We send the previous ones from each of the pins to the center, and then transfer the top white pair from the right to the left column.
Now we make the second eye for the panda. We wind the black elastic band on the right side of the slingshot 4 turns. We put on the white pair in the usual way.

We lower 4 black turns and all the white elastic bands from the left pin, while making sure that the black one is to the right of the white ones.

We throw a pair of white ones from the left to the right side and weave the second eye.
We wrap the black rubber band three times on the left pin, and then we put a pair on both columns.

We lower the black turns into the middle and put on a pair of white ones in the usual way.

We discard the black ones from both columns and, together with them, the top two white pairs on the right side.

To complete the weaving, we put a white single elastic band on both parts of the slingshot, and completely throw all the elastic bands onto it.

We will move one of the elastic bands on the columns to the adjacent column, and lower the bottom one to the center. Remove the panda figurine from the machine and tighten the loop well.

The rubber band panda on the slingshot is ready, and you can decorate your pencil or pen! You need to put it on by the outermost long fastenings on the body.
Happy crafting!
A rubber band case is an original accessory for a pencil. How to weave a cover from rubber bands? This cover is woven from rubber bands on a machine. It's also easy. Below watch how to weave a cover from rubber bands, video clip.
Rainbow Loom rubber bands can be used to make a pen or pencil. For this purpose weaving on four columns is used. It is also called “quardofish”. The principle of this is not at all complicated, the sequence of actions is very simple and easy to remember. In our example, we will weave a cover from rubber bands for a hook.

So, how to make a cover from rubber bands? To weave a rubber band cover you will need:
Rubber bands of any color. You can decorate a pen case by weaving elastic bands of various colors into it, get creative and come up with different combinations. In our example, we will use green elastic bands in two shades. The number of elastic bands depends on the length of the case and how much you want to “stretch” the case on the handle. If you want the cover to be denser, you will need to weave it the same length as the handle itself. If you like a more “airy” option, you can weave the cover a little shorter, and then distribute the elastic bands along the entire length of the handle.
Machine – we will use two rows of the machine. Place the rows on the same level with the open sides of the column to the right.
Hook.
1. We begin our master class on how to weave a cover from rubber bands on a machine. Take one elastic band and put it on four columns: two columns of the right row and two columns of the left row.

2. Remove the elastic from one post, twist it in a figure eight, and put it on the same post again. This action can be performed using a hook, but, as it seems to me, it is much more convenient to do it without a hook - with your fingers (see “Case made of rubber bands” video for more details).


4. Place another elastic band over four posts.

5. Using a hook, remove the bottom elastic band on each of the posts, and throw it over the post and drop it into the middle. We start the hook from the outside of the post (see “Case made of rubber bands on the machine” video).

6. The preparatory work is over, and now the sequence begins, which must be repeated until the very end. Place another elastic band over the four posts in the usual manner. And again drop the bottom elastic band into the middle, grabbing it with the hook from the outside of the post. Continue doing the same steps in the same manner until the cover is the length you want.

7. We continue our master class on how to weave a cover from rubber bands on a machine. You can complete the weaving at the stage when there is only one elastic band left on all four columns (watch the video on how to weave a cover from elastic bands).

8. Thread the handle into the middle of our case. Attention! In this case, you can lose the elastic bands on the posts. Therefore, make sure that the elastic bands placed on the posts remain in place.

9. Remove one rubber band from the post, throw it over the handle and release.

10. Our master class on how to weave a cover from rubber bands is coming to an end. Do the same with each of the elastic bands placed on the posts. Thus, all elastic bands of the weave are secured.

The case is ready! Now you know how to weave a rubber band cover!

P.S. You can also weave a bracelet using the same technique (it’s best to see the master class for more details). To create a bracelet, at the end of the weaving you need to secure all four elastic bands to the clasp. Then, at the beginning of weaving, find a quadruple elastic band and also secure it to the fastener.
Classmates
A series of master classes on how to decorate your pen. Lemur, Pikachu, Whiskers or just a rainbow case.
A multi-colored pencil case is woven on forks. For the first row, you need to connect the outer teeth of the forks with loops in the form of a figure eight. When weaving the next row, the elastic bands are put on the same teeth without twisting, and the bottom row is thrown up. This way the cover is woven to the required length.
After finishing the work, the case is attached to the pencil with the first and last row of rubber bands.
Idea: You can weave a cover for a child’s brush so that it doesn’t rub or slip in the handle.
To weave a lemur you will need a long loom. All rubber bands, except the first one, are taken in pairs.
The mustache is made from rubber bands of the same color. First the right part is woven, then the left, at the last stage they are connected on the machine.
Pikachu weaves on a machine. Each working ring consists of a pair of rubber bands.
Idea: These figures can be used to decorate cocktail straws at themed parties.
The times when jacquard patterns, braids and flowers could only be seen on a sweater are long gone. Today they successfully...
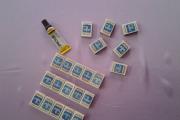
Lilia Degtyareva Glue previously prepared empty match boxes together using glue, 5 pieces each. If...
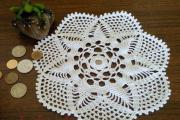
So the wave of knitting money napkins has reached me... I have the same attitude towards knitted napkins, you can even say that I...

Prevention of diseases of the cardiovascular system With age, many people notice the development of some diseases....

The woman waits with special trepidation and love. She doesn’t know much, because everything that happens now will happen in...

Pregnancy is a significant and joyful event in every family. The expectant mother wants to protect the baby, no matter how many days...

If intuition is not a mystical gift, then each of us is capable of learning to hear intuition, we just need...

Today I, the magician Sergei Artgrom, will tell you how to use stones in magic to attract money, success and...

When choosing gold jewelry in jewelry stores, buyers often have the question: “Which gold is better:...

The 7th month of pregnancy is the time when the baby reaches the age at which it is already possible to survive...

Papercraft is a type of modeling, the material for which is patterns (reams), cut...

Pregnancy is a particularly important period. What drinks can be consumed during this period, will the included ones cause harm...

Conceived and developed as a comprehensive program for parents and teachers raising children aged 4...

Is it worth arguing that pregnancy is an amazing time in every sense? So many pleasant discoveries, changes,...
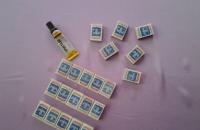
Liliya Degtyareva Glue previously prepared empty match boxes together using glue, 5...
So the wave of knitting money napkins has reached me... I have the same attitude towards knitted napkins, one might even say...