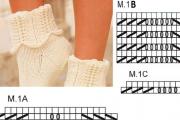
Socks with a simple raised knitting pattern
The times when jacquard patterns, braids and flowers could only be seen on a sweater are long gone. Today they successfully...
I used small mother-of-pearl cabochons. Can be replaced with sewn on rhinestones, cabochons, buttons. Japanese Toho and Delica beads pearls of different sizes crystal rondelle beads (for the eyes) base for embroidery or interlining. I always use non-woven embroidery base. To do this, I buy interlining at a regular fabric store, cut it into several identical squares (5-15 pieces, depending on the thickness of the interlining) and glue them together one by one using an iron. The first two squares are applied with the adhesive side to each other and ironed, each subsequent layer is applied to the previous one and also ironed. This base for embroidery is quite rigid, but at the same time porous, which makes it easy to insert a needle into it. What are the advantages of non-woven fabric? The non-woven base does not fray at the edges, does not wrinkle, or deforms. And this is also the most budget option) the base for the brooch is leather or suede for the underside of the thread. I have lavsan threads. You can also use nylon or monofilament. Lavsan threads are not ideal, they fray and flake, but they are quite strong and pleasant to the touch. Bead needles, fishing line 0.3-0.5 mm Part one: creating a sketch Any embroidered work must begin with a sketch. A good, even sketch is the key to success, the foundation of a future building. The sketch can be drawn by hand or printed on a printer. I found a suitable drawing of a dragonfly and printed it out. Then you need to use double-sided tape or glue to glue the cut out dragonfly onto a piece of cardboard or thick paper and cut it out too. We won't need the tail later, but we'll leave it for now. Now we apply our template to the embroidery base and carefully trace it with a pen. At this stage, it is important to make a thin and clear outline to make it easier to embroider directly along the line of the handle. Stage two: embroidering the outline  Glue the cabochons and start embroidering the outline. We thread the thread into the eye of the needle, secure it with a small knot, and make two or three knots at the second end of the thread. I got carried away a little, so my photos don’t start with the first bead, but that doesn’t change the essence).
  From the inside, we insert the needle anywhere in the contour, and bring it out to the front part. We string one Toho bead No. 11. We retreat along the contour line a distance equal to the width of the bead and bring the needle to the wrong side. Then we again insert the needle into the first hole, bring it out to the front side and pass through the first bead from left to right.
 Now we collect the second bead. We retreat the same distance from the first and insert the needle. On the wrong side, insert the needle into the previous hole and pass it through the second bead from left to right. In this way we embroider the entire outline, leaving space for beads next to the cabochons.
  You need to embroider the outline very carefully, always trying to retreat the same distance and maintain the same thread tension. It is better to redo uneven places immediately. Stage three: embroidering frames for cabochons We bring the needle next to the cabochon. We trim the cabochon with Delica beads No. 11. When embroidering the first row of the frame, it is better to place the beads more tightly. You need to have an even number of beads in the first row. We try to insert the needle perpendicular to the base so that it comes out in the right place. We make sure that the beads do not fall under the stone. Having finished the circle, you need to pass the needle into the first bead.
  We begin mosaic weaving. We string one bead, insert the needle through one bead. And so we do two rows. We make the third row with beads No. 15 and tighten the frame.
  Having finished the third row, we make the fourth row through one bead. Then we return diagonally to the wrong side and make a knot.
  We do the same with the second cabochon.
  Stage four: filling the insides I want to fill the lower wings with voluminous embroidery. To do this, cut out two identical ovals from the non-woven base and glue them. We take out the needle as shown in the photo and collect 8 beads No. 15. We throw them through the non-woven insert and insert the needle on the other side. I mixed two colors of beads and added them in random order. We continue in the same spirit, changing the number of beads as we narrow and widen the tab.
  The result was quite an interesting effect.
  We continue to fill the insides. We sew on small pearls and Swarovski bicones.
 As we go, we put different beads in place of the eyes to find the right ones. Now I want to combine the style of the lower wings and the upper ones a little, for this I will do 3D embroidery again. We cut out two small tabs, draw a line with a pen, and glue the tabs. We embroider.
  Sew on a large pearl for the body, two crystal beads for the eyes and a lower bead for the tail. We sew the bottom bead tightly, several times. Let's finalize the outline.
  Stage five: tail To create the tail of a dragonfly, take a fishing line 0.3-0.5 mm thick. We string pearls and beads. We string the last stop bead No. 11 and go back.
  We got two ends of the fishing line. We insert both ends into the very bottom bead on the dragonfly’s body and make a couple of knots.
  Then we take a suitable needle for the fishing line and, one by one, bring the ends of the fishing line to the wrong side and secure them there with a knot. Stage six: Decorating the edge of the embroidery and turning it into a brooch. Carefully cut out the embroidery without touching the threads. We find our cardboard template and glue it to the back of the embroidery. This step is necessary so that our dragonfly retains its shape and does not bend anywhere.
  Then we apply the embroidery to a piece of leather, trace it, and cut it out. On the wrong side of the leather we draw a line on which the base for the brooch will be located. We cut along the line with a stationery knife.
  Apply glue to the inside of the skin. Insert the base for the brooch. glue it to the embroidery.
  Trim off excess skin. We make a closing row. Take a fishing line and a needle, make a knot at one end of the fishing line. We insert the needle through the back of the embroidery onto the front part between the two contour beads. We string one bead No. 11. We insert the needle in the same place and bring it out on the front side of the skin.
  We pass through the bead from left to right. We string the second bead, insert the needle between the next pair of beads, bring it to the skin and pass through the bead from left to right. And so we process the entire edge.
  And that's what we got!

 Thank you for your attention!
Hello!
I offer a tutorial on how to create a brooch in the shape of a dragonfly. We will make transparent and flexible wings on a wire frame.
We will need:
Beads: rainbow dark turquoise, blue rainbow; beads size 12: dark turquoise, blue and light blue;
Emerald faceted beads, green pearls;
Turquoise cabochon 14x10mm;
Silver wire 0.16mm and 0.8mm;
Leather, thick paper, interlining, Moment glue;
Monofilament and beading needles, turquoise floss;
Round nose pliers, thin crochet hook;
Brooch base 4cm.
We make four loops from 0.8mm wire, two of which are slightly smaller. Using round-nose pliers, we cut off the excess wire at the ends, leaving about 5-6mm, and bend them, making loops. Next, take a thinner wire of 0.16 mm, about 30 cm long. We fix one end of it at the base of the workpiece. Now we make a web inside using a simple small crochet hook. We fix the end of the wire in the same place where we started, at the base. We thread the needle with turquoise floss thread, fasten its end at the base and make a colored web on top of the wire one.

Now we need to hide the uneven edge of the future wing, and we do this with colored thread, tightly tying the edge. We thread the monofilament into the needle, fasten its end to the base of the wing and trim the edge with blue and dark turquoise beads. In this case, I made the outer edge dark. When we have finished covering the edge with beads, we put 4 blue beads on the needle (the number of beads depends on the size of the beads) and pass through the first beads of the adjacent edge.

Next, using a needle threaded with monofilament, we pass through the web inside the wing, decorating it with small beads in dark turquoise, blue and light blue. One wing is ready. We do the same with the rest, trying to maintain the symmetry of the pattern at the edges. Now we are preparing the body of the future dragonfly. We glue a turquoise cabochon onto a small piece of the base and trim it with blue rainbow and light blue beads. We cut out the blank.

We cut off a piece of the base 5-6 cm and apply the edges of the finished workpiece just above the center. Sew the wings onto the loops. Only so that there are only loops inside the marked edges. Now we glue it, and then carefully sew the finished dragonfly body in the middle along the edge. We make the eyes of the dragonfly by sewing two green pearls. We hide ugly holes with a thread between the finished eyes with a loop with dark turquoise rainbow beads and a faceted small bead. We extend the piece by sewing a pearl and a faceted bead onto the back side of the dragonfly. Again we hide the flaws with loops with blue beads. I sew around the sewn pearl with blue and dark turquoise beads. We embroider blue beads around the central part of the dragonfly's body. Now we cut out the future brooch, retreating 1-2mm from the edge.

Take a 0.8mm wire and bend the 1-2mm ends with round pliers. We string it on it, alternating beads and bicone beads. We cut off the excess end of the wire, leaving 5mm, bend it into loops and sew it to the non-woven fabric from the reverse side. Dilute slightly blue acrylic paint in 3-4 drops of water and paint over the edges of the brooch base with a thin brush. We cut out a small piece of leather in which we make holes for the brooch mount. We glue the base and then sew it to the back side of the dragonfly. We cut out a small oval from thick paper and glue it to the top of the sewn base for the brooch in the area of the dragonfly’s body. Apply glue, insert the fastener and glue the leather to the interlining with the suede side. Carefully cut out, leaving 1mm of skin around the edges.

To make the further procedure easier, we bend the wings and legs. We trim the edge with blue rainbow and dark turquoise beads. Next, we weave a flagellum using the Ndebele technique for 4 beads using blue, turquoise and light blue beads. This will be the tail of our dragonfly.

We fasten and remove the needle with monofilament from the outer bead. We pass the needle through the finished flagellum, secure it with an emerald bead, pick up the bead and pass back through the bead and flagellum. We tighten it. We take the needle out of one of the outer beads on the flagellum and collect 5 blue beads. We pass the needle under the outer bead, collect the same number of beads and pass into the adjacent bead on the flagellum. We also fasten the tail on the bottom side, only to the beads that were used to trim the edge. Now we give realistic curves to the paws, wings and the brooch is ready.

I hope my lesson will inspire you to new ideas. I wish you good luck!
For work we will need: cabochon stones.
Japanese Toho and Delica beads
pearls of different sizes
crystal rondelle beads (for eyes)
non-woven embroidery base,
brooch base
leather or suede for the back
threads
Bead needles
fishing line 0.3-0.5 mm
Part one: creating a sketch
Any embroidered work must begin with a sketch. A good, even sketch is the key to success, the foundation of a future building. The sketch can be drawn by hand or printed on a printer. I found a suitable drawing of a dragonfly and printed it out. Then you need to use double-sided tape or glue to glue the cut out dragonfly onto a piece of cardboard or thick paper and cut it out too. We won't need the tail later, but we'll leave it for now.
Now we apply our template to the embroidery base and carefully trace it with a pen. At this stage, it is important to make a thin and clear outline to make it easier to embroider directly along the line of the handle.
Stage two: embroidering the outline
Glue the cabochons and start embroidering the outline. We thread the thread into the eye of the needle, secure it with a small knot, and make two or three knots at the second end of the thread. I got carried away a little, so my photos don’t start with the first bead, but that doesn’t change the essence).
From the inside, we insert the needle anywhere in the contour, and bring it out to the front part. We string one Toho bead No. 11.
We retreat along the contour line a distance equal to the width of the bead and bring the needle to the wrong side. Then we again insert the needle into the first hole, bring it out to the front side and pass through the first bead from left to right.
Now we collect the second bead. We retreat the same distance from the first and insert the needle. On the wrong side, insert the needle into the previous hole and pass it through the second bead from left to right. In this way we embroider the entire outline, leaving space for beads next to the cabochons.
You need to embroider the outline very carefully, always trying to retreat the same distance and maintain the same thread tension. It is better to redo uneven places immediately.
Stage three: embroidery of frames for cabochons
We bring the needle out next to the cabochon. We trim the cabochon with Delica beads No. 11. When embroidering the first row of the frame, it is better to place the beads more tightly. You need to have an even number of beads in the first row. We try to insert the needle perpendicular to the base so that it comes out in the right place. We make sure that the beads do not fall under the stone. Having finished the circle, you need to pass the needle into the first bead.
We begin mosaic weaving. We string one bead, insert the needle through one bead. And so we do two rows. We make the third row with beads No. 15 and tighten the frame.
Having finished the third row, we make the fourth row through one bead. Then we return diagonally to the wrong side and make a knot.
We do the same with the second cabochon.
Stage four: filling the insides
I want to fill the lower wings with voluminous embroidery. To do this, cut out two identical ovals from the non-woven base and glue them. We take out the needle as shown in the photo and collect 8 beads No. 15. We throw them through the non-woven insert and insert the needle on the other side. I mixed two colors of beads and added them in random order.
We continue in the same spirit, changing the number of beads as we narrow and widen the tab.
The result was quite an interesting effect.
We continue to fill the insides. We sew on small pearls and Swarovski bicones.
As we go, we put different beads in place of the eyes to find the right ones.
Now I want to combine the style of the lower wings and the upper ones a little, for this I will do 3D embroidery again. We cut out two small tabs, draw a line with a pen, and glue the tabs. We embroider.
Sew on a large pearl for the body, two crystal beads for the eyes and a lower bead for the tail. We sew the bottom bead tightly, several times. Let's finalize the outline.
Stage five: tail
To create a dragonfly tail, take a fishing line 0.3-0.5 mm thick. We string pearls and beads. We string the last stop bead No. 11 and go back.
We got two ends of the fishing line. We insert both ends into the very bottom bead on the dragonfly’s body and make a couple of knots.
Then we take a suitable needle for the fishing line and, one by one, bring the ends of the fishing line to the wrong side and secure them there with a knot.
Stage six: Decorating the edge of the embroidery and turning it into a brooch
Carefully cut out the embroidery without touching the threads.
We find our cardboard template and glue it to the back of the embroidery. This step is necessary so that our dragonfly retains its shape and does not bend anywhere.
Then we apply the embroidery to a piece of leather, trace it, and cut it out.
On the wrong side of the leather we draw a line on which the base for the brooch will be located. We cut along the line with a stationery knife.
Apply glue to the inside of the skin. Insert the base for the brooch. glue it to the embroidery.
Trim off excess skin.
We make a closing row. Take a fishing line and a needle, make a knot at one end of the fishing line. We insert the needle through the back of the embroidery onto the front part between the two contour beads. We string one bead No. 11. We insert the needle in the same place and bring it out on the front side of the skin.
We pass through the bead from left to right. We string the second bead, insert the needle between the next pair of beads, bring it to the skin and pass through the bead from left to right. And so we process the entire edge.
And that's what we got!
The dragonfly is a kind of symbol of women's secrets. Swift, light and predatory, the dragonfly has been inspiring creators for a long time: artists, jewelers, poets. I suggest we get inspired too - we’ll make a dragonfly brooch from beads.
And many more magnificent brooches:
For work we will need: non-woven fabric as a base fabric, backing fabric (suede), beads, rhinestones, beads, hemispheres, wire, monofilament for embroidery in a transparent color, base fastening.
Progress of work: on the non-woven fabric we draw the outline of a dragonfly. We start sewing the beads on from the eyes, then the body along the contour. Sew a light-colored bead between the eyes and the outline.
Let's sew on the rondels and fill the dragonfly's body with beads.
We embroider the wings along the contour and glue the hemispheres with super glue. We sew on rhinestones and embroider around them with beads.

We continue to embroider the wings, gluing and sewing beads and rhinestones, filling the space around them with beads.

When we have completely embroidered the dragonflies, we cut off the excess fabric closer to the beads. We cut out a piece of cardboard in which we make holes for fastening. We put beads on the wire and make a tail. We place the wire between the base and the cardboard, spreading the ends under the body in the form of an accordion. Glue the cardboard and base fabric. Insert the brooch mount.
From suede we cut out a blank for the wrong side. Glue the skin to the dragonfly and stitch it along the contour with beads.

Our dragonfly brooch is ready!

Insects woven from beads, be it a variety of beetles, butterflies or dragonflies, have found their use as women's accessories. All kinds of brooches, hairpins, pendants are actively used in the everyday life of ladies. Such small products are an excellent addition and decoration to this or that image, evening dress or business suit. Therefore, we suggest that you familiarize yourself with a master class for beginners, the result of which will be a wonderful dragonfly made of beads.
For beginning craftswomen, the pattern of weaving a dragonfly from beads should be relatively simple, understandable and readable, because it is on the basis of it that the future product will be created. A step-by-step diagram of weaving a dragonfly from beads is shown in the photo.

First you need to decide on the materials for work. We will need:
The color scheme is determined solely by personal preferences and the invented design of the future product. In order to approach the work responsibly, it would be a good idea to study special literature to learn about the life of these insects and get acquainted with their real colors, then the beaded dragonfly will turn out to be the most realistic in color scheme.
For a visual example, our dragonfly will consist of a gray body, orange wings and black beads.
We will use the parallel bead weaving method. It is important to immediately determine the final purpose of use. A beaded dragonfly will be a brooch, pendant, keychain or phone pendant. If the latter option, then it is better to start weaving from the end, that is, from the tail and use fishing line. When the product is woven, it will be enough to tie the ends of the fishing line into a knot and not cut them off, but use them to fasten the pendant. If the dragonfly is woven as a pendant, then it is better to use wire and weave it from the head, so that in the future it will be easier to hide the ends of the weave.
Consider the option of weaving from the head. To begin, we will put a large black bead, a small gray bead, another black bead and three gray beads on the wire. You need to place these beads in the center of the wire. Then pass the opposite empty part of the wire through three gray beads and tighten. As a result, we get two ready-made rows, which, as you already understand, are the eyes of the dragonfly. We proceed to the next row, to do this we thread four gray beads onto either side of the wire and thread the empty edge of the wire into them. Next, we do everything the same, only we increase the number of beads by one. There should be 5-6 rows in total.

Let's start weaving wings from orange small beads. We collect 26 beads on both sides of the wire. Next, we pull the wire from both ends alternately through the first orange bead. Thus, we get dragonfly wings. When the first pair of wings is ready, we weave a row of gray beads according to the principle described above. Next, we begin weaving the second pair of wings, but we will now use not 26, but 23 beads for each wing.
When the wings are woven, it remains to make the body of the dragonfly. We do this by weaving with gray beads according to the principle described above. The sixth row of the product will consist of five beads, the seventh - of four, the eighth - of three, and then all rows will consist of a pair of beads.
The final, but very important stage, is the process of securing the wire. We do this as follows: any one edge of the wire must be pulled through the penultimate row of beads. As a result, both edges of the wire should be on the same side. We twist the wire together and cut off the excess.

With a little diligence, you get a wonderful beaded dragonfly that is ready to become a feminine accessory or home decor item.
Having mastered this technique, you can study and try others, for example, weaving dragonfly wings with a solid fabric, and try making the body from beads of various shapes.
In order to weave the wings with a continuous fabric, you need to make them separately from each other. The first pair of wings will be held on a wire base 60 cm long. You can use beads of two colors. Black and purple beads look great.
The first row will consist of two black beads located in the center, through which one of the edges of the wire will be pulled. Next, we put on the beads in the following sequence: black, purple, black. Again we pull one of the edges of the wire through them and tighten it. For further weaving, a diagram is presented, working according to which you should get 21 rows of beads.

We fasten the wire and proceed to weaving the second wing in the same way. The second pair of wings will be smaller than the first, and will have 19 rows at its base.

If it is difficult for beginners to weave and navigate according to patterns, then video lessons can be a great help in their work.
The times when jacquard patterns, braids and flowers could only be seen on a sweater are long gone. Today they successfully...
Lilia Degtyareva Glue previously prepared empty match boxes together using glue, 5 pieces each. If...
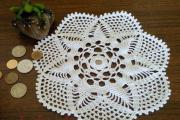
So the wave of knitting money napkins has reached me... I have the same attitude towards knitted napkins, you can even say that I...

Prevention of diseases of the cardiovascular system With age, many people notice the development of some diseases....

The woman waits with special trepidation and love. She doesn’t know much, because everything that happens now will happen in...

Pregnancy is a significant and joyful event in every family. The expectant mother wants to protect the baby, no matter how many days...

If intuition is not a mystical gift, then each of us is capable of learning to hear intuition, we just need...

Today I, the magician Sergei Artgrom, will tell you how to use stones in magic to attract money, success and...

When choosing gold jewelry in jewelry stores, buyers often have the question: “Which gold is better:...

The 7th month of pregnancy is the time when the baby reaches the age at which it is already possible to survive...

Papercraft is a type of modeling, the material for which is patterns (reams), cut...

Pregnancy is a particularly important period. What drinks can be consumed during this period, will the included ones cause harm...

Conceived and developed as a comprehensive program for parents and teachers raising children aged 4...

Is it worth arguing that pregnancy is an amazing time in every sense? So many pleasant discoveries, changes,...
Liliya Degtyareva Glue previously prepared empty match boxes together using glue, 5...
So the wave of knitting money napkins has reached me... I have the same attitude towards knitted napkins, one might even say...